s0026_e_00_0_unified.book Page 1 Wednesday, September 16, 2009 1:53 PM DIGITAL CAMERA Basic guide INSTRUCTION MANUAL Printed in China VN331701 INSTRUCTION MANUAL P.2 Review the camera part names, the basic steps for shooting and playback, and the basic operations. Table of Contents P. 26 z Thank you for purchasing an Olympus digital camera. Before you start to use your new camera, please read these instructions carefully to enjoy optimum performance and a longer service life.
s0026_e_00_0_unified.book Page 2 Tuesday, September 29, 2009 10:30 AM Unpack the box contents The following items are included with the camera. If anything is missing or damaged, contact the dealer from whom you purchased the camera.
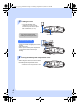
s0026_e_00_0_unified.book Page 3 Tuesday, September 29, 2009 10:30 AM Preparing the Camera W Charging the battery Charging indicator Amber light : Charging in progress Blue light : Charging complete (Charging time: Up to approximately 3 hours 30 minutes).
s0026_e_00_0_unified.book Page 4 Tuesday, September 29, 2009 10:30 AM 3 Loading the card • Insert the SD/SDHC card (referred to as “card” in these instructions) until it locks in place. g“Card basics” (P. 127) • Turn off the camera before loading or removing the card. Contact area SD card slot Removing the card • Press the inserted card lightly and it will be ejected. • Pull out the card. • Never open the battery/card compartment cover while the card access lamp is blinking.
s0026_e_00_0_unified.book Page 5 Tuesday, September 29, 2009 10:30 AM Attaching a lens to the camera Remove the body cap from the camera and the rear cap from the lens 1 Basic guide 1 2 1 2 Rear cap 2 Attach a lens to the camera Body cap Lens attachment mark (Red) Alignment mark (Red) • Align the lens attachment mark (red) on the camera with the alignment mark (red) on the lens, then insert the lens into the camera’s body (1).
s0026_e_00_0_unified.book Page 6 Tuesday, September 29, 2009 10:30 AM Power on 1 Press the ON/OFF button to turn on the camera • To turn off the power, press the ON/OFF button again. Mode dial Set the mode dial to P. SSWF indicator ON/OFF button P LCD monitor When you turn on the power the LCD monitor lights up. LN 250 F5.6 38 Dust reduction function operation The dust reduction function is automatically activated when the camera is turned on.
s0026_e_00_2_pre_7.fm Page 7 Sunday, October 4, 2009 1:15 PM Setting the date/time Basic guide Date and time information is recorded on the card together with the images. The file name is also included with the date and time information. Be sure to set the correct date and time before using the camera. 1 Press the MENU button • The menu screen is displayed.
s0026_e_00_0_unified.book Page 8 Tuesday, September 29, 2009 10:30 AM Camera 1 2 3 8 4 5 9 5 6 0 a 7 SSWF indicator ....................... gP. 6, 125 ON/OFF button .............................. gP. 6 Shutter button ................................ gP. 12 F (Exposure compensation) button ....................................................... gP. 43 5 Strap eyelet ..................................... gP. 2 6 Lens attachment mark ..................... gP.
s0026_e_00_0_unified.book Page 9 Tuesday, September 29, 2009 10:30 AM Basic guide 8 9 0 a b c 1 d 2 g 3 4 h e 5 f 6 7 5 6 7 8 9 0 a b c Mode dial ...................................... gP. 10 LCD monitor ............................ gP. 22, 24 MENU button ............................... gP. 20 INFO (Information display) button ................................................ gP. 23, 79 Tripod socket Battery/card compartment cover ..... gP. 3 Battery/card compartment lock ....... gP.
s0026_e_00_0_unified.book Page 10 Tuesday, September 29, 2009 10:30 AM Mode dial The mode dial allows you to change the camera settings easily according to the subject. Advanced shooting modes • For more advanced shooting and greater creative control, you can set the aperture value and shutter speed. • The settings made in the advanced shooting modes are retained even if the camera is turned off. Allows you to shoot using an aperture and shutter speed Program shooting P that the camera sets. (gP.
s0026_e_00_0_unified.book Page 11 Tuesday, September 29, 2009 10:30 AM Basic guide Setting the art filter/scene 1 Set the mode dial to ART or SCN. • The art filter menu or scene menu is displayed. 1 POP ART 1 PORTRAIT B e F D C G SELECT SET SELECT SET 2 Use fg to select the filter or scene. 3 Press the i button.
s0026_e_00_0_unified.book Page 12 Tuesday, September 29, 2009 10:30 AM Shooting 1 Shutter button Select a composition while viewing the LCD monitor LCD monitor 2 Adjust the focus Card access lamp Press the shutter button halfway. LCD monitor AF confirmation mark P AF target LN 250 F5.6 Shutter speed 38 Aperture value • When the focus is locked, the AF confirmation mark (( or n) and AF target mark light up.
s0026_e_00_0_unified.book Page 13 Tuesday, September 29, 2009 10:30 AM Basic guide Holding the camera Keep your fingers and the strap away from the lens. Horizontal grip Vertical grip When the camera stops operating If no operations are performed for approximately one minute, the camera enters the sleep mode (stand-by) and stops operating. The camera activates again when you touch any button (the shutter button, q button, etc.). g“SLEEP” (P.
s0026_e_00_0_unified.book Page 14 Tuesday, September 29, 2009 10:30 AM Playback/Erasing Playing back images Pressing the q button displays the last picture taken. • Pressing the q button again sets the camera to the shooting mode. Displays the frame that is stored 10 frames back q button Displays the next frame Displays the previous frame Arrow pad Displays the frame that is stored 10 frames ahead Each time you turn the sub dial towards U, the image is incrementally enlarged from 2× to 14×.
s0026_e_00_0_unified.book Page 15 Tuesday, September 29, 2009 10:30 AM Direct buttons 1 Press the button for the function you want to set • The direct menu is displayed. • The function assigned to the button that was pressed remains selected. You can turn the sub dial and set the function during that time. If no operations are performed during that time, the setting for that function is confirmed. g“BUTTON TIMER” (P. 98) e.g.
s0026_e_00_0_unified.book Page 16 Tuesday, September 29, 2009 10:30 AM Live control The following screen which simultaneously displays shooting setting functions and associated options is called the live control. Press the i button to display the live control on the LCD monitor. You can set the art filter, the white balance and other effects while checking live view. When the super control panel is displayed, press the INFO button to switch the display.
s0026_e_00_0_unified.book Page 17 Tuesday, September 29, 2009 10:30 AM Press the i button to display the live control • Press the i button again to turn off the live control. Sub dial j P Basic guide 1 j WB AUTO LF AUTO 5 2 3 1 w x Main dial i button j 2 P j Cursor Main dial (j) Displays the selected setting name.
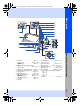
s0026_e_00_0_unified.book Page 18 Tuesday, September 29, 2009 10:30 AM Super control panel The following screen allows the display and setting of shooting settings at the same time and is called the super control panel. On the live control display, press the INFO button to switch to the super control panel. b 1 2 3 4 c P ISO j 5 6 NORM 7 8 9 d OFF 4:3 mall Super Fine 0 a LIVE 250 F5.6 +2.0 m l k j e f g INFO 38 h i The functions within this area can be set on the super control panel.
s0026_e_00_2_pre_7.fm Page 19 Friday, October 2, 2009 2:16 PM Press the INFO button while live control is displayed to display the super control panel Sub dial j • Press the INFO button again to return to the live control. Basic guide 1 P ISO j NORM OFF 4:3 mall Super Fine LIVE 250 F5.
s0026_e_00_0_unified.book Page 20 Tuesday, September 29, 2009 10:30 AM Menu 1 Press the MENU button to display the menu CARD SETUP CUSTOM RESET PICTURE MODE GRADATION IMAGE ASPECT Operation BACK guide Press the MENU button to go back one screen.
s0026_e_00_0_unified.book Page 21 Tuesday, September 29, 2009 10:30 AM You can use the Custom Menu to customize the camera settings and operations to suit your personal preferences. Customization is performed from the “Custom Menu” menu. The Custom Menu is added when [c MENU DISPLAY] in the Setup Menu is set to [ON]. For details of the Custom Menu, refer to “Customizing your camera” (gP.
s0026_e_00_0_unified.book Page 22 Tuesday, September 29, 2009 10:30 AM LCD monitor (Shooting) You can use the LCD monitor to view the subject while shooting. g“Exposure” (P. 37) 1 2 3 c d P j WB AUTO 4 5 6 7 8 9 0 a b ISO AUTO AEL BKT : 4:3 LN 250 F5.6 +2.0 1 Internal temperature warning m ..................................................... gP. 124 2 My Mode ....................................... gP. 98 3 Shooting mode ................... gP. 10, 37-40 4 Flash mode ...........................
s0026_e_00_0_unified.book Page 23 Tuesday, September 29, 2009 10:30 AM You can switch the information displayed on the monitor by pressing the INFO button repeatedly or by turning the main dial while pressing the INFO button. Information display on P Zoom display (gP. 54) Histogram display Basic guide Switching the information display P P LN 250 F5.6 38 250 F5.6 38 38 250 F5.6 *2 P - 0.3 0.0 +0.3 250 F5.6 38 Scale display*1 WB/F Image only +0.7 SET Multi view display (gP.
s0026_e_00_0_unified.book Page 24 Tuesday, September 29, 2009 10:30 AM LCD monitor (Playback) You can switch the monitor display using the INFO button. g“Information display” (P. 79) Overall display Simplified display 1 2 3 4 5 b d e c x10 x10 250 F5.6 45mm ±0.0 ISO 100 WBAUTO A±0 G±0 j NATURAL 4:3 RAW 100-0015 15 +2.0 6 [4032x3024,1/8] 4:3 RAW 100-0015 2009.11.01 21:56 15 8 9 0 a 7 1 Aspect border ................................ gP. 59 2 Print reservation Number of prints ..................
s0026_e_00_0_unified.book Page 25 Tuesday, September 29, 2009 10:30 AM The operation button icons on the body of the camera are used to indicate the operation buttons in this manual. “Names of parts and functions” (gP. 8) See. In this manual, j indicates turning the main dial. In this manual, j indicates turning the sub dial. Basic guide Indications used in this manual In this manual, k indicates the arrow pad. fghi indicate the up, down, left and right buttons of the arrow pad.
s0026_e_00_0_unified.book Page 26 Tuesday, September 29, 2009 10:30 AM Table of Contents Basic guide 2 Identifies the camera part names and describes the basic steps for shooting and playback. Preparations for shooting .............................................................................................. 2 Unpack the box contents............................................................................... 2 Preparing the Camera...................................................................
s0026_e_00_0_unified.book Page 27 Tuesday, September 29, 2009 10:30 AM 2 Focusing and shooting functions 49 Describes the optimal focusing methods according to the subject and shooting conditions. AF mode selection .......................................................................................................49 S-AF (single AF)..........................................................................................49 C-AF (continuous AF)..........................................................
s0026_e_00_0_unified.book Page 28 Tuesday, September 29, 2009 10:30 AM 4 Recording Movies 74 Describes movie recording method and functions. Movie recording .......................................................................................................... 74 Changing the settings for movie recording .................................................................. 75 Adding effects to a movie............................................................................
s0026_e_00_0_unified.book Page 29 Tuesday, September 29, 2009 10:30 AM 7 Customizing your camera 93 Describes how to customize the camera’s settings. R AF/MF .....................................................................................................................93 AF MODE ....................................................................................................93 AF AREA .....................................................................................................
s0026_e_00_0_unified.book Page 30 Tuesday, September 29, 2009 10:30 AM V EXP/e/ISO ........................................................................................................ 102 EV STEP ................................................................................................... 102 METERING ............................................................................................... 102 AELMetering ......................................................................................
s0026_e_00_0_unified.book Page 31 Tuesday, September 29, 2009 10:30 AM 8 Printing 109 Describes how to print your pictures. Print reservation (DPOF) ...........................................................................................109 Print reservation ........................................................................................109 Single-frame reservation ...........................................................................110 All-frame reservation ............................
s0026_e_00_0_unified.book Page 32 Tuesday, September 29, 2009 10:30 AM 11 Information 127 Refer to this section for information on optional accessories, camera specifications, and other useful shooting information. Card basics................................................................................................................ 127 Usable cards ............................................................................................. 127 Formatting the card ..................................
s0026_e_00_0_unified.book Page 33 Tuesday, September 29, 2009 10:30 AM Quick reference Shooting Taking pictures with automatic settings Set the mode dial to A and start taking pictures. P. 10 Use focus lock. P. 50 Select the AF target and take the picture. P. 52 The minimum shooting distance varies depending on the lens. Move to the minimum shooting distance of the lens from the subject and take a picture. P. 129 The camera may be having difficulty focusing on the subject with auto focus.
s0026_e_00_0_unified.book Page 34 Tuesday, September 29, 2009 10:30 AM Take a picture while checking the histogram. P. 23 Take a picture while checking the shutter speed and aperture value displays. If either is blinking, the optimal exposure is not obtained. P. 37-39, P. 134 Set the gradation setting to [AUTO]. Subjects with areas of large contrast are adjusted automatically. P. 73 Adjust the exposure compensation. P. 43 Set [PICTURE MODE] to [MONOTONE].
s0026_e_00_0_unified.book Page 35 Tuesday, September 29, 2009 10:30 AM Taking pictures without noise Optimizing the LCD monitor Reducing camera shake Taking pictures while checking the level of the camera Set [NOISE REDUCT.] to [AUTO] or [ON]. P. 104 To take pictures in a dark location, set [NOISE FILTER] to [HIGH]. P. 105 You can adjust the brightness of the LCD monitor. P.
s0026_e_00_0_unified.book Page 36 Tuesday, September 29, 2009 10:30 AM Playback Displaying the image after the picture is taken Set [REC VIEW]. You can set the number of seconds that the image is displayed. P. 91 Displaying the image after the picture is taken and deleting unneeded images Set [REC VIEW] to [AUTO q]. After you take a picture, the camera switches to playback mode automatically, allowing you to delete the image. P.
s0026_e_00_0_unified.book Page 37 Tuesday, September 29, 2009 10:30 AM 1 Exposure Program shooting The camera sets the optimum aperture value and shutter speed automatically according to the subject brightness. Set the mode dial to P. • The shutter speed and aperture are displayed. 1 Exposure Shooting mode LCD monitor P AF confirmation mark LN 250 F5.
s0026_e_00_0_unified.book Page 38 Tuesday, September 29, 2009 10:30 AM Aperture priority shooting 1 The camera sets the optimum shutter speed automatically for the aperture value you have selected. When you open the aperture (decrease the aperture value), the camera will focus within a shorter range (shallow depth of field) and produce a picture with a blurred background. When you close the aperture (increase the aperture value), the camera will focus within a longer range.
s0026_e_00_0_unified.book Page 39 Tuesday, September 29, 2009 10:30 AM Shutter priority shooting The camera sets the optimum aperture value automatically for the shutter speed you have selected. Set the shutter speed depending on the type of effect you want. A higher shutter speed allows you to capture a fast-moving subject without blur, and a slower shutter speed blurs a moving subject, creating a feeling of speed or motion. Set the shutter speed depending on the type of effect you want.
s0026_e_00_0_unified.book Page 40 Tuesday, September 29, 2009 10:30 AM Manual shooting Allows you to set the aperture and shutter speed manually. You can check how much it differs from the appropriate exposure by using the exposure level indicator. This mode gives you more creative control, allowing you to make whatever settings you like, regardless of the correct exposure. 1 Set the mode dial to M and turn the dial to set the value. Aperture value: Turn the sub dial to set the value.
s0026_e_00_0_unified.book Page 41 Tuesday, September 29, 2009 10:30 AM Bulb shooting You can take a picture with a bulb exposure time in which the shutter stays open as long as you hold down the shutter button. In M mode, set the shutter speed to [BULB]. • [BULB] is displayed. TIPS To automatically end bulb shooting after a specified period of time: 1 j You can set the maximum time for bulb shooting. g“BULB TIMER” (P.
s0026_e_00_0_unified.book Page 42 Tuesday, September 29, 2009 10:30 AM Changing the metering mode There are 5 ways to measure the subject brightness: Digital ESP metering, Center weighted averaging metering, and 3 types of spot metering. Select the most suitable mode for the shooting conditions.
s0026_e_00_0_unified.book Page 43 Tuesday, September 29, 2009 10:30 AM Exposure compensation In some situations, you may get better results if you manually compensate (adjust) the exposure value set automatically by the camera. In many cases, bright subjects (such as snow) will turn out darker than their natural colors. Adjusting toward + makes these subjects closer to their real shades. For the same reason, adjust toward – when shooting dark subjects. You can use value in the range ±3.
s0026_e_00_0_unified.book Page 44 Tuesday, September 29, 2009 10:30 AM AE lock The metered exposure value can be locked with the AEL/AFL button (AE lock). Use AE lock when you want a different exposure setting from the one that would normally apply under the current shooting conditions. Normally, pressing the shutter button halfway locks both AF (auto focus) and AE (automatic exposure), but you can lock the exposure alone by pressing the AEL/AFL button.
s0026_e_01_exposure_7.fm Page 45 Tuesday, September 29, 2009 11:19 AM AE bracketing The camera automatically shoots a number of pictures at different exposure values for each frame. Even in conditions where correct exposure is difficult to obtain (such as a backlit subject or a scene at dusk), you can pick the picture you prefer from a selected number of frames with a variety of different exposure settings (exposure and compensation values).
s0026_e_00_0_unified.book Page 46 Tuesday, September 29, 2009 10:30 AM ISO sensitivity setting The larger the ISO value, the darker the location in which you can shoot. However, increasing the ISO value leads to increased noise (graininess) in the picture. ISO200, which gives optimal noise and gradation balance, is recommended for normal use. For a slower shutter speed or when you want to open the aperture, use ISO100.
s0026_e_00_0_unified.book Page 47 Tuesday, September 29, 2009 10:30 AM ISO bracketing The camera automatically takes pictures at a different ISO sensitivity with the shutter speed and aperture value fixed. 3 images with different exposures are recorded in the order of the set ISO sensitivity (optimum exposure when set to [AUTO]), exposure in the – direction, and exposure in the + direction. Compensation value: 0.3, 0.7 or 1.
s0026_e_00_0_unified.book Page 48 Tuesday, September 29, 2009 10:30 AM TIPS To cancel the image during shooting: j Pressing the D button cancels the last picture taken. To shoot multiple exposures while checking the composition for each frame: j The overlay images are displayed semi-transparently so you can shoot while checking the position of the image overlay. x 1 Exposure 48 EN Notes • When multiple exposure is set, [SLEEP] is set to [OFF] automatically.
s0026_e_00_0_unified.book Page 49 Tuesday, September 29, 2009 10:30 AM 2 Focusing and shooting functions AF mode selection The three focus modes S-AF, C-AF, and MF are available with this camera. You can take pictures by combining the S-AF mode with MF mode, and the C-AF mode with AF TRACKING.
s0026_e_00_0_unified.book Page 50 Tuesday, September 29, 2009 10:30 AM Composing and taking a picture after locking the focus (focus lock) Compose the picture with focus locked and press the shutter button to take the picture. • When the focusing mark blinks, this indicates that the picture is out of focus. Try again. e.g.) The camera focuses using the center AF target. P LN 2 250 F5.
s0026_e_02_focus_7.fm Page 51 Friday, October 2, 2009 2:14 PM Simultaneous use of S-AF mode and MF mode (S-AF+MF) This function allows you to fine-adjust the focus manually by turning the focus ring after AF is performed in the S-AF mode. • Press the shutter button halfway. After AF is confirmed, rotate the focus ring to fine-adjust the focus. x Notes • If the shutter button is pressed again after fine-adjusting the focus with the focus ring, the AF is activated and your adjustments are cancelled.
s0026_e_00_0_unified.book Page 52 Tuesday, September 29, 2009 10:30 AM AF target selection This camera has 11 AF targets for focusing on the subject with auto focus. Select the optimal AF target mode according to your subject and the composition. There are two AF target modes: All target AF mode, which uses AF at all AF targets, and Single target AF mode, which uses AF centering around one selected AF target. B All target AF mode The camera focuses automatically on one of the 11 AF targets.
s0026_e_00_0_unified.book Page 53 Tuesday, September 29, 2009 10:30 AM Selecting the AF target mode and position Select the AF target mode or select the AF target to use with Single target AF mode. 1 2 Using [AF AREA] select M to enable selection of the AF target mode and position. Use the main dial and sub dial or arrow pad to select the AF target. Set to B. TIPS Selecting the position of the AF target with the arrow pad. j The position of the AF target can be changed by pressing the arrow pad.
s0026_e_00_0_unified.book Page 54 Tuesday, September 29, 2009 10:30 AM Enlarged display operation You can enlarge subjects and display them. Enlarging the image is convenient for checking focus and adjusting the image by MF. P i button LN 2 Focusing and shooting functions 54 EN 250 F5.6 38 10x 1 Press the INFO button repeatedly to display the zoom display. 2 Use k to move the frame and press the i button. 3 g“Switching the information display” (P. 23) • The enlargement frame will be displayed.
s0026_e_00_0_unified.book Page 55 Tuesday, September 29, 2009 10:30 AM Using the face detection function By setting [g FACE DETECT] to [ON], the camera will detect people’s faces in the frame and adjust the focus and metering automatically. Direct button < (The setting changes each time the button is pressed.
s0026_e_00_0_unified.book Page 56 Tuesday, September 29, 2009 10:30 AM Sequential shooting Single-frame shooting o Shoots 1 frame at a time when the shutter button is pressed (normal shooting mode). Sequential shooting j Shoots at approximately 3 frames/sec. for as long as the shutter button is pressed (during S-AF, MF). • Press the shutter button fully and keep it pressed. The camera will take pictures in sequence until you release the button.
s0026_e_00_0_unified.book Page 57 Tuesday, September 29, 2009 10:30 AM Self-timer shooting This function lets you take pictures using the self-timer. You can set the camera to release the shutter after either 12 or 2 seconds. Fix the camera securely on a tripod for self-timer shooting. For the setting method, see “Sequential shooting” (gP. 56). Press the shutter button all the way.
s0026_e_00_0_unified.book Page 58 Tuesday, September 29, 2009 10:30 AM Setting the focal length By setting the focal length of the lens in advance, you can use the image stabilizer function with lenses other than Micro Four Thirds/Four Thirds system lenses. This setting is deactivated when a Micro Four Thirds/Four Thirds system lens is attached. 1 2 2 Focusing and shooting functions 58 EN Press the F button when the image stabilizer is turned on. Use the sub dial to set the focal length and press i.
s0026_e_00_0_unified.book Page 59 Tuesday, September 29, 2009 10:30 AM Setting the image aspect You can change the aspect ratio (horizontal-to-vertical ratio) when taking pictures using live view. Depending on your preference, you can set the aspect ratio to [4:3] (standard), [16:9], [3:2], or [6:6]. JPEG images are trimmed and saved according to the aspect ratio.
s0026_e_00_0_unified.book Page 60 Tuesday, September 29, 2009 10:30 AM Panorama shooting You can enjoy panorama shooting easily. Using OLYMPUS Master (provided CD-ROM) to join images where the subject’s edges overlap, you can create a single panorama composite image. Panorama shooting is possible up to a maximum of 10 images. 250 F5.6 2 38 Focusing and shooting functions EN EXIT EXIT • Try your best to include common parts of the overlapping images when shooting the subject. 1 2 Set the mode.
s0026_e_00_0_unified.book Page 61 Tuesday, September 29, 2009 10:30 AM Flash shooting This camera does not have a built-in flash. A separately sold external flash unit is required for flash shooting. Refer to the external flash’s manual as well.
s0026_e_00_0_unified.book Page 62 Tuesday, September 29, 2009 10:30 AM • Super FP flash Super FP flash is available with the FL-50R or FL-36R. You can use the Super FP flash even where normal flashes cannot be used with high shutter speed. Fill-in flash shooting with the aperture open (such as in outdoor portrait shooting) is also possible with Super FP flash. For details, refer to the external flash’s manual.
s0026_e_00_0_unified.book Page 63 Tuesday, September 29, 2009 10:30 AM Fill-in flash # The flash fires regardless of the light conditions. This mode is useful for eliminating shadows on the subject’s face (such as shadows from tree leaves), in a backlight situation, or for correcting the color shift produced by artificial lighting (especially fluorescent light). x Notes • When the flash fires, the shutter speed is set to 1/180 sec. or less.
s0026_e_02_focus_7.fm Page 64 Friday, October 2, 2009 2:14 PM Flash bracketing The camera shoots multiple frames, changing the amount of light emitted by the flash for each shot. The camera shoots 3 frames at a time with the following amount of light: optimum light, light adjusted in the – direction, and light adjusted in the + direction. Menu 2 Focusing and shooting functions 64 EN MENU [c] [V] [BRACKETING] [FL BKT] • The compensation value will change according to the EV step. g“EV STEP” (P.
s0026_e_00_0_unified.book Page 65 Tuesday, September 29, 2009 10:30 AM Record mode, white balance, and picture mode Selecting the record mode You can select a record mode in which to take pictures. Choose the record mode that is best for your purpose (printing, editing on a PC, website editing, etc.). Recording formats JPEG For JPEG images, select a combination of image size (Y, X, W) and compression rate (SF, F, N, B). An image consists of pixels (dots).
s0026_e_00_0_unified.book Page 66 Tuesday, September 29, 2009 10:30 AM RAW This is unprocessed data that has not undergone changes in white balance, sharpness, contrast or color. To display as an image on the computer, use OLYMPUS Master. RAW data cannot be displayed on a different camera or by using common software, and it cannot be selected for print reservation. RAW files are assigned an “.ORF” file extension. RAW images can be edited with this camera and saved as JPEG data. g“Editing still images” (P.
s0026_e_00_0_unified.book Page 67 Tuesday, September 29, 2009 10:30 AM Live control i j: [K] Super control panel i INFO k: [K] Menu MENU [W] [K] [STILL PICTURE] P j NORM TIPS To quickly set the record mode: To find out the file size/number of storable still pictures for each record mode: LIVE INFO 38 250 F5.6 STILL PICTURE K STILL PICTURE MOVIE BACK j “Record mode and file size/number of storable still pictures” (gP.
s0026_e_00_0_unified.book Page 68 Tuesday, September 29, 2009 10:30 AM Selecting the white balance 3 Record mode, white balance, and picture mode Color reproduction differs depending on light conditions. For instance, when daylight or tungsten lighting is reflected on white paper, the shade of white produced will be slightly different for each. With a digital camera, white color can be adjusted to reproduce more natural white with a digital processor. This is called white balance.
s0026_e_00_0_unified.book Page 69 Tuesday, September 29, 2009 10:30 AM Setting the auto/preset/custom white balance You can adjust the white balance by selecting the appropriate color temperature for the light conditions. Direct button WB Live control i j: [WB] Super control panel i INFO k: [WB] j j • Custom white balance is set by selecting [CWB] and turning the sub dial while pressing down the F button.
s0026_e_00_0_unified.book Page 70 Tuesday, September 29, 2009 10:30 AM Adjusting the white balance in the A direction (Amber-Blue) Depending on the original WB conditions, the image will become more amber when adjusted toward +, and bluer when adjusted toward –. Adjusting the white balance in the G direction (Green-Magenta) Depending on the original WB conditions, the image will become greener when adjusted toward +, and magenta when adjusted toward –.
s0026_e_00_0_unified.book Page 71 Tuesday, September 29, 2009 10:30 AM Taking a picture while comparing the effect of white balance You can take a picture while comparing the effect of white balance on a 4-split screen. 1 Press the INFO button repeatedly to display the multi view display. WB g“Switching the information display” (P. 23) • To switch to the white balance comparison screen when the exposure compensation comparison screen is displayed, press f. Press fg to switch the screen.
s0026_e_00_0_unified.book Page 72 Tuesday, September 29, 2009 10:30 AM Picture mode 3 You can select image tone to create unique image effects. You can also fine-adjust image parameters such as contrast and sharpness for each mode. The adjusted parameters are recorded in each picture effect mode. [hi- ENHANCE] : Produces more impressive-looking pictures matched to the scene mode. [iVIVID] : Produces vivid colors. [jNATURAL] : Produces natural colors. [ZMUTED] : Produces flat tones.
s0026_e_00_0_unified.book Page 73 Tuesday, September 29, 2009 10:30 AM [PICT. TONE] : Colors the black and white image. (MONOTONE) [N: NEUTRAL] [S: SEPIA] [B: BLUE] [P: PURPLE] [G: GREEN] : : : : : Creates a normal black and white image. Sepia Bluish Purplish Greenish Gradation In addition to the [NORMAL] gradation setting, you can select from 3 other gradation settings. [HIGH KEY] : Gradation for a bright subject. [LOW KEY] : Gradation for a dark subject.
s0026_e_00_0_unified.book Page 74 Tuesday, September 29, 2009 10:30 AM 4 Recording Movies Movie recording You can record high-definition movies. Stereo sound is recorded simultaneously. In addition to automatic exposure, you can change the aperture to suit your preference, and manually set both the aperture and shutter speed and use art filtering effects to enrich the expressiveness of your movies. 1 4 2 Set the mode dial to n. Press the shutter button halfway down and focus on what you wish record.
s0026_e_00_0_unified.book Page 75 Tuesday, September 29, 2009 10:30 AM x Notes • When recording a movie, you cannot change the settings for exposure compensation, aperture value or shutter speed. • In movie mode, [IMAGE STABILIZER] provides electronic stabilization. When you use this function, the recorded image is enlarged by a small amount. Also, [I.S.1] will operate regardless of the settings for [I.S.1], [I.S.2] and [I.S.3]. • Stabilization is not possible when the camera shake is excessive.
s0026_e_00_0_unified.book Page 76 Tuesday, September 29, 2009 10:30 AM Selecting the record mode Live control i j [K] Menu MENU [W] [K] [MOVIE] Movie Record Mode Record mode Application HD The number of pixels is 1280 × 720. You can record high-definition movies. SD The number of pixels is 640 × 480. Recording Audio when Recording Movie 4 Set to [ON] to record sound simultaneously when movie recording begins.
s0026_e_00_0_unified.book Page 77 Tuesday, September 29, 2009 10:30 AM 5 Playback functions Single-frame/Close-up playback 1 2 Press the q button (Single-frame playback). j • The last recorded image appears. • The sound recorded when taking the picture is played back simultaneously. • The LCD monitor turns off after more than 1 minute if no operations are performed. Use k to select images you want to view. You can also turn the sub dial to switch to U for close-up playback.
s0026_e_00_0_unified.book Page 78 Tuesday, September 29, 2009 10:30 AM Index display/Calendar display This function lets you show several images at the same time. This is useful when you want to quickly search a number of pictures to find a particular image. During single-frame playback, each time you turn the sub dial toward G, the number of images shown changes between 4, 9, 16, 25, 49 and 100 pictures.
s0026_e_00_0_unified.book Page 79 Tuesday, September 29, 2009 10:30 AM Information display This allows you to display detailed information about the image. Luminance information can also be displayed with histogram and highlight graphs. Each press of the INFO button switches the display. • This setting is stored and will be shown the next time the information display is called up. INFO button Image only Simplified display x10 [4032x3024,1/8] LN 100-0015 2009.11.
s0026_e_00_0_unified.book Page 80 Tuesday, September 29, 2009 10:30 AM Slideshow This function displays images stored on the card one after another. The images are played back in order, starting with the displayed image. 1 MENU [q] [m] • Press the i button during playback to select slideshow. j JPEG JPEG EDIT R m < 2 5 Playback functions 3 4 EN SET MENU button i button [START] : Perform slideshow using current settings. [BGM] : Set BGM (5 types) or turn BGM [OFF].
s0026_e_00_0_unified.book Page 81 Tuesday, September 29, 2009 10:30 AM Rotating images This function lets you rotate images and display them vertically on the monitor during singleframe playback. This is useful when taking pictures with the camera held vertically. The images will automatically be displayed in the correct direction even if the camera is rotated. 1 MENU [q] [y] F button • When set to [ON], images shot vertically will be automatically rotated and displayed during playback.
s0026_e_00_0_unified.book Page 82 Tuesday, September 29, 2009 10:30 AM Movie playback 1 2 Select a movie, and press the i button. Select [MOVIE PLAY] and press the i button. j • Playback will start. MOVIE MOVIE PLAY m BACK SET MENU button i button Operations during movie playback • Volume: Turn the main dial to adjust the volume of the sound from the camera speaker. • Rewind/Fast-forward: Select using hi.
s0026_e_05_playback_7.fm Page 83 Tuesday, September 29, 2009 11:19 AM Playback on TV Use the AV cable provided with the camera to playback recorded images on your TV. You can playback high-definition images on a high-definition TV by connecting it to the camera using a commercially available HDMI mini-cable. Connection via AV cable • Be sure to turn off the camera and the TV before connecting the AV cable. Multi-connector Connect to the TV video input jack (yellow) and audio input jack (white).
s0026_e_00_0_unified.book Page 84 Tuesday, September 29, 2009 10:30 AM Connection via HDMI mini-cable • Be sure to turn off the camera and the TV before connecting the mini-cable. Connect to the HDMI connector on the TV. HDMI miniconnector 5 HDMI mini-cable (commercially available) 1 2 3 4 5 Use the camera to select the video signal format that matches that of the connected TV ([NTSC]/[PAL]). g“VIDEO OUT” (P. 100) Turn off the camera. Connect the TV and camera.
s0026_e_00_0_unified.book Page 85 Tuesday, September 29, 2009 10:30 AM Editing still images Recorded images can be edited and saved as new images. Available editing functions depend on the image format (image record mode). A JPEG file can be printed as is without modification. A RAW file, on the other hand cannot be printed as is. To print a RAW file, use the RAW edit function to convert the RAW data format to JPEG.
s0026_e_00_0_unified.book Page 86 Tuesday, September 29, 2009 10:30 AM 1 2 MENU [q] [EDIT] [SEL. IMAGE] Confirm the data format from here. • Selection is also possible during playback by pressing the i button. Use hi to select an image, then press the i button. • The camera recognizes the image data format. • For images recorded in JPEG+RAW, a selection screen will appear, asking you which data to edit. • You cannot edit movies.
s0026_e_00_0_unified.book Page 87 Tuesday, September 29, 2009 10:30 AM Image overlay Up to 3 frames of RAW images taken with the camera can be overlaid and saved as a separate image. The image is saved with the record mode set at the time the image is saved. 1 MENU [q] [EDIT] [IMAGE OVERLAY] • Selection is also possible during playback by pressing the i button. 2 3 Select the number of frames to overlay and press the i button. Use k to select a frame and press the i button.
s0026_e_00_0_unified.book Page 88 Tuesday, September 29, 2009 10:30 AM Protecting selected frames During index display you can select multiple images and protect them all at the same time. 1 During index display, select the images you want to protect using k, then press the i button. • The selected images will be shown with v. • To cancel your selection, press the i button again. 2 3 Press k to select the next images you want to protect, then press the i button.
s0026_e_00_0_unified.book Page 89 Tuesday, September 29, 2009 10:30 AM Single-frame erase 1 2 Display the images you want to erase and press the D button. Use fg to select [YES], then press the i button. D button Erasing selected frames During index display, you can select multiple images and erase them all at the same time. 1 2 3 4 Select the images you wish to erase on the index display, then press i. • The selected images will be shown with v. • To cancel your selection, press the i button again.
s0026_e_00_0_unified.book Page 90 Tuesday, September 29, 2009 10:30 AM 6 Setup functions Setup Menu Use the Setup Menu to set the basic camera functions. ’09.11.01 14:01 ’09.11.01 14:01 ENG. W j±0 k±0 s 5SEC REC VIEW cMENU DISPLAY ON FIRMWARE ENG. W j±0 k±0 s 5SEC REC VIEW cMENU DISPLAY ON FIRMWARE BACK SET Use fg to select [d], then press i. i BACK SET Use fg to select a function, then press i. For details on using the menu lists, see “Menu” (gP. 20). X (Date/time setting) gP.
s0026_e_00_0_unified.book Page 91 Tuesday, September 29, 2009 10:30 AM REC VIEW You can display the picture you have just taken while it is being recorded to the card, and to select how long the picture is displayed. This is useful for making a brief check of the picture you have just taken. Pressing the shutter button halfway while checking the picture lets you resume shooting immediately. [1SEC]-[20SEC] Selects the number of seconds to display each picture. Can be set in units of 1 second.
s0026_e_00_0_unified.book Page 92 Tuesday, September 29, 2009 10:30 AM Resetting the camera settings In P, A, S, M or n mode, current camera settings (including any changes you have made) are retained when the power is turned off. To reset the camera to the factory default settings, set [RESET]. Registering [RESET1]/[RESET2] If settings after a reset are pre-registered to [RESET1]/[RESET2], the camera can be reset to the factory default settings, by executing [RESET1]/[RESET2].
s0026_e_00_0_unified.book Page 93 Tuesday, September 29, 2009 10:30 AM 7 Customizing your camera Use the Custom Menu to customize the shooting functions. The Custom Menu has 9 tabs (R to Z) that are divided according to the functions to be set. In the default setting, the Custom Menu is not displayed. To customize the functions, set [cMENU DISPLAY] in the Setup Menu to [ON] to display the Custom Menu. (gP.
s0026_e_00_0_unified.book Page 94 Tuesday, September 29, 2009 10:30 AM P SET UP Selects the operations of dials or arrow pad when selecting the AF target. [OFF] Stops after moving to the AF target on the end. [LOOP] After moving to the AF target on the end, moves to the AF target on the opposite end of the same row or column. Selects all AF targets before moving to the AF target on the opposite end, and [AF AREA] is set to B.
s0026_e_00_0_unified.book Page 95 Tuesday, September 29, 2009 10:30 AM S BUTTON/DIAL DIAL FUNCTION In P, A, S, or M mode, you can assign functions other than the default functions to the main dial and sub dial. You can also switch the operations of the main dial and sub dial for menu operations with the default operations. P : [%]/[F]/[w] A : [FNo.]/[F]/[w] S : [SHUTTER]/[F]/[w] M : [SHUTTER]/[FNo.
s0026_e_00_0_unified.book Page 96 Tuesday, September 29, 2009 10:30 AM AEL/AFL You can use the AEL/AFL button to perform AF or metering operations instead of using the shutter button. Select the function of the button to match the operation when the shutter button is pressed. Select [mode1] to [mode4] in each focus mode. (You can only select [mode4] in C-AF mode.
s0026_e_00_0_unified.book Page 97 Tuesday, September 29, 2009 10:30 AM ; FUNCTION 7 Customizing your camera You can assign a function to the < button. [Fn FACE DETECT] Using the < button, set [gFACE DETECT] to [ON], and settings ideal for portrait shooting are set. Pressing this button again sets this feature to [OFF]. g“Using the face detection function” (P. 55), “g FACE DETECT” (P. 101) [PREVIEW] (electronic) While holding down the < button, you can use the preview function. g“Preview function” (P.
s0026_e_00_0_unified.book Page 98 Tuesday, September 29, 2009 10:30 AM 7 FUNCTION Other functions can be assigned to the 7 button. [AF MODE] g“AF mode selection” (P. 49) [METERING] g“Changing the metering mode” (P. 42) [FLASH MODE] g“Flash shooting” (P. 61) [BACKLIT LCD] g“; FUNCTION” (P. 97) [IMAGE STABILIZER] g“Image stabilizer” (P. 57) MY MODE SETUP You can store two frequently used settings as My Mode.
s0026_e_00_0_unified.book Page 99 Tuesday, September 29, 2009 10:30 AM A You can switch the functions of the AEL/AFL button and the < button. When you select [ON], the AEL/AFL button will function as the < button, and the < button will function as the AEL/AFL button. n FUNCTION You can set the function of the arrow pad. [OFF] To prevent malfunction, the functions assigned to the arrow pad will not be activated when the button is pressed. [ON] The functions assigned to the arrow pad will be activated.
s0026_e_00_0_unified.book Page 100 Tuesday, September 29, 2009 10:30 AM VIDEO OUT You can select NTSC or PAL according to your TV’s video signal type. You will need to set this when you want to connect the camera to a TV and play back images in a foreign country. Make sure the correct video signal type is selected before connecting the video cable. If you use the wrong video signal type, recorded pictures will not play back properly on your TV.
s0026_e_00_0_unified.book Page 101 Tuesday, September 29, 2009 10:30 AM LIVE VIEW BOOST During live view shooting, you can brighten the monitor for easier confirmation on the subject. [OFF] The subject is displayed on the monitor with the brightness level that is adjusted according to the exposure being set. You can shoot while confirming through the monitor in advance to get a picture that is to your liking.
s0026_e_00_0_unified.book Page 102 Tuesday, September 29, 2009 10:30 AM Monitor indication: Press the INFO button repeatedly to display the level gauge. g“Switching the information display” (P. 23) TIPS To calibrate the level gauge: j g“LEVEL ADJUST” (P. 108) x Notes • If the camera is tilted forward or backward to a large degree, the error of the horizontal titling increases. Displayed when the display range is exceeded. gP. 76 MOVIE R Set to [ON] to record sound when shooting movies.
s0026_e_00_0_unified.book Page 103 Tuesday, September 29, 2009 10:30 AM ISO STEP You can select the EV step of the ISO sensitivity from [1/3EV] or [1EV]. ISO-AUTO SET You can set the upper limit and default ISO values when ISO is set to [AUTO]. [HIGH LIMIT] This sets the upper limit of the ISO value that automatically changes. The upper limit can be set from 200 to 6400 in 1/3 EV increments. [DEFAULT] This sets the value to be normally used when the optimum exposure can be obtained.
s0026_e_00_0_unified.book Page 104 Tuesday, September 29, 2009 10:30 AM W # CUSTOM FLASH MODE gP. 62 Select the firing pattern, timing and other parameters for when the external flash unit is used. Available flash modes vary according to the exposure mode. w gP. 63 Adjust the flash firing strength with the range [+3] to [-3]. #X-SYNC. You can set the shutter speed that will be used when the flash fires. The speed can be set from 1/60 to 1/180 in 1/3 EV increments.
s0026_e_00_0_unified.book Page 105 Tuesday, September 29, 2009 10:30 AM x Notes • During sequential shooting, [NOISE REDUCT.] is [OFF] automatically. • This function may not work effectively with some shooting conditions or subjects. NOISE FILTER You can select the noise processing level. Use [STANDARD] for general use. [HIGH] is recommended during high sensitivity shooting. gP. 68 WB Select the white balance to suit the light source.
s0026_e_00_0_unified.book Page 106 Tuesday, September 29, 2009 10:30 AM K SET You can combine 3 image sizes and 4 compression rates and register 4 combinations. Select the registered setting with [K]. g“Selecting the record mode” (P. 65) Register 4 different combinations of image settings. DSET 1 Set the number of pixels. 2 3 Y SF X F W N PIXEL COUNT BACK 4 W SF Yarge SET Set the compression rate. PIXEL COUNT You can set the pixel size for the image size [X] and [W].
s0026_e_00_0_unified.book Page 107 Tuesday, September 29, 2009 10:30 AM FILE NAME When you take a picture, the camera assigns it a unique file name and saves it in a folder. File names are assigned as shown in the illustration below. [AUTO] Even when a new card is inserted, the folder numbers are retained from the previous card.
s0026_e_00_0_unified.book Page 108 Tuesday, September 29, 2009 10:30 AM dpi SETTING You can set the resolution for printing images in advance. The set value is recorded on the card with the images. [AUTO] Automatically set according to the image size. [CUSTOM] You can make the desired setting. Press i to display the setting screen. Z K UTILITY PIXEL MAPPING gP. 126 The pixel mapping feature allows the camera to simultaneously adjust the image pickup device and image processing functions.
s0026_e_00_0_unified.book Page 109 Tuesday, September 29, 2009 10:30 AM 8 Printing Print reservation (DPOF) Print reservation Print reservation allows you to save printing data (the number of prints and the date/time information) with the pictures stored on the card. Pictures set with print reservation can be printed using the following methods. DPOF (Digital Print Order Format) This is for saving desired print settings on digital cameras.
s0026_e_00_0_unified.book Page 110 Tuesday, September 29, 2009 10:30 AM Single-frame reservation Follow the operation guide to set print reservation for a picture. 1 MENU [q] [<] • Selection is also possible during playback by pressing the i button. ON EDIT RESET PROTECT 2 3 Operation guide Select [<] and press the i button. BACK SET PRINT ORDER SETTING BACK SET Press hi to select the frame that you want to set as print reservation, then press fg to set the number of prints.
s0026_e_00_0_unified.book Page 111 Tuesday, September 29, 2009 10:30 AM All-frame reservation Applies print reservation to all the pictures stored in the card. The number of prints is fixed at 1. 1 2 3 4 MENU [q] [<] Select [U] and press the i button. Select the date and time format and press the i button. [NO] The pictures are printed without the date and time. [DATE] The pictures are printed with the shooting date. [TIME] The pictures are printed with the shooting time.
s0026_e_00_0_unified.book Page 112 Tuesday, September 29, 2009 10:30 AM Direct printing (PictBridge) By connecting the camera to a PictBridge-compatible printer with the USB cable, you can print out recorded pictures directly. To find out if your printer is compatible with PictBridge, refer to the printer’s manual. PictBridge The standard that enables digital cameras and printers made by different manufacturers to be connected, and also allows pictures to be printed directly from the camera.
s0026_e_00_0_unified.book Page 113 Tuesday, September 29, 2009 10:30 AM 2 3 Turn on the camera. • The selection screen for the USB connection is displayed. Use fg to select [PRINT]. • [ONE MOMENT] is displayed and the camera and printer are connected. Go to “Making prints using different print options” (gP. 113). x Notes • If the screen is not displayed after a few minutes, disconnect the USB Cable and start again from Step 1.
s0026_e_00_0_unified.book Page 114 Tuesday, September 29, 2009 10:30 AM Setting the print paper items This setting varies with the type of printer. If only the printer’s STANDARD setting is available, you cannot change the setting. [SIZE] Sets the paper size that the printer PRINTPAPER supports. [BORDERLESS] Selects whether the picture is printed SIZE BORDERLESS on the entire page or inside a blank frame. STANDARD BACK [PICS/SHEET] Selects the number of pictures per sheet.
s0026_e_00_0_unified.book Page 115 Tuesday, September 29, 2009 10:30 AM Setting printing data Select whether to print printing data such as the date and time or file name on the picture when printing. When the print mode is set to [ALL PRINT] and [OPTION SET] is selected, the following screen appears. [<×] Sets the number of prints. PRINT INFO [DATE] Prints the date and time recorded on the picture. 1 [FILE NAME] Prints the file name recorded on the DATE WITHOUT picture.
s0026_e_00_0_unified.book Page 116 Tuesday, September 29, 2009 10:30 AM 9 Using the OLYMPUS Master software Flowchart Just connect the camera to a computer with the USB cable and you can easily transfer images stored on the card to the computer with the provided OLYMPUS Master software. Things to prepare • OLYMPUS Master 2 CD-ROM • USB cable • Computer that fulfills the operating environment (For the required operating environment, refer to the OLYMPUS Master installation guide.
s0026_e_00_0_unified.book Page 117 Tuesday, September 29, 2009 10:30 AM Connecting the camera to a computer Connect the camera to your computer with the provided USB cable. 1 Use the provided USB cable to connect the computer’s USB port to the camera’s multi-connector. • The location of the USB port varies with the computer. For details, refer to your computer’s manual. Smaller terminal Multi-connector USB cable Look for this mark. 2 3 4 Turn on the camera.
s0026_e_00_0_unified.book Page 118 Tuesday, September 29, 2009 10:30 AM Start up the OLYMPUS Master software Windows 1 Double-click the “OLYMPUS Master 2” icon on the desktop. Macintosh 1 Double-click the “OLYMPUS Master 2” icon folder. in the “OLYMPUS Master 2” • The browse window is displayed. • When OLYMPUS Master is started up for the first time after installation, the OLYMPUS Master initial setting screen and user registration screen are displayed before the browse window.
s0026_e_00_0_unified.book Page 119 Tuesday, September 29, 2009 10:30 AM Disconnecting the camera from your computer 1 Make sure that the card access lamp has stopped blinking. Card access lamp 2 Prepare to remove the USB cable. Windows 1) In the system tray, click the “Unplug or Eject Hardware” icon . 2) Click on the pop-up message. 3) Click “OK” on the “Safe to Remove Hardware” window. 3 x 1) The trash icon changes to the eject icon when the “Untitled” or “NO_NAME” icon on the desktop is dragged.
s0026_e_00_0_unified.book Page 120 Tuesday, September 29, 2009 10:30 AM Viewing still images 1 Click the “Album” tab on the browse window and select the album that you want to view. Thumbnail • The selected album image is displayed in the thumbnail area. 2 Double-click the still picture thumbnail that you want to view. • OLYMPUS Master switches to the image edit window and the picture is enlarged. • Click “Back” to return to the browse window.
s0026_e_00_0_unified.book Page 121 Tuesday, September 29, 2009 10:30 AM 10 Shooting tips and maintenance Shooting tips and information The camera does not turn on even when a battery is loaded The battery is not fully charged • Charge the battery with the charger. The battery is temporarily unable to function because of the cold • Battery performance declines in low temperatures, and the charge may not be sufficient to turn on the camera.
s0026_e_00_0_unified.book Page 122 Tuesday, September 29, 2009 10:30 AM Subjects that are difficult to focus on It may be difficult to focus with auto focus in the following situations. AF confirmation mark is blinking. These subjects are not focused. Subject with low contrast Excessively bright light in Object with no vertical center of frame lines AF confirmation mark lights up but the subject is not focused.
s0026_e_00_0_unified.book Page 123 Tuesday, September 29, 2009 10:30 AM Error codes Monitor indication Possible cause The card is not inserted, or it cannot be recognized. Corrective action Insert a card or insert a different card. NO CARD CARD ERROR There is a problem with the card. Insert the card again. If the problem persists, format the card. If the card cannot be formatted, it cannot be used. The card write-protect switch is set to the [LOCK] side. Release the switch. gP. 127 The card is full.
s0026_e_00_0_unified.book Page 124 Tuesday, September 29, 2009 10:30 AM Monitor indication m Possible cause Corrective action The internal temperature of the camera has risen due to continuous use, for example. Turn off the camera and wait for the internal temperature to cool. The battery is drained. Charge the battery. Internal camera temperature is too high. Please wait for cooling before camera use. Wait a moment for the camera to turn off automatically.
s0026_e_00_0_unified.book Page 125 Tuesday, September 29, 2009 10:30 AM Camera maintenance Cleaning and storing the camera Cleaning the camera Turn off the camera and remove the battery before cleaning the camera. Exterior: • Wipe gently with a soft cloth. If the camera is very dirty, soak the cloth in mild soapy water and wring well. Wipe the camera with the damp cloth and then dry it with a dry cloth. If you have used the camera at the beach, use a cloth soaked in clean water and well wrung.
s0026_e_00_0_unified.book Page 126 Tuesday, September 29, 2009 10:30 AM Pixel mapping k Checking the image processing functions The pixel mapping feature allows the camera to check and adjust the image pickup device and image processing functions. After using the monitor or taking continuous shots, wait for at least one minute before using the pixel mapping function to ensure that it operates correctly. 1 2 MENU [c] [Z] [PIXEL MAPPING] Press i, then press the i button.
s0026_e_00_0_unified.book Page 127 Tuesday, September 29, 2009 10:30 AM 11 Information Card basics Usable cards “Card” in this manual refers to a recording medium. The only cards usable with this camera are SD memory cards and SDHC memory cards (sold separately) which conform to the SD standard. For the latest information, please visit the Olympus website. SD card write protect switch The SD card body has a write protect switch.
s0026_e_00_0_unified.book Page 128 Tuesday, September 29, 2009 10:30 AM Battery and charger z Use the single Olympus lithium-ion battery (BLS-1). Other batteries cannot be used. z The camera’s power consumption varies widely with usage and other conditions. z As the following consume a lot of power even without shooting, the battery will be drained quickly. • Performing auto focus repeatedly by pressing the shutter button halfway in shooting mode.
s0026_e_00_0_unified.book Page 129 Tuesday, September 29, 2009 10:30 AM Interchangeable lenses Select the lens that you want to shoot with. Use a specified lens (Micro Four Thirds mount). To use the “Four Thirds System Lens”, an adapter (sold separately) is required. An adapter to allow use of an OM system lens is also available (sold separately). M.
s0026_e_00_0_unified.book Page 130 Tuesday, September 29, 2009 10:30 AM M.
s0026_e_00_0_unified.book Page 131 Tuesday, September 29, 2009 10:30 AM Main Specifications Items 14-42 mm Mount 17 mm Micro Four Thirds mount Focal length 14-42 mm Max. aperture f3.5 - 5.6 f2.8 75.4°-28.9° 64.9° Image angle Lens configuration Iris control Shooting range 17 mm 8 groups, 9 lenses 4 groups, 6 lenses Multilayer film coating f3.5 - 22 f2.8 - 22 0.25 m - ) 0.2 m - ) Focus adjustment AF/MF switching Weight (excluding hood and cap) 150 g 71 g Dimensions (Max.
s0026_e_00_0_unified.book Page 132 Tuesday, September 29, 2009 10:30 AM Using the electronic viewfinder (sold separately) If you use the electronic viewfinder (sold separately: VF-2), you can view the shooting screen in the finder. This is convenient when you are in a very bright location, such as under direct sunlight, where it is difficult to view the monitor or are using the camera at a low angle. Also refer to the electronic viewfinder’s manual. 1 2 3 4 5 6 7 8 Turn off the camera.
s0026_e_00_0_unified.book Page 133 Tuesday, September 29, 2009 10:30 AM Program line diagram (P mode) In the P mode, the camera is programmed such that the aperture value and shutter speed are automatically selected according to the subject’s brightness as shown below. The program line diagram varies with the type of lens mounted. When using the (14- 42 mm F3.5 - 5.
s0026_e_00_0_unified.book Page 134 Tuesday, September 29, 2009 10:30 AM Exposure warning display If the optimum exposure cannot be obtained when pressing the shutter button halfway, the display will blink on the LCD monitor. Shooting mode Warning display example (blinking) Status The subject is too dark. • Increase the ISO sensitivity. • Use the flash. The subject is too bright. • Decrease the ISO sensitivity. • Use a commercially available ND filter (for adjusting the amount of light).
s0026_e_00_0_unified.
s0026_e_00_0_unified.book Page 136 Tuesday, September 29, 2009 10:30 AM White balance color temperature The higher the color temperature, the richer the light in bluish tones and the poorer in reddish; the lower the color temperature, the richer the light in reddish tones and the poorer in bluish. The spectral balance of different white light sources is rated numerically by color temperature - concept of physics expressed using the Kelvin (K) temperature scale.
s0026_e_00_0_unified.book Page 137 Tuesday, September 29, 2009 10:30 AM Record mode and file size/number of storable still pictures The file size in the table is approximate for files with a 4:3 aspect ratio. Record mode Number of pixels (PIXEL COUNT) RAW YSF YF YN YB XSF XF XN XB XSF XF XN XB XSF XF XN x Loss-less compression 1/2.7 1/4 File format ORF 1/8 1/12 3200 × 2400 2560 × 1920 1600 × 1200 1280 × 960 1024 × 768 640 × 480 1/2.7 1/4 1/8 1/12 1/2.7 1/4 1/8 1/12 1/2.7 1/4 1/8 1/12 1/2.
s0026_e_00_0_unified.
s0026_e_00_0_unified.book Page 139 Tuesday, September 29, 2009 10:30 AM Menu directory Shooting Menu Tab Function CARD SETUP Setting Ref. page P. 89 P. 127 ALL ERASE/FORMAT RESET CUSTOM RESET RESET1 SET/RESET RESET2 SET/RESET P. 92 PICTURE MODE hi-FINISH/iVIVID/jNATURAL*/ZMUTED/ cPORTRAIT/MMONOTONE/CCUSTOM P. 72 GRADATION AUTO/NORMAL*/HIGH KEY/LOW KEY P. 73 K STILL RAW/YF/YN*/XN/WN/YF+RAW/YN+RAW/ PICTURE XN+RAW/WN+RAW P.
s0026_e_00_0_unified.book Page 140 Tuesday, September 29, 2009 10:30 AM Playback Menu Tab Function Setting Ref. page START q m BGM MELANCHOLY*/NOSTALGIC/ LOVE/JOY/COOL/OFF SLIDE ALL*/STILL PICTURE/MOVIE SLIDE INTERVAL 2 SEC - 10 SEC (3 SEC*) MOVIE INTERVAL FULL/SHORT* OFF/ON* y SEL. IMAGE EDIT IMAGE OVERLAY <
s0026_e_00_0_unified.book Page 141 Tuesday, September 29, 2009 10:30 AM Tab c Function S Setting BUTTON/DIAL Ref. page P. 95 ; FUNCTION %*/F/w FNo.*/F/w SHUTTER*/F/w Main dial: SHUTTER*/FNo. M Sub dial: SHUTTER/FNo.
s0026_e_00_0_unified.book Page 142 Tuesday, September 29, 2009 10:30 AM Tab c Function V Setting EXP/e/ISO EV STEP 1/3EV*/1/2EV/1EV AELMetering e* J 5 5HI 5SH AUTO*/J/5/5HI/5SH ISO AUTO*/100 - 6400 METERING ISO STEP 1/3EV*/1EV ISO-AUTO SET HIGH LIMIT DEFAULT ISO-AUTO P/A/S*/ALL BULB TIMER 1MIN - 30MIN (8 MIN*) ANTI-SHOCK z OFF*/1/8 SEC - 30 SEC AE BKT WB BKT BRACKETING FL BKT ISO BKT W Information 11 142 EN 200 - 6400 (1600*) 200 - 6400 (200*) OFF*/3F 0.3EV/3F 0.7EV/ 3F 1.
s0026_e_00_0_unified.book Page 143 Tuesday, September 29, 2009 10:30 AM Tab c Function X K/COLOR/WB NOISE REDUCT.
s0026_e_00_0_unified.book Page 144 Tuesday, September 29, 2009 10:30 AM Specifications Camera specifications Product type Product type Lens Lens mount Equivalent focal length on a 35 mm film camera : Digital camera with interchangeable lens system : M.Zuiko Digital, Micro Four Thirds System Lens : Micro Four Thirds mount : Approx. twice the focal length of the lens Image pickup device Product type No. of total pixels No.
s0026_e_00_0_unified.book Page 145 Tuesday, September 29, 2009 10:30 AM Recording Memory Recording system Applicable standards Sound with still pictures Movie Audio : SD memory card SDHC memory card : Digital recording, JPEG (in accordance with Design rule for Camera File system (DCF)), RAW Data : Exif 2.2, Digital Print Order Format (DPOF), PRINT Image Matching III, PictBridge : Wave format : AVI Motion JPEG : PCM 44.
s0026_e_00_0_unified.book Page 146 Tuesday, September 29, 2009 10:30 AM Battery/charger specifications BLS-1 Lithium ion battery MODEL NO. Product type Nominal voltage Nominal capacity No. of charge and discharge times Ambient temperature Dimensions Weight : : : : PS-BLS1 Rechargeable Lithium ion battery DC 7.2V 1150mAh : Approx.
s0026_e_00_0_unified.book Page 147 Tuesday, September 29, 2009 10:30 AM SAFETY PRECAUTIONS CAUTION RISK OF ELECTRIC SHOCK DO NOT OPEN CAUTION: TO REDUCE THE RISK OF ELECTRICAL SHOCK, DO NOT REMOVE COVER (OR BACK). NO USER-SERVICEABLE PARTS INSIDE. REFER SERVICING TO QUALIFIED OLYMPUS SERVICE PERSONNEL. An exclamation mark enclosed in a triangle alerts you to important operating and maintenance instructions in the documentation provided with the product.
s0026_e_00_0_unified.book Page 148 Tuesday, September 29, 2009 10:30 AM Product Handling Precautions WARNING ( Do not use the camera near flammable or explosive gases. ( Do not use the flash and LED on people (infants, small children, etc.) at close range. • You must be at least 1 m (3 ft.) away from the faces of your subjects. Firing the flash too close to the subject’s eyes could cause a momentary loss of vision. ( Keep young children and infants away from the camera.
s0026_e_00_0_unified.book Page 149 Tuesday, September 29, 2009 10:30 AM • If rechargeable batteries have not been recharged within the specified time, stop charging them and do not use them. • Do not use a battery if it is cracked or broken. • If a battery leaks, becomes discolored or deformed, or becomes abnormal in any other way during operation, stop using the camera.
s0026_e_00_0_unified.book Page 150 Tuesday, September 29, 2009 10:30 AM Lens • • • • • • • Do not immerse in water or splash with water. Do not drop or exert strong force on the lens. Do not hold at the moving part of the lens. Do not touch the lens surface directly. Do not touch the contact points directly. Do not subject to abrupt temperature changes. The operating temperature range is -10 °C - 40 °C (14 °F - 104 °F). Always use within this temperature range.
s0026_e_00_0_unified.book Page 151 Tuesday, September 29, 2009 10:30 AM Use Only Dedicated Rechargeable Battery and Battery Charger We strongly recommend that you use only the genuine Olympus dedicated rechargeable battery and battery charger with this camera. Using a non-genuine rechargeable battery and/or battery charger may result in fire or personal injury due to leakage, heating, ignition or damage to the battery.
s0026_e_00_0_unified.book Page 152 Tuesday, September 29, 2009 10:30 AM Provisions of warranty 1. If this product proves to be defective, although it has been used properly (in accordance with the written Handling Care and Operating instructions supplied with it), during the applicable national warranty period and has been purchased from an authorized Olympus distributor within the business area of Olympus Imaging Europa GmbH as stipulated on the website: http://www.olympus.
s0026_e_00_0_unified.book Page 153 Tuesday, September 29, 2009 10:30 AM Trademarks • • • • • IBM is a registered trademark of International Business Machines Corporation. Microsoft and Windows are registered trademarks of Microsoft Corporation. Macintosh is a trademark of Apple Inc. SDHC logo is a trademark. “Shadow Adjustment Technology” function contains patented technologies from Apical Limited.
s0026_e_00_0_unified.book Page 154 Tuesday, September 29, 2009 10:30 AM Index Symbols Auto white balance ........................................68 A .......................................................... 99 w+F ......................................................... 104 8 (Beep sound) ......................................... 100 W (Language selection) .......................... 90 P HOME .................................................... 97 P SET UP .............................................
s0026_e_00_0_unified.book Page 155 Tuesday, September 29, 2009 10:30 AM Exposure compensation F ........................... 43 EXPOSURE SHIFT ..................................... 108 F F (Fine) .......................................................... 65 FACE DETECT g ................................ 55, 101 FILE NAME ................................................. 107 Fill-in flash # ................................................. 63 FIREWORKS ( ...........................................
s0026_e_00_0_unified.book Page 156 Tuesday, September 29, 2009 10:30 AM Preset white balance ..................................... 68 PREVIEW ................................................ 41, 97 PRINT ................................................. 100, 113 Print reservation .......................................... 109 PRIORITY SET ........................................... 107 Program shift % ........................................... 37 Program shooting P ......................................
s0026_e_00_0_unified.
s0026_e_00_0_unified.
s0026_e_00_0_unified.
s0026_e_12_unifiedix.
s0026_e_12_unifiedix.
s0026_e_12_unifiedix.
s0026_e_12_unifiedix.
s0026_e_00_0_unified.book Page 1 Wednesday, September 16, 2009 1:53 PM DIGITAL CAMERA Basic guide INSTRUCTION MANUAL Printed in China VN331701 INSTRUCTION MANUAL P.2 Review the camera part names, the basic steps for shooting and playback, and the basic operations. Table of Contents P. 26 z Thank you for purchasing an Olympus digital camera. Before you start to use your new camera, please read these instructions carefully to enjoy optimum performance and a longer service life.