DIGITAL CAMERA Basic Manual Book_Basic_FE360.
Contents ¾ Preparing the Camera ...........................3 Checking the contents of the box ............3 Using the digital image stabilization mode (h mode) ............................................11 Attaching the camera strap......................3 Shooting movies (n mode) ..................11 Charging the battery ................................3 ¾ Using Shooting Functions ..................12 Loading the battery and the xD-Picture Card™ (sold separately) into the camera.....................
Preparing the Camera Checking the contents of the box Charging the battery Lithium ion battery 3 ▼ Battery charger 2 Digital camera 1 Strap AC outlet AC cable LI-42B Lithium Ion Battery LI-40C Battery Charger Charging indicator On: Charging Off: Charged Battery comes partially charged. Before use, be sure to charge the battery until the charging indicator goes off (for approx. 5 hours). For details on the battery and the charger, see “Battery and charger” (p. 45).
Loading the battery and the xD-Picture Card™ (sold separately) into the camera 3 Notch Do not insert anything other than an xD-Picture Card or the microSD Attachment into the camera. 1 Contact area 2 1 Battery/card compartment cover Insert the card straight until it clicks into place. Do not touch the contact area directly. 2 4 1 2 This camera allows the user to take pictures using the internal memory even when no xD-Picture Card (sold separately) is inserted. “Using an xD-Picture Card” (p.
Using the microSD card/ microSDHC card (sold separately) A microSD card or microSDHC card (hereafter both will be referred to as microSD card) is also compatible with this camera using the microSD Attachment. Setting the date and time The date and time set here are saved to image file names, date prints, and other data. 1 ● The date and time setting screen is displayed when the date and time are not set. “Using the microSD Attachment” (p. 48) 1 Press the o button to turn on the camera.
Changing the display language The language for the menu and error messages displayed on the monitor is selectable. 1 Press the m button, and press klmn to select [x SETUP]. RESET P/AUTO EXIT MENU 2 IMAGE QUALITY SILENT MODE CAMERA MENU SETUP SCENE DIS MODE SET OK Press the B button. SETUP 1 MEMORY FORMAT 2 BACKUP ENGLISH 3 PIXEL MAPPING NO EXIT 3 MENU SET OK Use kl to select [W] and press the B button.
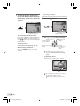
Shooting, Playback, and Erasing 2 Shooting with automatic settings (h mode) Hold the camera and compose the shot. This is a fully automatic mode that allows the user to take pictures by simply pressing the shutter button without using the menu to make detailed settings. 1 AUTO Monitor 1/400 Press the o button to turn on the camera. F3.5 Horizontal grip h mode indicator AUTO Vertical grip 8M NORM IN 4 Number of storable still images (p.
4 To take the picture, gently press the shutter button all the way down while being careful not to shake the camera. Viewing images 1 Press the q button. AUTO NORM 8M 100-0001 Press fully 2008.10.26 12:30 1/400 F3.1 Image review screen To view images during shooting Pressing the q button enables playback of images. To return to shooting, either press the A/K button or press the shutter button halfway down. IN 1 Number of frames Playback image 2 Use klmn to select an image.
Operations during movie playback Fast-forward: Press and hold down n. Rewind: Press and hold down m. Pause: Press the B button. Erasing images during playback (Single image erase) 1 Press the S button when the image to be erased is displayed. ERASE IN 2008.10.26 12:30 100-0004 IN 00:12 /00:34 Elapsed time/ Total recording time YES NO During playback First (last) frame/frame advance: During pause, press k to display the first frame, and press l to display the last frame.
Using Shooting Modes Using the best mode for the shooting scene (f mode) To lock the focus distance for underwater shoots (AF lock) (Available in the FE-360/X-875/C-570 only) [ f] (p. 27) 1 2 When [k UNDERWATER WIDE1], or, [H UNDERWATER MACRO] is selected, press l. Press the m button. Use klmn to select [ f], and press the B button. AFL ^ mark PORTRAIT EXIT MENU ● An explanation of the selected mode is displayed while the E button is pressed and held.
3 Shooting movies (n mode) Press the B button. 1 P mode indicator Confirm the mode indicator is n. P A mode indicator 8M NORM IN 4 QVGA Using the digital image stabilization mode (h mode) 15 00:34 When the mode indicator is not n, press n/K button. This mode enables the user to reduce blurring that is caused by a camera shake and subject movement. 1 IN 2 Press the B button.
Using Shooting Functions 2 Using the zoom Pressing the zoom buttons adjusts the shooting range. Use mn to select the setting option, and press the B button to set. Option Pressing the wide (W) button Pressing the telephoto (T) button P The flash fires automatically in low-light or backlight conditions. REDEYE Pre-flashes are emitted to reduce the occurrence of red eye in your photos. FILL IN The flash fires regardless of the available light. FLASH OFF The flash does not fire.
Shooting closeups (Macro shooting) Using the self-timer This function enables the camera to focus and shoot subjects at close distances. 1 Press the & button. P After the shutter button is pressed all the way down, the picture is taken after a time delay. 1 Press the Y button. P Y OFF OFF SET OK SET OK ON SELFTIMER 1(( 8M NORM OFF % & OFF 2 2 Use mn to select the setting option, and press the B button to set. Option Macro mode is deactivated.
Printing Direct printing (PictBridge*1) By connecting the camera to a PictBridgecompatible printer, you can print images directly without using a computer. To find out if your printer supports PictBridge, refer to the printer’s instruction manual. *1 PictBridge is a standard for connecting digital cameras and printers of different makers and printing out pictures directly. 2 Turn on the printer, and then connect the printer and camera.
Using OLYMPUS Master 2 System requirements and installation of OLYMPUS Master 2 Windows After the computer detects the camera, a message indicating the completion of the setting appears. Confirm the message and click “OK”. The camera is recognized as a removable disk. Install the OLYMPUS Master 2 software by referring to the included installation guide. Macintosh When iPhoto has started, exit iPhoto and start OLYMPUS Master 2.
Operating OLYMPUS Master 2 When OLYMPUS Master 2 is started, Quick Start Guide appears on the screen that helps you to handle the camera without any question. When the Quick Start Guide is not in the tool bar to show displayed, click the Guide. For details on the operation, refer to the help guide of the software. Transferring and saving images without using OLYMPUS Master 2 This camera is compatible with the USB Mass Storage Class.
Appendix Using the microSD Attachment Do not use the attachment with Olympus digital cameras that do not support this microSD Attachment, as well as with other brands of digital cameras, computers, printers, and other devices that support xD-Picture Card. Doing so not only may damage the pictures taken, but may also result in the malfunction of the device. SAFETY PRECAUTIONS CAUTION RISK OF ELECTRIC SHOCK DO NOT OPEN CAUTION: TO REDUCE THE RISK OF ELECTRICAL SHOCK, DO NOT REMOVE COVER (OR BACK).
Location — To avoid damage to the product, mount the product securely on a stable tripod, stand, or bracket. Power Source — Connect this product only to the power source described on the product label. Foreign Objects — To avoid personal injury, never insert a metal object into the product. Heat — Never use or store this product near any heat source such as a radiator, heat register, stove, or any type of equipment or appliance that generates heat, including stereo amplifiers.
Battery Handling Precautions Follow these important guidelines to prevent batteries from leaking, overheating, burning, exploding, or causing electrical shocks or burns. DANGER • The camera uses a lithium ion battery specified by Olympus. Charge the battery with the specified charger. Do not use any other chargers. • Never heat or incinerate batteries. • Take precautions when carrying or storing batteries to prevent them from coming into contact with any metal objects such as jewelry, pins, fasteners, etc.
Battery Handling Precautions • This camera uses a lithium ion battery specified by Olympus. Do not use any other type of battery. • If the battery’s terminals get wet or greasy, camera contact failure may result. Wipe the battery well with a dry cloth before use. • Always charge a battery when using it for the first time, or if it has not been used for a long period. • When operating the camera with battery power at low temperatures, try to keep the camera and spare battery as warm as possible.
Disclaimer of Warranty • Olympus makes no representations or warranties, either expressed or implied, by or concerning any content of these written materials or software, and in no event shall be liable for any implied warranty of merchantability or fitness for any particular purpose or for any consequential, incidental or indirect damages (including but not limited to damages for loss of business profits, business interruption and loss of business information) arising from the use or inability to use these
2 The customer shall transport the product to the dealer or Olympus authorized service station at his own risk and shall be responsible for any costs incurred in transporting the product. 3 This warranty does not cover the following and the customer will be required to pay repair charge, even for defects occurring within the warranty period referred to above. a.
SPECIFICATIONS Camera Product type : Digital camera (for shooting and displaying) Recording system Still pictures : Digital recording, JPEG (in accordance with Design rule for Camera File system (DCF)) Applicable standards : Exif 2.
Lithium ion battery (LI-42B) Product type : Lithium ion rechargeable battery Standard voltage : DC 3.7 V Standard capacity : 740 mAh Battery life : Approx. 300 full charges (varies on usage) Operating environment Temperature : 0°C to 40°C (32°F to 104°F) (charging) / -10°C to 60°C (14°F to 140°F) (operation) / -20°C to 35°C (-4°F to 95°F) (storage) Dimensions : 31.5 mm (W) × 39.5 mm (H) × 6.0 mm (D) (1.2 × 1.5 × 0.2 in.) Weight : Approx. 15 g (0.
MEMO EN Book_Basic_FE360.
Contenu ¾ Préparer l’appareil photo ....................27 Vérifier le contenu de la boîte ................27 Utiliser le mode de stabilisation d’image numérique (mode h) ..........................35 Fixer la courroie .....................................27 Enregistrer des vidéos (mode n) .........35 Charger la batterie .................................27 ¾ Utiliser les fonctions de prise de vue 36 Insérer la batterie et la carte xD-Picture Card™ (vendue séparément) dans l’appareil photo ............
Préparer l’appareil photo Vérifier le contenu de la boîte Charger la batterie Batterie au lithium-ion ▼ 3 Chargeur de batterie 2 Appareil photo numérique Courroie 1 Prise de courant Câble d’alimentation Batterie au lithium-ion LI-42B Chargeur de batterie LI-40C Câble USB Câble AV CD-ROM OLYMPUS Master 2 Connecteur microSD Indicateur de charge Activé : chargement en cours Éteint : chargement terminé La batterie est livrée en partie chargée.
Insérer la batterie et la carte xD-Picture Card™ (vendue séparément) dans l’appareil photo 3 Encoche Zone de contact N’insérez dans l’appareil photo rien d’autre que la carte xD-Picture Card ou le Connecteur microSD. 1 2 1 Insérez la carte bien droit jusqu’à ce qu’elle se mette en place avec un léger bruit sec. Couvercle du compartiment de la batterie/ carte Ne touchez pas la zone de contact avec les mains.
Utiliser une carte microSD/ carte microSDHC (vendue séparément) Lorsqu’un Connecteur microSD est utilisé, cet appareil photo prend aussi en charge les cartes microSD et cartes microSDHC (ci-après toutes deux dénommées carte microSD). Régler la date et l’heure La date et l’heure que vous réglez ici sont sauvegardées pour les noms de fichier d’image, les impressions de date et autres données. 1 ● L’écran de réglage de la date et de l’heure “Utiliser un Connecteur microSD” (p.
Changer la langue d’affichage Vous pouvez sélectionner la langue pour le menu et les messages d’erreur qui s’affichent sur l’écran. 1 Appuyez sur la touche m, puis appuyez sur klmn pour sélectionner [x REGLAGE]. QUALITE SILENCE D'IMAGE REINITIALI. MENU APPAREIL REGLAGE SCENE MODE DIS P/AUTO QUITTE MENU CONF OK 2 Appuyez sur la touche B. REGLAGE 1 FORMATER 2 SAUVEGARDER FRANCAIS 3 PIXEL MAPPING NON QUITTE 3 MENU CONF OK Utilisez kl pour sélectionner [W], puis appuyez sur la touche B.
Prise de vue, affichage et effacement 2 Prendre des photos avec les réglages automatiques (mode h) Tenez l’appareil photo et cadrez la photo à prendre. Il s’agit d’un mode entièrement automatique qui permet à l’utilisateur de prendre des photos en appuyant simplement sur le déclencheur sans avoir à effectuer de réglages détaillés à l’aide du menu. 1 AUTO Écran 1/400 F3.5 Tenue horizontale Appuyez sur la touche o pour allumer l’appareil photo.
4 Pour prendre la photo, enfoncez doucement le déclencheur jusqu’au fond, en prenant soin de ne pas secouer l’appareil photo. Afficher les photos 1 Appuyez sur la touche q. AUTO NORM 8M Enfoncez complètement 100-0001 2008.10.26 12:30 1/400 F3.1 Écran d’aperçu de photo Pour afficher les photos pendant la prise de vue La pression sur la touche q permet d’afficher les photos. Pour revenir au mode prise de vue, appuyez sur la touche A/K ou enfoncez le déclencheur à mi-course.
Opérations lors de la lecture de vidéo Avance rapide : Appuyez de manière continue sur n. Recul rapide : Appuyez de manière continue sur m. Pause : Appuyez sur la touche B. Effacer des photos pendant la lecture (effacement d’image simple) 1 Appuyez sur la touche S alors que la photo à effacer s’affiche. EFFACER Durée écoulée/ Durée de d’enregistrement totale 2008.10.
Utiliser les modes prise de vue Utiliser le mode le plus approprié pour la scène de prise de vue (mode f) Pour verrouiller la distance de mise au point pour les prises de vue sous l’eau (verrou AF) (Uniquement disponible sur le modèle FE-360/X-875/C-570) [ f] (p. 27) 1 2 Lorsque [k SOUS-MARIN LARGE 1], ou, [H SOUS-MARIN MACRO] est sélectionné, appuyez sur l. Appuyez sur la touche m. Utilisez klmn pour sélectionner [ f], puis appuyez sur la touche B.
3 Enregistrer des vidéos (mode n) Appuyez sur la touche B. Indicateur de mode P 1 P Vérifiez que l’indicateur de mode est n. Indicateur de mode A 8M NORM IN 4 Utiliser le mode de stabilisation d’image numérique (mode h) QVGA 15 2 Appuyez sur la touche B. Affichage du mode de prise de vue actuel AUTO Enfoncez le déclencheur à micourse pour faire la mise au point sur le sujet, puis appuyez doucement jusqu’au fond pour lancer l’enregistrement.
Utiliser les fonctions de prise de vue 2 Utiliser le zoom En appuyant sur les touches de zoom vous pouvez ajuster la plage de prise de vue. Appuyer sur la touche grand angle (W) Appuyer sur la touche de téléobjectif (T) P Option P 8M 8M NORM IN 4 NORM IN 4 Barre de zoom Zoom optique : 3x, zoom numérique : 4x Il est recommandé d’utiliser le mode h (p. 27) lors de la prise de vue avec le zoom téléobjectif. L’apparence de la barre de zoom identifie l’état du zoom numérique.
Prise de vue en gros plan Utiliser le retardateur Cette fonction permet à l’appareil photo de faire la mise au point et de prendre en photo des sujets de très près. La photo n’est prise qu’un certain temps après que vous avez enfoncé le déclencheur jusqu’au fond. 1 1 Appuyez sur la touche &. P Appuyez sur la touche Y. P OFF Y CONF OK OFF CONF OK ON RETARDATEUR 8M OFF 2 Utilisez mn pour sélectionner l’option de réglage, puis appuyez sur la touche B pour valider.
Imprimer Impression directe (PictBridge*1) 2 En connectant l’appareil photo à une imprimante compatible PictBridge, vous pouvez imprimer les photos directement sur cette dernière sans utiliser d’ordinateur. Pour savoir si votre imprimante prend en charge PictBridge, reportez-vous à son mode d’emploi. *1 PictBridge est une norme d’interconnexion des appareils photo numériques et des imprimantes de différents fabricants et d’impression directe des images.
Utiliser OLYMPUS Master 2 Configuration système requise et installation d’OLYMPUS Master 2 Windows Une fois l’appareil photo détecté par l’ordinateur, un message indiquant la fin du réglage apparaît. Confirmez le message et cliquez sur “OK”. L’appareil photo est reconnu en tant que disque amovible. Installez le logiciel OLYMPUS Master 2 en vous reportant au guide d’installation fourni. Macintosh Si iPhoto est en cours d’exécution, quittez iPhoto et lancez OLYMPUS Master 2.
Utiliser OLYMPUS Master 2 Au démarrage d’OLYMPUS Master 2, le Guide de mise en route apparaît sur l’écran pour vous aider à utiliser l’appareil sans la moindre question. Si le Guide de mise en dans la route n’apparaît pas, cliquez sur boîte d’outils pour l’afficher. Pour plus de détails sur l’utilisation, reportezvous au guide d’aide du logiciel. Transférer et sauvegarder des photos sans OLYMPUS Master 2 Cet appareil photo est compatible avec la catégorie mémoire de masse USB.
Appendice Utiliser un Connecteur microSD PRÉCAUTIONS DE SÉCURITÉ ATTENTION Ne pas utiliser le connecteur sur un appareil photo numérique Olympus qui ne prend pas en charge ce Connecteur microSD, ni sur les autres marques d’appareils photo numériques, sur les ordinateurs, imprimantes et autres appareils qui prennent en charge les cartes xD-Picture Card. Non seulement vous risqueriez d’abîmer les photos prises, mais cela peut aussi provoquer un dysfonctionnement sur l’appareil.
Emplacement — Pour éviter d’endommager l’appareil, monter le produit solidement sur un trépied ou un sabot stable. Alimentation — Ne raccorder ce produit qu’à la source d’alimentation décrite sur l’étiquette du produit. Entrée d’objets — Pour éviter des blessures, ne jamais introduire d’objet métallique dans le produit.
Précautions de manipulation de la batterie Veuillez suivre ces consignes importantes pour éviter le coulage du liquide de la batterie, une génération de chaleur, des brûlures, une explosion, ou de causer des décharges électriques ou brûlures. DANGER • L’appareil photo utilise une batterie au lithium-ion spécifiée par Olympus. Chargez la batterie avec le chargeur spécifié. N’utilisez aucun autre chargeur. • Ne jamais chauffer ni mettre au feu la batterie.
Précautions pour la manipulation de la batterie • Cet appareil photo utilise une batterie au lithiumion spécifiée par Olympus. Ne pas utiliser de batterie d’un autre type. • Si les bornes de la batterie deviennent humides ou grasses, un mauvais contact risque de se produire. Essuyer la batterie correctement avec un chiffon sec avant utilisation. • Toujours charger une batterie pour l’utiliser la première fois, ou si elle n’a pas été utilisée pendant une longue période.
Restrictions relatives à la garantie • Olympus décline toute responsabilité ou garantie, expresse ou implicite, pour ou relative au contenu de la présente documentation écrite ou du logiciel, et ne pourra en aucun cas être tenu pour responsable de toute autre garantie implicite de commercialisation ou d’adaptation à des fins particulières, ou pour les dommages encourus, qu’ils soient directs, imprévus ou indirects (notamment non limités aux dommages dus à une perte financière, une interruption d’activité ou
2 3 4 5 46 Olympus agréé pendant une période d’un an à partir de la date d’achat, en cas de réparations, conformément à la garantie internationale. Veuillez noter que de tels centres de service après-vente Olympus n’existent pas dans certains pays. Le client est responsable des risques du transport du produit chez un distributeur Olympus ou dans un centre de service après-vente Olympus, tous les frais de transport sont à sa charge.
CARACTÉRISTIQUES Appareil photo Type de produit : Appareil photo numérique (prise de vue et affichage) Système d’enregistrement Images fixes : Enregistrement numérique, JPEG (conforme à la norme DCF (Design rule for Camera File system - règle de conception du système de fichiers de l’appareil photo)) Normes applicables : Exif 2.
Batterie au lithium-ion (LI-42B) Type de produit : Batterie au lithium-ion rechargeable Tension standard : 3,7 V CC Capacité standard : 740 mAh Durée de vie de la batterie : Environ 300 rechargements complets (varie selon l’utilisation) Conditions de fonctionnement Température : 0 °C à 40 °C (chargement) / –10 °C à 60 °C (fonctionnement) / –20 °C à 35 °C (stockage) Dimensions : 31,5 mm (L) × 39,5 mm (H) × 6,0 mm (P) Poids : Environ 15 g Chargeur de batterie (LI-40C) Alimentation requise : 100
MEMO FR Book_Basic_FE360.
Índice ¾ Preparación de la cámara ...................51 Comprobación de los contenidos de la caja ........................................................51 Colocación de la correa de la cámara ...51 Carga de la batería ................................51 Inserción de la batería y de la tarjeta xD-Picture Card™ (vendida aparte) en la cámara...................................................52 Uso de la tarjeta microSD/ tarjeta microSDHC (vendida aparte) ................
Preparación de la cámara Comprobación de los contenidos de la caja Carga de la batería Batería de ion de litio ▼ 3 Cargador de batería 2 Cámara digital Correa 1 Tomacorriente de CA Cable de CA Batería de ion de litio LI-42B Cargador de batería LI-40C Cable USB Cable AV Indicador de carga Iluminado: Cargándose Apagado: Carga completada La batería viene parcialmente cargada. Antes de usarla, asegúrese de cargar la batería hasta que el indicador de carga se apague (al cabo de 5 horas aprox.).
Inserción de la batería y de la tarjeta xD-Picture Card™ (vendida aparte) en la cámara 3 Muesca No introduzca nada que sea distinto de la tarjeta xD-Picture Card o del Adaptador microSD en la cámara. 1 Área de contacto 2 1 Tapa del compartimento de la batería/ tarjeta Insértela derecha hasta que encaje en su posición con un chasquido. No toque el área de contacto con las manos.
Uso de la tarjeta microSD/ tarjeta microSDHC (vendida aparte) Una tarjeta microSD o tarjeta microSDHC (en adelante designadas ambas como tarjeta microSD) también es compatible con esta cámara si se usa un Adaptador microSD. Ajuste de la fecha y la hora La fecha y la hora configuradas aquí se guardan en los nombres de archivos de imagen, impresiones de fechas, y otros datos. 1 ● Cuando la fecha y la hora no están configuradas, “Uso de un Adaptador microSD” (p.
Cambio del idioma de la pantalla El idioma del menú y de los mensajes de error que aparecen en el monitor es seleccionable. 1 Presione el botón m, y presione klmn para seleccionar [x CONFIGURAC.]. CALIDAD MODO IMAGEN SILENC. MENÚ RESTAURAR CÁMARA P/AUTO SALIR MENU 2 SCENE CONFIGURAC. MODO DIS ACEPT. OK Presione el B botón. CONFIGURAC. 1 FORMATEAR 2 BACKUP ESPAÑOL 3 MAPEO PÍX. NO SALIR 3 MENU ACEPT. OK Use kl para seleccionar [W], y presione el botón B.
Toma, reproducción y borrado Toma con ajustes automáticos (modo h) 2 Apunte la cámara y encuadre la toma. Éste es un modo completamente automático que permite al usuario tomar fotografías simplemente presionando el botón disparador sin usar el menú para establecer configuraciones detalladas. 1 AUTO Monitor 1/400 Presione el botón o para encender la cámara. F3.5 Empuñadura horizontal Indicador de modo h AUTO Empuñadura vertical 8M NORM IN 4 Número de imágenes fijas almacenables (p.
4 Para tomar la fotografía, presione el botón disparador suavemente hasta el final de su recorrido con cuidado de no mover la cámara. Visualización de imágenes 1 Presione el botón q. AUTO NORM 8M 100-0001 Presione completamente 2008.10.26 12:30 1/400 IN 1 F3.1 Número de fotogramas Pantalla de revisión de imágenes Para ver las imágenes durante la toma Al presionar el botón q se habilita la reproducción de imágenes.
Operaciones durante la reproducción de vídeos Avance rápido: Presione y mantenga apretado n. Rebobinado: Presione y mantenga apretado m. Pausa: Presione el button B. Borrado de imágenes durante la reproducción (Borrado de una imagen) 1 Presione el botón S cuando aparezca en pantalla la imagen que desee borrar. BORRAR Tiempo transcurrido/ Tiempo de grabación total IN 2008.10.26 12:30 100-0004 IN 00:12 /00:34 SI NO CANCEL.
Uso de los modos de toma Uso del mejor modo para la escena de toma (modo f) Para bloquear la distancia focal en las tomas subacuáticas (bloqueo AF) (Disponible únicamente en el modelo FE-360/X-875/C-570) [ f] (p. 27) 1 2 Cuando esté seleccionado [k SUBACUÁTICO AMPLIO.1], o, [H SUBACUÁTICO MACRO], presione l. Presione el botón m. Use klmn para seleccionar [ f], y presione el botón B.
3 Toma de vídeos (modo n) Presione el botón B. 1 Indicador de modo P P Verifique que el indicador de modo está en n. Indicador de modo A 8M NORM IN 4 Uso del modo de estabilización de imagen digital (modo h) 15 00:34 IN Si el indicador de modo no está en n, presione el botón n/K. Este modo permite al usuario reducir la borrosidad causada por el movimiento de la cámara y del objeto. 1 QVGA 2 Presione el botón B.
Uso de las funciones de toma 2 Uso del zoom Presionando los botones del zoom se ajusta el intervalo de toma. Pulsación hacia el extremo de ángulo abierto (W) Pulsación hacia el extremo de telefoto (T) P Use mn para seleccionar la opción de ajuste, y presione el botón B para establecerlo. Opción FLASH AUTO OJOS ROJOS Se emiten flashes previos para reducir el efecto de ojos rojos en las fotos. DE RELLENO El flash se dispara independientemente de la luz disponible. APAGADO El flash no se dispara.
Toma de primeros planos (Macrofilmación) Uso del disparador automático Esta función permite a la cámara enfocar y filmar objetos a corta distancia. Después de presionar el botón disparador hasta abajo del todo, la fotografía se toma al cabo de una cierta demora. 1 1 Presione el botón &. P Presione el botón Y. P OFF Y OFF ACEPT. OK ACEPT. OK ON TEMPORIZADOR 8M OFF 2 Use mn para seleccionar la opción de ajuste, y presione el botón B para establecerlo. Opción Desactiva el modo macro.
Impresión Impresión directa (PictBridge*1) 2 Si se conecta la cámara a una impresora compatible con PictBridge, se podrán imprimir imágenes directamente sin necesidad de usar un ordenador. Para averiguar si su impresora es compatible con PictBridge, consulte el manual de instrucciones de la impresora. *1 Encienda la impresora y luego conéctela a la cámara.
Uso del programa OLYMPUS Master 2 Requisitos del sistema e instalación de OLYMPUS Master 2 Windows Una vez que el ordenador detecta la cámara, aparece un mensaje indicando que la configuración ha finalizado. Confirme el mensaje y haga clic en “OK”. La cámara es detectada como un disco extraíble. Instale el software OLYMPUS Master 2 consultando la guía de instalación incluída. Macintosh Cuando se inicie iPhoto, salga de iPhoto e inicie OLYMPUS Master 2.
Manejo de OLYMPUS Master 2 Cuando se inicia OLYMPUS Master 2, aparecerá en pantalla la Guía de inicio rápido que le ayudará a manejar la cámara sin ninguna duda. Si la Guía de inicio rápido en la barra de no aparece, haga clic en herramientas para mostrar la Guía. Para obtener más detalles sobre el manejo, consulte la guía de ayuda del software. Transferencia y almacenamiento de imágenes sin usar OLYMPUS Master 2 Esta cámara es compatible con la Clase de Almacenamiento Masivo USB.
Apéndice Uso de un Adaptador microSD No use el adaptador con cámaras digitales Olympus que no sean compatibles con este Adaptador microSD, ni con otras marcas de cámaras digitales, ordenadores, impresoras y otros dispositivos compatibles con la tarjeta xD-Picture Card. De lo contrario, no sólo pueden dañarse las fotografías tomadas, sino que también puede averiarse el dispositivo. Si no puede extraer la tarjeta microSD, no use la fuerza.
Ubicación — Para evitarle daños al producto, monte el producto sobre un trípode, caballete o soporte estable. Fuentes de alimentación — Conecte este producto únicamente con la fuente de alimentación descrita en la etiqueta del producto. Objetos extraños — Para evitar daños personales, nunca inserte objetos de metal en el producto.
Precauciones acerca del uso de la batería Siga estas importantes indicaciones para evitar que se produzcan fugas, recalentamientos, incendios o explosión de la batería, o que cause descargas eléctricas o quemaduras. PELIGRO • La cámara utiliza una batería de iones de litio especificada por Olympus. Cargue la batería con el cargador especificado. No utilice otros cargadores. • Nunca caliente ni incinere las baterías.
Precauciones al manipular la batería • Esta cámara utiliza una batería de iones de litio especificada por Olympus. No utilice ningún otro tipo de batería. • Si los terminales de la batería se humedecen o engrasan, los contactos de la cámara pueden resultar en fallos. Limpie bien la batería con un paño seco antes de usarlo. • Cargue siempre la batería antes de usarla por primera vez, o si no se ha utilizado la batería durante un período largo.
Descargo de responsabilidad de garantías • Olympus no asume la responsabilidad ni ofrece garantías, escritas o implícitas, con respecto al contenido de este material escrito o del software, ni tampoco en ningún caso asumirá la responsabilidad por ninguna garantía implicada en la comercialización o conveniencia para algún propósito particular, o algún perjuicio consecuente, fortuito o indirecto (que incluye, pero no se restringe a los perjuicios causados por pérdida de beneficios comerciales, interrupciones
2 El coste del transporte del producto al establecimiento vendedor o servicio técnico autorizado correrá a cuenta del comprador. 3 Por otra parte, incluso dentro del período de garantía, el comprador deberá pagar los gastos de reparación en los siguientes casos: a. Cualquier defecto que se produzca debido al uso indebido (tal como una operación no mencionada en el “Precauciones de Seguridad”). b.
ESPECIFICACIONES Cámara Tipo de producto : Cámara digital (para fotografía y reproducción) Sistema de grabación Fotografías : Grabación digital, JPEG (según las Normas de diseño para sistema de archivos de cámara (DCF)) Estándares aplicables : Exif 2.
Batería de iones de litio (LI-42B) Tipo de producto : Batería recargable de iones de litio Voltaje estándar : CC 3,7 V Capacidad estándar : 740 mAh Duración de la batería : Aprox. 300 recargas completas (varía según el uso) Entorno de funcionamiento Temperatura : 0°C a 40°C (durante la carga) / –10°C a 60°C (funcionamiento) / –20°C a 35°C (almacenamiento) Dimensiones : 31,5 mm (anchura) × 39,5 mm (altura) × 6,0 mm (prof.) Peso : Aprox.
MEMO ES Book_Basic_FE360.
Inhaltsverzeichnis ¾ Vorbereiten der Kamera ......................75 Überprüfen des Verpackungsinhalts......75 Anbringen des Trageriemens ................75 Laden des Akkus ...................................75 Einsetzen des Akkus und einer xD-Picture Card™ (separat erhältlich) in die Kamera ............................................76 Verwendung einer microSD- Karte/ microSDHC-Karte (separat erhältlich) ...77 Einstellen von Datum und Uhrzeit .........77 Ändern der Anzeigesprache ..................
Vorbereiten der Kamera Überprüfen des Verpackungsinhalts Laden des Akkus Lithium-Ionen-Akku 3 ▼ Ladegerät 2 Digitalkamera 1 Trageriemen Netzsteckdose Netzkabel Lithium-Ionen-Akku LI-42B Ladegerät LI-40C Ladezustandsanzeige Ein: Ladevorgang findet statt Aus: Ladevorgang ist abgeschlossen Beim Kauf der Kamera ist der Akku nur teilweise geladen. Bitte laden Sie den Akku vor derersten Benutzung (ca. 5 Stunden). Einzelheiten zu Akku und Ladegerät finden Sie im Abschnitt „Akku und Ladegerät“ (S. 45).
Einsetzen des Akkus und einer xD-Picture Card™ (separat erhältlich) in die Kamera 3 Kerbe Setzen Sie ausschließlich xD-Picture Card oder den microSD-Adapter in die Kamera ein. 1 Kontaktbereich 2 1 Akku-/ Kartenfachdeckel Halten Sie die Karte senkrecht, und schieben Sie sie gerade in den Steckplatz, bis sie hörbar einrastet. Vermeiden Sie eine Berührung des Kontaktbereichs mit der Hand.
Verwendung einer microSDKarte/microSDHC-Karte (separat erhältlich) Unter Verwendung des mitgelieferten microSDAdapters können microSD-Karten und microSDHC-Karten (im Weiteren werden beide Ausführungen als „microSD-Karte“ bezeichnet) ebenfalls mit dieser Kamera verwendet werden. Einstellen von Datum und Uhrzeit Nachdem Sie die in diesem Abschnitt beschriebene Einstellung der Uhr vorgenommen haben, werden das Datum und die Uhrzeit gemeinsam mit Dateinamen, Datumsausdruckund anderen Daten abgespeichert.
Zur genauen Einstellung der Uhrzeit drücken Sie die B-Taste, wenn das Zeitsignal 00 Sekunden anzeigt. Datum und Uhrzeit können Sie in folgendem Menü einstellen: [X] (Datum/Zeit) (S. 37) Ändern der Anzeigesprache Sie können die Sprache wählen, in der die Menüs und Fehlermeldungen auf dem LCDMonitor angezeigt werden. 1 Drücken Sie die m-Taste, und anschließend klmn, um [x EINRICHTEN] zu wählen. BILDQUAL. RUECKST. LAUTLOS MODUS KAMERAEINMENÜ RICHTEN SCENE P/AUTO DIS MOD. ZURÜCK MENU EINST.
Aufnahme, Wiedergabe und Löschen von Bildern Aufnehmen mit automatischen Einstellungen (h-Modus) 2 Dieser vollautomatische Aufnahmemodus gestattet es dem Benutzer, Bilder durch einfaches Drücken des Auslösers aufzunehmen, ohne detaillierte Menüeinstellungen vorzunehmen. 1 Visieren Sie das Motiv mit der Kamera an, und wählen Sie den gewünschten Bildausschnitt. AUTO LCDMonitor Drücken Sie die o-Taste, um die Kamera einzuschalten. 1/400 F3.
4 Um die Aufnahme zu machen, drücken Sie den Auslöser sacht vollständig durch, während Sie die Kamera möglichst ruhig halten. Anzeigen von Bildern 1 Drücken Sie die q-Taste. AUTO NORM 8M Vollständig durchdrücken 100-0001 2008.10.26 12:30 1/400 IN 1 F3.1 Anzahl der Bilder Wiedergabebild Bildkontrolle-Bildschirm Anzeigen des letzten Bildes Sie können das soeben aufgenommene Bild anzeigen, indem Sie die q-Taste drücken.
Bedienungsvorgänge während der Filmwiedergabe Suchlauf vorwärts: Halten Sie n gedrückt. Suchlauf rückwärts: Halten Sie m gedrückt. Pause: Drücken Sie die B-Taste. Löschen von Bildern während der Wiedergabe (EinzelbildLöschung) 1 Wenn das zu löschende Bild angezeigt wird, drücken Sie die S-Taste. BILD LÖSCHEN 2008.10.
Verwenden der verschiedenen Aufnahmemodi Wahl des für die Aufnahmesituation optimal geeigneten Motivprogramms (f-Modus) Speichern der Schärfeeinstellung für Unterwasseraufnahmen (AF-Speicher) (Nur verfügbar bei FE-360/X-875/C-570) Bei Wahl von [k UNTERWASSERWEITW.1] oder [H UNTERWASSERMAKRO] drücken Sie l. [ f] (S. 27) 1 2 Drücken Sie die m-Taste. Betätigen Sie klmn zur Wahl von [ f], und drücken Sie dann die B-Taste.
3 Filmaufnahmen (n-Modus) Drücken Sie die B-Taste. P-Modusanzeige 1 P Vergewissern Sie sich, dass n als Modusanzeige erscheint. A-Modusanzeige 8M NORM IN 4 Verwendung des digitalen Bildstabilisator-Modus (h-Modus) QVGA 15 Dieser Modus ermöglicht es Ihnen, Unschärfe zu reduzieren, die durch Verwackeln oder eine Bewegung des Motivs verursacht werden kann.
Verwenden der Aufnahmefunktionen 2 Verwendung des Zooms Betätigen Sie die Zoomtasten, um den Aufnahmebereich einzustellen. Wegzoomen mit Weitwinkel-Zoomtaste (W) Heranzoomen mit Tele-Zoomtaste (T) Betätigen Sie mn zur Wahl der gewünschten Option, und drücken Sie dann die B-Taste zur Einstellung. Option P BLITZ AUTO ROTE AUGEN Vor Auslösen des Hauptblitzes werden mehrere Vorblitze abgegeben, um das Auftreten von roten Augen in den Aufnahmen zu verhindern. AUFHELLBLI.
Nahaufnahmen (Makrofunktion) Verwendung des Selbstauslösers Diese Funktion gestattet es Ihnen, Motive in einem kleinen Abstand von der Kamera scharfzustellen und aufzunehmen. 1 Drücken Sie die &-Taste. P OFF Wenn Sie den Auslöser vollständig durchdrücken, wird der Verschluss erst nach Verstreichen der eingestellten Verzögerungszeit ausgelöst. 1 Drücken Sie die Y-Taste. P Y EINST. OK EINST.
Drucken Direktes Ausdrucken (PictBridge*1) Sie können Ihre Bilder direkt ausdrucken, indem Sie die Kamera an einen PictBridgekompatiblen Drucker anschließen, ohne dass ein Personalcomputer erforderlich ist. Bitte schlagen Sie in der Bedienungsanleitung Ihres Druckers nach, um zu ermitteln, ob der Drucker mit PictBridge kompatibel ist. *1 PictBridge ist ein Standard zum Anschluss von Digitalkameras und Druckern verschiedener Hersteller und direktem Ausdruck von Bildern.
Verwenden der Software OLYMPUS Master 2 Systemanforderungen und Installation von OLYMPUS Master 2 Windows Nachdem die Kamera vom Computer erkannt ist, überprüfen Sie die Meldung, die den Abschluss der Einstellung bestätigt, und klicken Sie dann auf „OK“. Die Kamera wird als Wechseldatenträger erkannt. Installieren Sie die Software OLYMPUS Master 2 unter Bezugnahme auf die mitgelieferte Installationsanleitung. Macintosh Wenn iPhoto startet, beenden Sie iPhoto, und starten Sie OLYMPUS Master 2.
Bedienung von OLYMPUS Master 2 Beim Starten von OLYMPUS Master 2 erscheint die Quick Start-Anleitung auf dem Bildschirm, die Ihnen eine fehlerfreie Bedienung der Kamera erleichtert. Wenn die Kurzanleitung nicht angezeigt wird, in der Tool-Leiste, um die klicken Sie auf Kurzanleitung anzuzeigen. Einzelheiten zur Bedienung finden Sie in der Online-Hilfe der Software. Übertragen und Abspeichern von Bildern ohne Verwendung von OLYMPUS Master 2 Diese Kamera ist mit der USB Mass Storage Class-Norm kompatibel.
Anhang Verwendung des microSDAdapters SICHERHEITSHINWEISE VORSICHT Verwenden Sie den Adapter weder mit Olympus-Digitalkameras, die den Gebrauch eines microSD-Adapters nicht unterstützen, noch mit Digitalkameras anderer Fabrikate, Personalcomputern, Druckern und anderen Geräten, die mit der xD-Picture Card kompatibel sind. Anderenfalls können die Aufnahme beschädigt und Funktionsstörungen des betreffenden Gerätes verursacht werden.
Standort — Um Schäden an der Kamera zu vermeiden, sollten Sie die Kamera fest auf ein stabiles Stativ, Gestell oder auf einer Halterung befestigen. Stromversorgung — Es dürfen ausschließlich geeignete Stromquellen entsprechend dem am Produkt angebrachten Typenschild verwendet werden. Fremdkörper — Darauf achten, dass keine metallischen Gegenstände in das Produktinnere gelangen. Andernfalls können Sie Verletzungen davontragen.
Sicherheitshinweise bei der Akkuund Batteriehandhabung Bitte beachten Sie diese wichtigen Richtlinien, um das Auslaufen von Batterieflüssigkeit sowie das Überhitzen, Entzünden oder Platzen des Akkus und/ oder Stromschläge und Verletzungen zu vermeiden. GEFAHR • Die Kamera arbeitet mit einem von Olympus spezifizierten Lithiumionen-Akku. Laden Sie den Akku vor Gebrauch mit dem Ladegerät vollständig auf. In keinem Fall darf ein ungeeignetes Ladegerät verwendet werden.
• Beachten Sie stets die in der Bedienungsanleitung der Kamera enthaltenen Angaben bezüglich der Eignungseinschränkungen in bestimmten Anwendungssituationen und -umgebungen. Sicherheitshinweise bei der Akkuund Batteriehandhabung • Diese Kamera arbeitet mit einem von Olympus spezifizierten Lithium-Ionen-Akku. Keine andere Akkuausführung verwenden. • Falls an den Akkupolen Wasser, Öl oder Fett anhaftet, können Kontaktunterbrechungen auftreten.
Zu Ihrer Beachtung Das unbefugte Fotografieren sowie der unbefugte Gebrauch von urheberrechtlich geschütztem Material kann gegen geltendes Urheberrecht verstoßen. Olympus übernimmt keinerlei Haftung für Urheberrechtsverletzungen, die aus dem unbefugten Fotografieren oder Gebrauch oder aus jedweder sonstigen unbefugten Handhabung von urheberrechtlich geschütztem Material herrühren. Urheberrechtshinweis Alle Rechte vorbehalten.
c. Für Schäden, die auf unsachgemäßen Transport, auf Fall oder Erschütterungen usw. nach dem Kaufdatum zurückzuführen sind. d. Für Schäden, die auf Feuer, Erdbeben, Überschwemmung, Unwetter und andere Naturkatastrophen, Umwelteinflüsse oder nicht vorschriftsgemäße Spannungsversorgung zurückzuführen sind. e. Für Schäden, die auf unsachgemäße oder fahrlässige Lagerung (bei besonders hohen Temperaturen, hoher Luftfeuchtigkeit, in der Nähe von Insektiziden wie Naphtalin oder schädlichen Chemikalien usw.) bzw.
TECHNISCHE DATEN Kamera Produkttyp : Digitalkamera (zur Bildaufzeichnung und -anzeige) Aufnahmesystem Einzelbild : Digital-Aufzeichnung, JPEG (in Übereinstimmung mit „Design rule for Camera File system“ (DCF)) Gültige Standards : Exif 2.
Lithium-Ionen-Akku (LI-42B) Produkttyp : Wiederaufladbarer Lithium-Ionen-Akku Standardspannung : Gleichspannung 3,7 V Standardkapazität : 740 mAh Akkulebensdauer : Ca. 300 mal vollständig aufladbar (je nach Verwendung) Umgebungsbedingungen Temperatur : 0 °C bis 40 °C (Aufladevorgang)/-10 °C bis 60 °C (Betrieb)/ -20 °C bis 35 °C (Lagerung) Abmessungen : 31,5 mm (B) × 39,5 mm (H) × 6,0 mm (T) Gewicht : Ca.
MEMO DE Book_Basic_FE360.
Содержание ¾ Подготовка фотокамеры ...............99 Проверка содержимого коробки.........99 Прикрепление ремешка фотокамеры ........................................99 Зарядка аккумулятора........................99 Использование режима цифровой стабилизации изображения (Режим h) ........................................107 Видеосъемка (Режим n) ..................107 ¾ Использование функций Установка в фотокамеру аккумулятора и карты xD-Picture Card™ (приобретается отдельно) ............100 съемки .......
Подготовка фотокамеры Проверка содержимого коробки Зарядка аккумулятора Ионно-литиевый аккумулятор ▼ 3 Зарядное устройство 2 Цифровая фотокамера Ремешок 1 Розетка сети переменного тока Сетевой кабель Ионно-литиевый аккумулятор LI-42B Зарядное устройство LI-40C Кабель USB Аудио-видео кабель Индикатор зарядки Вкл.: Зарядка Не горит: Зарядка выполнена Аккумулятор поставляется частично заряженным.
Установка в фотокамеру аккумулятора и карты xD-Picture Card™ (приобретается отдельно) 3 Паз Область контактов Не устанавливайте ничего, кроме карты xD-Picture Card или адаптер microSD в камеру. 1 2 1 Ровно вставьте карту памяти, пока она не защелкнется на месте. Крышка отсека аккумулятора/ карты Не прикасайтесь руками к области контактов.
Использование карты microSD/карты microSDHC (приобретается отдельно) Карты microSD или карты microSDHC (именуемые в дальнейшем “карты microSD”) также совместимы с этой фотокамерой при использовании Адаптера microSD. Установка даты и времени Установленные в этом разделе дата и время сохраняются для присвоения названий файлам изображений, печати даты и других данных. 1 ● Если дата и время не установлены, “Использование Адаптера microSD” (стр. 48) 1 Нажмите кнопку o для включения фотокамеры.
Изменения языка отображения Можно выбрать язык для меню и сообщений об ошибках, отображаемых на мониторе. 1 Нажмите кнопку m и нажмите klmn для выбора опции [x НАСТРОЙКА]. СБРОС КАЧ-ВО ИЗОБР. ТИХИЙ РЕЖИМ МЕНЮ КАМЕРЫ НАСТРОЙКА РЕЖИМ SCENE P/AUTO СТАБ. ВЫХОД MENU УСТАН OK 2 Нажмите кнопку B. НАСТРОЙКА 1 ФОРМАТ. 2 РЕЗЕРВ. РУССКИЙ 3 PIXEL MAPPING НЕТ ВЫХОД 3 MENU Используйте kl для выбора положения [W] и нажмите кнопку B.
Съемка, воспроизведение и удаление 2 Съемка с автоматическими установками (Режим h) Полностью автоматический режим позволяет пользователю выполнять съемку, просто нажимая кнопку спуска затвора без использования меню для выполнения подробных установок. 1 Держите фотокамеру в руках и скомпонуйте снимок. AUTO Монитор 1/400 Нажмите кнопку o для включения фотокамеры. F3.5 Горизонтальный захват Индикатор режима h AUTO Вертикальный захват 8M NORM IN 4 Количество сохраняемых фотоснимков (стр.
4 Для выполнения съемки плавно нажмите кнопку спуска затвора полностью вниз, стараясь при этом не трясти фотокамеру. Просмотр изображений 1 Нажмите кнопку q. AUTO NORM 8M 100-0001 Нажмите полностью 2008.10.26 12:30 1/400 F3.1 Экран обзора изображений Для просмотра снимков во время съемки Нажатие кнопки q позволяет воспроизводить изображения. Чтобы вернуться к съемке, либо нажмите кнопку A/K, либо нажмите кнопку затвора наполовину вниз. Для видеосъемки “Видеосъемка (Режим A)” (стр.
Операции во время воспроизведения видеозаписи Быстрая перемотка вперед: Нажмите и удерживайте n. Быстрая перемотка назад: Нажмите и удерживайте m. Пауза: Нажмите кнопку B. Удаление изображений во время воспроизведения (Удаление одного снимка) 1 Нажмите кнопку S, когда отображается изображение, которое нужно удалить. УДАЛЕНИЕ Истекшее время/ Полное время записи 2008.10.
Использование режимов съемки Использование наилучшего режима для сцены съемки (Режим f) Для блокировки фокусного расстояния для подводной съемки (Блокировка АФ) (Доступно только в модели FE-360/X-875/C-570) [ f] (стр. 27) 1 2 Когда выбраны опции [k ШИР. УГОЛ ПОД ВОДОЙ 1] или [H МАКРО ПОД ВОДОЙ], нажмите l. Нажмите кнопку m. Используйте klmn для выбора положения [ f] и нажмите кнопку B. Метка ^ AFL ПОРТРЕТ Для отмены нажмите l еще раз, чтобы очистить метку ^.
3 Видеосъемка (Режим n) Нажмите кнопку B. 1 Индикатор режима P P Убедитесь, что индикатор режима высвечивается в виде n. Индикатор режима A 8M NORM IN 4 Использование режима цифровой стабилизации изображения (Режим h) QVGA 15 Этот режим дает пользователю возможность уменьшать размытость, обусловленную дрожанием фотокамеры и перемещением объекта. 1 IN 00:34 Когда индикатор режима отличается от n, нажмите кнопку n/K. 2 Нажмите кнопку B.
Использование функций съемки 2 Использование увеличение Нажатие клавиш зума регулирует диапазон съемки. Нажатие широкоугольной клавиши (W) Нажатие теле-фото клавиши (T) P Используйте mn для выбора варианта настройки и нажмите кнопку B, чтобы установить. Вариант ВСПЫШКА АВТ КР. ГЛАЗА Срабатывает предварительная вспышка для уменьшения эффекта красных глаз на Ваших фотоснимках.
Съемка крупным планом (Макро съемка) Использование таймера автоспуска Эта функция позволяет фотокамере выполнять фокусировку и съемку объектов на близком расстоянии. После нажатия кнопки спуска затвора полностью вниз съемка выполняется после истечения временной задержки. 1 1 Нажмите кнопку &. P Нажмите кнопку Y. P OFF Y УСТАН OK УСТАН OFF OK ON АВТОСПУСК 8M ОТКЛ. 2 Используйте mn для выбора варианта настройки и нажмите кнопку B, чтобы установить. Вариант ОТКЛ.
Печать Прямая печать (PictBridge*1) С помощью подсоединения фотокамеры к PictBridge-совместимому принтеру Вы можете непосредственно печатать изображения без использования компьютера. Чтобы узнать, поддерживает ли Ваш принтер стандарт PictBridge, обратитесь к руководству по эксплуатации принтера. *1 PictBridge – это стандарт, предназначенный для соединения цифровых фотокамер и принтеров различных производителей для прямой печати фотоснимков.
Использование OLYMPUS Master 2 Требования к системе и установка OLYMPUS Master 2 Windows После того, как компьютер обнаружит фотокамеру, появится сообщение, указывающее завершение настройки. Подтвердите сообщение и щелкните “OK”. Фотокамера распознается как съемный диск. Установите программное обеспечение OLYMPUS Master 2, обращаясь к прилагаемому руководству по установке. Подсоединение фотокамеры к компьютеру 1 Macintosh Когда запустится iPhoto, выйдите из iPhoto и запустите OLYMPUS Master 2.
Функционирование OLYMPUS Master 2 Когда запускается OLYMPUS Master 2, на экране появится Краткое руководство, которое поможет Вам без вопроса обращаться с фотокамерой. Если Краткое руководство не отображается, щелкните на панели задач, чтобы отобразить Руководство. Передача и сохранение изображений без использования OLYMPUS Master 2 Данная фотокамера совместима со стандартом USB Mass Storage Class.
Приложение Использование Адаптера microSD Не используйте адаптер с цифровыми фотокамерами Olympus, не поддерживающими такие Адаптеры microSD, а также с цифровыми фотокамерами, компьютерами, принтерами и другими устройствами других производителей, которые поддерживают карты xD-Picture Card. Это может не только повредить снятые изображения, но также привести к неисправности устройства. Если карту microSD невозможно удалить, не прилагайте силу.
Вода и влага — Меры предосторожности для влагозащитных изделий описаны в разделах о защите от влаги. Размещение — Надежно устанавливайте изделие на штатив, стойку или зажим, чтобы избежать повреждения изделия. Источники питания — Подключайте данное изделие только к тем источникам питания, которые указаны на изделии. Посторонние предметы — Во избежание травм запрещено вставлять в изделие металлические предметы.
Меры предосторожности при использовании аккумулятора Во избежание протечки, перегрева, возгорания или взрыва аккумулятора, поражения электрическим током или причинения ожогов при ее использовании, следуйте приведенным ниже инструкциям. ОПАСНО • В этой фотокамере используется ионнолитиевый аккумулятор фирмы Olympus. Заряжайте аккумулятор с помощью указанного зарядного устройства. Нельзя использовать другие зарядные устройства. • Нельзя нагревать аккумуляторы или бросать их в огонь.
• Вынимайте аккумулятор перед продолжительным хранением фотокамеры. Выбирайте для хранения прохладные и сухие места во избежание конденсации и образования налета внутри фотокамеры. Проверьте фотокамеру после хранения, включив питание и нажав на кнопку спуска затвора, убедитесь, что она функционирует нормально. • Всегда соблюдайте ограничения, накладываемые на среду эксплуатации фотокамеры, описанные в ее руководстве.
Отказ от гарантии • Фирма Olympus не дает никаких заверений или гарантий, как явных, так и подразумеваемых, в отношении любого содержания данных печатных материалов, программного обеспечения или в связи с ними, и ни в коем случае не несет никакой ответственности в отношении любой подразумеваемой гарантии или пригодности к применению для конкретных целей или за любые косвенные, побочные или сопутствующие убытки (включая, но не ограничиваясь убытками в связи с упущенной выгодой, приостановкой ведения бизнеса
2 3 4 5 118 свою деятельность компания Olympus Imaging Europa GmbH, которая обозначена на вebсайте: http://www.olympus.com, до окончания двухлетнего гарантийного срока. В течение срока действия однолетней всемирной гарантии владелец имеет право предъявить изделие в любой сервисный центр Olympus. Обратите внимание, что сервисные центры Olympus открыты не во всех странах.
ТЕХНИЧЕСКИЕ ХАРАКТЕРИСТИКИ Фотокамера Тип изделия : Цифровая фотокамера (для съемки и просмотра) Система записи Формат записи : Цифровая запись, JPEG (в соответствии с Design rule for Camera File system (DCF) (Проектные нормы для файловой системы фотокамеры) Поддерживаемые стандарты : Exif 2.
Ионно-литиевый аккумулятор (LI-42B) Тип изделия : Ионно-литиевый аккумулятор Стандартное напряжение : 3,7 В пост. тока Стандартная емкость : 740 мАч Срок службы аккумулятора : Около 300 полных зарядок (зависит от применения) Операционная система Температура : От 0°C до 40°C (зарядка)/ oт -10°C до 60°C (эксплуатация)/ oт -20°C до 35°C (хранение) Размеры : 31,5 мм (Ш) × 39,5 мм (В) × 6,0 мм (Г) Масса : Примерно 15 г Зарядное устройство (LI-40C) Требования к питанию : 100 - 240 В перем.
MEMO RU Book_Basic_FE360.
MEMO 122 RU Book_Basic_FE360.
MEMO RU Book_Basic_FE360.
Printed in China Book_Basic_FE360.