r2090_1_4_7.fm Page 1 Friday, April 25, 2008 4:56 PM UFL-2 Instruction Manual http://www.olympus.
r2090_e_00.book Page 2 Thursday, May 1, 2008 6:29 PM Thank you for purchasing an Olympus product. Please read this instruction manual carefully and use the product safely and correctly. Please keep this instruction manual for reference after reading it. Introduction EN z Unauthorized copying of this manual in part or in full, except for private use, is prohibited. Unauthorized reproduction is strictly prohibited. z OLYMPUS IMAGING CORP.
r2090_e_00.book Page 3 Thursday, May 1, 2008 6:29 PM SAFETY PRECAUTIONS This instruction manual uses a variety of common symbols and icons to assist you in proper handling and usage of this product properly, and to warn you of potential hazards to yourself and others as well as to property. An exclamation mark enclosed in a triangle alerts you to important operating and maintenance instructions in the documentation provided with the product.
r2090_e_00.book Page 4 Thursday, May 1, 2008 6:29 PM WARNING EN z Never use the flash in front of the eyes especially for infants or children within 1 m. It may cause permanent vision impairment, etc. z Keep the flash and batteries out of the reach of infants and children. There is the possibility of the occurrence of the following types of accidents: • Swallowing of small parts. Please consult a physician immediately if any parts have been swallowed.
r2090_e_00.book Page 5 Thursday, May 1, 2008 6:29 PM z Do not place this product at locations with abnormally high or abnormally low temperatures or at locations with extreme temperature changes. The product may deteriorate or may cause a fire. z Do not alter the battery compartment or try to insert any foreign objects into it. z Do not store the flash at the locations subject to vibrations. It may cause malfunction.
r2090_e_00.book Page 6 Thursday, May 1, 2008 6:29 PM z Do not connect the batteries to a power socket or car cigarette lighter. It could cause a fire or an explosion etc. z If battery fluid gets into your eyes, flush your eyes immediately with clear, cold running water and seek medical attention immediately. WARNING EN z Keep batteries dry at all times. z Do not touch the batteries with wet hands. It may cause electrical shocks or malfunctions.
r2090_e_00.book Page 7 Thursday, May 1, 2008 6:29 PM z If a battery leaks, becomes discolored or deformed, or becomes abnormal in any other way during operation, stop using it. It may cause a fire or an electrical shock. Please contact your local service station or dealer. z Do not remove batteries immediately after using them. Batteries may become hot during prolonged use, which may cause burns.
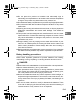
r2090_e_00.book Page 8 Thursday, May 1, 2008 6:29 PM About O-ring Please note the following points to use the O-ring. z When sealing this product, make sure that no hairs, fibers, sand particles or other foreign matter stick not only to the O-ring, but also to the contact surface. Even a single hair or a single grain of sand may cause water leakage. Please check with special care. Examples of foreign matter sticking to the O-ring EN Hair Fibers Grains of sand z The O-ring is a consumption product.
r2090_e_00.book Page 9 Thursday, May 1, 2008 6:29 PM • • • • z z z z Places where there are open fires. Places where water is deeper than 60 m. Places subject to vibrations. Places where high temperatures exist or high humidity and/or where extreme differences in temperatures exist. • Places where volatile chemicals are stored or used. Do not apply excessive force on the arm mount.
r2090_e_00.book Page 10 Thursday, May 1, 2008 6:29 PM Contents Introduction............................................................................ 2 Please read the following items before use........................... 2 SAFETY PRECAUTIONS...................................................... 3 Battery handling precautions ................................................. 5 About O-ring .......................................................................... 8 Handling the product ..................
r2090_e_00.book Page 11 Thursday, May 1, 2008 6:29 PM 8. Handling After Shooting .................................................31 Wiping off any waterdrops ................................................... 31 Removing the batteries........................................................ 31 Cleaning the flash with pure water ...................................... 31 Drying the flash.................................................................... 32 Perform maintenance on the O-ring ................
r2090_e_00.book Page 12 Thursday, May 1, 2008 6:29 PM 1. Name of the Parts Flash 6 1 EN 2 3 4 1 AF illuminator light-emitting window 2 Light-emitting window 3 Fiber optic cable connector 5 4 Auto light-receiving window 5 Flash leash hole 6 Battery cap Checking the package contents The items listed at the right are included with the electronic flash. Contact your local service station or dealer if accessories should be missing or damaged.
r2090_e_00.book Page 13 Thursday, May 1, 2008 6:29 PM b a 0 9 1 2 3 4 5 8 6 7 Gas outlet valve AUTO CHECK lamp TEST button/CHARGE lamp Dial ZOOM button • Sets the firing angle within 12 - 42 mm (24 - 85 mm with the 135 type). 6 Arm mount 1 2 3 4 5 Silicone grease EN Arm mount knob POWER button TTL cable connector LIGHT button • Press to light up the control panel for about 15 sec.
r2090_e_00.book Page 14 Thursday, May 1, 2008 6:29 PM Control panel Super FP flash Flash control mode Flash intensity control FOUR THIRDS gP.26 gP.26 gP.28 gP.28 Wide indication gP.28 EN ISO sensitivity gP.29 Guide number (GN) gP.28 Setting display Firing angle (ZOOM) mode gP.13 Firing angle (ZOOM) value gP.13 Aperture (F) gP.29 Feet gP.28 Meter gP.
r2090_e_00.book Page 15 Thursday, May 1, 2008 6:29 PM 2. Maintaining the Waterproof Function This product is sealed with an O-ring. Maintenance of the waterproof function is required even before using this product underwater for the first time. Removing the O-ring Open the battery cap and remove the O-ring from the flash. EN 1 Insert the O-ring remover between the O-ring and the wall of the O-ring groove. 2 Move the tip of the inserted remover under the O-ring.
r2090_e_00.book Page 16 Thursday, May 1, 2008 6:29 PM Removing any sand, dirt, etc. After visually checking that dirt, sand, and other foreign matter has been removed from the O-ring, check for damage and cracks by squeezing the entire circumference of the O-ring lightly with your fingertips. EN Using a clean cloth free of fibers or a lint-free cotton swab, remove any foreign matter attached to the grooves of the O-ring.
r2090_e_00.book Page 17 Thursday, May 1, 2008 6:29 PM Applying grease to the O-ring 1 Apply the specified grease. Make sure there is no dirt on your fingers or on the O-ring; then squeeze about 3 mm of grease onto your fingertip. (3 mm is the most appropriate amount.) 2 Spread the grease over the O-ring. Using two fingers and a thumb, spread the grease over the O-ring while rubbing it in. Use caution not to squeeze or pull the O-ring too hard.
r2090_e_00.book Page 18 Thursday, May 1, 2008 6:29 PM 3. Inserting the Batteries Usable batteries (sold separately) Always use one of the following battery combinations: AA alkaline batteries/AA NiMH batteries/AA lithium batteries/ AA oxyride batteries/AA NiCd batteries • Manganese batteries are not to be used. EN Inserting the batteries 1 Carefully rotate the battery cap counterclockwise to remove it. 2 Install the batteries in the correct manner paying especial attention to match the (+) and (-) marks.
r2090_e_00.book Page 19 Thursday, May 1, 2008 6:29 PM CAUTION • While installing and exchanging batteries make sure to wipe the flash of any water and always use dry hands. Pay especial attention for any drips from hair and wetsuits. • Turn gently and slowly when taking on/off the battery cap. If the cap is turned too quickly the O-ring may get caught and cause a leakage.
r2090_e_00.book Page 20 Thursday, May 1, 2008 6:29 PM 4. Mounting the Flash Attaching to an arm Attach the flash to the arm. When attaching the arm to the camera, make sure to read the arm’s instruction manual on how to attach the arm. EN 1 Loosen the arm mount knob by turning in an counterclockwise direction. 2 Place part A in the space between the arm mount. 3 Turn the loosened knob, in step 1, in a clockwise direction all the way to clamp the arm to the flash.
r2090_e_00.book Page 21 Thursday, May 1, 2008 6:29 PM Connecting to a camera’s underwater case There are two ways to connect the flash to a camera’s underwater case. To learn what connection method to use, refer to the instruction manual that comes with your camera’s underwater case.
r2090_e_00.book Page 22 Thursday, May 1, 2008 6:29 PM Connecting using an underwater TTL cable (optional) and hot shoe cable (optional) Alignment mark EN 1 Verify that the flash is completely dry. 2 Remove the cap of the TTL cable connector on the flash. Inspect the O-ring and apply a thin coating of the supplied silicon grease. 3 Remove the cap from the TTL cable’s connector. 4 Align the TTL cable’s plug and the TTL cable connector on the flash at their alignment marks and insert the cable straight.
r2090_e_00.book Page 23 Thursday, May 1, 2008 6:29 PM 5. Basic Shooting Turning on the electronic flash Connect the flash to the camera’s underwater case using a cable. After turning on the camera and flash, be sure to check the remaining battery power. EN AUTO CHECK lamp Control panel TEST button/ CHARGE lamp POWER button 1 Press the POWER button. • The control panel is displayed and battery charging starts. • Press the POWER button again to turn the electronic flash off.
r2090_e_00.book Page 24 Thursday, May 1, 2008 6:29 PM Shooting When the flash is connected using the underwater fiber optic cable Following is an explanation of the basic method for taking pictures with the flash connected to a camera’s underwater case using the underwater fiber optic cable. Refer to your camera’s instruction manual for details about the camera’s operation. Channel EN RC mode Group MODE button 1 Press the MODE button on the flash repeatedly to set the flash to RC mode.
r2090_e_00.book Page 25 Thursday, May 1, 2008 6:29 PM When the flash is connected using the underwater TTL cable Let’s try shooting pictures using the TTL AUTO mode. In TTL AUTO mode the flash intensity is controlled automatically according to the camera’s settings. Flash control mode AUTO CHECK lamp Firing angle Displayed according to the focal length of the lens. EN Light control range MODE button 1 Set the camera’s shooting mode to one of the underwater modes.
r2090_e_00.book Page 26 Thursday, May 1, 2008 6:29 PM Select the flash control mode according to the subject and the shooting conditions. Press the MODE button repeatedly to change the flash control mode. Control panel display EN s Explanation The flash light intensity is controlled automatically according to the camera’s setup. The flash will be adjusted based on the brightness taken through the camera’s lens. The flash light intensity is controlled automatically according to the camera’s setup.
r2090_e_00.book Page 27 Thursday, May 1, 2008 6:29 PM 6. Custom Setup Custom setup allows you to customize the electronic flash to suit your preferences. EN MODE button 1 Press and hold the MODE button for more than 2 seconds, until the setup mode display appears in the control panel. 2 Press the MODE button to select the setup mode. 3 Turn the dial to select the value. 4 Press and hold the MODE button for more than 2 seconds to confirm the setup.
r2090_e_00.book Page 28 Thursday, May 1, 2008 6:29 PM Setup mode Firing angle (ZOOM) display EN Distance display unit Flash intensity control Wide indication Mode display MODE button Value display Dial Function Firing angle is displayed in terms of the lens focal length of a FOUR THIRDS camera. Firing angle is converted into the focal distance of the 135 type. This allows the flash to be used in the same feeling as the flash for a 135 type (35 mm film) camera. Distance is displayed in meter.
r2090_e_00.book Page 29 Thursday, May 1, 2008 6:29 PM Setup mode ISO, F communication in AUTO mode • Available only in AUTO mode, with cameras with communicatio n capability. ISO sensitivity selection in AUTO mode • Works with a camera without communicatio n capability. Also works with a camera with communicatio n capability when the ISO, F communicatio n is set to [OFF].
r2090_e_00.book Page 30 Thursday, May 1, 2008 6:29 PM 7. Using as Slave Flash The electronic flash is equipped with the slave function. In this function you can emit the flash by synchronizing it to the emission of another flash. Slave mode EN MODE button 1 Connect this flash to the flash to which you want to synchronize it using the underwater fiber optic cable. 2 Press the MODE button of the electronic flash repeatedly to set the flash control mode to [SL AUTO] or [SL MANUAL].
r2090_e_00.book Page 31 Thursday, May 1, 2008 6:29 PM 8. Handling After Shooting Wiping off any waterdrops After underwater shooting, remove any drops of water from the flash. Use pressurized air or lint-free cloth to carefully wipe away any water from the buttons, the battery cap and the gaps between the battery cap and the body of the flash. EN CAUTION • Waterdrops may spill into the flash when the battery cap is removed, especially when they remain between the flash and the battery cap.
r2090_e_00.book Page 32 Thursday, May 1, 2008 6:29 PM CAUTION • Leakage may occur to some parts if exposed to high water pressure. • Operate the switches of the flash when it is in clean tap water to remove any salt from their shafts. Do not disassemble the flash for cleaning. • If the flash is dried before all salt has been removed, this could affect its performance. Always make sure all salt has been removed. Drying the flash EN After washing the flash, dry it with a clean, soft, lint-free cloth.
r2090_e_00.book Page 33 Thursday, May 1, 2008 6:29 PM 9. Appendix Q & A on the use of the UFL-2 Q1: What cautions must be observed when taking off the battery cap? A1: Pay attention to the following points: 1 Take the cap off in a place where it is safe from spray and the scattering of sand. 2 Wipe off all water drops in the gap between the battery cap and the body, and any place that is uneven. As when taking off the cap water drops may run inside.
r2090_e_00.book Page 34 Thursday, May 1, 2008 6:29 PM Q3: How to handle the flash after use? A3: After using the flash, remove the batteries at once and seal it again with the battery cap and then rinse it in pure water. After use in salt water, you should immerse the flash for an extended period of time in pure water. Operate the switches when it is in clean tap water to remove any salt from their shafts. After rinsing, remove moisture with a dry cloth free of salt, and dry the flash in the shade.
r2090_e_00.book Page 35 Thursday, May 1, 2008 6:29 PM Q5: What are the important points for O-ring maintenance? A5: Please observe the following items. 1 Never use alcohol, thinner, benzene or similar organic solvents or chemical detergents to clean the O-ring. When such chemicals are used, it is to be feared that the O-ring will be damaged or that its deterioration will be accelerated. 2 Use the original Olympus silicone O-ring grease (white cap).
r2090_e_00.book Page 36 Thursday, May 1, 2008 6:29 PM Q7: Please tell me about repairs. A7: Please contact your local service station or dealer, if repairs should be necessary. Do not try to repair, disassemble or modify the flash yourself. Repair, disassembly or modification by you or third parties not authorized by Olympus invalidates the guarantee. Q8: What are the model numbers of the UFL-2 accessories? A8: The following accessories are being sold.
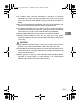
r2090_e_00.book Page 37 Thursday, May 1, 2008 6:29 PM Warning display list Warning details In AUTO mode: Out of light control range Control panel display (camera without communication capability) Remedy Change the camera’s ISO sensitivity or aperture setting. EN (camera without communication capability) In MANUAL mode: Subject too close When the optimum shooting distance is less than 0.6 m (1.9 ft.
r2090_e_00.book Page 38 Thursday, May 1, 2008 6:29 PM Troubleshooting EN Q: A: When are test flash activation and auto checking effective? Correct activation of the flash can be confirmed by checking the AUTO CHECK lamp (AUTO modes only). Q: Why doesn’t the flash control mode change when I press the MODE button? When the electronic flash is connected to certain types of communication-capable cameras, the flash control mode can only be controlled from the camera.
r2090_e_00.book Page 39 Thursday, May 1, 2008 6:29 PM Q: A: Q: A: Q: A: Q: A: How can I find out if my camera is compatible with wireless flash? You can use the RC mode only with cameras compatible with the Olympus wireless RC flash system. With other cameras you may be able to use the electronic flash as slave flash if the camera’s built-in flash can be set to slave flash mode or manual flash mode. For details, refer to the camera’s instruction manual.
r2090_e_00.book Page 40 Thursday, May 1, 2008 6:29 PM Specifications MODEL NO.
r2090_e_00.