Basic guide Quick task index Table of Contents DIGITAL CAMERA Instruction Manual 1. Basic photography/frequentlyused options 2. Other shooting options 3. Flash shooting 4. Shooting and viewing movies 5. Playback options 6. Sending and receiving images 7. Using OLYMPUS Viewer 2 8. Printing pictures 9. Camera setup 10. Customizing camera settings 11. Information 12. SAFETY PRECAUTIONS System chart Index Thank you for purchasing an Olympus digital camera.
■ This notice concerns the supplied flash unit and is chiefly directed to users in North America. Information for Your Safety IMPORTANT SAFETY INSTRUCTIONS When using your photographic equipment, basic safety precautions should always be followed, including the following: • Read and understand all instructions before using. • Close supervision is necessary when any flash is used by or near children. Do not leave flash unattended while in use.
Unpack the box contents The following items are included with the camera. If anything is missing or damaged, contact the dealer from whom you purchased the camera. Body cap Strap USB cable CB-USB6 Flash FL-LM2 Lithium ion battery BLN-1 Lithium ion charger BCN-1 Camera AV cable (Monaural) CB-AVC3 • Flash case • Computer software CD-ROM • Instruction manual • Warranty card Attaching the strap 1 Thread the strap in the direction of the arrows.
Charging and inserting the battery Basic guide 1 Charging the battery. Charging indicator Charging in progress Charging complete Charging error Lithium ion battery (BLN-1) Lithium ion charger (BCN-1) Lights orange Off Blinks orange Preparations for shooting (Charging time: Up to approximately 4 hours) 3 Charging SDirection indicator indicating mark # Cautions 1 AC wall outlet 2 AC cable • Unplug the charger when charging is complete. 2 Loading the battery.
Inserting and removing cards Loading the card. • Open the card slot cover. • Slide the card in until it is locked into place. g “Card basics” (P. 103) Card slot Basic guide 1 # Cautions • Turn off the camera before loading or removing the card. 2 2 3 Closing the card slot cover. • Close the cover until you hear a click. # Cautions • Be sure the card slot cover is closed before using the camera. Removing the card Press the inserted card lightly and it will be ejected. Pull out the card.
Attaching a lens to the camera Basic guide 1 Attach a lens to the camera. 1 2 1 Rear cap 2 Preparations for shooting • Align the lens attachment mark (red) on the camera with the alignment mark (red) on the lens, then insert the lens into the camera’s body. • Rotate the lens in the direction indicated by the arrow until you hear it click. # Cautions • Make sure the camera is turned off. • Do not press the lens release button. • Do not touch internal portions of the camera. 2 Remove the lens cap.
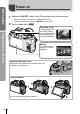
Attaching the flash unit Remove the terminal cover from the flash unit and attach the flash to the camera. • Slide the flash unit all the way in, stopping when it contacts the back of the shoe and is securely in place. Basic guide 1 UNLOCK switch 2 Preparations for shooting 2 1 To use the flash, raise the flash head. • Lower the flash head when the flash is not in use. Removing the Flash Unit UNLOCK switch Press the UNLOCK switch while removing the flash unit.
Power on Basic guide 1 Rotate the ON/OFF switch to the ON position to turn the camera on. • When the camera is turned on, the monitor will turn on. • To turn the camera off, rotate the ON/OFF switch to OFF. 2 Set the mode dial to A. Viewfinder (P. 30) Preparations for shooting The viewfinder turns on and the monitor turns off automatically when you put your eye to the viewfinder. e ISO-A 200 250 F5.6 01:02:03 1023 Monitor The super control panel (P. 22) will be displayed. 2012.05.
Setting the date/time Basic guide Date and time information is recorded on the card together with the images. The file name is also included with the date and time information. Be sure to set the correct date and time before using the camera. 1 Display the menus. • Press the MENU button to display the menus. Shooting Menu 1 1 2 Set Back 2 j 4:3 Off Setup Menu Select [X] in the [d] (setup) tab. 1 • Use FG to select [d] and press I. • Select [X] and press I.
Names of parts Basic guide Camera 1 2 3 4 9 0 a b Names of parts and functions 5 6 7 c 8 h e i f g j n k Remove when using the HLD-6 battery holder. 1 2 3 4 5 6 7 8 9 0 a b c 10 EN 5 d o l m Main dial* (o) ...................P. 16, 57 – 59 Shutter button ...............P. 13, 14, 44, 96 R (Movie) button....P. 13, 15, 67, 69, 93 Fn2 button ..........................P. 25, 69, 93 Strap eyelet.......................................P. 3 Sub dial* (r).....................P.
1 7 8 5 0 a b c 9 Accessory port ................................P. 76 Viewfinder ..................................P. 8, 30 Eye sensor Eyecup Monitor (Touch screen) .......P. 27, 31, 32 Hot shoe u (LV) button ........................P. 15, 92 q (Playback) button................P. 16, 69 Names of parts and functions 2 3 4 d e 1 2 3 4 5 6 7 8 Basic guide 6 9 Fn1 button ................................P. 69, 93 0 MENU button .................................P.
Camera controls Basic guide Mode dial Use the mode dial to select the shooting mode. After choosing the shooting mode, use the shutter button to take photographs and the R button to shoot movies. Mode icon Indicator ■ Advanced shooting modes Basic operations P Program shooting (P. 57) A Aperture priority shooting (P. 57) S Shutter priority shooting (P. 58) M Manual shooting (P. 58) • The settings made in the advanced shooting modes are retained even if the camera is turned off.
Use the shutter button to take photographs and the R button record movies. R button Shutter button Movies: R button Photos: shutter button P Aperture and shutter speed are automatically adjusted for optimal results. A You control aperture. S You control shutter speed. M You control aperture and shutter speed. The camera automatically adjusts settings and records a movie. A A full auto mode in which the camera automatically optimizes settings for the current scene. ART Select an art filter.
Taking photographs/shooting movies Basic guide 1 Frame a picture in the viewfinder. • The monitor turns off and the display in the viewfinder lights up. • Be careful that your fingers or the camera strap do not obstruct the lens. e ISO-A 200 250 F5.6 01:02:03 Basic operations 1023 250 F5.6 Horizontal grip Vertical grip Shutter speed Aperture value Viewfinder 2 Adjust the focus. • Lightly press the shutter button down to the first position (press the shutter button halfway).
Basic guide 3 Release the shutter. Taking photographs Press the shutter button all the way (fully). • The shutter sounds and the picture is taken. n Framing subjects in the monitor 00:02:18 u button Press the u button to display the subject in the monitor. Press the u button again to switch back to the original display. $ Notes • The camera can be configured to switch between the viewfinder and monitor displays either automatically or manually.
Playback/Erasing Basic guide Viewing Images Single-frame playback • Press the q button to display your most recent photograph or movie. • Use the sub dial or arrow pad to view other pictures. Sub dial Arrow pad L N 100-0020 2012.05.01 12:30 20 Basic operations Still image Displays the previous frame Displays the next frame WB AUTO P 100-0004 HD 2012.05.
Basic guide Volume Volume can be adjusted by pressing F or G during single-frame and movie playback. 00:00:02/00:00:14 Basic operations Erasing images Display an image you want to delete and press D. Select [Yes] and press Q. You can also select multiple images for deletion. Erase Yes No D button Set Back Protecting images Protect images from accidental deletion. Display an image you wish to protect and press the Fn2 button; a 0 (protect) icon will appear on the image.
Using art filters Basic guide 1 Rotate the mode dial to ART. • A menu of art filters will be displayed. Select a filter using FG. • Press Q or press the shutter button halfway to select the highlighted item and exit the art filter menu. ART 1 Pop Art 1 7 Exit Set Basic operations Types of art filters j k l m n o 2 Pop Art Soft Focus Pale&Light Color Light Tone Grainy Film Pin Hole s t u v Y u Diorama Cross Process Gentle Sepia Dramatic Tone Key Line ART BKT (ART bracketing) Shoot.
Shooting in scene mode Basic guide 1 Rotate the mode dial to SCN. • A menu of scene menu will be displayed. Select a scene using FG. • Press Q or press the shutter button halfway to select the highlighted option and exit the scene menu. SCN 1 Exit Portrait Set O P L K J G U G H I q J 2 Portrait e-Portrait Landscape Landscape+Portrait Sport Night Scene Night+Portrait Children High Key Low Key DIS Mode Macro r Q R T s ( g f w m T Nature Macro Candle Sunset Documents Panorama (P.
Using Movie Mode (n) Basic guide Movie mode (n) can be used to film movies with special effects. Basic operations 1 Rotate the mode dial to n. 2 Press G or I. G Multi Echo Apply an after-image effect. After-images will appear behind moving objects. I One Shot Echo An after-image will appear for a short time after you press the button. The after-image will disappear automatically after a while. • Movie effects will be displayed in the monitor.
Shooting Options Live guides are available in iAUTO (A) mode. While iAUTO is a full auto mode, live guides make it easy to access a variety of advanced photographic techniques. Guide item Level bar/selection Clear & Vivid Change Color Saturation 0 Flat & Muted Cancel 1 2 Set the mode dial to A. 3 Use FG on the arrow pad to choose the level. 4 Shoot. Set After pressing Q to display the live guide, use the FG buttons on the arrow pad to highlight an item and press Q to select.
Basic guide Using the super control panel The super control panel lists shooting options and their status. The LV super control panel is displayed when the monitor is used to frame pictures. Super control panel 1 6 ISO ISO AUTO 2 Basic operations 3 4 NORM AUTO 5 4:3 mall Super Fine +RAW P AEL / AFL 250 F5.6 +2.0 f e d 8 9 Off 38 c ba 0 Settings that can be modified using super control panel 1 2 3 4 5 6 Currently selected option ISO sensitivity .................................P.
1 2 Press Q. ISO ISO AUTO Cursor WB AUTO NORM AUTO i 4:3 Normal AEL / AFL 01:02:03 250 F5.6 1023 • To choose an option from a menu, highlight the item and press Q. Framing pictures in the monitor When pictures are framed in the monitor, settings can be adjusted using the live control (P. 24) or LV super control panel. Before using the LV super control panel, select [On] for [KControl Settings] (P. 87) > [Live SCP]. 1 Press Q. IS OFF j • The live control will be displayed.
Basic guide Using live control The live control is used to adjust settings when pictures are framed in the monitor. The effects can be viewed in the monitor. In modes other than P/S/A/M/n, you will need to adjust settings in the custom menu (P. 86) before using the live control. IS OFF j WB WB AUTO AUTO Functions Basic operations 4:3 LF WB Auto P HD AUTO AUTO Settings Available settings Record mode ........................................P. 54 Flash mode ........................................
When framing pictures in the viewfinder, you can adjust settings quickly using the multi-function button. At default settings, the Fn2 button is assigned the role of the multi-function button. Basic guide Using the Multi-Function Button Choosing a function 1 Press and hold the Fn2 button and rotate the dial. • The menus are displayed. Keep rotating the dial to select the desired function. • Release the button when the desired function is selected. Using multifunction options Press the Fn2 button.
Using the menus Basic guide 1 Press the MENU button to display the menus. Shooting Menu 1 Menus 1 Basic operations W Preliminary and basic shooting options X Advanced shooting options q Playback and retouch options c Custom menu # Accessory port menu* d Camera setup (e.g., date and language) Tab Operation guide Set Press Q to confirm the setting Use FG to select a tab and press Q. Select an item using FG and press Q to display options for the selected item.
Using the Touch screen Live Guides Tab The touch screen can be used with live guides. 1 Touch the tab and swipe your finger to the left to display live guides. ISO-A 200 Use your finger to position the sliders. LN HD • Press the MENU button to exit the live guide display. 250 F5.6 01:02:03 250 F5.6 01:02:03 38 Shooting Mode You can focus and shoot by tapping the monitor. Tap to cycle through touch screen settings. Basic operations • Tap to select items.
Basic guide Playback Mode Use the touch screen to page through images or zoom in and out. Full-Frame Playback Viewing Additional Images • Slide your finger to the left to view later frames, right to scroll view earlier frames. • Keep your finger on the edges of the display to scroll continuously backward or forward through pictures. Basic operations Playback Zoom • Slide the bar up or down to zoom in or out. • Use your finger to scroll the display when the picture is zoomed in.
Tap the desired item. • The item will be highlighted. WB ISO AUTO WB AUTO NORM AUTO i 4:3 Normal 250 F5.6 +2.0 3 Basic guide 2 AEL / AFL 01:02:03 1023 Rotate the dial to choose an option. • The situations in which touch screen operations are not available include the following.
Information displayed in the monitor Basic guide Shooting Framing pictures in the viewfinder Information displayed in the monitor MY1 AEL PBH 1 2 PBH fe d Hi +7 Sh -3 250 F5.6 +2.0 e ISO-A 200 01:02:03 1023 3 MY1 AEL c 4 Hi +7 -3 Sh-3 Sh 250 F5.6 +2.0 b a 0 1 Battery check 7 Lit up: Ready for use 8 Lit up: Battery is running low 9 Blinks (red) : Charging required 2 Shooting mode...................P. 12, 57 – 61 3 Myset ..............................................P.
1 2345 67 890 B A z y x w FP RC BKT FPS a bc 45 mm R IS 1 j S-AF ISO 400 +2.0 4:3 u t -3 AEL P sr q 1 2 3 4 5 6 7 8 9 0 a b c d e f g h i j k p Card write indicator ...........................P. 5 Super FP flash s ..........................P. 66 RC mode.........................................P. 97 Auto bracket t ............................P. 63 Multiple exposure a .....................P. 62 High frame rate ...............................P. 92 Digital Tele-converter ......................
Basic guide Playback Simplified display 1 2 3 Overall display 456 d e gh f ×10 ×10 250 P +2.0 F5.6 45mm +1.0 WB AUTO Information displayed in the monitor ISO 400 G+4 Adobe Natural 4608×3456 3D c 4:3 L N 100-0015 2012.05.01 12:30 SD ba 0 15 7 8 9 1 Battery check ............................P. 30, 31 2 Eye-Fi upload complete ..................P. 93 3 Print reservation Number of prints .............................P. 81 4 Sound record ..................................P.
Quick task index Taking pictures with automatic settings iAUTO (A) 12 Easy photography with special effects Art filter (ART) 18 Choosing an aspect ratio Aspect ratio 55 Quickly matching settings to the scene Scene (SCN) 19 Pro-level photography made simple Live guide 21 Taking pictures so that whites come out white and blacks come out black Exposure compensation 47 Taking pictures with a blurred background Taking pictures that stop the subject in motion or convey a sense of motion Taking
Quick task index Quick task index Taking pictures without white subjects appearing too white or black subjects appearing too dark Optimizing the monitor/ adjusting monitor hue Gradation (Picture Mode) 52 Histogram/ Exposure compensation 39/47 Highlight and shadow control 47 Monitor brightness adjustment 85 Live View Boost 88 Preview function 58 Test Picture 94 Level Gauge (G/Info Settings) 39 Shooting with deliberate composition Displayed Grid (G/Info Settings) 87 Zooming in on photos
Table of Contents Basic guide 4 Names of parts and functions ...10 Names of parts .........................10 Camera 10 Basic operations ........................12 Camera controls .......................12 Mode dial The Shutter and R Buttons 12 13 Taking photographs/shooting movies ...................................14 Playback/Erasing ......................16 Viewing Images Volume Erasing images Protecting images 16 17 17 17 Using art filters..........................18 Shooting in scene mode .....
Table of Contents Changing the brightness of highlights and shadows ............47 Table of Contents Choosing how the camera measures brightness (metering) ....................................48 Exposure lock (AE lock) ............48 Reducing camera shake (the image stabilizer)..................49 Adjusting color (white balance) ...........................50 White balance compensation ...50 One-touch white balance ..........51 Processing options (picture mode) ............................
Sending and receiving images 76 Receiving images/adding a host ..............................................76 Editing the address book ..........77 Creating albums .........................77 Using OLYMPUS Viewer 2 78 Windows ...................................78 Macintosh .................................79 Copying pictures to a computer without OLYMPUS Viewer 2.......79 Printing pictures 81 Print reservation (DPOF) ...........81 Creating a print order................
Table of Contents Table of Contents Cleaning and checking the image pickup device ............102 Pixel mapping Checking the image processing functions............102 Card basics ...............................103 Usable cards...........................103 Formatting the card ................103 Battery and charger .................104 Using an optional AC adapter ......................................104 Using your charger abroad .....104 Interchangeable lenses............104 M.
Basic photography/frequently-used options 1 Use the INFO button to display photo info or control panels for choosing shooting options. Choosing the Information displayed in the monitor 1 Framing pictures in the viewfinder INFO 2012.05.01 12:30 ISO AUTO INFO INFO WB AUTO ISO NORM AUTO 200 i 4:3 Normal AEL / AFL 01:02:03 250 F5.6 P 1023 Super control panel 250 F5.6 0.0 Level gauge display Indicators hidden Framing pictures in the monitor INFO ISO P INFO ISO 200 ISO 200 250 F5.
Displaying information during playback The INFO button can be used to choose the information displayed during playback. ×10 ×10 INFO INFO 250 P +2.0 F5.6 45mm ±0.0 WB AUTO A±10 ISO 400 G±10 Adobe Natural 1 4032×3024 4:3 2012.05.01 12:30 Basic photography/frequently-used options INFO Image only INFO 15 Light box display* 4:3 15 16 15 Overall display (P. 32) 15 2012.05.01 12:30 Highlight & Shadow display* INFO ×10 INFO Shadow Highlight 1/8 L N 100-0015 2012.05.
Other uses for the INFO button One-touch white balance Select [P] or [Q] for one-touch white balance. Color temperature Select [CWB] to choose the color temperature. (P. 50) 1 2x Highlight and shadow control Highlights and shadows can be adjusted from the exposure compensation dialog. (P. 47) Focal length Select IS mode and choose a focal length for image stabilization. (P. 49) Help Help is displayed automatically about two seconds after an item is selected.
Restoring default or custom settings Camera settings can be easily restored to one of three presets. Reset: Myset: 1 Quick Myset: Restore default settings. Restore preselected settings for P, A, S, or M mode. The shooting mode does not change. Up to four sets of preselected settings can be stored. Stored settings take effect while the Fn1 or R button is pressed. Shooting mode is adjusted to the preset settings.
Choosing a focus mode (AF mode) Select a focusing method (focus mode). 1 Display the super control panel or live control and select the AF mode item. 2 Use the sub dial to choose a setting. • The selected AF mode is displayed on the monitor. AF Mode ISO AUTO WB AUTO NORM AUTO i 4:3 Normal AEL / AFL 250 F5.6 4080 S-AF (single AF) The camera focuses once when the shutter button is pressed halfway.
Choosing a focus target (AF target) Use FGHI to select AF targets. • “All targets” mode is restored if you move the cursor off the screen. • You can choose from the following three target types. Press the INFO button and use FG. 1 Basic photography/frequently-used options All Targets Single Target Group Target The camera automatically chooses from the full set of focus targets. Select the focus target manually. The camera automatically chooses from the targets in the selected group.
Zoom frame AF/zoom AF You can also zoom in on an area of the image in the monitor and adjust focus. Choosing a high zoom ratio allows you to use autofocus to focus on a smaller area than is normally covered by the AF target. You can also position the focus target more precisely. Q/a ISO 200 a ISO 200 LN LN HD 250 F5.6 0.0 01:02:03 Shooting display 30 HD 250 F5.6 0.0 Zoom frame AF 01:02:03 30 a Zoom AF 1 Before proceeding, use [Button Function] (P. 86) to assign [a] to a button.
Face priority AF/pupil detection AF The camera detects faces and adjusts focus and digital ESP. Taking pictures using face priority 1 Basic photography/frequently-used options 1 Display the super control panel or live control and select the face priority item. 2 Use the sub dial to choose a setting. I Face Priority ISO AUTO WB AUTO NORM AUTO 4:3 Normal AEL / AFL 01:01:07 250 F5.6 3 4080 J Face Priority Off Face priority off. I Face Priority On Face priority on.
Controlling exposure (exposure compensation) Rotate the sub dial to choose exposure compensation. Choose positive (“+”) values to make pictures brighter, negative (“–”) values to make pictures darker. Exposure can be adjusted by ±3 EV. 1 No compensation (0) Positive (+) % Tips To change the exposure adjustment interval. g [EV Step] (P. 88)/ Changing the direction of the dial. g [Dial Direction] (P. 87)/ If [Button Function] (P.
Choosing how the camera measures brightness (metering) Choose how the camera meters subject brightness. 1 1 2 Display the super control panel or live control and select the metering item. Metering ISO AUTO Use the sub dial to choose a setting. WB AUTO NORM AUTO i 4:3 Basic photography/frequently-used options Normal AEL / AFL 01:01:07 250 F5.
Reducing camera shake (the image stabilizer) You can reduce the amount of camera shake that can occur when shooting in low light situations or shooting with high magnification. 1 Display the super control panel or live control and select the image stabilizer item. Image Stabilizer ISO AUTO WB AUTO NORM AUTO i 1 4:3 2 AEL / AFL 01:01:07 250 F5.6 Use the sub dial to choose a setting. 4080 J IS Off Image stabilizer is off. e Auto Image stabilizer is on.
Adjusting color (white balance) White balance (WB) ensures that white objects in images recorded by the camera appear white. [AUTO] is suitable in most circumstances, but other values can be selected according to the light source when [AUTO] fails to produce the desired results or you wish to introduce a deliberate color cast into your images. 1 1 Display the super control panel or live control and select the white balance item.
Auto Adjusting the white balance in the A direction (Amber-Blue) Higher values produce “warmer” (redder) tints, lower values “cooler” (bluer) tints. Adjusting the white balance in the G direction (Green-Magenta) Higher values produce greener tints, lower values tints that are more purple. G -5 WB Preview Back Set Press Q to save settings and exit. % Tips • To display a test photograph taken at the selected white balance value, press the R button. • Adjusting all WB mode settings at once.
Processing options (picture mode) Select a picture mode and make individual adjustments to contrast, sharpness, and other parameters. Changes to each picture mode are stored separately. 1 1 Select [Picture Mode] in shooting menu W (P. 111). 2 Select an option with FG and press Q. 2 Basic photography/frequently-used options Card Setup Reset/Myset Picture Mode D Image Aspect Digital Tele-converter Back j 4:3 Off Set Picture modes h i-Enhance i Vivid Produces vivid colors.
3 Press I to display settings for the selected option. h i-a J K Contrast Distinction between light and dark D D D D Sharpness Sharpness of the image D D D D Saturation Vividness of the color D D k D Gradation Adjust tone (gradation). Normal Use [Normal] mode for general uses. High Key Gradation for a bright subject. Low Key D D D D D k k D k k D D k k D D Gradation for a dark subject. Effect (i-Enhance) Sets the extent that the effect will be applied.
Image quality (record mode) Select an image quality for photographs and movies according their intended use, for example retouching on a computer or display on the web. Choosing a record mode 1 1 Display the live control and highlight the current record mode option for photographs or movies. IS OFF j Basic photography/frequently-used options WB AUTO • Photo image quality can also be adjusted from the super control panel. 2 4:3 4608x3456 Use the sub dial to choose a setting.
Record modes (movies) Record mode Full HD Fine Full HD Normal HD Fine HD Normal HD Pixel count 1920×1080 1920×1080 1280×720 1280×720 Frame rate 59.94i *2 59.94i *2 59.94p *2 59.94p *2 File format MPEG-4 AVC/ H.264*1 1280×720 Approx. 30 fps*3 Motion JPEG*4 640×480 Display on TVs and other devices For computer playback or editing. • Depending on the type of card used, recording may end before the maximum length is reached. *1 Individual movies can be up to 29 minutes long.
% Tips Choosing the standard and maximum ISO sensitivities. g [ISO-Auto Set] (P. 88) / Choosing the ISO step increment. g [ISO Step] (P. 88) / Using auto ISO sensitivity in mode M. g [ISO-Auto] (P. 89) Sequential shooting/using the self timer 1 Basic photography/frequently-used options Keep the shutter button pressed all the way down to take a series of photos. Alternatively, you can take pictures using the self timer. 1 2 Display the super control panel or live control and select [o].
2 Other shooting options “Point-and-shoot” photography (P program mode) In mode P, the camera automatically adjusts shutter speed and aperture in response to subject brightness. Set the mode dial to P. Framing pictures in the viewfinder Framing pictures in the monitor 250 F5.6 +2.0 Shooting mode (%: Program shift) e ISO-A 200 AF confirmation mark ISO-A 01:02:03 200 1023 LN HD P Shutter speed Aperture value 250 F5.6 0.
• Rotate the sub dial to choose exposure compensation. • Larger apertures (lower f-numbers) decrease depth of field (the area in front of or behind the focus point that appears to be in focus), softening background details. Smaller apertures (higher f-numbers) increase depth of field. ISO 400 LN HD A 250 F5.6 +0.0 01:02:03 38 Aperture value 2 Preview function Other shooting options You can preview depth of field (the area behind and in front of the subject that appears to be in focus).
Choosing when the exposure ends (bulb/time photography) Use for night landscapes and fireworks. Shutter speeds of [BULB] and [LIVE TIME] are available in mode M. Bulb photography (BULB): The shutter remains open while the shutter button is pressed. The exposure ends when the shutter button is released. Time photography (TIME): The exposure begins when the shutter button is pressed all the way down. To end the exposure, press the shutter button all the way down again.
Taking Panoramas If you have installed the supplied computer software, you can use it to join pictures together to form a panorama. Images are framed in the monitor. g “Using OLYMPUS Viewer 2” (P. 78) Taking pictures for a panorama 1 Rotate the mode dial to SCN. 2 3 4 Select [Panorama] and press Q. 2 Other shooting options Use FGHI to choose a pan direction. Take a picture, using the guides to frame the shot. • Focus, exposure, and other settings are fixed at the values for the first shot.
3D Photography Take 3D photographs. The results can be viewed on devices that support 3D display. Images are framed in the monitor. The camera monitor can not be used to view images in 3D. 1 Rotate the mode dial to SCN. 2 Select [3D Photo] and press Q. • The subject is displayed in the monitor. 3 Press the shutter button to take the first shot and keep the shutter button in this position. Line up the image. • Focus and exposure are locked at the values for the first shot.
Recording multiple exposures in a single image (multiple exposure) Record multiple exposures in a single image, using the option currently selected for image quality. 1 2 2 Select [Multiple Exposure] in shooting menu X (P. 111). Multiple Exposure Adjust settings. Other shooting options Frame Select [2f]. Auto Gain When set to [On], the brightness of each frame is set to 1/2 and the images are overlaid. When set to [Off], the images are overlaid with the original brightness of each frame.
Varying settings over a series of photographs (bracketing) “Bracketing” refers to the act of varying settings automatically over a series of shots or a series of images to “bracket” the current value. 1 Select [Bracketing] in shooting menu X (P. 111). Shooting Menu 2 j/Y Image Stabilizer Bracketing Multiple Exposure w # RC Mode 1 2 o Off Off 0.0 Off 2 Choose a bracketing type. • 0 is displayed in the monitor.
• The 0 indicator turns green during bracketing. • The size of the bracketing increment changes with the value selected for [EV Step]. (P. 88) Bracketing -Off A-- G-3f 0.3EV 3f 0.7EV -3f 1.0EV --- AE BKT WB BKT FL BKT ISO BKT ART BKT Back 2 Set Other shooting options ISO BKT (ISO bracketing) The camera varies sensitivity by 0.3 EV, 0.7 EV, or 1.
3 Flash shooting The built-in flash can be set manually as required. The built-in flash can be used for flash photography in a variety of shooting conditions. Using a flash (flash photography) 1 Attach the flash unit and raise the flash head. • g “Attaching the flash unit” (P. 7) Display the super control panel or live control and highlight the flash mode. 3 Use the sub dial to choose a setting. • The options available and the order in which they are displayed vary depending on the shooting mode.
Adjusting flash output (Flash intensity control) Flash output can be adjusted if you find that your subject to appears overexposed, or is underexposed even though the exposure in the rest of the frame is just right. 1 Display the super control panel or live control and select the flash intensity control item. 2 Use the sub dial to choose a setting. S-AF ISO AUTO OFF 0.0 P 3 R 0 % Tips Flash shooting For information on flash bracketing: g “FL BKT (FL bracketing)” (P.
4 Shooting and viewing movies Use the R button to record High Definition (HD) movies with sound. In movie mode, you can create movies that take advantage of the effects available in modes A and M. Changing the settings for movie recording Adding effects to a movie 1 2 After selecting n mode, display the live control (P. 24) and use FG to highlight the shooting mode. IS OFF P WB AUTO S-AF Use HI to choose a mode and press Q.
Movie sound options (recording sound with movies) 1 Display the live control (P. 24) and select the Movie R item using FG. 2 Switch ON/OFF using HI and press Q. R R K R Movie R On n OFF ON ON # Cautions • When recording sound in a movie, the sound made by the lens and camera operating may be recorded. If desired, you can reduce these sounds by shooting with [AF Mode] set to [S-AF], or by limiting the amount of times you press the buttons. • No sound is recorded in [ART7] (Diorama) mode.
5 Playback options Single-frame playback Press the q button to view pictures full frame. Press the shutter button halfway to return to shooting mode. Index display/calendar display q q q/Q q 2012.5 Sun 2012.05.01 12:30 20 L N 100-0020 2012.05.01 12:30 20 Single-frame playback p 2012.05.01 12:30 20 4 frames p 2012.05.
Using the Zoom Frame The zoom frame can be used to zoom in on images. Fn1 INFO/ Fn1 Fn1 L N 100-0020 2012.05.01 12:30 2x 20 Single-frame playback 20 INFO/ Fn1 2x 2x Scroll Zoom frame INFO 20 View other pictures (zoom paging) Close-up playback Arrow pad (FGHI) Fn1 or INFO Position the zoom frame. In zoom paging, use HI to view other pictures at the current zoom ratio. Choose between zoom frame, zoom scroll, and zoom paging.
Slideshow This function displays images stored on the card one after another. 1 Press Q during playback and select the slideshow option. JPEG JPEG Edit R Rotate m < Back 2 Set Adjust settings. Start the slideshow. Images are displayed in order, starting with the current picture. BGM Set BGM (4 types) or turn BGM [Off]. Effect * Choose the transition between frames. Slide Set type of slideshow to execute. Slide Interval Choose the length of time each slide is displayed from 2 to 10 seconds.
Editing still images Recorded images can be edited and saved as new images. 1 Display the image to be edited and press Q. • [RAW Data Edit] is displayed if the picture is a RAW image, [JPEG Edit] if it is a JPEG image. If the image was recorded in RAW+JPEG format, the copy that will be edited is determined by your choice of [Edit] option. 2 Select [RAW Data Edit] or [JPEG Edit] and press Q. RAW Data Edit Create a JPEG copy of a RAW image.
Image overlay Up to 3 frames of RAW images taken with the camera can be overlaid and saved as a separate image. The image is saved with the record mode set at the time the image is saved. (If [RAW] is selected, the copy will be saved in [YN+RAW] format.) 1 With a RAW image displayed during playback, press Q and select [Image Overlay]. 2 3 Select the number of images in the overlay and press Q. Use FGHI to select the RAW images that will be used in the overlay and press Q to select.
Viewing camera images on TV Use the AV cable provided with the camera to playback recorded images on your TV. Connect the camera to an HD TV using an HDMI cable (available from third-party suppliers) to view high-quality images on a TV screen. AV cable (included) (Connect to the TV video input jack (yellow) and audio input jack (white).) Multi-connector HDMI cable (sold separately: CB-HD1) (Connect to the HDMI connector on the TV.
Using the TV remote control The camera can be operated by a TV remote control when connected to a TV that supports HDMI control. 1 2 3 Select [HDMI] in c Custom Menu (P. 87) tab U. Select [HDMI Control] and choose [On]. Operate the camera by using the TV remote control. • You can operate the camera by following the operation guide displayed on the TV.
6 Sending and receiving images The optional OLYMPUS PENPAL can be used to upload pictures to, and receive pictures from, Bluetooth devices or other cameras connected to an OLYMPUS PENPAL. Visit the OLYMPUS website for more information on Bluetooth devices. Before sending or receiving images, select [On] for [c/# Menu Display] > [# Menu Display] to make the accessory port menu accessible. Sending images Resize and upload JPEG images to another device.
Editing the address book The OLYMPUS PENPAL can store host information. You can assign names to hosts or delete host information. 1 A. OLYMPUS PENPAL Share Select [OLYMPUS PENPAL Share] in the A tab of the accessory port menu (P. 95). Please Wait Address Book My OLYMPUS PENPAL Picture Send Size • Press I and select [Address Book]. Set Back 2 1 Select [Address List] and press Q. • The names of existing hosts are listed. 3 Select the host you wish to edit and press Q.
7 Using OLYMPUS Viewer 2 Windows 1 Insert the supplied CD in a CD-ROM drive. Windows XP • A “Setup” dialog will be displayed. Windows Vista/Windows 7 • An Autorun dialog will be displayed. Click “OLYMPUS Setup” to display the “Setup” dialog. # Caution 7 • If the “Setup” dialog is not displayed, select “My Computer” (Windows XP) or “Computer” (Windows Vista/Windows 7) from the start menu. Double-click the CD-ROM (OLYMPUS Setup) icon to open the “OLYMPUS Setup” window and then double-click “LAUNCHER.
OLYMPUS Viewer 2 Operating System Windows XP (Service Pack 2 or later) /Windows Vista / Windows 7 Processor Pentium 4 1.3 GHz or better (Pentium D 3.0 GHz or better required for movies) RAM 1 GB or more (2 GB or more recommended) Free Hard Drive Space 1 GB or more Monitor Settings 1024 × 768 pixels or more Minimum 65,536 colors (16,770,000 colors recommended) • See online help for information on using the software. Macintosh 1 Insert the supplied CD in a CD-ROM drive.
1 Turn the camera off and connect it to the computer. • The location of the USB port varies with the computer. For details, refer to your computer’s manual. 2 Turn on the camera. • The selection screen for the USB connection is displayed. 3 Press FG to select [Storage]. Press Q. USB Storage MTP Print Exit Set 4 The computer recognizes the camera as a new device.
8 Printing pictures Print reservation (DPOF*) You can save digital “print orders” to the memory card listing the pictures to be printed and the number of copies of each print. You can then have the pictures printed at a print shop that supports DPOF or print the pictures yourself by connecting the camera directly to a DPOF printer. A memory card is required when creating a print order.
3 Press HI to select images you wish to remove from the print order. 4 Select the date and time format and press Q. 5 Select [Set] and press Q. • Use G to set the number of prints to 0. Press Q once you have removed all the desired pictures from the print order. • This setting is applied to all frames with print reservation data. Direct printing (PictBridge) By connecting the camera to a PictBridge-compatible printer with the USB cable, you can print out recorded pictures directly.
Easy printing Use the camera to display the picture you wish to print before connecting the printer via the USB cable. 1 Use HI to display the pictures you want to print on the camera. 2 Press I. • The picture selection screen appears when printing is completed. To print another picture, use HI to select the image and press Q. • To exit, unplug the USB cable from the camera while the picture selection screen is displayed.
Selecting pictures you want to print Select pictures you want to print. The selected pictures can be printed later (single-frame reservation) or the picture you are displaying can be printed right away. 123-3456 2012.05.01 12:30 Select Print 15 Single Print More Print (f) Prints the currently displayed picture. If there is a picture that [Single Print] reservation has already been applied to, only that reserved picture will be printed.
9 Camera setup Setup Menu Setup Menu Use the Setup Menu to set the basic camera functions. For details on using the menu lists, see “Using the menus” (P. 26). 1 2 X W --.--.-- --:-English j±0 k±0 5sec Rec View c/# Menu Display Firmware Back Option Set g Description X (Date/time setting) Set the camera clock. W (Changing the display language) You can change the language used for the on-screen display and error messages from English to another language.
10 Customizing camera settings Camera settings can be customized using the custom and accessory menus. The c Custom menu is used to fine-tune camera settings. The # Accessory Port menu is used to adjust settings for accessory port devices. Before Using the Custom/Accessory Port Menus The Custom and Accessory Port menus are only available when the appropriate option is selected for the [c/# Menu Display] item in the setup menu. g “Setup Menu” (P.
S Button/Dial Option Dial Function Dial Direction c MENU S g Description Choose the roles played by the main and sub dials. You can also use the MENU button to choose dial rotation and cursor movement directions. — Choose the direction in which the dial is rotated in increase or decrease shutter speed and aperture. — T Release/j c MENU T Description g If [On] is selected, the shutter can be released even when the camera is not in focus. This option can be set separately for S-AF (P.
U Disp/8/PC MENU Description g Display only the selected picture mode when the live control or super control panel is used to select a picture mode. — Histogram Settings [Highlight]: Choose the lower bound for the highlight display. [Shadow]: Choose the upper bound for the shadow display. 40 Mode Guide Choose [On] to display help for the selected mode when the mode dial is rotated to a new setting.
V Exp/p/ISO MENU c V Description g Choose the shooting modes in which [Auto] ISO sensitivity is available. [P/A/S]: Auto ISO sensitivity selection is available in all modes except M. ISO sensitivity is fixed at ISO 200 in mode M. [All]: Auto ISO sensitivity selection is available in all modes. — BULB/TIME Timer Choose the maximum exposure for bulb and time photography. — Live BULB Choose the display interval during shooting. Some restrictions apply. The frequency drops at high ISO sensitivities.
X K/Color/WB c MENU Option X g Description W Keep Warm Color Select [Off] to eliminate “warm” colors from pictures taken under incandescent lighting. — #+WB Adjust white balance for use with a flash. — Color Space You can select how colors are reproduced on the monitor or printer. — Shading Comp. Choose [On] to correct peripheral illumination according to the type of lens. • Compensation is not available for teleconverters or extension tubes.
Y Record/Erase Option File Name MENU c Y g Description [Auto]: Even when a new card is inserted, the file numbers are retained from the previous card. File numbering continues from the last number used or from the highest number available on the card. [Reset]: When you insert a new card, the folder numbers starts at 100 and the file name starts at 0001. If a card containing images is inserted, the file numbers start at the number following the highest file number on the card.
Z Movie Option c MENU g Description nMode Choose a movie record mode. This option can also be selected using the live control. 67 Movie+Still Choose [On] to record a photograph when movie recording ends. 96 Movie R Choose [Off] to record silent movies. This option can also be selected using the live control. 68 Movie Effect Selecting [Off] disables movie effects. 67 Wind Noise Reduction Reduce wind noise during recording.
Description g Touch Screen Settings Activate the touch screen. Choose [Off] to disable the touch screen. 27 Eye-Fi* Enable or disable upload when using an Eye-Fi card. 103 Option * Use in accordance with local regulations. Onboard airplanes and in other locations in which the use of wireless devices is prohibited, remove the Eye-Fi card from the camera or select [Off] for [Eye-Fi]. The camera does not support the “endless” Eye-Fi mode.
10 Customizing camera settings 94 EN R REC Press the button to record a movie. If movie recording is not currently assigned to a button, movies can be recorded by rotating the mode dial to n and pressing the shutter button. Preview (electronic) Aperture is stopped down to the selected value while the button is pressed (P. 58). P Choose the AF target. P Home Pressing the button selects the AF target position saved with [P Set Home] (P. 86). The home AF target position is indicated by a p icon.
Accessory port menu options A OLYMPUS PENPAL Share Option MENU A # g Description Please Wait Receive images and add hosts to the address book. 76 Address Book [Address List]: View the hosts that have been saved to the address book. [New Pairing]: Add a host to the address book. [Search Timer]: Choose how long the camera searches for a host. 77 My OLYMPUS PENPAL Display information for your OLYMPUS PENPAL, including the name, address, and supported services. Press Q to edit the device name.
Recording movies with the shutter button If movie recording is not assigned to any button (including the R button), the shutter button can be used to record movies. 1 2 Set the mode dial to n. AF confirmation mark Press the shutter button halfway down and focus on what you wish record. • When the subject is in focus, the AF confirmation mark lights up. HD n 250 F5.6 n mode display 3 00:21:38 Available recording time Press the shutter button all the way to begin recording.
Wireless remote control flash photography External flash units that offer a remote control mode and are designated for use with this camera can be used for wireless flash photography. The camera can independently control a flash mounted on the camera and remote flash units in up to 3 groups. See the documentation provided with the external flash units for details. 1 Set the remote flash units to RC mode and place them as desired. • Turn each flash unit on, press the MODE button, and select RC mode.
11 Information Shooting tips and information The camera does not turn on even when a battery is loaded The battery is not fully charged • Charge the battery with the charger. The battery is temporarily unable to function because of the cold • Battery performance drops at low temperatures. Remove the battery and warm it by putting it in your pocket for a while.
Noise reduction is activated • When shooting night scenes, shutter speeds are slower and noise tends to appear in images. The camera activates the noise-reduction process after shooting at slow shutter speeds. During which, shooting is not allowed. You can set [Noise Reduct.] (P. 89) to [Off]. The number of AF targets is reduced. The number and size of AF targets varies with aspect ratio, group target settings, and the option selected for [Digital Tele-converter].
Error codes Monitor indication Possible cause Corrective action The card is not inserted, or it cannot be recognized. Insert a card or insert a different card. There is a problem with the card. Insert the card again. If the problem persists, format the card. If the card cannot be formatted, it cannot be used. Writing to the card is prohibited. The card write-protect switch is set to the “LOCK” side. Release the switch. (P. 103) • The card is full.
Monitor indication Possible cause Corrective action Turn off the camera and wait for the internal temperature to cool. m The internal temperature of the camera has risen due to sequential shooting. Wait a moment for the camera to turn off automatically. Allow the internal temperature of the camera to cool before resuming operations. The battery is drained. Charge the battery. The camera is not connected to the computer or printer correctly. Disconnect the camera and connect it again correctly.
Cleaning and storing the camera Cleaning the camera Turn off the camera and remove the battery before cleaning the camera. Exterior: • Wipe gently with a soft cloth. If the camera is very dirty, soak the cloth in mild soapy water and wring well. Wipe the camera with the damp cloth and then dry it with a dry cloth. If you have used the camera at the beach, use a cloth soaked in clean water and well wrung. Monitor and viewfinder: • Wipe gently with a soft cloth.
1 2 Select [Pixel Mapping] (P. 92) in c Custom Menu tab k. Press I, then press Q. • The [Busy] bar is displayed when pixel mapping is in progress. When pixel mapping is finished, the menu is restored. # Cautions • If you accidentally turn the camera off during pixel mapping, start again from Step 1. Card basics Usable cards In this manual, all storage devices are referred to as “cards.
Battery and charger • Use the single Olympus lithium-ion battery. Use only genuine OLYMPUS rechargeable batteries. • The camera’s power consumption varies widely with usage and other conditions. • As the following consume a lot of power even without shooting, the battery will be drained quickly. • Performing auto focus repeatedly by pressing the shutter button halfway in shooting mode. • Displaying images on the monitor for a prolonged period. • When connected to a computer or printer.
• Do not point the lens attached to the camera toward the sun. This may cause the camera to malfunction or even ignite due to the magnifying effect of sunlight focusing through the lens. • Be careful not to lose the body cap and rear cap. M.ZUIKO DIGITAL lens specifications Names of parts If the hood is attached to a lens with a decorative ring, rotate the ring to the left.
Main Specifications Items 14 – 42 mm II R Mount Focal length 40 – 150 mm R 12 – 50 mm Micro Four Thirds mount 14 – 42 mm 40 – 150 mm 12 – 50 mm Max. aperture f/3.5 – 5.6 f/4.0 – 5.6 f/3.5 – 6.3 Image angle 75° – 29° 30.3° – 8.2° 84° – 24° Lens configuration 7 groups, 8 lenses 10 groups, 13 lenses 9 groups, 10 lenses Iris control f/3.5 – 22 Multilayer film coating Shooting range (Focal length) 0.25 m – ) (14 – 19mm) 0.
Macro arm light (MAL–1) Use to illuminate subjects for macro photography, even at ranges at which vignetting would occur with the flash. Microphone set (SEMA–1) The microphone can be placed at a distance from the camera to avoid recording ambient sounds or wind noise. Third-party commercial microphones can also be used depending on your creative intent. We recommend that you use the supplied extension cord. (power supplied via l3.
Flash modes that can be set by shooting mode Shooting Mode P/A Super control panel #AUTO Auto flash ! Auto flash (red-eye reduction) # Fill-in flash $ Flash off ! SLOW Slow synchronization (red-eye reduction) #SLOW Slow synchronization (1st curtain) # Slow synchronization (2nd curtain) SLOW2 S/M # Fill-in flash #! Fill-in flash (red-eye reduction) 11 Information 108 EN Conditions for firing the flash Shutter speed limit Fires automatically in dark/backlit * conditions 1/30 sec.
Flash synchronization and shutter speed Shooting mode P A S M Flash timing Upper limit of synchronization timing*1 1/ (lens focal length × 2) or synchronization timing, whichever is slower Fixed timing when flash fires*2 1/60 1/250 ― The set shutter speed *1 Can be changed using menu: 1/60 – 1/250 g [# X-Sync.] (P. 89) *2 Can be changed using menu: 30 – 1/250 g [# Slow Limit] (P.
Record mode and file size/number of storable still pictures The file size in the table is approximate for files with a 4:3 aspect ratio. 11 Information Record Number of pixels File Compression mode (Pixel Count) format RAW Loss-less compression ORF 1/2.7 YSF 1/4 YF 4608×3456 1/8 YN 1/12 YB 1/2.7 XSF 1/4 XF 3200×2400 1/8 XN 1/12 XB 1/2.7 XSF 1/4 XF 2560×1920 1/8 XN 1/12 XB 1/2.7 XSF 1/4 XF 1920×1440 1/8 XN 1/12 XB JPEG 1/2.7 XSF 1/4 XF 1600×1200 1/8 XN 1/12 XB 1/2.7 WSF 1/4 WF 1280×960 1/8 WN 1/12 WB 1/2.
Menu directory *1: Can be added to [Myset]. *2: Default can be restored by selecting [Full] for [Reset]. *3: Default can be restored by selecting [Basic] for [Reset].
d Setup Menu Tab d Function Default *1 ― ― j ±0, k ±0, Natural 0.5 sec D c Menu Display On c/# Menu Display # Menu Display Off Firmware ― X W* i Rec View *2 *3 D D D D g 9 85 85 85 85 D 85 * Settings differ depending on the region where the camera is purchased. c Custom Menu Tab c R AF/MF Function AF Mode Still Picture Movie Full-time AF AEL/AFL 11 Information 112 EN Reset Lens BULB/TIME Focusing Focus Ring MF Assist P Set Home AF Illuminat.
ISO-Auto Set ISO-Auto BULB/TIME Timer Live BULB Live TIME Anti-Shock z Default Off On 3.5 fps 9 fps On Off *1 *2 *3 D D D D D D D D D D D D D D 1080i Off ― Live Guide Live Control Art Menu Scene Menu Image Only, Overall Image Only, u, Level Gauge O, Calendar Off On 255 0 On Off mode1 mode1 10 sec 8 sec 1 min 4h On Auto 1/3EV p Auto Auto 1/3EV High Limit: 1600 Default: 200 P/A/S 8 min Off 0.
11 Information Tab Function c W # Custom #X-Sync. #Slow Limit w+F X K/Color/WB Noise Reduct. Noise Filter WB All Set All > All Reset W Keep Warm Color #+WB Color Space Shading Comp. K Set Xiddle Pixel Count Wmall Y Record/Erase Quick Erase RAW+JPEG Erase File Name Edit Filename Priority Set dpi Setting Copyright Info.
Tab c Function 8 Battery Priority Level Adjust Touch Screen Settings Eye-Fi Default PBH Battery — On On *1 *2 D D D D D Default *1 D *3 g 92 93 # Accessory Port Menu Tab Function # A OLYMPUS PENPAL Share Please Wait Address List Address Search Timer Book New Pairing My OLYMPUS PENPAL Picture Send Size B OLYMPUS PENPAL Album Copy All Reset Protect Album Mem. Usage Album Mem.
Shutter Product type Shutter Auto focus Product type Focusing points Selection of focusing point Exposure control Metering system Metered range Shooting modes ISO sensitivity Exposure compensation White balance Mode setting Recording Memory Recording system Applicable standards 11 Information 116 EN Computerized focal-plane shutter 1/4000 - 60 sec.
Flash FL-LM2 Guide number Firing angle 10 (ISO200) Covers the angle of view of a 14 mm lens (28 mm in 35 mm format) Dimensions Weight Approx. 44.3 mm (W) × 33.5 mm (H) × 52.5 mm (D) (1.7" × 1.3" × 2.1") Approx. 31 g (0.7 Ib.) Battery/charger Lithium ion battery MODEL NO. Product type Nominal voltage Nominal capacity No. of charge and discharge times Ambient temperature Dimensions Weight BLN-1 Rechargeable Lithium ion battery DC7.6V 1220 mAh Approx.
12 SAFETY PRECAUTIONS SAFETY PRECAUTIONS CAUTION RISK OF ELECTRIC SHOCK DO NOT OPEN CAUTION: TO REDUCE THE RISK OF ELECTRICAL SHOCK, DO NOT REMOVE COVER (OR BACK). NO USER-SERVICEABLE PARTS INSIDE. REFER SERVICING TO QUALIFIED OLYMPUS SERVICE PERSONNEL. An exclamation mark enclosed in a triangle alerts you to important operating and maintenance instructions in the documentation provided with the product.
• Accidentally firing the flash into their own eyes or those of another child. • Accidentally being injured by the moving parts of the camera. • Do not look at the sun or strong lights with the camera. • Do not use or store the camera in dusty or humid places. • Do not cover the flash with a hand while firing. CAUTION Battery Handling Precautions Follow these important guidelines to prevent batteries from leaking, overheating, burning, exploding, or causing electrical shocks or burns.
• This camera uses a lithium ion battery specified by Olympus. Do not use any other type of battery. For safe and proper use, read the battery's instruction manual carefully before using it. • If the battery's terminals get wet or greasy, camera contact failure may result. Wipe the battery well with a dry cloth before use. • Always charge a battery when using it for the first time, or if it has not been used for a long period.
Due to its characteristics or the angle at which you are viewing the monitor, the spot may not be uniform in color and brightness. This is not a malfunction. Lens • • • • • • Do not immerse in water or splash with water. Do not drop or exert strong force on the lens. Do not hold at the moving part of the lens. Do not touch the lens surface directly. Do not touch the contact points directly. Do not subject to abrupt temperature changes. • The operating temperature range is –10 °C 40 °C (14 °F - 104 °F).
Use Only Dedicated Rechargeable Battery and Battery Charger We strongly recommend that you use only the genuine Olympus dedicated rechargeable battery and battery charger with this camera. Using a non-genuine rechargeable battery and/or battery charger may result in fire or personal injury due to leakage, heating, ignition or damage to the battery.
PRODUCT LIABILITY) OR OTHERWISE. IN NO EVENT SHALL OLYMPUS BE LIABLE FOR ANY INDIRECT, INCIDENTAL, CONSEQUENTIAL OR SPECIAL DAMAGES OF ANY KIND (INCLUDING WITHOUT LIMITATION LOSS OF PROFITS OR LOSS OF USE), WHETHER OR NOT OLYMPUS SHALL BE OR SHOULD BE AWARE OF THE POSSIBILITY OF SUCH POTENTIAL LOSS OR DAMAGE.
When returning Products for service, your package should include the following: 1 Sales receipt showing date and place of purchase. 2 Copy of this limited warranty bearing the Product serial number corresponding to the serial number on the Product (unless it is a model on which Olympus does not place and record serial numbers). 3 A detailed description of the problem. 4 Sample prints, negatives, digital prints (or files on disk) if available and related to the problem.
3 4 Notes regarding Guarantee maintenance 1 This Guarantee will only be valid if the Guarantee Certificate is duly completed by Olympus or an authorized dealer or other documents contain sufficient proof. Therefore, please make sure that your name, the name of the dealer, the serial number and the year, month and date of purchase are all completed or the original invoice or the sales receipt (indicating the dealer's name, the date of purchase and product type) is attached to this Guarantee Certificate.
System chart Viewfinder Power Supply*4 BLN-1 BCN-1 HLD-6 AC-3 EP-11 Li-ion Battery Li-ion Battery Charger Power Battery Holder AC adapter Eyecup Remote Operation RM-UC1 Remote Cable Connection Cable Case / Strap*5 USB Cable/ AV Cable/ HDMI Cable Shoulder Strap Camera Case Accessory port devices Underwater System Underwater case Memory Card SD/SDHC/ SDXC/ Eye-Fi *6 OLYMPUS PENPAL PP-1*3 Communication Unit SEMA-1 Microphone Set 1 Software OLYMPUS Viewer MAL-1 Digital Photo Managing S
: E-M5 compatible products : Commercially available products For the latest information, please visit the Olympus website. Converter Lens*2 Lens M.ZUIKO DIGITAL 12-50mm f3.5-6.3 EZ M.ZUIKO DIGITAL ED 12mm f2.0 M.ZUIKO DIGITAL 17mm f2.8 M.ZUIKO DIGITAL 45mm f1.8 M.ZUIKO DIGITAL 14-42mm f3.5-5.6 II R M.ZUIKO DIGITAL ED 9-18mm f4.0-5.6 M.ZUIKO DIGITAL ED 14-150mm f4.0-5.6 M.ZUIKO DIGITAL ED 40-150mm f4.0-5.6 R M.ZUIKO DIGITAL ED 75-300mm f4.8-6.
Index Symbols W Shooting Menu 1 ........................... 111 X Shooting Menu 2 ........................... 111 q Playback Menu ............................ 111 d Setup Menu .............................. 85, 112 c Custom Menu.......................... 86, 112 # Accessory port menu.............. 95, 115 R AF/MF .............................................86 S Button/Dial ......................................86 T Release/j ....................................87 U Disp/8/PC ...............................
B B&W Filter ...........................................53 Backlit LCD ..........................................88 Battery .......................................3, 4, 104 BGM ....................................................71 Black & White ......................................72 Bracketing............................................63 Bulb photography ................................59 BULB/TIME Timer................................89 Button Function ...................................
Image Stabilizer o .............................49 INFO button .......................... 11, 39 – 41 Info Off .................................................88 Information display ........................39, 40 o (Image stabilizer)............................49 ISO ................................................55, 89 ISO BKT ..............................................64 ISO Step ..............................................88 ISO-Auto ..............................................88 ISO-Auto Set ..
R RAW ....................................................54 RAW Data Edit ....................................72 RAW K ..............................................94 RAW+JPEG Erase ..............................90 Rec View .............................................85 Record mode K ........................ 54, 110 Recording Volume ...............................92 Redeye Fix ..........................................72 Red-eye reduction flash ! ...............65 Reset Lens .............................
Premises: Goods delivery: Letters: Consumer Product Division Wendenstrasse 14 – 18, 20097 Hamburg, Germany Tel.: +49 40 - 23 77 3-0 / Fax: +49 40 - 23 07 61 Bredowstrasse 20, 22113 Hamburg, Germany Postfach 10 49 08, 20034 Hamburg, Germany European Technical Customer Support: Please visit our homepage http://www.olympus-europa.
9am to 9pm (Monday to Friday) ET VM468201