
User Manual

Shooting
2
43
EN
Shooting a Panorama
Pan the camera following an on-screen guide to create a single wide-angle (panorama)
photo.
1
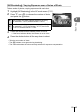
Highlight [Panorama] in the AP mode menu (P. 37) and press the Q
button.
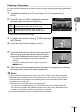
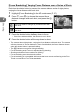
2
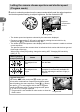
Press G, then use HI to highlight the desired
panorama type and press the Q button.
z
Take panoramas with an angle of view of
approximately double* that of other shots.
y
Take panoramas with an angle of view of
approximately four times* that of other shots.
Panorama
* Varies with the lens and focal length.
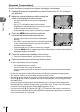
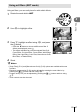
3
Highlight a pan direction using FGHI and press
the Q button.
4
Press the shutter button halfway to focus.
5
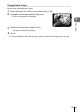
Press the shutter button the rest of the way down to
start shooting, and then pan the camera slowly in
the direction indicated by the arrow in the display.
• The arrow in the display moves as the camera is
panned.
• To cancel shooting and return to Step 3, press the
MENU button.
Cancel Save
6
When the arrow in the display reaches the end of the progress bar, shooting
will end and the camera will create a panorama.
$ Notes
• Focus, exposure, and the like are fi xed at the values in effect at the start of shooting.
• Before the arrow reaches the end of the progress bar, you can press the Q button or
press the shutter button again to end shooting and record a panorama from the data
recorded to the current point.
• Shooting may be cancelled and an error displayed if:
the camera is panned too slowly or too quickly/the camera is panned diagonally/
the camera is panned in the opposite direction to the arrow in the display/the lens is
zoomed in or out/panning does not start within a set period
• Panorama photography may be unavailable with some lenses.