
User Manual


Shooting
2
76
EN
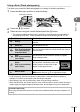
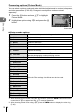
Processing options ( Picture Mode)
You can select a picture mode and make individual adjustments to contrast, sharpness,
and other parameters (P. 89–92). Changes to each picture mode are stored
separately.
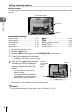
1
Press the Q button and use FG to highlight
Picture Mode.
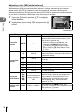
2
Highlight an option using HI and press the Q
button.
JJ KK
Natural
4:3
WB
AUTO
WB
AUTO
S-AFS-AF
ISO
AUTO
L
F
P
Picture Mode
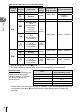
Picture mode options
A
i-Enhance
Produces more impressive-looking results suited to the scene.
B
Vivid
Produces vivid colors.
C
Natural
Produces natural colors.
D
Muted Produces fl at tones.
E
Portrait
Produces beautiful skin tones.
J
Monochrome
Produces black and white tone.
K
Custom
Use to select one picture mode, set the parameters, and
register the setting.
v
e-Portrait
Produces smooth skin textures. This mode cannot be used with
bracket photography or when shooting movies.
c
Color Creator*
1
Provides a color fi nish set in Color Creator.
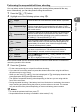
e
Pop Art
Uses Art Filter settings. Art effects can also be used.
f
Soft Focus
g
Pale&Light Color
h
Light Tone
i
Grainy Film
j
Pin Hole
k
Diorama
l
Cross Process
m
Gentle Sepia
n
Dramatic Tone
o
Key Line
p
Watercolor
q
Vintage
r
Partial Color*
2
v
Bleach Bypass
9
Instant Film
*1 After choosing Color Creator using the HI buttons, press the INFO button and use the
control dial or HI to adjust hue and FG to adjust saturation.
*2 After choosing Partial Color using HI, press the INFO button to display the color ring
(P. 49).