OAPC127 PORTABLE AIR CONDITIONER
Table of Contents Table of Contents.......................................................................... 2 Important Safeguards ................................................................... 3-4 Placement and Installation ............................................................ 5-6 Parts List ....................................................................................... 6-7 Control Panel ................................................................................
Important Safeguards Please read this manual Inside you will find many helpful hints on how to use and maintain your unit properly. Just a little preventative care on your part can save you a great deal of time and money over the life of your unit. You will find many answers to common problems inside this manual. CAUTION • Contact the authorized service center for repair of this unit • This unit is not intended for use by young children or infirm persons, without Supervision.
• Always contact an authorized qualified service agent to carry out repairs. • If the supply cord is damaged it must be repaired by a qualified repairer • Keep the area clear around the unit. There needs to be an air path of a Minimum of 50cm all around the unit from walls, furniture and curtains. • If the unit is knocked over during use turn off the unit and unplug it from the power point.
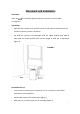
Placement and Installation Placement Place the on flat and dry ground, and keep at least 50 cm from walls etc. (figure 1) Installation • Spin slide bar connector into exhaust hose first, then spin the exhaust hose into exhaust connector (counter-clockwise). • Put slide bar connector into adjustable slide bar, adjust window open width in order slide bar match window well, and the length of slide bar is adjustable.
FIGURE 2 FIGURE 3 Warning Use only the exhaust pipe supplied.
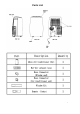
Parts List 7
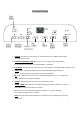
Control Panel Operation 1. POWER: press this key to turn unit On or Off. After unit turns on, default value is cooling mode with low fan speed. 2. OPERATION MODE BUTTON: after unit turns on, for cooling only model, press this key to select the other modes: Fan, Dry/dehumidify, Cool or Auto. 3. FAN SPEED: after unit turns on, press this key to select between 3 fan speeds (high, medium or low). 4.
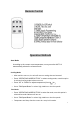
Remote Control Operation Methods Auto Mode According to the current room temperature, once you select AUTO it automatically selects the relevant mode. Cooling Mode • After machine turns on, the unit will revert to setting that was lastused. • Press “OPERATING MODE BUTTON”” to select cooling mode, once this option is selected cooling mode inductor turns on. • Press “UP” or “DOWN” to adjust temperature (from 16 • Press “FAN Speed Button” to select high, Medium or low fan speeds. 31 .
Timer Mode • When in off/ standby, press "TIMER" to setup the power-on timer, press "UP or "DOWN" to adjust the timer (from 1-24 hours) press "TIMER" to confirm selection. • "Under power-on mode, press "TIMER" to setup power-off, Press "UP or "DOWN" to adjust the timer (from 1-24 hours) press "TIMER" to confirm selection Dry/ Dehumidifying Mode • Press “OPERATING MODE BUTTON” to select dehumidifying mode, once this option is selected dehumidifying mode indicator turns on.
Water Drainage This unit has an auto-water-evaporating system. Condensed-water cycle is used to cool down the condenser, which not only improves cooling efficiency, but also saves energy. • If inner water tank is full, “W.F” indicator will flash on the screen, after 8 seconds the machine goes into standby mode, the buzzer beeps, the compressor stops and all keys are invalid.
Maintenance Note: in order to avoid electric shocks, please turn off at the control panel, switch off the power point then unplug the appliance before cleaning Cleaning • Please switch off at the control panel, then at the power point then unplug before cleaning. • Use soft semi-dry cloth to clean the machine. Don’t use chemical agents, such as benzene, alcohol, gasoline etc.; otherwise the machine surface can be damaged.
Seasonal Cleaning If the unit is not being used for a long time, please follow these steps. • Pull out drainage plug upper / lower to empty any water out. • Let the unit run under fan mode for 2 hours to dry out the machine internals • Turn off the unit, switch off the power point and remove the plug. • Clean and dry filters then reinstall them. • Pull out exhaust pipe for safe keeping. • Put the unit into a plastic bag and place it in a dry place.
Technical Data Model OAPC127 BTU/h Cooling capacity Mains 12000 220-240V/50Hz/1Ph Power consumption W Current A 1345 6 Refrigerant R410A Compressor Rotary Fan speeds 3 Thermostat ℃ 16-31 Timer h 0-24 mm 470 x 715 x 335 kg 25 Dimensions(W*H*D) Gross weight Appendix A Circuit Diagram 14
Omega Altise products are distributed in Australia by Shriro Australia Pty Ltd. Locked Bag 5002, Kingsgrove NSW 2208 Phone: 1300 795 572 Fax: (02) 9415 5525 Web: http://www.omegaaltise.com.