
Installation Guide

Asegura la tapón de presión y
tapa terminal ajustable.
Retirez le Omega du sac/de
la boîte. Ne placez pas le sac
vide sur votre tête.
Retirez le ruban d’emballage.
Retirez le couvercle supérieur
et utilisez-le pour entreposer les
fruits et légumes à presser.
Retirez les conteneurs pour le
jus et pour la pulpe.
Mettez le bouton de
verrouillage en position
ouverte/déverrouillée.
Tournez le tambour vers le
haut et remettez-le en position
verrouillée.
Installez la trémie
d’alimentation sur le tambour.
Installez bouchon de pression
y le capuchon d’extrémité
réglable.
Placez le compartiment à jus
sous le bec à jus. Pour verser le
jus dans un verre, placez le tamis
sur le compartiment à jus.
Placez le conteneur à pulpe
sous le bec à pulpe.
Vous êtes prêt à préparer le
jus! Placez le contenu dans la
goulotte et utilisez le piston pour
presser le contenu vers le bas.
Utilisez une brosse pour
nettoyer le bec à pulpe.
Pour les beurres de noix, les aliments pour bébés, le lait de soja et autres collations homogénéisées, remplacez le cône avec le cône
d’homogénéisation (situé dans le coffre de rangement avec les capuchons d’extrémités).
Saca el Omega de la caja/
bolsa. No coloques la bolsa
vacía sobre tu cabeza.
Retira la cinta de empaque.
Quita la cubierta superior
y úsala para guardar los
productos frescos para
hacer jugo.
Retira los recipientes de pulpa
y jugo.
Coloca bajo el pico el recipiente
para jugos. Para verter en un vaso,
coloca el cedazo en el recipiente
para jugos.
Coloca el recipiente de pulpa
debajo del pico.
¡Ya estás listo para hacer jugo!
Coloca los productos en el
conducto y usa el émbolo
para empujarlos.
Usa el cepillo para limpiar el
pico por donde sale la pulpa.
Para mantequillas de nuez, alimentos para bebés, leche de soya y los demás aperitivos homogenizados, reemplaza el cono que esté
colocado por el cono para homogenizar, (ubicado en el depósito para almacenaje junto con las tapas terminales.)
Mueve la perilla de bloqueo
a la posición abierto/
desbloqueado.
Rota el tambor y retórnalo a la
posición de bloqueo.
Engancha la tolva al tambor.
1
5
9
2
6
10
3
8
11
4
12
Remove Juice Cube from bag.
Do not place the empty bag
over your head.
Rotate chute, and return to
locked position.
Remove packing tape, don’t
eat it.
Add pulp regulator cap.
Remove top cover and use it to
store juicing products.
7
Attach juicing funnel.
Remove juice and pulp containers.
Insert juice screen on juice bin
and place under juice spout.
You’re ready to juice! Place content
in chute and use plunger to press
content down.
Hold and unlock juicing chute.
Place pulp container under
pulp spout.
For nut butters, baby food, soy milk and all other homogenized snacks, replace juicing shaft cover with homogenizing shaft cover located in trunk storage along with extrusion shapes.
Use brush to clean pulp spout.
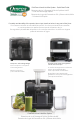
Cold Press Juicer & Nutrition System -
Quick-Start Guide
Extracteur de Jus à Pressage à Froid et Système Nutritif - Guide de Démarrage Rapide
Extractor de Jugos de Prensado en Frío y Sistema de Nutrición - Guía de Inicio Rápido
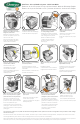
Remove Omega from box/
bag. Do not place the empty
bag over your head.
Remove packing tape. Remove top cover and use it
to store juicing produce.
Remove juice and pulp
containers.
Move the locking knob to the
open/unlock position.
Rotate the drum up, and return
to locked position.
Attach the hopper onto the
drum.
Attach pressure cap and
adjustable end cap.
Place the juice bin under the juice
spout. To pour juice into a glass,
place the sieve on the juice bin.
Place pulp container under
pulp spout.
You’re ready to juice! Place
content in chute and use
plunger to press content down.
Use brush to clean pulp spout.
For nut butters, baby food, soy milk and all other homogenized snacks, replace cone with homogenizer cone (located in trunk storage
with the end caps.)
1
5
9
2
6
10
3
8
11
4
12
Remove Juice Cube from bag.
Do not place the empty bag
over your head.
Rotate chute, and return to
locked position.
Remove packing tape, don’t
eat it.
Add pulp regulator cap.
Remove top cover and use it to
store juicing products.
7
Attach juicing funnel.
Remove juice and pulp containers.
Insert juice screen on juice bin
and place under juice spout.
You’re ready to juice! Place content
in chute and use plunger to press
content down.
Hold and unlock juicing chute.
Place pulp container under
pulp spout.
For nut butters, baby food, soy milk and all other homogenized snacks, replace juicing shaft cover with homogenizing shaft cover located in trunk storage along with extrusion shapes.
Use brush to clean pulp spout.