
Installation Manual


continued on backside
Wire Shelving
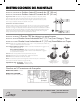
DIAGRAM 1
DIAGRAM 2
Top
Top
Note: Please dispose of loose, round plastic pieces. These are used to separate the shelves
for shipping purposes.
Helpful Hint: When placing the plastic tapered sleeves onto the posts (Step 1), slide the
plastic tapered sleeves up or down on the post until you feel it “snap” into the lines or grooves
of the post. It is normal to have a slight gap in-between the two pieces of the plastic tapered
sleeves when it is placed on the post.
Step 1 For mobile version, install casters into bottoms of posts.
Step 2 Choose the desired height of the bottom shelf (for added stability, it is recommended
that the bottom shelf is installed no more than 6"(2 – 3 lines) from the floor and the
top shelf no more than 6"(2 – 3 lines) from the top.) Snap two (2) tapered sleeves,
with the word UP on top, at the desired height on each post. Shelves can be adjusted
every 1". (Note: Double grooves in the posts are placed every 8th groove for simple
shelf height reference.)
Step 3 Place shelf on its side, making sure the wider portion of the four (4) round shelf
collars are facing the bottom of the unit, slide the top of the posts through the
round shelf collars on each corner of the shelves. Push the shelves firmly onto
the tapered sleeves.
Step 4 After installing the bottom shelf, set the unit upright.
Step 5 Snap the tapered sleeves into place on posts at the next desired shelf height. Slide
the shelf down from the top of the posts onto the tapered sleeves and repeat this
step for the remaining shelves. (Note: A rubber mallet may be used to tap each corner
of the shelves so they firmly install onto the tapered sleeves. Note: The leg levelers may
need to be utilized in order to make the unit level or flush against the wall.)
WARNING: HEAVY OBJECTS MUST BE PLACED--NOT DROPPED--ONTO THE SHELVES!!
ASSEMBLY
INSTRUCTIONS