
User's Manual


710.0089 Rev. 1.1 SmartWave LF Tool User Manual
7
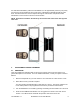
5. Hold the SmartWave LF Tool pointed towards the tire’s sidewall adjacent to sensor’s
location approximately 2” away from the tire’s surface. The sensor should be located at the
valve stem with a rim label indicating its location. Do not touch the edge of the rim.
6. Press and release the Initiate/Learn button once & hold LF Initiator tool in position for 5
seconds until the 4 rapid beeps are heard. Do not hold down the Initiate/Learn button.
7. When completed correctly, the user interface should indicate “Learn Complete”.
Two possible error conditions are:
• Learn Time Out: A Learn transmission was not provoked fast enough and the
system timed out. Repeat the Learn process.
• Duplicate Sensor ID: The sensor ID that was programmed to the wheel position is
also programmed to another wheel position.
8. Repeat the steps above until you’ve completed programming all of the necessary tire
locations, then exit the user interface’s Setup Mode.
6. VERIFYING CORRECT INSTALLATION
To ensure that the system is properly configured after new sensor ID numbers have been
programmed in the receiver, verify the programming by following the steps below:
1. Power up the receiver by switching the ignition on.
2. Press the On/Off/Mode Select Button once to toggle the tool mode back to the Initiate
function. The LED under the antenna symbol must now be ON.
3. Place the LF Initiator next to each sensor position and press the Initiate/Learn button to
cause each sensor to transmit ID number and tire data.
4. Check the display to confirm that the signal was received by the receiver (wheel position
should have turned dark).
5. If a sensor’s transmission was not received, repeat step 2. If the problem persists, power
down the system and repeat the “Programming Sensor ID Number” process or consult the
troubleshooting section in the SmartWave User Manual.