
User Manual

10.0 Speaker Mount
INstallation Instructions
To use the 10.0 Speaker Mount Kit, your speaker must meet the
following criteria:
• This mount is ONLY for speakers that weigh up to 10lbs. (4.5kg).
• Your speaker must have one of the following means of securing
the mount:
• A factory installed ¼”-20 threaded insert
• A keyhole manufactured into the back of the speaker
• Factory installed, correctly spaced threaded inserts for use
with our mounting plate
• Sturdy wood frame that can be safely drilled into and securely
attached to our mounting plate with the #14 course thread screws
provided.
CAUTION: If you have any questions or concerns regarding the
mounting of your speaker, contact a professional installer or the
speaker manufacturer as necessary.
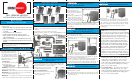
The Clamp Assembly
The clamp assembly consists of the
clamp plate and jaw and attaches to
your mounting surface (wall, ceiling,
etc). The clamp assembly provides
the clamping action that surrounds the
ball and locks in the chosen angle of
adjustment (see fig. A)
Mounting Options
Before you begin, decide which mounting option and ball
shaft are appropriate for your speaker.
Before You Start
Read This Section Carefully
KIT COMPONENTS AND THEIR USE
Tools Required
You will need at least these tools for the installation
• 5/32” hex wrench (supplied)
• Drill bits: ¼” (for drywall installation) or 5/16” (for wood and masonry
surfaces)
• 7/16”(11mm) open wrench or small crescent wrench
• Phillips screwdriver, medium size (or electric drill with Phillips drive bit)
• Wire cutters • Hammer • An electric drill
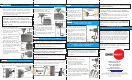
OPTION I:
For Speakers With a ¼”-20 Factory Installed
Threaded Insert
• Insert the ball shaft and rotate it several turns until it is fully threaded
into the threaded female insert on the speaker. When you “hit bottom”
back out the ball shaft one quarter turn (Fig B).
• Using the 7/16 open wrench or crescent
wrench, firmly tighten the jam nut, but
DO NOT OVER-TIGHTEN.
• When the ball shaft resists moderate rotational
force and forms a solid joint with the
speaker, stop tightening.
OPTION II:
For Speakers with a “Keyhole” on the Back
Wall or ceiling mount ONLY
• Pick up the keyhole adapter. On one end there is a Philips head screw.
Make sure there is about ¼” clearance between the end of the adapter
and the head of the screw.
• Insert the top of the Phillips head
screw into the keyhole opening on
the back of the speaker. Slide the
adapter into the narrow part of the
keyhole opening as far as it will go.
• Grip the ball shaft and pull upwards against the Philips head screw at the
same time as you tighten the adapter against the back of the speaker.
Gently tighten the ball shaft with the 7/16 open wrench or small crescent
wrench (Fig C).
• Pick up the extra jam nut. Position it so that
the circular part of the nut faces the end of
the ball shaft protruding from the bottom of the mounting plate.
Thread the nut onto the shaft a few turns only—until the top of the nut
is even with the end of the ball shaft. (Fig. D)
OPTION IV:
For Wood Speakers with NO Threaded Inserts
• Pick up the extra jam nut. Position it so that the circular part of
the nut faces the end of the ball shaft protruding from the bottom
of the mounting plate. Thread the nut onto the shaft a few turns
only—until the top of the nut is even with the end of the ball shaft.
• Place the mounting plate on a flat surface and pull up on the ball
shaft. Screw the top jam nut down against the top of the
mounting plate.
The Ball Shaft
The ball shaft attaches to the speaker
in the following ways.
OPTION I— threads directly into the ¼”-20 factory installed
threaded insert on the speaker
OPTION II– speakers with a keyhole, slides into the keyhole adapter
OPTION III–when mounting plate is necessary to access threaded
inserts, the ball shaft attaches to the plate
OPTION IV– wood speakers with no threaded inserts, the ball shaft
attaches to the mounting plate which is attached to speaker with screws.
Determine which format is
needed for your speaker:
OPTION III:
For Speakers That Require a Mounting
Plate to Access Threaded Inserts
• You must affix the mounting plate to the ball shaft before attaching
the mounting plate to the speaker:
• Pick up the ball shaft and mounting plate. Insert the threaded end of the
ball shaft into the top of the mounting plate until it butts up against the
bottom of the jam nut.
• Place the mounting plate on a flat surface and pull up on the ball shaft.
Screw the top jam nut down against the top of the mounting plate.
• Attach the mounting plate to the speaker by placing the slotted holes over
the threaded inserts and inserting and tightening the screws. (Fig. E)
• Pick up the ball shaft. Screw it in
to the open end of the adapter as
far as possible.
• You must affix the mounting plate to the ball shaft before attaching the
mounting plate to the speaker:
• Pick up the ball shaft and mounting plate. Insert the threaded end of the
ball shaft into the top of the mounting plate until it butts up against the
bottom of the jam nut.
OPTION IV:
For Wood Speakers with NO Threaded Inserts
NOTE: When no threaded inserts for mounting
purposes have been provided by the speaker manufac-
turer, a speaker can still be safely mounted on the wall
or ceiling. But you have to be sure that it is put
together with materials strong enough to support its
own weight with the #14 course thread screws
provided. Most compact speakers are made well
enough and use adequate materials thick enough for
mounting with an OmniMount assembly. The #14
screws should not be used in Masonite®, thin panel
wood or plastic. Such materials will likely require
different fastening hardware and methods and
possible reinforcement to be mounted safely. If your
evaluation raises any questions about the speaker’s
construction or material strength, contact your dealer
or the speaker manufacturer and ASK QUESTIONS!
• 10.0 Wall Mount— To mount on a wall, the
mounting plate will be affixed to the back of the
speaker. If you are mounting on a side wall, the
mounting plate will be affixed to the side of the
speaker. The 10.0 straight ball shaft can also be used
for a ceiling application by affixing the mounting
plate to the top of the speaker.
• 10.0 Ceiling Mount— To mount to the ceiling, the
mounting plate will be affixed to the back of the
speaker. The 10.0 bent ball shaft can also be used for
a wall application by affixing the mounting plate to
the top or bottom of the speaker.
Fig. A
Fig. B
Fig. C
Fig. D
Fig. E
Fig. F