Tel: 253-395-9500 Fax: 253-395-9494 th 6403 South 208 Street, Kent, WA 98032 KEEP THIS MANUAL FOR FUTURE NEEDS 1 of 27
Every person involved with the installation, operation and maintenance of this device needs to ● ● ● ● be qualified follow the instructions of this manual consider this manual to be part of the total product keep this manual for the entire service life of the product Pass this manual on to every further owner or user of the product. Download the latest version of the user manual from the OmniSistem website.
(Safety Instructions Continued) ● If the device has been exposed to drastic temperature fluctuation (e.g. after transportation), do not switch it on immediately. The arising condensation water might damage your device. Leave the device switched off until it has reached room temperature. ● Please make sure that there are no obvious transport damages. Should you notice any damages on the A/C connection cable or on the casing, do not take the device into operation and immediately consult your local dealer.
OPERATING PROCEDURES This device is a moving head light for creating decorative effects. This product is only allowed to be operated with an alternating voltage of 100240V, 50/60 Hz and was designed for indoor use only. This device is designed for professional use, e.g. on stages, in clubs, bars, theatres, etc. Lighting effects are not designed for permanent operation. Consistent operation breaks will ensure that the device will serve you for a long time without defects. Do not shake the device.
PRODUCT FEATURES & SPECIFICATIONS Light ● ● ● ● ● ● Light source: LumiEngin COB21600MW Lamp life: 60,000 hours Luminous Flux: 8450 lumen, 11300 lux @ 2.5 m Control: Remote on/off via DMX Ballast: switching mode power supply Beam angle: 13° X/Y ● ● ● Pan: 630° (4.0 sec) or 540° (3.58 sec), Tilt: 265° (2.
OVERVIEW 6 of 27 (1) (2) (3) (4) (5) (6) (7) (8) (9) (10) (11) (12) Objective lens Arm Base Handle Wireless indicator Display Microphone Left button Down button Enter button Up button Right button (13) (14) (15) (16) (17) 3PIN DMX input socket 3PIN DMX output socket Power input Power output Fuseholder (18) Power switch
INSTALLATION Inserting/Exchanging Gobos If you wish to use other gobos, or if gobos are to be exchanged, please follow the instructions below: Remove the fixation ring with an appropriate tool. Remove the gobo and insert the new gobo. Press the fixation ring together and insert it in front of the gobo. Rigging The installation of the projector has to be built and constructed in a way that it can hold 10 times the weight for 1 hour without any harming deformation.
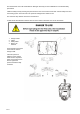
Procedure: The projector should be installed outside areas where persons may walk by or be seated. IMPORTANT! OVERHEAD RIGGING REQUIRES EXTENSIVE EXPERIENCE, including (but not limited to) calculating working load limits, installation material being used, and periodic safety inspection of all installation material and the projector. If you lack these qualifications, do not attempt the installation yourself, but instead use a professional structural rigger.
The manufacturer cannot be made liable for damages caused by incorrect installations or insufficient safety precautions! Install the safety bond by inserting the quick link in the hole on the bottom of the base. Pull the safety bond over the trussing system. Insert the end in the quick link and tighten the fixation screw. The maximum drop distance must never exceed 20cm. A safety bond which already holds the strain of a fall or which is defective must not be used again. 1. 2. 3. 4.
DMX512 connection / connection between fixtures Please note, the starting address depends upon which controller is being used. Only use a DMX cable and 3pin XLR plugs and connectors in order to connect the controller with the fixture or one fixture with another. Occupation of the XLR connection: If you are using controllers during your show, you can connect the DMX output of the controller directly with the DMX input of the first fixture in the DMX chain.
Connection with the Mains Connect the device to the power source with the enclosed power supply cable. The configuration of the connection cables is as follows: Cable Brown Blue Yellow/Green Pin Live Neutral Ground International L N Ground needs to be connected! If the device will be directly connected with the local power supply network, a disconnection switch with a minimum opening of 3mm at every pole has to be included in the permanent electrical installation.
Note: After switching on, the device will automatically detect whether DMX512 data is received or not. If there is no data received at the DMX input, the display will flash. This situation can occur if: ● the XLR plug (cable with DMX signal from controller) is not connected with the input of the device. ● the controller is switched off or defective, if the cable or connector is defective or the signal wires are swapped in the input connector.
32-223 224-25 5 4 6 Shutter Shutter Closed No Function (Shutter Open) Strobe Effect (Slow to Fast) No Function (Shutter Open) Pulse Effect in Sequences No Function (Shutter Open) Random Strobe Effect (Slow to Fast) No Function (Shutter Open) 0-31 32-63 64-95 96-127 128-15 9 160-19 1 192-22 3 224-25 5 5 7 Dimmer Dimmer (Closed to Open) 0-255 6 9 7 10 Virtual Color Function No Function CTC Function Forward Spin Reverse Spin Continuous Color Bounce Indexed No Function 0-15 16-31 32-47 48-63 64-
215-25 5 0-27 28-255 9 12 Virtual Color 2 Color Bounce: Blackout Red Green Blue White Red=0, Green=Up, Blue=Full, White=0 Red=0, Green=Full, Blue=Down, White=0 Red=Up, Green=Full, Blue=0, White=0 Red=Full, Green=Down, Blue=0, White=0 Red=Full, Green=0, Blue=Up, White=0 Red=Down, Green=0, Blue=Full, White=0 Indexed Color: Color 1 (Open) Color 2 - Color 9 0-0 1-1 2-2 3-3 4-4 5-46 47-88 89-130 131-17 2 173-21 4 215-25 5 0-27 28-255 10 13 6 8 Red Red 0-100% 0-255 Red Fine Red Fine Control 0-255
10 12 Gobos Continuous Positioning 0-360° 0-255 Indexed: Position 1 (Open) Position 2 - Position 8 0-5 6-47 Indexed w/ Blackout: Position 1 (Open) Position 2 - Position 8 48-53 54-97 Indexed w/ Shake: Position 2 Position 3 - Position 8 Forward Wheel Spin (Stop to Fast) Reverse Wheel Spin (Stop to Fast) 54-97 116-22 3 224-23 9 240-25 5 16 23 Gobo Rotation Continuous Forward Spin Reverse Spin Forward Animate Rotate Forward Animate Rotate w/ Blackout Reverse Animate Rotate Reverse Animate Rotate
19 26 Fixed Gobo 12 14 Fixed Gobo Indexed & Indexed w/ Blackout & Shake: Position 1 (Open) Position 2 - Position 8 0-31 32-255 Forward Wheel Spin (Stop to Fast) Reverse Wheel Spin (Stop to Fast) Continuous Positioning 0-360° 0-255 0-255 0-255 Indexed: Position 1 (Open) Position 2 - Position 8 0-5 6-47 Indexed w/ Blackout: Position 1 (Open) Position 2 - Position 8 48-53 54-97 Indexed w/ Shake: Position 2 Position 3 - Position 8 Forward Wheel Spin (Stop to Fast) Reverse Wheel Spin (Stop to Fast)
25 26 32 33 Iris Pulse Closing w/ Reverse Blackout No Function 64-95 96-255 Indexed: Max Diameter to Min Diameter 0-255 Pulse Opening & Pulse Closing: Pulse (Slow to Fast) 0-255 16 18 Iris Indexed Pulse Opening w/ Forward Blackout Pulse Opening w/ Reverse Blackout Pulse Closing w/ Forward Blackout Pulse Closing w/ Reverse Blackout 0-191 192-20 7 208-22 3 224-23 9 240-25 5 17 18 Control Normal Reset All Reset Pan & Tilt No Function Reset Gobo No Function Reset Others Display Off Display On
unit off. (Activates after 5 minutes.) Information Set 18 of 27 Lamp Adjust ① Pan…... Adjust Value Time Info Current XXXX (Hours) Fixture Life XXXX (Hours) Boot Time Total Run Time Temperature Near Lamp Temp Temperature Sensors Fans Speed Near Lamp Fan Fan Speed Sensors Channel Value Pan…... Display Channel Value Error Message Pan, Tilt…... Channel Errors Fixture Model [Model & Brand] Display Model & Brand Software Version 1U01 V.1.0.
Password Private Reload (③) All Reload Program Play ① DMX Receive Slave Receive Sequence Music XXX On/Off On/Off Slave Receive 1, 2, 3 Master / Standalone Music / Standalone Select Chase ② Chase Part 1 Chase 1 ~ 8 Chase 1 Chase Part 2 Chase 1 ~ 8 Chase 2 Chase Part 3 Chase 1 ~ 8 Chase 3 Edit Chase ② Chase 1 … Chase 8 Chase Test Step 01 Step 64 Password (050) Private Reload All Reload DMX Receive Choose Slave Position Run Sequence Music Mode Select and Run Auto Program =SCXXX =SCXXX Test Beginnin
Initial status With this function you can display which value the respective channels will start. Error channels With this function you can display the channel errors. Fixture Model With this function you can display the model number and brand of the fixture. Software version With this function you can display the software version of each IC. 1. Select “Software ver.” by pressing Up or Down. 2. Press the Enter button. The display shows e.g. “1U01 VX.X.XX”, “X.X.XX“ stands for the version number.
3. Press the Enter button to confirm. Hibernation Power Standby Mode With this function you can put the device in the power standby mode. This function will be automatically activated after a predefined period of time of no DMX activity. In standby mode the lamp/LEDs and all motors will power down if no DMX signal is sent to the fixture for a period of e. g. 15 minutes (can be user defined). The fixture will automatically reset and return to normal operation once a DMX signal is sent.
Category _Network Management DISC_UNIQUE_BRANCH 0x0001 DISC_MUTE 0x0002 DISC_UN_MUTE 0x0003 Category RDM Information SUPPORTED_PARAMETERS 0x0050 PARAMETER_DESCRIPTION 0x0051 Category _Product Information DEVICE_INFO 0x0060 DEVICE_MODEL_DESCRIPTION 0x0080 MANUFACTURER_LABEL 0x0081 DEVICE_LABEL 0x0082 FACTORY_DEFAULTS 0x0090 SOFTWARE_VERSION_LABEL 0x00C0 Category DMX512 Setup DMX_PERSONALITY 0x00E0 DMX_PERSONALITY_DESCRIPTION 0x00E1 DMX_START_ADDRESS 0x00F0 SLOT_INFO 0x0120 SLO
RESET_DEVICE 0x1001 Reload Default With this function you can restore the factory settings of the device. The different settings (marked in the table) will be set back to the default values (shaded). Program Play Slave Device With this function, you can define the device as a slave. You can choose one of three different Slave programs. For further information see “Edit Chase”. Sequence With this function, you can run the internal program. You can select the desired program under “Select Chase”.
3. 4. 5. 6. 7. Select “Sequence” by pressing Up or Down. Press the Enter-button to confirm. Press Up or Down to select “Master” or “Alone”. The selection "Alone" means Stand Alone-mode and "Master" that the device is defined as master. Press the Enter-button to confirm. Program for Select Chase 1. Select “Edit Chase” by pressing Up or Down. 2. Press the Enter button to confirm. 3. Select “Select Chase” by pressing Up or Down. 4. Press the Enter button to confirm. 5.
Error Messages When you turn on the fixture, it will perform a reset first. The display may show an error message while there are problems with one or more channels. The error message stands for the channels equipped with a testing sensor. For example, when the display shows “Err channel PAN”, it means there is some error in the horizontal movement (PAN), controlchannel 1.
We recommend a frequent cleaning of the device. Please use a moist, lintfree cloth. Never use alcohol or solvents! The objective lens will require weekly cleaning as fog/smoke machine fluid tends to build up residues, reducing the light output very quickly. The cooling fans should be cleaned monthly. The interior of the fixture should be cleaned at least annually using a vacuum cleaner or an air jet. There are no serviceable parts inside the device.
TECHNICAL SPECIFICATIONS Power Supply: 100240V AC, ~50/60 Hz Power Consumption: 180W DMX Control Channels: 26/33/17/18 DMX512 Connection: 3pin XLR Sound Control: Builtin Microphone Light Source: LumiEngin COB2 1600 lm/w Beam Angle: Approx. 13° Color Wheel: 8 Dichroic Filters + Open Fixed Gobo Wheel: 7 Gobos + Open Rotating Gobo Wheel: 7 Gobos + Open Maximum PAN Movement: 630° or 540° (Selectable) Maximum TILT movement: 265° Dimensions (LxWxH): 343 x 262 x 455 mm (13.5” x 10.