BEDIENUNGSANLEITUNG USER'S MANUAL MMP-1 SD/USB MIXER/PLAYER Für weiteren Gebrauch aufbewahren! Keep this manual for future needs! © Copyright Nachdruck verboten! Reproduction prohibited!
Inhaltsverzeichnis/Table of contents 1. EINFÜHRUNG............................................................................................................................................... 4 2. SICHERHEITSHINWEISE............................................................................................................................. 4 3. BESTIMMUNGSGEMÄSSE VERWENDUNG .............................................................................................. 5 4. GERÄTEBESCHREIBUNG .............
/40 00040292.DOC, Version 1.
BEDIENUNGSANLEITUNG MMP-1 SD/USB-Mixer/Player Lesen Sie vor der ersten Inbetriebnahme zur eigenen Sicherheit diese Bedienungsanleitung sorgfältig durch! Alle Personen, die mit der Aufstellung, Inbetriebnahme, Bedienung, Wartung und Instandhaltung dieses Gerätes zu tun haben, müssen - entsprechend qualifiziert sein - diese Bedienungsanleitung genau beachten - die Bedienungsanleitung als Teil des Produkts betrachten - die Bedienungsanleitung während der Lebensdauer des Produkts behalten - die Bedienungsanle
Das Gerät darf nicht in Betrieb genommen werden, nachdem es von einem kalten in einen warmen Raum gebracht wurde. Das dabei entstehende Kondenswasser kann unter Umständen Ihr Gerät zerstören. Lassen Sie das Gerät solange uneingeschaltet, bis es Zimmertemperatur erreicht hat! Stellen Sie keine Flüssigkeitsbehälter, die leicht umfallen können, auf dem Gerät oder in dessen Nähe ab. Falls doch einmal Flüssigkeit in das Geräteinnere gelangen sollte, sofort Netzteil ziehen.
Die relative Luftfeuchte darf 50 % bei einer Umgebungstemperatur von 40° C nicht überschreiten. Dieses Gerät darf nur in einer Höhenlage zwischen -20 und 2000 m über NN betrieben werden. Nehmen Sie das Gerät erst in Betrieb, nachdem Sie sich mit seinen Funktionen vertraut gemacht haben. Lassen Sie das Gerät nicht von Personen bedienen, die sich nicht mit dem Gerät auskennen.
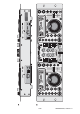
4.2 Bedienelemente und Anschlüsse 1 Laufwerkwahl SOURCE SELECT schaltet die Abspieleinheit im Pausebzw. Cuemodus zwischen Laufwerk A und B um. Die LEDs zeigen Ihnen, welches Laufwerk aktiviert ist. Die grüne LED bezeichnet Laufwerk A, die rote LED Laufwerk B. Wird das gewünschte Speichermedium nicht auf Anhieb erkannt (z.B. wenn die Laufwerke einer Abspieleinheit mit einer SD-Karte und einem USB-Gerät belegt sind), drücken Sie ggf.
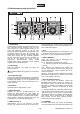
kein eindeutiges Signal erkennt. Drücken Sie die Taste kurz, um zunächst den automatischen Beatcounter zu deaktivieren. Tippen Sie dann die Taste mehrere Male im Takt des Titels an. Die Taktgeschwindigkeit wird auf dem Display in BPM angezeigt. Halten Sie die Taste für 2 Sekunden gedrückt, um wieder zurück zum automatischen Beatcounter zu schalten. 17 Kopfhöreranschluss 6,3 mm Klinkenbuchse PHONES zum Anschluss eines Stereo-Kopfhörers.
26 CUE 1-4 24 ► Zum Umschalten zwischen Wiedergabe und Pause. Während der Wiedergabe leuchtet die grüne LED, im Pausemodus blinkt die grüne LED. Zum Speichern (zuvor MEMO-Taste drücken) und Anwählen von Cue-Punkten oder Endlosschleifen. 25 CUE Speichert Cue-Punkte oder Endlosschleifen (Seamless Loops) auf den Tasten CUE 1-4.
a CUE leuchtet im Cue-Modus und blinkt, wenn ein neuer Cue-Punkt gesetzt wurde j Der PITCH-Schieberegler ist aktiviert b FOLDER Ordnernummer k Titelabspielzeit (ELAPSED) oder Titelrestspielzeit (REMAIN) dargestellt in Minuten (M), Sekunden (S) und Frames (F) c Grafische Anzeige der verstrichenen und noch verbleibenden Zeit. Nähert sich die verbleibende Spielzeit dem Ende, so beginnt die Anzeige zu blinken. d Automatischer Beatcounter ist aktiviert l Textzeile für Zusatzinformationen (z.B.
■ Wird der MMP-1 mit Mischfunktion betrieben, liegt das Summensignal von Abspieleinheit 1 und 2 am Summenausgang MIXED OUTPUT an. Verbinden Sie den Ausgang über ein Cinch-Kabel mit dem LineEingang eines Verstärkers oder aktiven Lautsprechers. Achten Sie darauf, dass die rechts/links Belegung (Steckerfarbe rot/weiß) an beiden Geräten übereinstimmt. ■ Bei aktivierter Mischfunktion lassen sich die Eingangskanäle über einen Stereo-Kopfhörer vor den Fadern abhören.
6. BEDIENUNG 12/40 00040292.DOC, Version 1.
/40 00040292.DOC, Version 1.
/40 00040292.DOC, Version 1.
/40 00040292.DOC, Version 1.
/40 00040292.DOC, Version 1.
/40 00040292.DOC, Version 1.
/40 00040292.DOC, Version 1.
/40 00040292.DOC, Version 1.
/40 00040292.DOC, Version 1.
7. FIRMWARE UPDATES Die interne Software (Firmware) des MMP-1 lässt sich aktualisieren. Dadurch können Sie auch nach dem Kauf neue Funktionen und Optimierungen und die Beseitigung eventuell auftretender Fehler in den MMP-1 integrieren. Wir empfehlen Ihnen, immer die aktuellste Version in Ihren MMP-1 zu laden, um so die größtmögliche Funktionalität verfügbar zu haben. Um zu überprüfen, mit welcher Firmwareversion das Gerät arbeitet, lesen Sie im Kapitel BEDIENUNG den Abschnitt SYSTEMMENÜ.
9. TECHNISCHE DATEN Spannungsversorgung: Gesamtanschlusswert: Typ: Speichermedium: Frequenzgang: Klirrfaktor: Geräuschspannungsabstand: Kanaltrennung: Audioausgang: Ausgangsspannung: Kopfhörer: Faderstart-Ausgang: Klangregelung: 2x Höhen: 2x Bässe: Frame-Genauigkeit: Geschwindigkeitsanpassung: Display: MP3-Formate: MPEG-1 Layer-3 (ISO/IEC 1172-3): MPEG-2 Layer-3 (ISO/IEC 13818-3): MPEG-2,5 Layer-3: Anwendbare Datei-Erweiterungen: Max. Dateigröße Max. Dateianzahl Max.
USER MANUAL MMP-1 SD/USB Mixer/Player CAUTION! Keep this device away from rain and moisture! Unplug mains lead before opening the housing! For your own safety, please read this user manual carefully before you initially start-up.
If the device has been exposed to drastic temperature fluctuation (e.g. after transportation), do not switch it on immediately. The arising condensation water might damage your device. Leave the device switched off until it has reached room temperature. Never put any liquids on the device or close to it. Should any liquid enter the device nevertheless, disconnect from mains immediately. Please let the device be checked by a qualified service technician before you operate it again.
Operate the device only after having familiarized with its functions. Do not permit operation by persons not qualified for operating the device. Most damages are the result of unprofessional operation! Never use solvents or aggressive detergents in order to clean the device! Rather use a soft and damp cloth. Please use the original packaging if the device is to be transported. Never remove the serial barcode from the device as this would make the guarantee void.
4.2 Operating elements and connections 1 Source selection 7 Gain SOURCE SELECT toggles each player mechanism between slot A and B in pause or cue mode. The LEDs will verify which slot is active. The green LED signifies slot A, the red LED signifies slot B. If the desired storage media is not recognized instantly (e.g.
11 Folder selection/Menu functions A Turn the control to the left or right to scroll through the folders of the storage media. Folder number and name are indicated in the LCD. B Press the control to indicate the name of the folder currently selected. C In menu mode, turn the control to the left or right to select the menu items. Press the control to set a menu item. Menu items and options are indicated in the LCD.
Line output player 2 32 Mixed output/Line output player 1 Analog audio output with line level of player mechanism 2 for connecting the line input of a mixer or amplifier. The red colored jack represents the right channel output and the white jack represents the left channel output. A Analog audio output with line level of the master signal of player mechanism 1 and 2 if the unit’s mixing function is activated. For connecting the line input of an amplifier or active speaker.
a CUE lights in cue mode and flashes every time a new Cue point is set. j The PITCH CONTROL is active b FOLDER indicates the folder number k ELAPSED or REMAIN(ING) title time indicated in minutes (M), seconds (S) and frames (F) c Visual indication of the elapsed and remaining time. l Text line for additional information (e.g. title name, folder This bar will begin to flash when a track is ending.
■ If the MMP-1 is operated with mixing function the master signal of player mechanism 1 and 2 is fed to the MIXED OUTPUT. Connect the output via an RCA cable to the line inputs of an amplifier or active speaker. Make sure that the right/left occupation (plug color red/white) is the same at both devices. ■ When the mixing function is activated the input channels can be monitored via stereo headphones ahead of the faders. Connect the headphones to the jack PHONES.
6. OPERATION 31/40 00040292.DOC, Version 1.
/40 00040292.DOC, Version 1.
/40 00040292.DOC, Version 1.
/40 00040292.DOC, Version 1.
/40 00040292.DOC, Version 1.
/40 00040292.DOC, Version 1.
/40 00040292.DOC, Version 1.
/40 00040292.DOC, Version 1.
7. FIRMWARE UPDATES The internal software (firmware) of the MMP-1 can be updated. New versions of the firmware will include new features, bug fixes and the optimization of current processes. We suggest to always operate the MMP-1 with the latest firmware to insure the highest level of functionality. To find out which firmware version you are running refer to chapter OPERATION, section SYSTEM MENU. Upgrading the firmware 1.
9. TECHNICAL SPECIFICATIONS Power supply: Power consumption: Type: Storage media: Frequency range: Distortion: S/N ratio: Channel separation: Audio output: Output voltage: Headphones: Fader start output: Tone control: 2x High: 2x Low: Frame accuracy: Pitch adjustment: Display: MP3 formats: MPEG-1 Layer-3 (ISO/IEC 1172-3): MPEG-2 Layer-3 (ISO/IEC 13818-3): MPEG-2.5 Layer-3: Applicable file extensions: Max. file size: Max. number of files: Max.