Quick Start Guide Rockwell ControlLogix / CompactLogix PLC Connecting to Omron 3G3MX2 AC Drive with EtherNet/IP Revision 1.
Section 1: Intro oduction This doc cument deta ails the steps necessa ary to conne ect an Omrron 3G3MX X2 AC Drive e configurred with a 3G3AX-MX2 3 2-EIP-A Eth herNet/IP a adapter to a an Allen-Bra adley ControlL Logix or CompactLogix x PLC. Forr the purposses of this d document, a Compac ctLogix PLC C will be use ed, but a ControlLogix C x PLC is ne early identiccal in the ste eps required d to make a connection n.
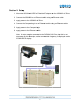
Section 2: Setu up 1. Mount th he 3G3AX-M MX2-EIP-A EtherNet/I P adapter o on the 3G3MX2 AC Drive. 2. Connect the 3G3MX X2 to an Ethernet swittch using an n Ethernet cable. 3. Apply po ower to the 3G3MX2 AC A Drive. 4. Connect the Compa actLogix to an Etherne et switch ussing an Ethe ernet cable e. 5. Apply po ower to the CompactLo ogix. 6. Apply po ower to the Ethernet sw witch.
Section 3: AC Drive and d EtherNe et/IP Ada apter Con nfiguratio on Parame eter Configuration: Configure C the following g paramete ers in the 3G G3MX2. The parametters listed below b are th hose that are changed d from facto ory defaultss.
5. On O the Netw work Configuration tab, make the settings sh hown, and cclick ‘Apply y Changes’. C 6. On O the 3G3M MX2 AC Drrive, set P185 to 0, the en cycle po ower to the 3G3MX2 A AC Drive, D allowiing the DC Bus to disc charge. This applies tthe IP Address set from m th he Web Bro owser.
Section 4: Esta ablishing g the Connection 1. Verify V that all the comp ponents are e connected d via Ethern net, and tha at power is tu urned on to the device es. 2. Open O the project file orr create a new project file for the CompactLo ogix in RSL Logix 5000. 3. Configure C th he IP address of the CompactLog gix as 192.1 168.1.77 ussing RSLog gix 5000. 4. Right R click on o the Etherrnet module e in the Com mpactLogixx, and click New Modu ule.
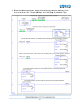
5. In n the Comm munication ns group, se elect “ETHE ERNET-MO ODULE Ge eneric Ethe ernet Module”, M an nd click OK K. 6. Configure C th he connectio on to the 3G G3MX2 as shown belo ow in the N New Module e dialog box, and a click OK.
7. Set S the RPI at 10.0 ms, which is th he default, and click O OK. ly for the 3G Tags willl have been created automatical a G3MX2 con nnection ass shown be elow.
8. Create the fo ollowing co omments in the Contro oller Tags section of RSLogix 500 00.
9. Create C the fo ollowing pro ogram, which will conttinuously ra amp the fre equency from 0 Hz to 60 Hz H to 0 Hz. Create ‘MX X2Start’ an d ‘MX2Stop p’ as additio onal Tags.
10. Download D th he project to o the Comp pactLogix p processor using RSLog gix 5000. 11. Iff the 3G3MX X2 AC Driv ve has an error, toggle e the MX2:0 0.Data[0].2 (Reset Erro or) bit from off Æ on Æ off to reset the e error, or p press the ‘S Stop / Rese et’ key on th he 3G3MX2 AC C Drive. 12. Using U RSLogix 5000, to oggle the ‘M MX2Start ta ag’ to start tthe frequen ncy ramping g frrom 0 Hz to o 60 Hz to 0 Hz.
Section 5: Othe er Conne ection Assemblies s 12
13
14
Terms and Conditions of Sale 1. Offer; Acceptance. These terms and conditions (these "Terms") are deemed part of all quotes, agreements, purchase orders, acknowledgments, price lists, catalogs, manuals, brochures and other documents, whether electronic or in writing, relating to the sale of products or services (collectively, the "Products") by Omron Electronics LLC and its subsidiary companies (“Omron”).
OMRON INDUSTRIAL AUTOMATION • THE AMERICAS HEADQUARTERS Schaumburg, IL USA • 847.843.7900 • 800.556.6766 • www.omron247.com OMRON CANADA, INC. • HEAD OFFICE Toronto, ON, Canada • 416.286.6465 • 866.986.6766 • www.omron247.com OMRON ARGENTINA • SALES OFFICE Cono Sur • 54.11.4783.5300 OMRON ELECTRONICS DE MEXICO • HEAD OFFICE México DF • 52.55.59.01.43.00 • 001.800.556.6766 • mela@omron.com OMRON CHILE • SALES OFFICE Santiago • 56.9.9917.3920 OMRON ELECTRONICS DE MEXICO • SALES OFFICE Apodaca, N.L. • 52.