INSTRUCTION MANUAL ENGLISH Pedometer Downloadable Model: HJ-322U
TABLE OF CONTENTS Before Using the Monitor Introduction. . . . . . . . . . . . . . . . . . . . . . . . . . . . . . . . . . . . . . . . . . . . . . . . . . 3 Important Safety Information . . . . . . . . . . . . . . . . . . . . . . . . . . . . . . . . . . . . 4 Operating The Device. . . . . . . . . . . . . . . . . . . . . . . . . . . . . . . . . . . . . 4 Care And Maintenance. . . . .
Before Using the Monitor INTRODUCTION Thank you for purchasing the OMRON® HJ-322U Pedometer. Fill-in for future reference DATE PURCHASED:____________________________ • Staple your purchase receipt here • Register your product online at www.register-omron.com This Pedometer features advanced 3D Smart Sensor technology - so it knows exactly when you’re taking a step. It’s more accurate than other pedometers which use a simple pendulum design. Use this in your pocket, bag or on your hip for added convenience.
IMPORTANT SAFETY INFORMATION To assure the correct use of the product basic safety measures should always be followed including the warnings and cautions listed in this instruction manual. SAFETY SYMBOLS USED IN THIS INSTRUCTION MANUAL Indicates a potentially hazardous situation which, if not WARNING avoided, could result in death or serious injury.
IMPORTANT SAFETY INFORMATION Do not touch the USB Connector with wet hands. Do not use a cell phone near the pedometer while transferring data. When transferring data to the online solution do not leave the unit plugged into the PC for an extended period of time. Dispose of the device, battery, and components according to applicable local regulations. Unlawful disposal may cause environmental pollution. CARE AND MAINTENANCE Do not disassemble or modify the unit.
Operating Instructions KNOW YOUR UNIT Front of unit: Display mem /▲ button Low battery indicator Transfer indicator set / ● button mode / ▼ button NOTE: Remove the protective film from the face of the unit.
KNOW YOUR UNIT Components: Holder Attach/remove the holder as illustrated below. NOTE: When attaching the holder, do not grip it strongly at the top and bottom.
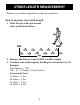
STRIDE LENGTH MEASUREMENT Measure your stride length before setting the pedometer. How to measure your stride length 1. Walk 10 steps with your normal stride as illustrated below. 2. Measure the distance from START to END in inches. 3. Calculate your stride length by dividing the total distance by 10.
SETTINGS The unit comes with the battery installed. When you use the unit for the first time, follow the steps below. For setting range details refer to “SPECIFICATIONS”. NOTE: If the initial settings are not correct, the measurement results may not be accurate. 1. Press and hold , or . After the following display, “lb” and “kg” flash on the display. 2. Setting the weight units. A) Press or to select the mode. B) Press to confirm the setting. 3.
SETTINGS 8. To set the stride length, repeat steps A) and B) in step 6 above. 9. To set the year, repeat steps A) and B) in step 6 above. 10. To set the month, repeat steps A) and B) in step 6 above. 11. To set the day, repeat steps A) and B) in step 6 above. 12. To set the hour, repeat steps A) and B) in step 6 above. 13. To set the minute, repeat steps A) and B) in step 6 above. All the settings are completed. Adjust the settings 1. Press and hold . “lb” or “kg” flash on the display. 2.
USING THE UNIT The unit accurately counts in a pocket, bag or anywhere you want to put it. The unit may be placed in the upper front pocket of your clothing, in the front pocket of your pants, in a bag, or attached to your belt or pants, or hang it from your neck. 1. Simply bring the unit with you wherever you go. NOTE: In order to avoid counting steps that are not part of a walk, the unit does not display the step count for the first 4 seconds of walking.
READING THE CURRENT DISPLAY Press to change the display.
READING THE CURRENT DISPLAY Calories By measuring the intensity of your activity, the unit can calculate the amount of calories burned. Aerobic steps Aerobic steps are the physical exercise that helps us stay healthy. Aerobic steps are counted separately when walking more than 60 steps per minute and more than 10 minutes successively. If a rest of less than 1 minute is taken after a continuous walk of more than 10 minutes, this will be regarded as part of “a continuous walk”.
MEMORY FUNCTION The unit stores up to 22 days of data, including the current day and displays the previous 7 days of data on the unit. The current day’s data is automatically stored in memory when the time reaches 12:00AM (0:00). The display will return to 0. NOTE: The time must be correctly set in the unit. 1. Press to select the type of measurement you want to see (steps, distance, etc.). 2. Press to view the results (days 1-7) in memory. The display changes with each press of as shown below.
MEMORY FUNCTION NOTE: If no button is pressed for more than 1 minute, the display will return to the current day’s data. Transfer Indicator The Transfer Indicator will blink when 18 days of data, including the current day, are stored in the memory and have not been transferred. The Transfer Indicator will light up when 22 days of data have not been transferred. The older measurement results are deleted first. Transfer the measurement results immediately.
TRANSFERRING DATA TO THE ONLINE SOLUTION To begin using the software for the first time, please visit www.omronfitness.com for the initial set-up instructions.
BATTERY LIFE Low battery indicator When the low battery indicator appears on the display, immediately replace the battery with a new CR2032 battery. Blinking Appears continuously Battery power is low. Battery power exhausted. The unit stops measurement. Data cannot be transferred. NOTES: • Do not remove the battery around 12:00AM. The measurement results of the day when the battery was removed will be added to the measurement results for the day the battery was inserted.
BATTERY REPLACEMENT 1. Loosen the screw of the battery cover on the back of the unit. Remove the battery cover by pulling it off in the direction of the arrow. Use the supplied screwdriver or use a small screwdriver to loosen the screw on the battery cover. 2. Remove the battery with a toothpick. NOTE: Do not use a pair of metal tweezers or any metal object such as a small screwdriver. CAUTION Dispose of the device, battery, and components according to applicable local regulations.
BATTERY REPLACEMENT CAUTION Do not throw the battery into fire. The battery may explode. 3. Insert the battery (CR2032) with the positive (+) side face up. 4. Replace the battery cover by sliding the catch in first, then tighten the screw.
DELETING ALL RESULTS AND SETTINGS Follow the procedure below to delete all the previous measurement results and settings, including the date, time, weight, height, and stride length. 1. Press and hold . “lb” or “kg” flashes on the display. 2. Press and hold and at the same time. After “Clr” has been displayed, “lb” and “kg” flash on the display. The measurement results stored in memory and the settings for the date, time, weight, height and stride length are deleted.
Care and Maintenance CARE AND MAINTENANCE To keep the unit in the best condition and protect the unit from damage follow the directions listed below: CAUTION Do not disassemble or modify the unit. Changes or modifications not approved by Omron Healthcare will void the user warranty. Clean the unit with a soft dry cloth. Do not use any abrasive or volatile cleaners. Do not immerse the unit or any of the components in water. The unit is not waterproof. Do not wash it or touch it with wet hands.
TROUBLESHOOTING TIPS Problem The low battery indicator blinks or appears continuously. Probable Cause The battery is low or worn. Battery saving mode active. Nothing is displayed. The polarities of the battery (+ and -) are aligned in the wrong directions. The battery is worn. The displayed values are incorrect. The unit is positioned incorrectly. Irregular movement. Inconsistent pace. Up and down movement. The set values are wrong. The display is unusual or the buttons do not operate normally.
TROUBLESHOOTING TIPS Problem Communication indicator Probable Cause Communication error. How to Correct Check the display on your PC and follow the instruction provided. Or plug in the USB Connector once more and try again. NOTE: If the error still occurs after trying the above, contact Omron’s Customer Support. NOTE: If a malfunction has occurred and you need to repair your unit, all settings and measurement results are deleted. We recommend that you record measurement results.
SPECIFICATIONS HJ-322U (HJ-322U-Z) 3VDC (1 lithium battery CR2032) Steps: 0 to 99,999 steps Distance: 0.0 to 621.3 miles / 0.0 to 999.
FCC STATEMENT NOTE: POTENTIAL FOR RADIO/TELEVISION INTERFERENCE (for U.S.A. only) This product has been tested and found to comply with the limits for a Class B digital device, pursuant to part 15 of the FCC rules. These limits are designed to provide reasonable protection against harmful interference in a residential installation.
FCC STATEMENT POTENTIAL FOR RADIO/TELEVISION INTERFERENCE (for Canada only) This digital apparatus does not exceed the Class B limits for radio noise emissions from digital apparatus as set out in the interference-causing equipment standard entitled “Digital Apparatus”, ICES-003 of the Canadian Department of Communications.
LIMITED WARRANTY Your OMRON HJ-322U Pedometer, excluding the battery, is warranted to be free from defects in materials and workmanship appearing within 1 year from the date of purchase, when used in accordance with the instructions provided with the unit. The above warranties extend only to the original retail purchaser. We will, at our option, repair or replace without charge any Pedometer covered by the above warranties.
OMRON HEALTHCARE, INC. 1925 West Field Court Lake Forest, IL 60045 U.S.A. www.omronhealthcare.com © 2012 OMRON HEALTHCARE, INC.