Digital Automatic Blood Pressure Monitor Model M10-IT • Instruction Manual • Mode d’emploi • Gebrauchsanweisung • Manuale di istruzioni • Manual de instrucciones • Gebruiksaanwijzing • EN FR DE IT ES NL • IM-HEM-7080IT-E-07-09/2012 1663794-1I RU AR
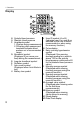
Contents Before using the unit Introduction ................................................................................. 3 Important Safety Information ..................................................... 4 1. Overview ................................................................................ 6 2. Preparation .......................................................................... 10 2.1 2.2 Installing/Replacing the Batteries ...............................................
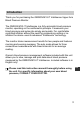
Before using the unit Introduction Introduction Thank you for purchasing the OMRON M10-IT Intellisense Upper Arm Blood Pressure Monitor. The OMRON M10-IT Intellisense is a fully automatic blood pressure monitor, operating on the oscillometric principle. It measures your blood pressure and pulse rate simply and quickly. For comfortable controlled inflation without the need for pressure pre-setting or reinflation the device uses its advanced “Intellisense” technology.
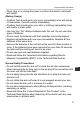
Important Safety Information Important Safety Information Consult your doctor during pregnancy, arrhythmia and arteriosclerosis. Use the unit only to store the designated users measurement results. Please read this section carefully before using the unit. Caution: (General Usage) • Always consult your doctor. You should never stop or change the dosage of medication prescribed by your doctor. • Do not leave the unit unattended with infants or persons who cannot express their consent.
Important Safety Information • Never plug in or unplug the power cord from the electric outlet with wet hands. (Battery Usage) • If battery fluid should get in your eyes, immediately rinse with plenty of clean water. Consult a doctor immediately. • If battery fluid should get on your skin or clothing, immediately rinse with plenty of clean water. • Use only four “AA” alkaline batteries with this unit. Do not use other types of batteries.
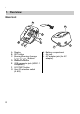
1. Overview 1. Overview Main Unit A H G F E B C D A. Display B. SET button C. Morning/Evening Average ( / ) buttons D. MEMORY button E. USB connector jack (USB 1.1 compatible) F. O/I START button G. User ID selection switch (A & B) 6 I H. Battery compartment I. Air jack J.
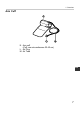
1. Overview Arm Cuff K L M K. Arm cuff (Cuff: arm circumference 22-42 cm) L. Air Plug M.
1. Overview Display N P R T V O W Q Y S AA U AC N. Systolic blood pressure O. Diastolic blood pressure P. Heartbeat symbol 1. (Flashes during measurement) 2. (If flashing after measurement completed indicates blood pressure out of recommended range) Q. Movement symbol (Displayed if you move your body during the measurement.) R. Irregular heartbeat symbol S. Deflation symbol T. Auto mode symbol (Displayed when Auto Mode is set.) U. Battery low symbol 8 X Z AB AD V.
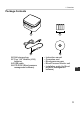
1. Overview Package Contents AE AF AG AH AE.Soft storage bag AF. Four “AA” alkaline (LR6) batteries AG.USB cable AH.
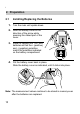
2. Preparation 2. Preparation 2.1 Installing/Replacing the Batteries 1. Turn the main unit upside down. 2. Slide the battery cover in the direction of the arrow while pressing the ribbed part of the cover. 3. Install or replace four “AA” size batteries so that the + (positive) and - (negative) polarities match the polarities indicated on the battery compartment. 4. Put the battery cover back in place. Slide the battery cover as indicated, until it clicks into place.
2. Preparation Battery Life & Replacement If the battery low symbol ( ) appears on the display, replace all four batteries at the same time. - When the battery low symbol ( ) starts to blink, you will still be able to use the unit for a short while. You should replace the batteries with new ones ahead of time. - When the symbol ( ) remains lit, the batteries are exhausted. You should replace the batteries with new ones at once.Turn the unit off before replacing the batteries.
2. Preparation 2.2 Setting the Date and Time Your blood pressure monitor automatically stores up to 84 individual measurement values with the date and time. To make use of the memory and average values functions: • Set the unit to the correct date and time before taking a measurement for the first time. • If the batteries have been removed for more than 30 seconds, the Date/Time setting will need to be reset. 1.
2. Preparation 4. Repeat steps 2 and 3 to set the month. The month is set and the day digits flash on the display. 5. Repeat steps 2 and 3 to set the day. The day is set and the hour digits flash on the display. 6. Repeat steps 2 and 3 to set EN the hour. The hour is set and the minutes digits flash on the display.
2. Preparation 7. Repeat steps 2 and 3 to set the minutes. The minutes settings is set. The unit automatically turns itself off after the minute setting has been set. To adjust the date and time, press the SET button while the unit is in standby mode. Notes on Adjusting the Date and Time Setting If you need to adjust the date and time for some reason, or if the date and time has been reset after replacing the batteries, adjust the date and time between 10:00 and 18:59.
2. Preparation 2. Refer to Chapter 2.2.2 to start setting the date and time. With this manual setting of date and time the unit needs to be manually shut off. It will not automatically turn off after the minutes have been set. Notes: • Please ensure that the date and time have been set correctly so that the weekly averages will be displayed correctly.
Operating instructions 3. Using the Unit 3. Using the Unit 3.1 How to Sit Correctly When Taking a Measurement You can take a measurement on either your left or right arm. Notes: • Measurements should be taken in a quiet place and you should be in a relaxed, seated position. Make sure that the room is not too hot or cold. • Avoid eating, smoking, or exercising for at least 30 minutes before taking a measurement. • Do not move or talk during measurement.
3. Using the Unit Notes: • Correct posture during measurement is necessary to get accurate results. • You should also try to measure your blood pressure at the same time each day. (Within 1 hour after waking up is recommended.) Incorrect Posture • Arched back (leaning forwards) • Sitting cross-legged • Sitting on a sofa or at a low table so that you tend to lean forward These situations could lead to higher blood pressure values due to strain or the arm cuff being lower than the heart.
3. Using the Unit 3.2 Applying the Arm Cuff You can wrap the cuff either on your right or left arm. • Remove tight-fitting clothing from your upper arm. • Do not place the cuff over thick clothes and do not roll up your sleeve if it is too tight. 1. Insert the air plug into the air jack (on the left side of the device). Air jack Air plug The cuff must be fully deflated when it is inserted into the air jack. 2.
3. Using the Unit 3. Hold the grip on the cuff securely with your hand. Grip Fabric fastener 4. Turn the palm of your hand upward. 5. Apply the cuff to your upper arm so that the blue strip is centred on the middle of your inner arm and points down the inside of the arm. The air tube should run down the inside of your forearm and be in line with your middle finger. The bottom of the cuff should be approximately 1 to 2 cm above the elbow.
3. Using the Unit 6. When the cuff is positioned correctly, close the fabric fastener FIRMLY. Notes: • Make certain the cuff fits snugly around your arm. • The cuff should make good contact with your skin. You should be able to fit your index finger between the cuff and your arm easily, so you can pull the cuff off and on. • Make sure that there are no kinks in the air tubing. Taking measurements on the right arm Please note the following points when applying the cuff to your right arm.
3. Using the Unit 3.3 Taking a Reading The unit is designed to take measurements and store the measurement values in the memory for two people using user ID A and user ID B. The unit can also be used to take a single measurement for other persons using the guest mode. The user ID symbol is not displayed when using the guest mode. Measurements taken using the guest mode are not stored in the memory. Using the Guest Mode 1.
3. Using the Unit Selecting the User ID Select your user ID. Always use the same user ID when taking a measurement. The unit stores the measurement values in the memory by the user ID selected. These measurement values are used to calculate the morning averages and evening averages. Slide the user ID selection switch up or down to select user A or B.
3. Using the Unit Using the Single Mode 1. Select your user ID (A or B). 2. Press the O/I START button. All symbols appear on the display. The user ID symbol you selected flashes on the display. The cuff starts to inflate automatically. As the cuff inflates, the unit automatically determines your ideal inflation level. This unit detects the pulse during inflation. Do not move your arm and remain still until the entire measurement process is completed.
3. Using the Unit 3. Inflation stops automatically and the measurement is started. As the cuff deflates, decreasing numbers appear on the display. The heartbeat symbol ( ) flashes at every heartbeat. 4. When the measurement is complete, the arm cuff completely deflates. Your blood pressure and pulse rate are displayed. 5. Press the O/I START button to turn the unit off. Note: If you forget to turn the monitor off, it will automatically turn off after five minutes.
3. Using the Unit Selecting the Auto Mode Auto Mode may be selected for either A or B user. 1. Make sure the unit is powered off. 2. Select your user ID (A or B). 3. Press and hold the SET button. The auto mode symbol ( the display. ) and the oFF setting appears on EN 4. Press the MEMORY button ( ) to select on. Note: Press the MEMORY button to alternate between on and oFF.
3. Using the Unit 5. Press the SET button to confirm the change. The number of seconds between each measurement is displayed. Note: The default value between each measurement is 60 seconds. 6. Press the MEMORY button ( ) to change the interval of time between each measurement. The interval can be set to 15 seconds, 30 seconds, 60 seconds or 120 seconds. Continue to press the MEMORY button until the desired interval appears on the display. 7. Press the SET button to confirm the setting.
3. Using the Unit Using the Auto Mode 1. Select your user ID (A or B). 2. Press the O/I START button. All symbols appear on the display. The user ID Symbol you selected flashes on the display. The cuff starts to inflate automatically. Note: To stop the inflation or measurement, press the O/I START button. The unit will stop inflating, start deflating and will turn off. 3. Inflation stops automatically and the measurement is started. As the cuff deflates, decreasing numbers appear on the display.
3. Using the Unit The second measurement starts automatically. The second measurement is complete, waiting to start the next measurement. The third measurement starts automatically. The consecutive measurements are complete. The average for the three measurements appears on the display. The three individual measurement results are not displayed while Auto Mode is taking the measurements. However, the results for each individual measurement can be displayed after all the measurements have been completed.
3. Using the Unit Important: • If your systolic or diastolic pressure is outside the standard range, the heartbeat symbol will blink when the measurement result is displayed. Recent research suggests that the following values can be used as a guide to high blood pressure for measurements taken at home. Systolic Blood Pressure Above 135 mmHg Diastolic Blood Pressure Above 85 mmHg This criteria is for home blood pressure measurement.
3. Using the Unit What is Irregular Heartbeat? Normal Heartbeat An irregular heartbeat is a heartbeat rhythm that varies Pulse by more than 25% from the Blood pressure average heartbeat rhythm detected while the unit is Irregular Heartbeat measuring the systolic and Short Long diastolic blood pressure. Pulse If such an irregular rhythm is Blood pressure detected more than twice during measurement, the irregular heartbeat symbol ( ) appears on the symbol when the measurement results are displayed.
3. Using the Unit 3.4 Instructions for Special Conditions If your systolic pressure is known to be more than 220 mmHg, press and hold the O/I START button until the arm cuff inflates 30 to 40 mmHg higher than your suspected systolic pressure. 1. Press the O/I START button to turn the unit on. Measurement starts. 2. When the cuff starts to inflate, press the O/I START button and keep it pressed until the pressure is 30 to 40 mmHg higher than your suspected systolic pressure.
3. Using the Unit 3.5 Using the Memory Function The unit is designed to store the blood pressure and the pulse rate in the memory for two people (user A and user B) every time a measurement is completed. The unit automatically stores up to 84 sets of measurement values (blood pressure and pulse rate) for each user (A and B). When 84 sets of measurement values are stored, the oldest record is deleted to save the most recent values.
3. Using the Unit 3. Press the MEMORY button ( ) to display the most recent set of individual measurement values on the screen. The values are displayed from the most recent to the oldest. Note: The date and time are alternately displayed with the measurement values. Alternating display Press the MEMORY button to display the next set of values. Press and hold the MEMORY button to display the values faster.
3. Using the Unit Morning and Evening Averages The unit calculates and displays a weekly average for measurements taken in the morning ( ) and evening ( ). The unit stores 8 weeks of morning averages and 8 weeks of evening averages for each user (A and B). Note: The week begins Sunday at 4:00 AM Morning Averages Morning averages are based on the first average reading using the auto mode or the first reading using the single mode. Measurement times must be between: 4:00 AM and 9:59 AM.
3. Using the Unit About the Weekly Averages Morning Weekly Average This is the average for measurements taken during the morning (4:00 AM-9:59 AM) between Sunday and Saturday. An average for each day is calculated for up to three measurements taken within 10 minutes of the first measurement of the morning.
3. Using the Unit To Display Morning and Evening Averages 1. Select your user ID (A or B). 2. Press the morning average button ( ) or the evening average button ( ). The average for the current week “THIS WEEK” appears on the display. The morning and evening average value of the same week can be displayed by pressing the morning average button ( ) or the evening average button ( ). It is important to check both morning and evening average of the same week. 3.
3. Using the Unit Notes on Display Combinations In addition to the morning average and evening average symbols, the unit may also display the morning hypertension symbol if the morning average for that week is above the home blood pressure guideline. (See Chapter 3 “Using the Unit - Important information” for details.) Depending on your measurement results, these may be displayed in the following combinations.
3. Using the Unit The morning hypertension symbol ( ) appears if the weekly average for morning measurements is above 135/85. In this case the morning hypertension symbol ( ) is displayed when the evening average is displayed, regardless of the values for the evening average. To Delete All Values Stored in the Memory The values stored in the memory are deleted by user ID. You cannot partially delete values stored in the memory. All values for the user you select will be deleted. 1.
3. Using the Unit 3.6 Downloading Data to a PC Omron’s blood pressure management software included with this unit allows you to view, manage and print data about blood pressure measured by the OMRON M10-IT Intellisense. Please see attached “Installation Guide” before installing software onto a PC. To operate the software application, please refer to the Installation Guide and use the help function in the software application. Use only the authorized OMRON USB cable sold with this unit.
4. Quick Reference Guide 4. Quick Reference Guide This Quick Reference Guide is for reference only. Please read the entire manual before using the unit for the first time. To help ensure a reliable reading, avoid eating, smoking, or exercising for at least 30 minutes before taking a measurement. Note: Remove any tight-fitting clothing from your upper arm. 1. Sit on a chair with your feet flat on the floor and place your arm on a table so that the arm cuff will be at the same level as your heart. 2.
Care and maintenance 5. Handling Errors and Problems 5. Handling Errors and Problems 5.1 Error Messages Error Display Cause Remedy Cuff is under inflated. Movement during measurement. Carefully read and repeat the steps listed under Chapter 3.3. Cuff over inflated. Batteries have run down. Replace all four “AA” batteries with new ones. Refer to Chapter 2.1. Blinks or appears continuously. Movement, sound. Carefully read and repeat the steps listed under Chapter 3.3. Cuff leaks air.
5. Handling Errors and Problems 5.2 Troubleshooting Problem No display appears when the O/I START button is pressed. 42 Cause Remedy The batteries are empty. Replace the batteries. Is the cuff wrapped correctly around the arm? Attach the arm cuff correctly. Cannot measure or readings are too high. The cuff pressure does not rise although the pump motor can be heard. Check that the air plug is properly connected to the unit. Push the air plug firmly into the air jack.
6. Maintenance and Storage 6. Maintenance and Storage To protect your unit from damage, please observe the following: • Do not subject your unit and cuff to extreme temperatures, humidity, moisture or direct sunlight. • Do not fold the cuff or tubing tightly. • Do not disassemble the unit. • Do not carry out repairs of any kind yourself. If a defect occurs, consult the OMRON distributor or Customer Services as mentioned on the packaging, or seek the advice of your surgical appliance stockist or pharmacist.
7. Optional Parts 7. Optional Parts AC Adapter S Arm Cuff Order No. 9515336-9 Order No. 9956685-4 Using the Optional AC Adapter Insert batteries into the battery compartment even when using the AC adapter. Notes: • Never plug in or unplug the power cord from the electric outlet with wet hands. • Use only the original AC adapter designed for this unit. Use of unsupported adapters may damage the unit. • When storing the AC adapter with the main unit, be careful not to damage the main unit or cuff. 1.
8. Technical Data 8. Technical Data Product Description Model Display Measurement Method Measurement Range Accuracy Inflation Deflation Memory Power Source Battery Life Operating temperature/ Humidity Storage temperature/ Humidity/Air Pressure Console Weight Cuff Weight Outer Dimensions Cuff Dimensions Package Content Digital Automatic Blood Pressure Monitor OMRON M10-IT (HEM-7080IT-E) LCD Digital Display Oscillometric method Pressure: 0 mmHg to 299 mmHg Pulse: 40 to 180/min.
8. Technical Data Important information regarding Electro Magnetic Compatibility (EMC) With the increased number of electronic devices such as PC’s and mobile (cellular) telephones, medical devices in use may be susceptible to electromagnetic interference from other devices. Electromagnetic interference may result in incorrect operation of the medical device and create a potentially unsafe situation. Medical devices should also not interfere with other devices.
9. Some Useful Information about Blood Pressure 9. Some Useful Information about Blood Pressure What is Blood Pressure? Blood pressure is a measure of the force of blood flowing against the walls of the arteries. Arterial blood pressure is constantly changing during the course of the heart's cycle. The highest pressure in the cycle is called the Systolic Blood Pressure; the lowest is the Diastolic Blood Pressure.
9. Some Useful Information about Blood Pressure Upper curve: systolic blood pressure Lower curve: diastolic blood pressure 200 mmHg 150 100 50 6 12 18 24 Time of day Example: fluctuation within a day (male, 35 years old) Classification of Blood Pressure by the World Health Organization The World Health Organization (WHO) and the International Society of Hypertension (ISH) developed the Blood Pressure Classification shown in this figure.
9. Some Useful Information about Blood Pressure Manufacturer OMRON HEALTHCARE Co., Ltd. 53, Kunotsubo, Terado-cho, Muko, Kyoto, 617-0002 JAPAN EU-representative OMRON HEALTHCARE EUROPE B.V. Scorpius 33, 2132 LR Hoofddorp, THE NETHERLANDS www.omron-healthcare.com Production facility OMRON (DALIAN) CO., LTD. Dalian, CHINA OMRON HEALTHCARE UK LTD. Opal Drive, Fox Milne, Milton Keynes, MK15 0DG, U.K. Subsidiary OMRON MEDIZINTECHNIK HANDELSGESELLSCHAFT mbH John-Deere-Str.