
User Manual


17
INSPECT UNIT AND RECHARGE BATTERY
STEP 2 INSERT THE POWER PLUG INTO AN
OUTLET (continued)
:KHQFKDUJLQJWKHEDWWHU\WKHEDWWHU\LFRQEOLQNVRQWKH
screen.
:KHQIXOO\FKDUJHGWKHLFRQZLOOGLVSOD\VKRUWO\RQWKHVFUHHQ
then power off. Press the
(power) button to see if the battery
is fully charged.
Press the
(power) button when the display is off. Then the
battery icon appears on the display.
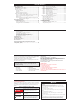
BATTERY ICON
Note: While the battery is charging, the main unit does not work.
Display Contents
Battery charge is full.
Battery charge is half.
Battery is close to low.
Battery is depleted.
Battery life
Rechargeable battery will last for 500 uses when fully charged and
under the following conditions: new battery was fully charged,
used 1 time/day in normal temperatures of 73.4 °F (23 °C). Battery
life depends on usage and storage conditions.
Note: Temperature during battery charging should be cool and
dry, +41 to +95 °F (5 to +35 °C).
Charging
18
STEP 3 UNPLUG THE AC ADAPTER AND
POWER PLUG ONCE THE BATTERY IS FULLY
CHARGED
INSPECT UNIT AND RECHARGE BATTERY
Outlet
1919
ASSEMBLY STEPS
STEP 1 PREPARE PADS
Put the jack into the bottom left side of the main unit. Place the
SDGVGDUNVLGHXSRQWRDÀDWVXUIDFH
Note: Do not turn the power on before placing the pads on the
body.
Before use, inspect the Pad and the cord for open wires or
any damage, if damaged, do not use and replace immediately
EHFDXVHLWFRXOGFDXVHVNLQEXUQVRU¿UH
STEP 2 ASSEMBLE GELS
Remove the Gels from the sealed plastic container.
Note:
The Pad and the Gel must be used together for safety and effectiveness.
Clean and dry affected area so it’s free of all lotions/oils/sweat.
STORING THE PADS ON THE PAD HOLDER
5HPRYHWKHSODVWLF¿OPDQGSODFH
the sticky side of the gel on either
side of the pad holder.
Pad facing down
Pad Holder
Pad sticky side up
2020
ASSEMBLY STEPS
STEP 3 PLACE GELS ONTO THE PADS
(DFKJHOKDVSODVWLF¿OPV5HPRYHWKHEODQNSODVWLF¿OPDQG
place it squarely onto the dark side of the pads.
Make sure the gel lays evenly and securely with no bubbles,
bending or missing pieces. Check for damage and check the
adhesion before each therapy session.
The gel should read “SKIN” on top. Remove the “SKIN” side’s
SODVWLF¿OPDQGSODFHRQWRWKHVNLQ
Note: Do NOT turn unit on until pads with gels are on your skin.
You MUST USE BOTH PADS with GELS or stimulation
will not work.
STEP 4 ATTACH THE PADS TO THE BODY
Make sure that pads stick to the skin.
For optimal therapy:
Place pads on either side of the pain,
not directly on the pain.
Place pads at least 1 inch apart.
MUST USE TWO PADS at a time for
therapy to work.
Do not overlap pads or put on top of each
other.
Do not add spray, lotions or creams to skin or pads.
Do not share pads.
The pads and gel are not made with natural rubber latex.