T9P new (6) 7/17/02 6:05 PM Page 1 R INSTRUCTION MANUAL Automatic Blood Pressure Monitor and Print-Out with IntelliSense™ Model T9P
T9P new (6) 7/17/02 6:05 PM Page 2 TITLE TABLE OF CONTENTS Introduction...................................................................................................3 Notes on Safety.............................................................................................4 Know Your Unit............................................................................................5 Quick Reference Guide ................................................................................
T9P new (6) 7/17/02 6:05 PM Page 3 INTRODUCTION TITLE Thank you for purchasing the Omron Automatic Blood Pressure Monitor and Print-Out with IntelliSenseTM, T9P. Although your blood pressure fluctuates throughout the day, no self-adjustment is necessary as the monitor intelligently adjusts to your changing conditions. The IntelliSenseTM monitor uses fuzzy logic intelligence to sense both your systolic and diastolic blood pressure values, and the result is personalized inflation with every reading.
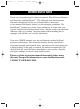
T9P new (10) 8/6/02 2:31 PM Page 4 NOTESTITLE ON SAFETY [ [ The warning signs and the sample icons shown here are listed for you to use the product safely and correctly as well as to prevent the risk and the damage to you and others from happening. The icons and meanings are as follow. Warning sign Caution Contents Indicates matters in which bodily harm or material damage* may arise as a result of incorrect handling.
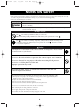
T9P new (6) 7/17/02 6:05 PM Page 5 KNOWTITLE YOUR UNIT Main Unit: Heart Symbol AC Adapter Jack Adjust Date/Time Set Date/Time Systolic Blood Pressure Printer Jack Cuff Jack ON/OFF Button Diastolic Blood Pressure START Button Pulse Rate Memory Call Button Date/Time Display Printer-Unit: Printer Cover Printer Cable Plug Power/Operation Light Paper Feed Print Current Data/Stop Printing Print Graph Print All Data Accessories: Arm Cuff (Applicable arm cuff for Adults 22 to 32 cm.
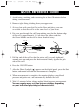
T9P new (6) 7/17/02 6:05 PM Page 6 TITLE QUICK REFERENCE GUIDE 1. Avoid eating, smoking, and exercising for at least 30 minutes before taking a measurement. 2. Remove tight-fitting clothing from your upper arm. 3. Sit in a chair with your feet flat on the floor and place your arm on a table so that the cuff is at the same level as your heart. 4.
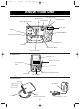
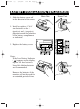
T9P new (6) 7/17/02 6:23 PM Page 7 TITLE BATTERY INSTALLATION/REPLACEMENT Main Unit: 1. Slide the battery cover off in the direction of the arrow. 2. Install or replace 4 "AA" size batteries so the + (positive) and – (negative) polarities match the polarities of the battery compartment as indicated. 3. Replace the battery cover. Notes: If the Low Battery Indicator ( ) appears on the display, replace all four batteries. Long-life alkaline batteries are recommended.
T9P new (6) 7/17/02 6:05 PM Page 8 HOW TO SET TIME AND DATE TITLE 1. When the batteries are installed, the display will show 12:00a.m. 2. Press and hold the “SET” button. The year digits (2001) will flash. 3. Press the “ADJUST” button to advance the digit(s) one at a time. If you hold down the ADJUST button, the digits will advance rapidly. 4. Press “SET” button when desired number is on the display to lock setting. 5. Repeat Step 3-4 for month and date. 6. Repeat Step 3-4 for hour and minutes.
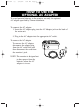
T9P new (6) 7/17/02 6:05 PM Page 9 HOW TITLE TO USE THE OPTIONAL AC ADAPTER To avoid potential damage to the monitor, use only the optional AC adapter specified by Omron distributor. To connect the AC adapter 1. Insert the AC adapter plug into the AC Adapter jack on the back of the main unit. 2. Plug in the AC adapter into the appropriate AC outlet.
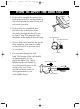
T9P new (6) 7/22/02 9:47 AM Page 10 HOW TO APPLY THE ARM CUFF TITLE 1. If the cuff is assembled correctly, the hook material will be on the outside of the cuff loop and the metal D-ring will not touch your skin. 2. If the cuff is not assembled, pass the end of the cuff furthest from the tubing through the metal D-ring to form a loop. The smooth cloth should be on the inside of the cuff loop. IC TOL SYS LIC STO DIA E/min PULS Pile Side Material Sewn Hook Material 3.
T9P new (6) 7/17/02 6:05 PM Page 11 TITLE TITLE HOW TO APPLY THE ARM CUFF 5. Pull the cuff so that the top and bottom edges are tightened evenly around your arm. 6. When the cuff is positioned correctly, press the sewn hook material FIRMLY against the pile side of the cuff. 7. Make certain the cuff fits snugly around your arm. The cuff should make good contact with your skin. You should be able to fit your index finger between the cuff and your arm easily, so you can pull the cuff off and on. 8.
T9P new (6) 7/17/02 6:05 PM Page 12 TITLE HOW TO TAKE A READING 1. Press the ON/OFF button. a) All display symbols appear for approximately one second. b) When the monitor becomes ready to measure, the Heart Symbol appears on the display. 2. Press the START button and remain still. As the cuff begins to inflate, the monitor automatically determines your ideal inflation level.
T9P new (6) 7/17/02 6:05 PM Page 13 TITLE HOW TO TAKE A READING Instructions for special conditions: [ If your systolic pressure is known to be more than 220 mmHg, push and hold the START button until the monitor inflates 30 to 40 mmHg higher than your suspected systolic pressure. NOTE: Do not apply more pressure than necessary. The monitor will not inflate above 300 mmHg. [ If you want to stop the measurement, push the ON/OFF button.
T9P new (6) 7/22/02 9:46 AM Page 14 TITLE HOW TO USE THE MEMORY FUNCTION This monitor has a memory capable of storing twenty-eight (28) sets of readings. Every time you complete the measurement, the monitor automatically stores blood pressure and pulse rate. [ [ Push the Symbol ( button to recall stored readings while the Heart ) is displayed. When twenty-eight (28) sets of readings are stored in memory, the oldest set will be deleted to store a new set.
T9P new (6) 7/17/02 6:05 PM Page 15 TITLE PRINTER UNIT HOW TO CONNECT 1. Remove printer cable plug from around printer unit. 2. Connect printer cable plug cord to the main unit. Arrow (8) on printer cable plug should face down to main unit.
T9P new (6) 7/17/02 6:05 PM Page 16 HOW TO LOAD PRINTER PAPER TITLE 1. Open printer cover in the direction indicated by the arrow symbol and remove paper roll from the main unit. 2. Peel off the glued edge of the printing paper included with the unit, and cut the first 10 cm with a pair of scissors. 3. Press the PAPER FEED button while inserting the edge of the printing paper into the paper feeding slot. When the edge of the paper protrudes sufficiently, release the PAPER FEED button. 4.
T9P new (6) 7/17/02 6:05 PM Page 17 HOW TO USETITLE THE PRINTER-UNIT The T9P has the ability to print all the readings stored in memory. NOTE: [ [ [ [ [ Make sure printer-unit is connected to main unit (see How to Connect Printer-Unit) Do not use printer-unit without loading printer paper (see How to Load Printer Paper). Improper use will decrease operation life cycle of printer-unit. Main unit does NOT have to be ON to operate printer-unit.
T9P new (6) 7/17/02 6:05 PM Page 18 HOW TO USETITLE THE PRINTER-UNIT The numerical print-out will list all stored readings (maximum of 28 readings) starting with the most recent reading to last stored reading: Systolic Reading Column Month(s) Date Time/Hour [ [ [ Diastolic Reading Column 3-6 mmHg D. T. 20 15 23 11 1 15 3 14 5 7 15 7 20 12 3 12 10 12 12 14 14 7 21 15 22 12 4 6 *AV.
T9P new (6) 7/17/02 6:05 PM Page 19 HOW TO USETITLE THE PRINTER-UNIT 3. Press “GRAPH” button to print a graph of all stored readings (stores a maximum of 28 readings). Month(s) 3-6 50 100 mmHg 150 200 Last reading stored If reading is lower than 50 mmHg or higher than 200 mmHg, (; or :) will appear.
T9P new (8) 7/29/02 11:30 AM Page 20 TROUBLESHOOTING TITLE Main Unit: Error Indicator Cause Cuff under-inflated. Movement during measurement. Correction Turn monitor off, wait 2-3 minutes and take another measurement. Repeat steps listed under "How to Take a Reading." If "EE" is displayed again, take another measurement by pressing and holding the START button as shown on instruction page 13 under "How to Take a Reading", instructions for special conditions.
T9P new (6) 7/17/02 6:05 PM Page 21 TITLE TROUBLESHOOTING Printer Unit: Error Indicator Nothing is printed Power/Operation light is blinking, stopped printing No printer paper comes out Cause Correction Printer cable plug is not connected properly or damaged Connect correctly Reference p.
T9P new (6) 7/17/02 6:05 PM Page 22 CARE ANDTITLE MAINTENANCE To protect your monitor from damage, please AVOID the following: [ Subjecting your monitor and cuff to extreme temperatures, humidity, moisture, and direct sunlight. [ Folding the cuff and tubing tightly. [ Inflating the monitor over 280 mmHg. [ Disassembling the monitor. [ [ [ Subjecting the monitor to strong shocks (for example, dropping the monitor on the floor.) Do not clean the monitor with volatile liquids.
T9P new (9) 8/1/02 3:06 PM Page 23 SPECIFICATIONS TITLE MAIN UNIT: Model: Display: Measurement Range: Accuracy/Calibration: Inflation: Deflation: Rapid Pressure Release: Pressure Detection: Measurement Method: Pulse Wave Detection: Power Source: Battery Life: Operating Temperatures/Humidity: Storage Temperatures/Humidity: Main Unit Weight: Main Unit Dimensions: Cuff Dimensions: Cuff Circumference: Accessories: T9P LCD Digital Display Pressure: 0 to 299 mmHg Pulse: 40 to 180/minute Pressure: ±4 mmHg Pu
T9P new (6) 7/17/02 6:05 PM Page 24 TITLEPRESSURE ABOUT BLOOD What Causes High Blood Pressure ? Blood pressure is only classed as high if it doesn’t go down when you rest. Permanently raised blood pressure can be caused by several factors such as hardening of the arteries, smoking or drinking too much alcohol. It can also be caused by cholesterol, a type of fat, building up inside your blood vessels and making them narrower. Being under stress can add to the problem.
T9P new (6) 7/17/02 6:05 PM Page 25 Product of OMRON Corporation, Japan OMRON Healthcare Singapore Pte Ltd 83, Clemenceau Avenue #11-01, UE Square Singapore 239920
T9P new (6) 7/17/02 6:05 PM Page 26
T9P new (6) 7/17/02 6:05 PM Page 27
T9P new (6) 7/17/02 6:05 PM Page 28