
Installation Guide


Re-Roofing With Ondura Tiles.
Ondura tiles make an ideal re-roof over both shingles (up to two
old roof layers) and metal roofing.
Over shingles, simply nail in place as you would a new roof after
first removing shingle ridge and hip covers and repairing any rotted
or unstable deck.
Over flat, standing seam metal over a solid deck, simply flatten
themetalseamsandproceedasifovershingles.Checklocalcodes
for other dry-in procedures.
Over corrugated or irregular metal roofing, we recommend use of
Ondura sheets instead of tiles.
Installing The First Tile
On A Square Roof.
1. From the corner where the eave and rake meet, measure along
the eave 48 inches and mark.
2. From the corner of the rake and the ridge, measure along
the ridge 48 inches and mark.
3. Snap a chalk line between these marks for tile alignment.
4. Nowyoucaninstallthefirsttilewitha1.75˝overhang.Starting
at the rake edge of the tile, nail down the first corrugation so that
this edge is aligned with the rake.
5. Place a closure strip between the tile and drip-edge and nail tile
in place with barbed roofing nails (4 1/2˝ from top) and Ondura
nails (through closure at eave). See Fig. 13 nailing pattern.
Checkeavealignmenttoinsureinstallationisstraight.
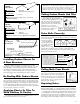
Drive Shingle Nails And
Ondura Nails Correctly.
Drive shingle nails through the valleys 4 1/2˝ from the top edge
of the tile so that the lapping tile covers heads. Drive perpendicular
into roof decking - not at an
angle - so nail head is snugly
in contact with tile. See Fig. 12.
Do not overdrive or underdrive
nails. You can also use a roof-
ing nail gun; however, never
use a staple gun.
Use only genuine 3˝ Ondura
nails to drive through corruga-
tion crowns at the eave, through
ridge cap at corrugation crowns,
and at the lower corners and
center of end lap of each tile
to protect against wind lift.
See Fig. 13.
Finishing The First Row Of Tiles.
1. From the first chalk line, mark off successive 44-inch spaces
alongtheeave.Dothesameattheridge.Thisdistanceallowsfor
a one corrugation side lap.
2. Snap chalk lines between the eave and ridge marks for tile alignment.
3. Nowlapthesecondtileonecorrugationoverthefirst,fastening
it as you did the first one.
4. Continuefasteningtilesuntilyouarefivetilesfromtheendofthe
eave row. Lay the last five into position to see if you have a tile valley
flushwiththerake.Ifyoudonothaveavalleyflushwiththerake,
shift all five unnailed tiles left or right until you have a valley flush with
the rake. Fasten these tiles in place with closure strips beneath eave edge.
Shingle
nail in valley.
Fig. 12
Ondura nail
in crown.
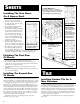
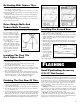
Installing The Second Row.
1. Snap a chalk line (or pull a string line) 14˝ from the lower edge
of the first row of tiles (See Fig. 15).
2. Begin the second and all even-numbered rows with a tile cut along
a valley with a knife so that this tile has only six crowns. Doing this
staggers side-laps from row to row so there are never four tiles
thick at any point.
3. Place this six-corrugation tile flush with the rake edge, butting the
chalklinesnappedonthefirstrow.Thiswillgiveyouanevenexpo-
sure along the roof.
4. Nailthistilein
place and install
the remainder of
the second row
using full tiles.
5. Continueinstalling
rows on both sides
of roof until reach-
ing the ridge.
NOTE: With roof
valley, always flash the valley first, then work from the rake edge to the valley.
Roofing Felt
• = Shingle nail in
valley under lap
X = Ondura nail in corrugation crown
Fig. 13
Row 2
Row 1
Fig. 15
2nd Row
1st Row
Maximum exposure 14˝
1.75˝ Overhang
Minimun end-lap
is 5 3/4˝
Roofing Felt
• = Shingle nail in
valley under lap
X = Ondura nail in corrugation crown
Fig. 14
Eave
Row 1
For high wind ereas.
FLASHING
Small Pipeflashing Accessory
(12˝x12˝ Flat Center).
Thesmallpipeflashingaccessorycanbeusedforcoldpipesupto10˝
in outside diameter or for hot pipes with a maximum of 6˝ in outside
diameter.Toinstall,lineupthecorrugationsoftheaccessorywiththose
of the Ondura sheet so the pipe to be flashed will come through the
centeroftheaccessory.Cuta15˝x15˝squareholeintheOndura
sheetsotheaccessorywillnestwell.Applytwobeadsofrubberized
elastomeric flashing cement/caulk around the square hole before
placing the accessory.
Cold Pipes:Cutaholeinthecenterareaoftheaccessorytofitthe
pipe.Insertthepipe.SlipanOndurapipeflashingbootwithrubber
collar over the pipe, caulk the boot to the flashing accessory and then
fasten it to the accessory with sheet metal screws.
Hot Pipes:Cutaholeinthecenterareaoftheaccessorythatis
2˝biggerallaroundthanthehotpipe.Installthehotpipemanufac-
turer’sbootwithcaulkandsheetmetalscrews.Theninstallthepipe
manufacturer’s storm collar per their instructions.
5