
Installation Guide


FINISHING
Handling Hips With Sheets or Tiles.
For hips, sheets or tiles from either side must meet to support hip cover
(an Ondura ridge cap). Framing should also be in place beneath and
near enough to the upper ends to receive nails securing the hip cover.
Snapchalklinesoneachsideofhiptomarkareaofhipcover.Then
cutclosurestripsintwocorrugationpiecesandusingrubberizedelas-
tomeric flashing cement/caulking, caulk in place a two corrugation
overlapping pattern (Fig. 30 or 31).Installhipcoverwith7˝endlaps.To
achieveatileeffect,eitherbuyridgescuttotileorcutridgesto193/4˝.
Fig. 18
Use elastomeric caulking at all
flashing joints and closure strips.
Ondura
Closure
strips
Purlins
Flashing
Sidewall Sidewall covering
Flashing
Closure under flashing
Ondura
Fastener
Fig. 20
Ondura
Inside closure
strip placement
Nail
Flashing
Deck
of
purlins
Outside closure
strip under flashing
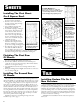
Installing The Ridge On A Sheet
Or Tile Roof.
Installallsheetsortilesonbothsidesoftheroofbeforelayingthe
ridge. At the ridge, the upper ends of sheets or tiles should be no more
than two inches apart to support the ridge cap (Fig. 22, 27, 28 or 29).
Don’tnaildowntheupperendsyet.They’resecuredwithOndura
nails when the ridge cap is nailed in place. Ondura ridge caps are avail-
able in two widths to cover a wide range of building applications.
Place the first ridge cap at the end of the ridge away from the
prevailing wind, allowing it to project out three to six inches from
theridgeend.Insertclosurestrip,thendriveOnduranailsthrough
ridge piece, closure strip, and every crown of underlying sheets or
tiles.Nowcutinthreetosixinchesalongthecrownoftheportion
of ridge cap projecting out from
the end. Fold down resulting
flaps for a weather guard.
Position subsequent ridge
capswitha7˝endlap.
Toachieveatileeffect,cut
ridges into fourths and install
in the same manner as full
sizedridgeswitha7˝endlap.
Fig. 22
2˝ Maximum
between
sheets
Narrow Ridge Cap Installation
Nails 1˝ from edge
of ridge cap
Purlin 1˝
down from
peak
For
3:12 to 8:12
Slope Application
Ondura Sheets As Siding.
As siding, Ondura sheets are installed either vertically over girt framing
orhorizontallyoverstuds.Shortcommonwasherednailscanbeused
invalleys.Alwaysuse3˝nailsinside-lapcrowns.Inbothapplications,
24 inches is the maximum suggested support spacing.
Sidewall covering
Sidewall
Deck of purlins
Fastener
Flashing
Sloping rafter
Fig. 19
Fig. 21
6
Ondura
Deck
of purlins
FinishingUp:
Cutafull-sized
Ondura sheet to a
seven-corrugation
width.Cutan
opening 20 inches
deep from the
bottom edge of the
sheet and three
corrugations wide.
Fit the sheet over the
flashing accessory so
that it will cover the
top and both side
corrugations.This
sheet should fit
directly over the sheet to which the accessory is applied, be caulked to the
accessory, and its upper end should be under the lap of the next higher
row of Ondura sheets. Fasten with Ondura nails (see Fig. 16).
Small
Pipeflashing
Fig. 16
Exploaded view
of molded base
pipeflashing
accessory
installation
Ondura
Sheet
Ondura
Pipeflashing Boot
Molded Base pipe
Flashing Accessory
Ondura
Sheet
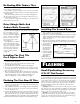
Valley Flashings.
For valleys, install a minimum 24˝
widemetalvalleyflashing.Cut
sheets or tiles at an angle to fit the
valley; then turn over, and on the
undersides along the valley edge,
caulk two corrugation pieces of
closure strip in an overlapping
pattern (Fig. 17).Thenputa1/2˝
bead of caulking on the flat side of
the closure strips and on the sheet
betweentheclosurestrips.Turnsheetsortilesrightsideup,careful-
ly lay in place so caulked closures seat on flashing, and nail in place.
2˝ Minimum
Fig. 17
2-Corrugation
pieces of solid
closure strip
Valley
flashing
(24˝ Min.)
Large Pipeflashing Accessory
(20˝x20˝ Flat Center).
Thelargepipeflashingaccessorycanbeusedforcoldpipesupto
18 inches in outside diameter or for hot pipes with a maximum of
14inchesinoutsidediameter.Toinstall,lineupthecorrugationsof
the accessory with those of the Ondura sheet so the pipe to be flashed
willcomethroughthecenteroftheaccessory.Cuta23˝x23˝square
hole in the Ondura sheet so the accessory will nest well. Apply two
beadsofrubberizedelastomericflashingcement/caulkaroundthe
square hole before placing the accessory.
Cold Pipes:Installthesameasthesmallpipeflashingaccessory.
Hot Pipes:Installthesameasthesmallpipeflashingaccessory.
Finishing Up:Cutafull-sizedOndurasheettoanine-corrugation
width.Cutanopening27inchesdeepfromthebottomedgeofthesheet
and five corrugations wide. Place the sheet over the flashing accessory so
thatitwillcoverthetopandbothsidecorrugations.Thissheetshouldfit
directly over the sheet to which the accessory is applied, be caulked to the
accessory, and its upper end should be under the lap of the next higher
row of Ondura sheets. Fasten with Ondura nails (see Fig. 16).
Slope Changes.
See Fig. 18 and 19 for Ondura installation at a slope change.
Flashing width should be increased as slope differences increase or
whenever water build-up on the lower slope can be substantial.
Sidewall Flashing.
See Figs 20 and 21 on how to flash when Ondura roofing meets
a sidewall.