ONDUVILLA ® The Attractive Alternative to Shingles I N S T A L L A T I O N I N S T R U C T I O N S 1
INSTALLATION INSTRUCTIONS Even though ONDUVILLA® is easy to install, it is important to read through these instructions to understand how they apply to your roof. ONDUVILLA®, like all roofing materials, should be carefully installed. Take your time and closely follow these installation guidelines. If you require additional assistance, please feel free to call our support team at 800.777.7663 and one of our associates will be happy to help.
TABLE OF CONTENTS Supporting structure................................................................ 4 Minimum pitch......................................................................... 4 Materials checklist.................................................................... 4 Installation principles............................................................... 5 Fastening.................................................................................. 5 Eaves.......................................
Detailed ONDUVILLA® installation guide Supporting structure ONDUVILLA® can be installed on all standard roof structures. Onduvilla® Fasteners Wooden deck (for example OSB) Minimum pitch: 2/12 for solid deck Ridge Slope Rise Eave Run Slope = amount of rise per run Example: 3-in rise per 12-in run = 3:12 Minimum slope required: 2:12 For residential applications, ONDUVILLA® should be installed over solid decking—usually plywood, wood boards, OSB, or planks—with a proper underlayment (felt).
installation principles Start installation at eave. Overlap joints away from entrances and/or away from the point of greatest traffic. This will improve overall appearance. Position the dark strip “shadow line” at the top. Stagger each course at least one corrugation from previous piece. Different visual effects can be created by various staggers of 1, 2, or 3 corrugations. Ensure proper waterproofing by aligning the overlapping guides.
Eaves Drive fasteners on top of the corrugations between the overlapping guides Underlayment e To bered g stag ” .5 12 ” 25 .6 10 Roof Deck (OSB) At eaves drive fasteners on top of the corrugations above the overlapping guides Shingle can overhang 1’’ to 1-1/2” Closure Strips Leave a space of 1/4’’ between the first corrugation and the rake line in order to provide for the correct fastening of the Verge Piece. (See Verge section on page 10.
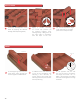
ridge for pitch below 10/12 Gap for ventilation Gap for ventilation Gap for ventilation Verge Piece 1 Run shingles to ridge. Leave gap for ventilation if desired. Cut the Apron Piece Verge Piece 2 The Apron Piece is installed on both sides of the roof to secure watertightness. At the verge, the Apron Piece has to be cut on site parallel to the last corrugation of the shingle. 3 For pitches above 8/12, it is necessary to cut the flat part above the corrugations.
hip 1 Carefully cut shingles maintaining proper gap for ventilation. 2 Apply Flashing Band for the first 3’ of hips and then ONDULAIR SLIM membrane for rest of hip. ONDULAIR SLIM Perforated aluminum selfadhesive tape, which provides additional water tightness and assists in the ventilation at hips and ridges. Closure Cap 3 8 Fix the Slim Cap and Closure Cap always on top of the corrugations of ONDUVILLA® shingles. As per the ridge, soft fastening is recommended at low pitches.
VALLEY Ice and water shield Roof deck (OSB) Metal valley Roof deck (OSB) 10” 10” Underlayment Fillers cut from Closure Strips Center full width of ice and water leak barrier in valley directly over sheathing. Install a minimum of 20” wide metal valley over ice and water leak barrier in 8’ to 10’ sections in shingle fashion overlapping a minimum of 6”. Preformed “w” style valley is preferred. Secure every 24” o.c. with cleats or large head nails.
Hips to ridge x pro Ap Slim Cap 4” -3/ 5 .1 Apron Piece Flashing Band 1 45° Slim Cap Secure the watertightness of the detail by applying self adhesive flashing material (Flashing Band.) 2 Apply a module consisting of 2 Slim Cap portions (to be fastened together using Flashing Band), cutting them at the right angle in accordance with the slope of the roof. 3 Cut the Slim Cap with an angle of 45° and fasten it. The ridge piece has to overlap the hips.
SIDEWALL METHOD 1 Install ice and water leak barrier directly to sheathing and 4” up sidewall. Run shingle to the sidewall and trim to fit. Install metal flashing over last corrugation and onto ice and water leak barrier on sidewall. Fasten through metal and shingle corrugation and fasten flashing to sidewall. Flash top edge of metal on sidewall with self-adhesive flashing tape making sure to correctly shingle flashing, weather resistant barrier and cladding over metal flashing.
MONO RIDGE TO WALL Universal Ridge Closure Strips Verge Piece 1 12 Install the Verge Piece. Install Closure Strips. 2 Apply a Standard Ridge piece and fasten it on both sides.
VENTILATION All roofs require proper ventilation. This illustrates how to install a power vent. Locate and position roof vent as recommended by manufacturer. Run shingles up slope to the desired location of vent. Position ONDUVILLA® Flashing Adapter with corrugations overlapping shingle. Use vent template to mark and cut out opening for vent in sheathing and the ONDUVILLA® Flashing Adapter. Make sure flange on the vent fits on the flat area of the adapter.
SPECIAL APPLICATION: ONDUVILLA® Flashing adapter The ONDUVILLA® Flashing Adapter can be used in a variety of locations on the roof in order to provide proper water tightness. This may include chimneys, ventilators, skylights or other roof penetrations. 1 Placing adapter at base of curb, chimney, etc. A: Install shingles up to a maximum of 1 shingle height or 16’’ away from the curb base. B: Place adapter so that one full corrugation is on each side of the curb.
ONDUVILLA®, a complete roofing system A complete system for a professionally installed roof ONDUVILLA ® has everything you need all in one comprehensive solution! All visible accessories are designed with the same shingle material, including the ridge, hip and gable end. And you can benefit from a wide range of smart, functional accessories to deliver a professionally installed roof.
Molded accessories Other accessories Product Description dimensions Slim Cap Cap for ridge and hips, for roofs with a pitch up to 10/12. 41-1/2 x 7’’ Closure Cap Designed for the finishing of ridge and hip lines (pitch up to 10/12. 42 x 7’’ Apron Piece Designed to provide watertightness and ventilation to the ridge line (Residential), for roofs with a pitch up to 8/12. Can also be used to seal the gap between Onduvilla® shingles and vertical wall abutment.