
Assembly Instructions


start here
commencez ici empezar aquí
Assembly Instructions
Les Instructions D’assemblage
Instrucciones De Montaje
English Spanish
French
1. Find a clear area in which you can work.
2. Unpack fixture and glass from carton.
3. Carefully review instructions prior to assembly.
1. Encontrar un área clara en la que se puede trabajar.
2. Desembale xture fi y el vidrio de la caja.
3. Revise cuidadosamente las instrucciones antes del montaje.
1. Trouvez un endroit clair dans lequel vous pouvez travailler.
2. Déballez fi xture et de verre du carton.
3. Examinez attentivement les instructions avant l'assemblage.
SAFETY WARNING: READ WIRING AND GROUNDING INSTRUC-
TIONS (I.S. 18) AND ANY ADDITIONAL DIRECTIONS. TURN
POWER SUPPLY OFF DURING INSTALLATION. IF NEW WIRING IS
REQUIRED, CONSULT A QUALIFIED ELECTRICIAN OR LOCAL
AUTHORITIES FOR CODE REQUIREMENTS.
ADVERTENCIA DE SEGURIDAD: CABLEADO DE LEER Y
INSTRUCCIONES DE CONEXIÓN A TIERRA (SI 18), E
INSTRUCCIONES ADICIONALES. VUELTA DE ALIMENTACIÓN
DURANTE LA INSTALACIÓN. SI SE REQUIERE UN NUEVO
CABLEADO, CONSULTE A UN ELECTRICISTA O AUTORI-
DADES LOCALES PARA REQUISITOS DEL CÓDIGO.
AVERTISSEMENT DE SÉCURITÉ: CÂBLAGE LIRE ET MISE A LA
TERRE (IS 18) ET TOUTE AUTRE INSTRUCTION. COUPER
L'ALIMENTATION PENDANT L'INSTALLATION. SI DE
NOUVELLES CÂBLAGE NE EST NÉCESSAIRE, CONSULTER UN
ÉLECTRICIEN QUALIFIÉ OU LES AUTORITÉS LOCALES LES
EXIGENCES DES CODES.
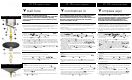
1. To begin assemlby first slip center stem (1) along wire and thread into
top of cluster assembly (2) - see DRAWING 1.
2. next slip top loop assembly (3) along wire and thread onto top onto top
of center stem (1). Now rotate the arms on the cluster assemblly until they
are 90 degrees apart - see DRAWING 2.
3. Now take one upright (4) and using a ball knob with stud (5) attach the
top of the upright to the large disc (A) on the top loop assembly. Repeat
process for the remaining 3 uprights (4) - see DRAWING 1.
4. Now take large square ring (6) and align holes drilled in accent ball (B)
with the holes (C) in uprights (4). Now slip screw (7) through hole and
thread into accent ball. Repeat for the 3 remaining uprights.
5. Now take small square ring (8) an insert into the four uprights (4) and
align holes in corner of square ring with threaded holes in accent ball (D)
attached to upright (4). Thread in screws (9) to secure ring.
6. To complete assembly take ring (10) slip it between the uprights (4) and
align holes in bottom of upright with holes in ring (10) and using ball knob
with stud (11) attach uprights to bottom ring.
7. Fixture is ready for installation. Follow instruction sheet (IS-19) provided
to attach fixture to ceiling.
B
C
D
A
1
2
3
4
5
6
7
8
9
10
11
90 DEGREES
DRAWING 1 - ASSEMBLY
DRAWING 2 - ASSEMBLY
ARMS
TOP VIEW
CLUSTER
ASSEMBLY
1. Para empezar primer vástago centro de concentración de
diapositivas (1) y el hilo en hilo a lo largo de la parte superior del
conjunto de agrupación (2) - vea el dibujo 1.
2. deslizamiento próxima asamblea bucle superior (3) a lo largo del
alambre e hilo en la parte superior a la parte superior del tallo
central (1). Ahora girar los brazos en el conjunto de clúster de
hasta 90 grados de separación que son - ver dibujo 2.
3. Ahora tome un montante (4) y el uso de un mando bola con
perno (5) unir la parte superior de la posición vertical para el disco
de ancho (A) en el conjunto de bucle superior. Repita el proceso
para los 3 postes restantes (4) - vea el dibujo 1.
4. Ahora despegue anillo cuadrado (6) y alinee los agujeros
perforados en bola de enfoque (B) con los orificios (C) en los
montantes (4). Ahora deslice el tornillo (7) a través del agujero y la
bola de hilo en el foco. Repita para los 3 postes restantes.
5. Ahora tome pequeño anillo cuadrado (8) insertar en los
montantes horno año (4) y alinear los agujeros en la esquina de
anillo cuadrado con agujeros roscados en balón énfasis (D) unidos
a vertical (4). Tema de tornillos (9) para asegurar el anillo.
6. Tomar anillo de montaje completo (10) deslizarlo entre les
montantes (4) y alinear los agujeros en la parte inferior de la
posición vertical con agujeros en el anillo (10) y el uso de perno
con pomo de bola (11) montantes se unen a anillo inferior.
7. Fixture está listo para la instalación. Siga la hoja de instruc-
ciones (IS-19) Proporcionada adjuntar a lámpara de techo.
1. Pour commencer première tige de centre de rassemblement de
glissement (1) et de fil dans le fil le long du haut de l'ensemble de la
grappe (2) - voir dessin ci.
2. glissement prochaine d'assemblage de boucle supérieure (3) le
long du fil et du fil sur le dessus sur sommet de la tige centrale (1).
Maintenant tourner les bras sur l'ensemble du cluster jusqu'à ce
qu'ils soient 90 degrés dehors - voir schéma 2.
3. Prenez maintenant un montant (4) et en utilisant un bouton de
balle Avec goujon (5) fixer la partie supérieure du montant du grand
disque (A) sur l'ensemble de la boucle supérieure. Répéter
l'opération pour les trois montants restants (4) - Voir dessin ci.
4. Maintenant, prendre le ring carré grande (6) et aligner les trous
percés dans accent balle (B) avec les trous (C) dans les montants
(4). Maintenant glisser vis (7) dans le trou et visser dans accent
balle. Répétez l'opération pour les trois montants restants.
5. Maintenant, prendre petit anneau carré (8) d'un insert dans les
quatre montants (4) et alignez dans le coin de Square Ring de trous
taraudés accent balle (D) attachés aux montants (4) trous. Enfiler
les vis (9) pour fixer la bague.
6. Pour prendre ensemble anneau complet (10) le glisser entre les
montants (4) et aligner les trous dans le fond de la verticale avec
des trous dans la bague (10) et en utilisant le bouton Avec rotule
(11) montants attachent à l'anneau inférieur.
7. Fixture est prêt pour l'installation. Suivez feuille d'instructions
(IS-19) prévu pour attacher à plafonnier.