URC 8800 A/V Producer User Guide
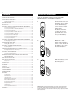
3 CONTENTS INSTALLING THE BATTERIES ....................................................................3 USING YOUR a/v PRODUCER™.................................................................4 Features and Functions.....................................................................4 SETTING THE CLOCK.................................................................................7 INSTALLING THE BATTERIES Your a/v Producer requires four (4) new AAA alkaline batteries.
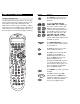
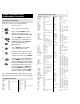
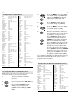
4 5 USING YOUR a/v PRODUCER Features and Functions The illustration below and the chart on the next two pages describe the features and the functions of the a/v Producer’s keypad. The following keys will always have the same function, regardless of which component you are controlling. For an explanation of what each key does by component type, please use the index at the rear of the manual (pages 49 to 61). Feature Function The SETUP key is used to access the menu and program your a/v Producer.
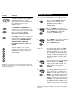
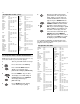
6 Feature 7 Function SETTING THE CLOCK To set up the CLOCK/TIME on the display screen: The CH + (Channel Up) and CH – (Channel Down) keys change channels the same as the Channel Up and Down keys on your original remote. The MACRO and MACRO2 keys memorize up to 15 keystrokes that can be accessed in sequence at the press of a single key. These keys are not mode specific.
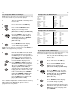
8 9 QUICK SET-UP To Quickly Set Up the a/v Producer to Operate Your Home Entertainment Components NOTE: If the four-digit code for your device begins with a “0”, only the last three numbers of your code will be displayed. 1 Turn on all of the components that you will be setting up. 2 Press and release the TV key. 3 Press and hold SETUP until the display screen changes from [TV and the TIME] to [TIMED SEQ]. 4 Press the MENU – key one time. The display screen will change to [CODE SETUP].
10 11 SETTING UP INDIVIDUAL HOME ENTERTAINMENT COMPONENTS Set Up Codes for TVs (cont.) To Set Up Your Television: NOTE: If the four-digit code for your device begins with a “0”, only the last three numbers of your code will be displayed. 1 Turn on your TV. 2 Press and release the TV key. 3 4 Press and hold SETUP until the display screen changes from [TV and the TIME] to [TIMED SEQ]. Press the MENU – key one time. The display screen will change to [CODE SETUP]. Press SELECT.
12 13 Set Up Codes for TVs (cont.
14 15 Set Up Codes For VCRs (Cont.
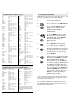
16 17 Set Up Codes For Cable Boxes ABC 0003, 0008, 0014, 0017, 0007, 0011, 0001, 0013 Allegro 0153, 0315 Antronix 0022, 0207 Archer 0153, 0022, 0207, 0797 Belcor 0056 Bell & Howell 0014 Cable Star 0056 Cabletenna 0022 Cableview 0022 Century 0153 Citizen 0153, 0315 Colour Voice 0025, 0031 Comtronics 0040 Contec 0019 Digi 0637 Eastern 0002 Emerson 0797 Everquest 0015, 0040 Focus 0400 GC Electronics 0056, 0207 Garrard 0153 Gemini 0015 General Instrument 0476, 0276, 0011, 0810 GoldStar 0144, 0040 Goodmind 07
18 19 To Set Up Your DVD or LD Player: NOTE: If the four-digit code for your device begins with a “0”, only the last three numbers of your code will be displayed. 1 Turn on your DVD or LD Player and insert a disc. 2 Press and release the DVD key. 3 Press and hold SETUP until the display screen changes from [DVD and the TIME] to [TIMED SEQ]. 4 Press the MENU – key one time. The display screen will change to [CODE SET UP]. Press SELECT. The display will change to [DEV SET UP].
20 21 To Set Up Your CD or MD Player (cont.): 7 or Aim the remote control at the CD or MD player and press POWER or PLAY. Your player should turn OFF or start to play your disc. Press the ESC key to return the display to [CD and the TIME]. If your player does not turn OFF or start to play your disc, enter the next code in the code list then press SELECT followed by POWER or PLAY again. Once the correct code is entered, press the ESC key to return the display to [CD and the TIME].
22 23 Set Up Codes For Tuner/Receivers ADC Adcom Aiwa Akai Bang & Olufsen Capetronic Carver Casio Clarinette Curtis Mathes Denon Emerson Fisher Garrard Harman/Kardon Inkel JBL JVC Kenwood Koss LXI Linn Lloyd’s MCS Magnavox Marantz Modulaire NAD NEC Nakamichi Onkyo 0531 0616 0158, 0189, 0121, 0405 0076, 0224 0898 0531, 0195 0189, 0008, 0042, 0360 0195 0195 0039, 0080 0004, 0273, 0771 0424 0042, 0219, 0360, 0801 0463, 0424 0110, 0189, 0891 0062 0110 0074 0027, 0186, 0042, 0077, 0313, 0314 0424 0181 0189 01
24 25 SETTING UP ADDITIONAL HOME ENTERTAINMENT COMPONENTS Besides the device keys that are already labeled (TV, VCR, CBL, etc.), the a/v Producer can also operate the following components: Cassette Decks, Home Automation, Digital Audio Tape, Turntables, Video Accessories, and Miscellaneous Audio Components (e.g., Graphic Equalizers and Digital Music Service Boxes). 6 Press MENU – to toggle between [TAPE] and [DAT].
26 27 SEARCHING FOR YOUR CODE Re-assigning Device Keys (cont.) 4 (Device Key) Press the device key you would like to move. The display screen will change to [COPY TO]. Press the unused device key you would like to replace. The display will change to [DEVICE2 and the TIME]. Proceed with programming the re-assigned device key with the appropriate code.
28 29 Finding Out Your Code After you have set up your components using the search, you may need to find out which four-digit code is operating your components. For example, to find out what four-digit code is operating your TV: 1 Press and release the TV key. 2 Press and hold SETUP until the display screen changes from [TV and the TIME] to [TIMED SEQ]. 3 4 Press the MENU – key one time. The display screen will change to [CODE SETUP]. Press SELECT. The display will change to [DEV SET UP].
30 SETTING UP THE HOME THEATER KEY (cont.) 5 6 7 8 Press SELECT. This will change the display to [TV]. Use the device keys (Device Key) TV, VCR, CBL/SAT or DVD to choose your CHANNEL source, then press SELECT. For example, if your Satellite will control channel changing in the Home Theater Mode, press CBL/SAT + SELECT. The display will change to [PLAYBACK]. This will allow you to choose the device that will control the transport keys (PLAY, REW, FF, PAUSE, STOP and REC). Press SELECT.
32 33 LEARNING FUNCTIONS ONTO THE 1L THROUGH 6L KEYS The 1L, 2L, 3L, 4L, 5L, and 6L keys can be used to customize those functions that are unique to your home entertainment needs. For example, the a/v Producer does not offer Tracking Up or Down for a VCR. However, with the learning feature, you can add these as well as many other functions to the a/v Producer. 7 Press and release the (1~6)L key where you want to assign a component’s feature. The a/v Producer’s red light will flash rapidly.
34 35 Deleting Functions from the L keys: 1 (Device Key) Press and release the Device key (e.g., VCR) where you want a/v Producer to learn new feature(s). 2 3 4 5 Press and hold SETUP until the display screen changes from the device you selected [e.g., VCR and the TIME] to [TIMED SEQ]. x 2 Press MENU – twice, the display will change to [CONFIGURE]. Press SELECT, the display will change to [THEATR SEL]. Press MENU + twice, the display will x 2 change to [IR LEARNER].
36 37 NOTE: When setting up your sequence, you will need to include any keystrokes that would normally be required during regular usage, such as pressing ENTER after entering a channel number when changing channels. To Delete a Timed Sequence 1 Press and hold SETUP until the display screen changes from [DEVICE and the TIME] to [TIMED SEQ]. Press SELECT. The display will change to [ADD MACRO]. Press MENU – one time. The display will change to [DEL MACRO]. Press SELECT.
38 39 REPEATING A SERIES OF KEY PRESSES USING THE MACRO AND MACRO2 KEYS The a/v Producer has two Macro keys (MACRO and MACRO2) that will play back a series of key strokes at any time with the press of one key. Each sequence can have up to a maximum of 15 keystrokes. These keys are not mode specific and can be accessed in any mode.
40 41 HOW TO USE THE SLEEP KEY The a/v Producer has a SLEEP key that either operates your component’s sleep timer or, if your component does not have a sleep timer, it activates the a/v Producer’s built-in sleep timer, after you activate SLEEP LOCK (see below). To use the a/v Producer’s SLEEP key, press SLEEP (i.e., SHIFT + MUTE). If your component does not have a sleep timer, the a/v Producer will access its own built-in timer. To activate it, press SLEEP (i.e., SHIFT + MUTE).
42 43 To return volume control to a component (cont.): 2 x 2 Press the MENU – key twice, the display will change to [CONFIGURE]. Press SELECT, the display will change to [THEATR SEL]. 3 x 2 Press MENU – two more times, the display will read [VOL LOCK]. Press SELECT, the display will change to [LOCK]. 4 Press MENU – one time to change the display to [UNLOCK] then press SELECT. The display will return to [DEVICE and the TIME].
44 45 CLEAR ALL SPECIFICATIONS If you would like to reset the a/v Producer of all advanced functions, use the CLEAR ALL feature. The CLEAR ALL feature will erase the following functions from the memory of the a/v Producer: Macro Sequences, Timed Macro Sequences, Volume Lock and Keymovers. CLEAR ALL will not erase your set-up codes. To clear the memory using the CLEAR ALL feature: 1 Press and hold SETUP until the display screen changes from [DEVICE and the TIME] to [TIMED SEQ].
46 47 TROUBLESHOOTING TROUBLESHOOTING (cont.) Problem: Solution Problem: Solution LCD screen begins to fade, does not appear or the red light blinks five times when you press a key? Replace the batteries with four (4) new AAA alkaline batteries. CH not working for your RCA TV? Due to RCA design (19831987), only the original remote control will operate these functions.
48 49 ERROR MESSAGES KEY INDEX Error Meaning MEM FULL Maximum memory capacity has been reached. BATTERY LO Replace batteries with four new "AAA" Alkaline batteries. TOO LONG Macro sequence being entered exceeds 15 keystrokes. LIST END You have reached the end of all valid codes using the Step-N-Set sequence. INVALID Displayed when trying to specify a key that is not valid for the sequence being entered. For example, when selecting a Device Key (e.g., TV) for a Macro sequence.
50 51 The VCR transport keys (i.e., PLAY, REW, FF, STOP, PAU and REC) access the features of your VCR. As a safety feature on the a/v Producer, you must press the REC key twice. TV Functions (cont.) + The PROG key (SHIFT + MENU) operates your secondary menus. Use the MENU + (Up), MENU – (Down), (Left) and (Right) to navigate through your menus. If your original remote control had a Select/Enter key for use in your menu, use SELECT or ENTER.
52 53 VCR Functions (cont.) The MENU key operates the same as the MENU or OSD (On Screen Display) key on your original re mote. Use the MENU + (Up), MENU – (Down), (Left) and (Right) to navigate through your menus. If your original remote control had a Select/Enter key for use in your menu, use SELECT or ENTER. + The PROG key (SHIFT + MENU) operates your secondary menus. Use the MENU + (Up), MENU – (Down), (Left) and (Right) to navigate through your menus.
54 55 Cable Functions (cont.) Use the MENU + (Up), MENU – (Down), (Left) and (Right) to navigate through your menus. If your original remote control had a Select/Enter key for use in your menu, use SELECT or ENTER. The SELECT key is used to make selections in the LCD Screen menu. It is also used to make selections in your on-screen menus. + The CLEAR key (SHIFT + SELECT) is used to exit or cancel selections in your on-screen menus.
56 57 The MENU key operates the same as the MENU or OSD (On Screen Display) key on your original re mote. Use the MENU + (Up), MENU – (Down), (Left) and (Right) to navigate through your menus. If your original remote control had a Select/Enter key for use in your menu, use SELECT or ENTER. DVD/LD/Cassette Functions (cont.) + The CENTER and REAR (SHIFT + CENTER) keys function the same as DISC A and DISC B keys on your original remote control.
59 58 The MENU + (Up) and MENU – (Down) keys access REAR LEVEL + and REAR LEVEL – respectively. MENU (Left) and MENU (Right) access BALANCE LEFT and BALANCE RIGHT. Receiver/Tuner Functions (cont.) The MENU + (Up) and MENU – (Down) keys access REAR LEVEL + and REAR LEVEL – respectively. MENU (Left) and MENU (Right) access BALANCE LEFT and BALANCE RIGHT.
60KEY 61 INDEX (cont.) The POWER key operates the same as the ALL ON key of your original remote. CD Functions The transport keys (i.e., PLAY, REW, FF, STOP, PAU and REC) access the features of your CD Player. NOTE: The SHIFT key accesses advanced features that are mapped under the VCR keys: e.g., SHIFT + STOP = EJECT. 0-9 The Digit keys (0 - 9) control direct track access the same as the digit keys on your original remote control.
62 63 WARRANTY One For All PRODUCTS Limited Warranty One For All warrants, to the original purchaser only, that this product will be free from defects in materials and workmanship, under normal use, for ninety (90) days from the date of original purchase.
URC-8800 REV A a/v Producer M8800 8/99