Microanlage 10029361 10029362 10029363 10029364
Sehr geehrter Kunde, zunächst möchten wir Ihnen zum Erwerb Ihres Gerätes gratulieren. Bitte lesen Sie die folgenden Anschluss- und Anwendungshinweise sorgfältig durch und befolgen Sie diese um möglichen technischen Schäden vorzubeugen. Sicherheitshinweise und Gewährleistung • • • • • • • • • • • • Diese Bedienungsanleitung dient dazu, Sie mit der Funktionsweise dieses Produktes vertraut zu machen. Bewahren Sie diese Anleitung daher stets gut auf, damit Sie jederzeit darauf zugreifen können.
Technische Daten Artikelnummer 10029361, 10029362, 10029363, 10029364 Stromversorgung AC 230V ~ 50Hz Stromverbrauch 27W max. Lautsprecher 2x 3“, 5W @ 4Ω (THD bei 1kHz: max. 10% ) Radio-Frequenzbereich FM 88 - 108 MHz USB CD Kompatibel mit USB 1.1 und USB 2.
Oberseite mit Bedienpanel: USB-Anschluss 7 12 On / Standby 8 13 OPEN/CLOSE MODE 9 14 VOL+ Play / Pause 10 15 VOL - Stop 11 16 FM-Antenne 17 19 AUX-Eingang (3,5mm) 18 Rückseite: 4 Netz-Eingang
Fernbedienung: On / Standby 1 11 MODE SLEEP 2 12 PLAY MODE/ST/FM MONO EQ 3 13 MEM / CLK 4 14 5 15 X-BASS 6 16 (Preset / Folder) 7 17 MUTE 8 18 VOL - OPEN/CLOSE 9 19 VOL + TIME Play / Pause FOLDER ON/OFF Stop / (Pair) (Preset / Folder) 10 5
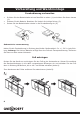
Vorbereitung und Wandmontage Fernbedienung vorbereiten • • • Drücken Sie den Batteriehalter wie auf den Bild zu sehen (1) und ziehen Sie diesen heraus (2). Ersetzen Sie die Batterie. Beachten Sie hierbei die richtige Polung (3). Setzen Sie den Batteriehalter wieder in die Fernbedienung ein (4). Gebrauch der Fernbedienung Halten Sie die Fernbedienung in Richtung des Geräts. Bedienwinkel: Ca. +/- 30° in jede Richtung. Achtung: Die Lithium-Batterie verfügt über eine Folie als Transportsicherung.
Wandmontage • Sie können den Standfuß der Microanlage abnehmen und das Gerät direkt an einer tragfähigen Wand montieren. Bitten Sie eine handwerklich geschickte / geschulte Person um Hilfe, falls Sie sich nicht sicher sind. • Nutzen Sie Schrauben (es werden 2 Schrauben benötigt), die zu Wandmaterial und genutzen Dübeln passen. • Fertigen Sie eine Bohrschablone an, oder zeichnen Sie direkt auf der Wand an: Die Bohrungen müssen auf einer Horizontalen im Abstand von 160mm zueinander liegen.
Bedienung Globale Funktionen / Basisfunktionen MODE: Drücken Sie MODE mehrfach, um zwischen den Betriebsmodi (Radio / CD / USB / AUX / BT) umzuschalten. VOL+/-: Stellen Sie mit VOL+/- die Lautstärke ein. MUTE: Drücken Sie MUTE, um die Ausgabe stummzuschalten. Drücken Sie nocheinmal, um die Stummschaltung zu beenden. X-BASS: Schalten Sie mit X-BASS eine Bassanhebung ein bzw. wieder aus. Ein entsprechendes Icon wird bei aktiver Bassanhebung im Display angezeigt.
BT (nur 10029363 & 10029364) Dieses Gerät unterstützt BT 2.1 + EDR mit dem A2DP-Profil. Die BT-Funktion kann zum Streamen von Musik von Ihrem Smartphone / Tablet genutzt werden, ermöglicht aber nicht den Einsatz als Freisprecheinrichtung. • • • • ein und wählen Sie mit MODE den BT-Modus. Schalten Sie das Gerät mit Aktivieren Sie BT auf Ihrem BT-Gerät und verbinden Sie mit V-15. Steuern Sie die Medienwiedergabe über Ihr externes Gerät oder mit den Tasten und .
Sleep: Drücken Sie SLEEP mehrfach, um die Sleep-Funktion zu aktivieren sowie die Einschlaf-Zeit einzustellen (90min - 80min - 70min - ... - 10min - off). Nach der eingestellten Zeit schaltet sich das Gerät automatisch in den Standby-Modus. Hinweise zur Entsorgung Befindet sich die linke Abbildung (durchgestrichene Mülltonne auf Rädern) auf dem Produkt, gilt die Europäische Richtlinie 2012/19/EU. Diese Produkte dürfen nicht mit dem normalen Hausmüll entsorgt werden.
Dear Customer, Congratulations on purchasing this product. Please read and follow these instructions, in order to avoid damaging the item. We do not cover any damages that may arise from improper use of the item or the disregard of the safety instructions. Important Safety Advice • • • • • • • • Read all instructions before using. To protect against a fire, electric shock or personal injury, do not immerse cord, electric plugs or device in water or other liquids.
Technical Data Art No. 10029361, 10029362, 10029363, 10029364 Power supply AC 230V ~ 50Hz Power consumption 27W max. Speakers 2x 3“, 5W @ 4Ω (THD @ 1kHz: 10% max.) FM Frequency FM 88 - 108 MHz USB CD Compatible with USB 1.1 & USB 2.
Top / Control Panel: USB slot 7 12 On / Standby 8 13 OPEN/CLOSE MODE 9 14 VOL+ Play / Pause 10 15 VOL - Stop 11 16 FM antenna 17 19 AUX-IN (3.
Remote Control: On / Standby 1 11 MODE SLEEP 2 12 PLAY MODE/ST/FM MONO EQ 3 13 MEM / CLK 4 14 5 15 X-BASS 6 16 (Preset / Folder) 7 17 MUTE 8 18 VOL - OPEN/CLOSE 9 19 VOL + TIME 14 10 Play / Pause FOLDER ON/OFF Stop / (Pair) (Preset / Folder)
Preparation and Wall Mounting Preparing the Remote Control • • • irst push to inside as the direction indicated by the arrow (See 1) and then Remove the battery holder as the direction indicated by the arrow (See 2). Replace the battery Set a new battery property with (+)side up as illustrated (See 3). Insert the battery holder. Push in the holder to the original position (See 4). Using the Remote Control Face the remote control towards the player front face IR mark (remote control signal receiver).
Wall Mounting • The stand is detachable so the device can be mounted to an appropriate wall directly. Please ask someone for support, if you are not sure how to do this. • Make a drill pattern or simply draw marks for the drilling holes onto your wall: the holes must be on a horizontal line, with a lead of 160mm. Be sure to use appropriate tools and dowels suitable for your wall material.
Operation Global Functions / Basic Functions MODE: Press MODE repeatedly for mode selection (Radio / CD / USB / AUX / BT). VOL+/-: Press VOL+/- to adjust the output level. MUTE: Press MUTE to mute the sound output. Press again to un-mute. X-BASS: Press to toggle X-BASS on/off. EQ: Press repeatedly to toggle pre-set equalizing (Classic - Pop - Jazz - Rock - EQ off). Radio • • • • Press to switch on, then use MODE to select radio mode.
BT (10029363 & 10029364) This device supports BT 2.1 + EDR with the A2DP profile. The BT function can be used to stream music from your smartphone / tablet / other BT device, but does not support hands free calling. • • • • to switch the device on and press MODE to select the BT mode. Press Activate BT on your smartphone/tablet/computer and pair with V-15. Use the buttons , , and to navigate through your media library or use your external BT device. Enter „0000“ , if prompted to enter a password.
Hints on Disposal According to the European waste regulation 2012/19/EU this symbol on the product or on its packaging indicates that this product may not be treated as household waste. Instead it should be taken to the appropriate collection point for the recycling of electrical and electronic equipment.
Chère cliente, cher client, Toutes nos félicitations pour l’acquisition de ce nouvel appareil. Veuillez lire attentivement et respecter les consignes suivantes de branchements et d’utilisation pour éviter d’éventuels dommages techniques. Consignes de sécurité • Ce mode d’emploi sert à vous familiariser aux fonctions de ce produit. Conservez-le bien afin de pouvoir vous y référer à tout moment.
Fiche technique Numéro d’article 10029361, 10029362, 10029363, 10029364 Alimentation électrique AC 230 V ~ 50 Hz Consommation électrique 27 W max. Haut-parleur 2x 3“, 5 W @ 4 Ω (Taux de distorsion harmonique à 1 KHz : max. 10 %) Plage de fréquence radio FM 88 - 108 MHz USB Compatible avec USB 1.1 et USB 2.0.
Dessus de l’appareil avec panneau de commande : 7 12 Marche / veille 8 13 OPEN / CLOSE MODE 9 14 VOL+ Lecture / pause 10 15 VOL- Arrêt 11 16 Antenne FM 17 19 Entrée AUX (3,5 mm) 18 Prise USB Arrière : 22 Prise secteur
Télécommande : 1 11 MODE SLEEP 2 12 PLAY MODE/ST/FM MONO EQ 3 13 Marche / veille MEM / CLK 4 14 Lecture / pause 5 15 ST / MONO X-BASS 6 16 Arrêt / (Couplage) <- (Présélection / Dossier) 7 17 -> (Présélection / Dossier) MUTE 8 18 VOL - OPEN / CLOSE 9 19 VOL + TIME 10 23
Préparation et montage mural Préparation de la télécommande • • • Appuyer sur le support de pile comme illustré ci-dessous (1) et le ressortir (2). Remplacer la pile. Veiller à respecter les polarités exactes (3). Réinsérer le support de pile dans la télécommande (4). Utilisation de la télécommande Pointer la télécommande en direction de l’appareil. Angle de fonctionnement : env. +/- 30° de toutes les directions. Attention : la pile en lithium est protégée par un emballage pour sécuriser son transport.
Montage mural • Il est possible de retirer le pied de la chaîne hifi pour monter directement l’appareil sur un mur pouvant le supporter. Demandez de l’aide à une personne formée / douée pour les travaux manuels si vous n’êtes pas sûr. • Utiliser des vis (2 vis sont nécessaires) qui conviennent au matériel du mur et aux chevilles utilisées. • Fabriquer un gabarit de forage ou dessiner directement sur le mur : les trous doivent être à 160mm de distance l’un de l’autre sur une ligne horizontale.
Utilisation Fonctions globales / fonctions basiques MODE : Appuyer plusieurs fois sur MODE pour changer de mode de fonctionnement (Radio / CD / USB / AUX / BT). VOL+/- : Régler le volume à l’aide de VOL+/-. MUTE : Appuyer sur MUTE pour mettre la musique en sourdine. Rappuyer sur MUTE pour remettre le volume. X-BASS : Avec X-BASS, allumer ou éteindre pour amplifier les basses. L’icône correspondante s’affiche à l’écran lorsque l’amplification des basses est activée.
BT (uniquement 10029363 & 10029364) Cet appareil fonctionne avec BT 2.1 + EDR avec le profil A2DP. La fonction Bluetooth peut être utiliser pour diffuser de la musique depuis votre smartphone / tablette, mais ne permet pas une utilisation en dispositif mains libres. • • • • et choisir le mode BT avec MODE. Allumer l’appareil avec Activer le bluetooth sur l’appareil Bluetooth et le connecter avec V-15. Commander la lecture des médias depuis l’appareil externe ou avec les touches et .
Veille : Appuyer plusieurs fois sur SLEEP pour activer la fonction veille et en régler la durée (90min - 80min - 70min - ... - 10min - off). Une fois le temps réglé écoulé, l’appareil passe automatiquement en mode veille. Informations sur le recyclage Vous trouverez sur le produit l’image ci-contre (une poubelle sur roues, barrée d‘une croix), ce qui indique que le produit se trouve soumis à la directive européenne 2012/19/UE.