Microanlage 10027560 10027561 10027562 10027563
Sehr geehrter Kunde, zunächst möchten wir Ihnen zum Erwerb Ihres Gerätes gratulieren. Bitte lesen Sie die folgenden Anschluss- und Anwendungshinweise sorgfältig durch und befolgen Sie diese um möglichen technischen Schäden vorzubeugen. Sicherheitshinweise und Gewährleistung • • • • • • • • • • • • Diese Bedienungsanleitung dient dazu, Sie mit der Funktionsweise dieses Produktes vertraut zu machen. Bewahren Sie diese Anleitung daher stets gut auf, damit Sie jederzeit darauf zugreifen können.
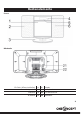
Bedienelemente Front: Rückseite: CD-Fach (öffnen/schließen) 1 5 Display Lautsprecher 2 6 Lautsprecher Standfuß 3 21 FM-Wurfantenne IR-Sensor 4 22 Netzkabel 3
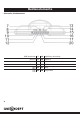
Bedienelemente Oberseite, Bedientasten: USB-Anschluss 7 13 Kopfhörer-Anschluss AUX-IN 8 14 Memory Standby Source 4 9 15 VOL+ 10 16 VOL- 11 17 Stop 12 20 Play/Pause
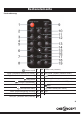
Bedienelemente Fernbedienung: Power on/off 1 11 Clock/Time (Uhrzeit) Play Mode (Repeat-/Random-Modi) Sleep (mehrfach drücken für Dauer) 2 12 EQ (mehrfach drücken für Auswahl) 3 13 Play/Pause 4 14 Memory (Senderspeicher/aufrufen) (voriger Titel/Sender) 5 15 Folder (Ordner-Modus bei MP3) X-Bass on/off 6 16 (zurück/nach oben) 7 17 Mute (Stummschaltung ein/aus) 8 18 VOL- 9 19 VOL+ Source (Funktionswahl) Mono/St.
Bedienung Globale Funktionen MUTE Nutzen Sie die MUTE-Taste auf der Fernbedienung zum stummschalten der Anlage. Mit wiederholtem Druck auf MUTE beenden Sie die Stummschaltung wieder. X-BASS Für eine zusätzliche Steigerung der tiefen Frequenzen drücken Sie X-BASS auf der Fernbedienung. Wiederholter Druck schaltet die Bass-Anhebung wieder ab. EQ Die Mikroanlage stellt einige werksseitig voreingestellte Klangformungen (Equalizer) zur Verfügung.
• jeweils in der rechten oberen Ecke des Displays angezeigt. Ein weiterer Druck auf PLAY MODE führt zurück in den normalen Abspielmodus. Programmierte Wiedergabe (Playlist) Sie können bis zu 32 Titel auswählen, diese Titel können Sie in der gewünschten Reihenfolge abspielen. Achtung: die Programmierung kann nur im STOP Modus durchgeführt werden. • • • • • Drücken Sie im STOP Modus die Taste MEMORY auf der Fernbedienung um die Programmierung zu beginnen. Drücken Sie / um den gewünschten Titel auszuwählen.
Audio IN Der AUX Anschluss ermöglicht es Ihnen externe Geräte (z.B. MP3 Player, Kassettenabspieler, ect.) über dieses Gerät wieder zu geben. • • • Drücken Sie die ON/STANDBY Taste um das Gerät einzuschalten. Drücken Sie die SOURCE Taste mehrfach um den AUDIO-IN-Modus zu wählen. Starten Sie nun die Wiedergabe an Ihrem externen Gerät. Sie müssen die Wiedergabe über Ihr externes Gerät steuern. Um Beschädigungen zu vermeiden, stellen Sie die Lautstärke des externen Gerätes nicht auf Maximum.
Sleep Timer (nur per Fernbedienung) Diese Funktion ermöglicht Ihnen, das das Gerät nach einer von Ihnen festgelegten Zeitspanne automatisch ausschaltet. Sie können den Sleep Timer einstellen wenn das Gerät eingeschaltet ist. • • • Um die Funktion zu aktivieren halten Sie die SLEEP Taste auf der Fernbedienung gedrückt, das Display zeigt “Sleep Timer-OFF, 90, 80, 70, 60, 50, 40, 30, 20, 10” und blinkt. Wenn das Display die gewünschte Zeit anzeigt lassen Sie die Taste los. Der Sleep Timer ist nun aktiviert.
Wandmontage Nutzen Sie die mitgelieferte Bohrschablone, um das Gerät an einer Wand zu montieren. Bitte beachten Sie, dass das Gerät circa 2,5 kg wiegt und somit eine stabile Wand Voraussetzung ist. Gasbeton- oder Rigips-Wände eignen sich nicht. Konsultieren Sie einen qualifizierten Techniker oder Handwerker, wenn Sie sich nicht sicher sind. Schrauben werden nicht mitgeliefert.
Hinweise zur Entsorgung Befindet sich die diese Abbildung (durchgestrichene Mülltonne auf Rädern) auf dem Produkt, gilt die Europäische Richtlinie 2002/96/EG. Diese Produkte dürfen nicht mit dem normalen Hausmüll entsorgt werden. Informieren Sie sich über die örtlichen Regelungen zur getrennten Sammlung elektrischer und elektronischer Gerätschaften. Richten Sie sich nach den örtlichen Regelungen und entsorgen Sie Altgeräte nicht über den Hausmüll.
Dear Customer, Congratulations on purchasing this product. Please read and follow these instructions, in order to avoid damaging the item. We do not cover any damages that may arise from improper use of the item or the disregard of the safety instructions. Important Safety Advice • • • • • • • • Read all instructions before using. To protect against a fire, electric shock or personal injury, do not immerse cord, electric plugs or device in water or other liquids.
Overview Front: Rear: CD tray (open/close) 1 5 Display Speaker 2 6 Speaker Stand 3 21 Antenna RC sensor 4 22 Mains cable 13
Overview: Controls Top, control panel: USB socket 7 13 Headphones jack AUX-IN jack 8 14 Memory Standby Source 14 9 15 VOL+ 10 16 VOL- 11 17 Stop 12 20 Play/Pause
Overview: Controls Remote control: Power on/off 1 11 Clock/Time Sleep (press repeatedly to adjust) 2 12 Play Mode (repeat & random modes) EQ (press repeatedly for preset) 3 13 Play/Pause 4 14 Memory (station presets) (previous track/station) 5 15 Folder (toggle folder mode (MP3)) X-Bass on/off 6 16 (back/up) 7 17 Mute (toggle mute on/off) 8 18 VOL- 9 19 VOL+ Source (ress repeatedly for selection) Mono/St.
Operation Global Functions Mute The Volume is muted temporarily when pressing the MUTE button on the remote control. Press again to restore the volume. X-BASS When the power is first turned on, the unit will enter the extra bass mode which emphasizes the bass frequencies, and “X-BASS” indicator will appear. To cancel the extra bass mode, press the X-BASS button on the remote control. EQ When the EQ button on the remote control, the current mode setting will be displayed.
Play Modes Press PLAY MODE repeatedly to toggle repeat and random play modes in the sequence REPEAT 1 (current track will be repeated) - REPEAT ALL (all contained tracks will be repeated) - RDM (contained tracks will be played in a random order). Press once again to de-activate and return to normal playback mode. Programmed play (Playlist) You can choose up to 32 selections for playback in the order you like. NOTE: Program can only be set in STOP mode.
Audio IN • • • • Use a connection lead to connect the portable audio player etc. to the AUDIO IN socket. When using video equipment, connect the audio output to this unit and the video output to a television. Press the ON/STAND-BY button to turn the power on. Press the SOURCE button on the remote control or SOURCE button repeatedly on main unit to select AUDIO IN function. Play the connected equipment. If volume level of the connected device is too high, sound distortion may occur.
Sleep operation (Remote control only) This function allows you to program the system to switch off itself after a set period of time. You can set your sleep time in power on mode: • • • To activate the sleep function, press the SLEEP button on the remote, the display will show “Sleep Timer-OFF, 90, 80, 70, 60, 50, 40, 30, 20, 10” and flash. When the display shows your desired sleep time, release the button, the sleep timer is now activated.
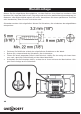
Wall Mounting Use the supplied pattern, to mount the device to a wall. Please note, the device weights about 2.5 kgs. Make sure the wall is stable enough to hold the weigth. Ask a qualified person for aide, when in doubt. Screws are not supplied. Use screws that have about the depicted dimensions: • • • • • 20 Fix the pattern paper to the wall in horizontal position. Drill according to the screw point marks on the pattern paper.
Environment Concerns According to the European waste regulation 2002/96/EG this symbol on the product or on its packaging indicates that this product may not be treated as household waste. Instead it should be taken to the appropriate collection point for the recycling of electrical and electronic equipment.
Chère cliente, cher client, Toutes nos félicitations pour l’acquisition de ce nouvel appareil. Veuillez lire attentivement et respecter les instructions de ce mode d’emploi afin d’éviter d’éventuels dommages. Nous ne saurions être tenus pour responsables des dommages dus au non-respect des consignes et à la mauvaise utilisation de l’appareil. Consignes de sécurité et garantie • • • • • • • • • • • • Ce mode d’emploi sert à vous familiariser aux fonctions de ce produit.
Eléments de commande Avant: Arrière: Compartiment CD 1 5 Ecran Haut-parleur 2 6 Haut-parleur Socle 3 21 Antenne souple Capteur IR 4 22 Câble d'alimentation 23
Eléments de commande Vue de dessus: Entrée USB 7 13 Entrée casque Entrée AUX 8 14 Mémoire Standby Source 24 9 15 Ecran 10 16 Haut-parleur 11 17 Stop 12 20 Lecture/Pause
Eléments de commande Télecommande: Power on/off 1 11 Clock/Time (horloge) Play Mode (Mode de lecture) Sleep 2 12 EQ 3 13 Lecture/Pause 4 14 Memory (Sauvegarder et rappeler une station de radio) 5 15 Folder (Fichier MP3) X-Bass on/off 6 16 (retour/haut) 7 17 Mute (Mode silencieux) 8 18 VOL- 9 19 VOL+ Source (Choix de fonction) Mono/St.
Fonctions Fonctions générales MUTE – MODE SILENCIEUX Utiliser la touche MUTE de la télécommande pour couper le son de la chaîne stéréo. Une nouvelle pression de la touche rétablit le son. X-BASS Pour augmenter la présence sonore des basses fréquences, utiliser la touche X-BASS de la télécommande, appuyer à nouveau sur cette touche pour arrêter cette fonction. EQ La micro chaîne stéréo possède quelques égalisations réglées en usine.
Lecture programmée (liste de lecture) Il est possible de sélectionner jusqu’à 32 titres, diffusables dans l’ordre souhaité. Attention : la programmation d’une liste de lecture ne peut s’effectuer qu’en mode STOP. • • • • • En mode STOP, appuyer sur la touche MEMORY de la télécommande pour commencer la programmation. Appuyer sur / pour sélectionner les titres souhaités. Appuyer sur la touche MEMORY pour sauvegarder le numéro du titre. Répéter les étapes 2-3 pour les titres suivants.
Réglage de l’heure (seulement depuis la télécommande) • • • Appuyer sur la touche ON/STAND-BY de l’appareil pour l’éteindre. Appuyer sur la touche CLOCK/TIMER pendant 2 secondes pour sélectionner un jour. / pour sélectionner le format d’affichage de l’heure 12 h Appuyer sur les touches ou 24 h puis appuyer sur la touche CLOCK/TIMER.
BT (10027562 + 10027563) BT est une technologie qui permet de connecter sans fil, dans une portée de faible distance (jusqu’à environ 10 mètres) un appareil BT (smartphone, ordinateur, tablette etc.) à une chaîne stéréo, et d’écouter des fichiers et des contenus audio. Cet appareil fournit BT 2.1 + EDR / A2DP / AVRCP. Couplage • • • Basculer en mode BT avec la touche SOURCE/FUNCTION. Un symbole de couplage s’affiche à l’écran et clignote. Activer la fonction BT sur l’appareil BT.
Montage mural Utiliser le patron avec les trous pour monter l‘appareil sur le mur. Noter que l‘appareil pèse environ 2,5 kg et nécessite donc un mur solide pour la fixation. Le béton léger ou le placo ne sont pas adaptés. Consulter un maçon ou un technicien en cas de doute. Les vis ne sont pas incluses dans la livraison, utiliser des vis correspondant à celles représentées sur l‘image: • • • • 30 Marquer au crayon les trous de perçage au mur en se servant du patron fourni.
Informations sur le recyclage Vous trouverez sur le produit l’image ci-contre (une poubelle sur roues, barrée d‘une croix), ce qui indique que le produit se trouve soumis à la directive européenne 2002/96/CE. Renseignez-vous sur les dispositions en vigueur dans votre région concernant la collecte séparée des appareils électriques et électroniques. Respectez-les et ne jetez pas les appareils usagés avec les ordures ménagères.
Gentile Cliente, La ringraziamo per aver scelto questo apparecchio. La preghiamo di leggere con attenzione questo manuale e di seguire con meticolosità le seguenti indicazioni per evitare di arrecare danni. Qualsiasi problema causato dal non aver seguito attentamente le indicazioni menzionate nel manuale di istruzioni non sono coperte dalla nostra garanzia e da alcuna responsabilità.
Componenti Fronte : Retro : CD cassetto (open/close) 1 5 Display Altoparlante 2 6 Altoparlante Supporto 3 21 Antenna RC sensore 4 22 Cavo di alimentazione 33
Componenti di controllo Panello di controllo superiore: Presa USB 7 13 Presa per cuffie AUX–IN 8 14 Memoria Standby Source 34 9 15 VOL + 10 16 VOL - 11 17 Stop 12 20 Play/Pause
Controllo a distanza Power on/off 1 11 Clock/Time Play Mode Sleep 2 12 EQ 3 13 Play/Pause 4 14 Memory 5 15 Folder 6 16 7 17 8 18 VOL- 9 19 VOL+ X-Bass on/off Mute Source Mono/St.
Funzionamento Funzioni generali Mute Il volume viene silenziato temporaneamente quando si preme il pulsante MUTE sul telecomando. Premere nuovamente per ripristinare il volume. X- Bass Quando si accende la prima volta, il dispositivo viene sintonizzato sulla modalità toni bassi in basso, che sottolinea le frequenze basse, e viene visualizzato l’indicatore “X – BASS”. Per annullare la modalità extra bassi, premere il pulsante X – BASS sul telecomando.
Modalità di riproduzione • Premere il pulsante PLAY MODE del telecomando per selezionare le modalità di ripetizione e riproduzione causale nella sequenza : REPEAT 1 (ripetizione della traccia corrente) – REPEAT ALL (tutte le tracce contenute verranno ripetute) – RDM (le tracce contenute verranno riprodotte in ordine casuale). Premere nuovamente per disattivare e ritornare alla modalità di riproduzione normale.
AUDIO IN La presa AUX consente di collegare una periferica (es. : lettore MP3, audio cassette, etc..) a questo apparecchio. • Premere il tasto ON/STAND- BY per accendere il dispositivo. • Premere diverse volte il tasto SOURCE per selezionare la modalità AUDIO – IN. • Avvia la riproduzione del dispositivo. La riproduzione deve essere controllata dal dispositivo periferico. Per evitare danni, non regolare il volume della periferica al massimo.
Spegnimento programmato (solo dal telecomando) Questa funzione spegne automaticamente il dispositivo dopo un tempo prestabilito. Il timer di spegnimento può essere regolato quando l’apparecchio è acceso. • Per attivare la funzione, tenere premuto il tasto SLEEP sul telecomando; sul display appare “Sleep Timer OFF, 90, 80, 70, 60, 50, 40, 30, 20, 10” e lampeggia. • Quando il display visualizza l’ora desiderata, rilasciare il pulsante. Il timer di riposo è attivo.
Montaggio a parete Utilizzare il modello con i fori per montare il dispositivo sulla parete. Si prega di notare come l’apparecchio pesi circa 2, 5 kg e pertanto richieda una parete solida per il fissaggio. Il calcestruzzo leggero o il placo non sono adatti. Consultare un muratore o un tecnico nel caso in cui si presentino dei dubbi.
Consigli per lo Smaltimento In accordo con le normative europee sui rifiuti 2012/19 EU questo simbolo presente sul prodotto o sulla sua confezione indica che il prodotto potrebbe non essere trattato come rifiuto domestico. Tuttavia può essere portato nell’appropriato punto di raccolta per il riciclo di prodotti elettrici ed elettronici.