
User Manual


3
OPERATION
1. Fill at least 2/3 of the stainless steel tank with a cleaning solution. Based on cleaning
requirements, a small amount of cleaning solution is recommended because it will
help to increase the cleaning performance.
2. Dismantle the spare parts to be cleaned as possible as you can, and remove the dirt,
oil contaminants, carbon deposit etc with a high-pressure jet, wire brush,scraper
knife or other tools so as to prolong the service life of the cleaning solution and
ensure the cleaning speed and performance.
3. Put the spare parts to be cleaned into the tank and make them fully-immersed, but
not overlapped as possible as you can.
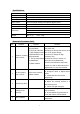
4. Start ultrasonic cleaning:
A. Connect the power socket on the back to a power with the power cord (the red
indicator will turns on and the LED screen will display “180”.)
B. Press the “TIME” button to switch the cleaning time in the following time
circulation: 90→ 120→ 150→ 180→ 210→ 240→ 270→ 300→ 330→ 360→ 540→
720→ 900→18. →21. →24. →27. → 30.→ 90 (18 cleaning time in total).
C. Press “ON/OFF” button once to make the machine start cleaning. The blue ultrasonic
indicator turns on, the setting time starts counting down. When the time reaches “886”,
the machine stop working automatically. Besides, the ultrasonic cleaning can also be
stopped by pressing “ON/OFF” once again.
D. Unplug the power cord, pour the cleaning solution, clean the tank and the housing
with a clean cloth.
5. In order to enhance the cleaning effect, you can add appropriate amount of detergent
into the cleaning solution or prolong the cleaning time.
6. The machine will stop working after 45 minutes continuous work, and can started
working again after 4 minutes’ break.