Contents AV Receiver HT-RC360 Introduction ...................................2 Connections.................................12 Turning On & Basic Operations ......20 Instruction Manual Advanced Operations .................40 Controlling Other Components...59 Appendix ......................................65 Thank you for purchasing an Onkyo AV Receiver. Please read this manual thoroughly before making connections and plugging in the unit.
Introduction WARNING: TO REDUCE THE RISK OF FIRE OR ELECTRIC SHOCK, DO NOT EXPOSE THIS APPARATUS TO RAIN OR MOISTURE. CAUTION: TO REDUCE THE RISK OF ELECTRIC SHOCK, DO NOT REMOVE COVER (OR BACK). NO USER-SERVICEABLE PARTS INSIDE. REFER SERVICING TO QUALIFIED SERVICE PERSONNEL.
Precautions 1. Recording Copyright—Unless it’s for personal use only, recording copyrighted material is illegal without the permission of the copyright holder. 2. AC Fuse—The AC fuse inside the unit is not userserviceable. If you cannot turn on the unit, contact your Onkyo dealer. 3. Care—Occasionally you should dust the unit all over with a soft cloth. For stubborn stains, use a soft cloth dampened with a weak solution of mild detergent and water. Dry the unit immediately afterwards with a clean cloth.
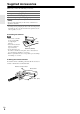
Supplied Accessories Make sure you have the following accessories: Indoor FM antenna (➔ page 19) AM loop antenna (➔ page 19) Speaker cable labels (➔ page 13) Speaker setup microphone (➔ page 29) Remote controller (RC-801M) and two batteries (AA/R6) (Note for China: The battery for the remote controller is not supplied for this unit.) * In catalogs and on packaging, the letter at the end of the product name indicates the color. Specifications and operations are the same regardless of color.
Contents Introduction Important Safety Instructions ......................................... 2 Precautions....................................................................... 3 Supplied Accessories...................................................... 4 Features ............................................................................ 6 Front & Rear Panels......................................................... 8 Front Panel.....................................................................
Features Amplifier Miscellaneous • 100 Watts/Channel @ 8 ohms (FTC) • 160 Watts/Channel @ 6 ohms (IEC) • 175 Watts/Channel @ 6 ohms (JEITA) • Optimum Gain Volume Circuitry • H.C.P.S.
*1 *2 Qdeo and QuietVideo are trademarks of Marvell or its affiliates. “x.v.Color” is a trademark of Sony Corporation. *3 Manufactured under license under U.S. Patent #’s: 5,451,942; 5,956,674; 5,974,380; 5,978,762; 6,226,616; 6,487,535; 7,212,872; 7,333,929; 7,392,195; 7,272,567 & other U.S. and worldwide patents issued & pending. DTS and the Symbol are registered trademarks, & DTS-HD, DTS-HD Master Audio, and the DTS logos are trademarks of DTS, Inc. Product includes software. © DTS, Inc.
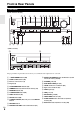
Front & Rear Panels Front Panel (North American models) a n o b c p d e q f g h i j k l r m s t uv (Chinese models) w x The page numbers in parentheses show where you can find the main explanation for each item.
Display a h b c d ij k For detailed information, see the pages in parentheses.
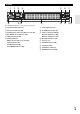
Rear Panel a b cd g h i jkl i MONITOR OUT V jack b COMPONENT VIDEO IN and OUT jacks j ZONE 2 LINE OUT jacks c ETHERNET port k SUBWOOFER PRE OUT jacks d FM ANTENNA jack and AM ANTENNA terminal l UNIVERSAL PORT jack e HDMI IN and OUT jacks m SPEAKERS terminals (CENTER, FRONT, SURROUND, SURROUND BACK or FRONT HIGH, ZONE 2) g u REMOTE CONTROL jack h Composite video and analog audio jacks (BD/DVD IN, VCR/DVR IN and OUT, CBL/SAT IN, GAME IN, TV/CD IN) 10 m a DIGITAL IN COAXIAL and OPTICAL jacks
Remote Controller Controlling the AV Receiver To control the AV receiver, press RECEIVER to select Receiver mode. You can also use the remote controller to control Onkyo Blu-ray Disc/DVD player, CD player, and other components. See “Entering Remote Control Codes” for more details (➔ page 62). a b *1 g For detailed information, see the pages in parentheses.
Connections Connecting the AV Receiver Connecting Your Speakers Connecting the Speaker Cables The following illustration shows which speaker should be connected to each pair of terminals. If you’re using only one surround back speaker, connect it to the SURROUND BACK or FRONT HIGH L terminals.
Speaker Configuration The following table indicates the channels you should use depending on the number of speakers that you have. No matter how many speakers you use, a powered subwoofer is recommended for a really powerful and solid bass. To get the best from your surround sound system, you need to set the speaker settings automatically (➔ page 29) or manually (➔ page 42).
Using a Powered Subwoofer To find the best position for your subwoofer, while playing a movie or some music with good bass, experiment by placing your subwoofer at various positions within the room, and choose the one that provides the most satisfying results. You can connect the powered subwoofer with two SUBWOOFER PRE OUT jacks respectively. The same signal is output from each jack.
About AV Connections Connecting AV components HDMI cable Other cables : Video & Audio AV receiver TV, projector, etc. Blu-ray Disc/ DVD player : Video : Audio AV receiver Game console TV, projector, etc. Blu-ray Disc/ DVD player • Before making any AV connections, read the manuals supplied with your AV components. • Don’t connect the power cord until you’ve completed and double-checked all AV connections.
Connecting Components with HDMI VCR or DVD recorder/Digital Video Recorder Game console TV, projector, etc. Other components Blu-ray Disc/DVD player Camcorder Satellite/cable set-top box, etc. Connect your components to the appropriate jacks. The default input assignments are shown below. ✔: Assignment can be changed (➔ page 41).
Connecting Your Components The on-screen setup menus appear only on a TV that is connected to the HDMI OUT. If your TV is connected to the MONITOR OUT V or the COMPONENT VIDEO OUT, use the AV receiver’s display when changing settings. C AB D E F G Connect your components to the appropriate jacks. The default input assignments are shown below. See “Connection Tips and Video Signal Path” for more information (➔ page 77). ✔: Assignment can be changed (➔ page 42). No.
Connecting Onkyo u Components 1 Make sure that each Onkyo component is connected with an analog audio cable (connection F in the hookup examples) (➔ page 17). 2 3 Make the u connection (see the illustration). If you’re using an RI Dock, or cassette tape deck, change the Input Display (➔ page 38).
Connecting the Antennas This section explains how to connect the supplied indoor FM antenna and AM loop antenna. The AV receiver won’t pick up any radio signals without any antenna connected, so you must connect the antenna to use the tuner. Caution • Be careful not to injure yourself when using thumbtacks. Push. Insert wire. Release. North American models Insert the plug fully into the jack. Chinese models Insert the plug fully into the jack. Assembling the AM loop antenna Thumbtacks, etc.
Turning On & Basic Operations Turning On/Off the AV Receiver 8ON/STANDBY 8RECEIVER RECEIVER Turning On 1 Press 8ON/STANDBY on the front panel. or Press RECEIVER followed by 8RECEIVER on the remote controller. The AV receiver comes on, the display lights. Turning Off 1 Press 8ON/STANDBY on the front panel. or Press RECEIVER followed by 8RECEIVER on the remote controller. The AV receiver will enter standby mode.
Playback The on-screen menus appear only on a TV that is connected to the HDMI OUT. If your TV is connected to the MONITOR OUT V or the COMPONENT VIDEO OUT, use the AV receiver’s display when changing settings. Controlling Contents of USB or Network Devices See “Controlling Other Components” about the operation of other components (➔ page 62). Press USB or NET first. This section describes the procedure for using the remote controller unless otherwise specified.
k RETURN This button returns to the previous menu. l 4 This button fast-forwards the current song. m 6 This button selects the next song. n 2 This button stops playback. o MODE You can switch between Standard Mode and Extended Mode during iPod/iPhone playback. p RANDOM This button performs random playback. Playing an iPod/iPhone via USB This section explains how to play music/video files on the iPod/iPhone.
Extended Mode (Music) control The music content information is displayed (lists are displayed), and you can control the music content while looking at the screen. Top screen list: Playlists, Artists, Albums, Genres, Songs, Composers, Shuffle Songs, Now Playing. Extended Mode (Video) control The video content information is displayed (lists are displayed), and you can control the video content while looking at the screen. Top screen list: Movies, Music Videos, TV Shows, Video Podcasts, Rentals.
3 Use q/w to select a program and then press ENTER. Playback starts. My Music 0 : 11 Greate Artist My Favorite Press MENU to enable selection from the following menu items. ` Stations like this: Stations like the one currently being played back are displayed. ` Add to My Favorites: Adds a station to My Favorites list. Press TOP MENU to go to the top menu of the Internet Radio services. Registering My Favorites*1 You can add the currently playing song or station to the “My Favorites”.
Playing Music Files on a Server You need to connect the AV receiver to your home network (➔ page 71). This section explains how to play music files on a computer or media server through the AV receiver (Server Playback). Windows Media Player 11 Setup This section explains how to configure Windows Media Player 11 so that the AV receiver can play the music files stored on your computer. 1 2 Start Windows Media Player 11. 3 Select the “Share my media” check box, and then click “OK”.
Using Remote Playback Listening to AM/FM Radio 1 Start Windows Media Player 12. To enable remote playback, you must first configure Windows Media Player 12. This section describes the procedure using the buttons on the front panel unless otherwise specified. 2 Press NET. The “NET” screen appears. The NET indicator lights. If it flashes, verify the network connection. 3 Use q/w/e/r to select “dlna”, and press ENTER. A list of media server appears.
■ Tuning into stations by frequency You can tune into AM and FM stations directly by entering the appropriate frequency. ■ Deleting Presets 1 Select the preset that you want to delete. See the previous section. 1 2 While holding down MEMORY, press TUNING MODE. The preset is deleted and its number disappears from the display. On the remote controller, press TUNER repeatedly to select “AM” or “FM”, followed by D.TUN. (Actual display depends on the country.
■ Displaying Radio Text (RT) 1 Press RT/PTY/TP once. The RT information scrolls across the display. Note • The message “Waiting” may appear while the AV receiver waits for the RT information. • If the message “No Text Data” appears on the display, no RT information is available.
Using Basic Functions Using the Automatic Speaker Setup With the supplied calibrated microphone, Audyssey 2EQ® automatically determines the number of speakers connected, their size for purposes of bass management, optimum crossover frequencies to the subwoofer (if present), and distances from the primary listening position. Audyssey 2EQ then removes the distortion caused by room acoustics by capturing room acoustical problems over the listening area in both the frequency and time domain.
3 When you’ve finished making the settings, press ENTER. 9 2EQ: Auto Setup AUDYSSEY Speakers Type (Front) Powered Zone2 Surround Back/Front High Normal No Surround Back Perform the “Speaker Setup” according to your speaker configuration: – Speakers Type (Front) (➔ page 43) – Powered Zone 2 (➔ page 43) – Surround Back/Front High (➔ page 43) When an optional unit is connected to the UNIVERSAL PORT jack on the AV receiver, the optional unit setting may appear on the speaker setting menu.
Error Messages Changing the Speaker Setup Manually While Audyssey 2EQ® Room Correction and Speaker Setup is in progress, one of the error messages below may appear. You can manually make changes to the settings found during Audyssey 2EQ Room Correction and Speaker Setup. See also: • “Speaker Configuration” (➔ page 43) • “Speaker Distance” (➔ page 44) • “Level Calibration” (➔ page 44) 2EQ: Auto Setup AUDYSSEY Ambient noise is too high.
Using the Listening Modes Selecting Listening Modes See “About Listening Modes” for detailed information about the listening modes (➔ page 33). ■ Listening Mode Buttons (North American models) Press RECEIVER first. MOVIE/TV, MUSIC, GAME (Chinese models) MUSIC MOVIE/TV GAME STEREO PURE AUDIO MOVIE/TV button This button selects the listening modes intended for use with movies and TV. MUSIC button This button selects the listening modes intended for use with music.
About Listening Modes The AV receiver’s listening modes can transform your listening room into a movie theater or concert hall, with high fidelity and stunning surround sound. ■ Explanatory Notes f be a a Front speakers b Center speaker c Surround speakers d Surround back speakers e Front high speakers f Subwoofers c d Input Source The following audio formats are supported by the listening mode. A This is mono (monophonic) sound. S This is stereo (stereophonic) sound.
■ Onkyo-Original DSP Listening Modes Listening Mode Description Orchestra Suitable for classical or operatic music, this mode emphasizes the surround channels in order to widen the stereo image, and simulates the natural reverberation of a large hall.
Listening Mode Description Input Source Speaker Layout Dolby Pro Logic IIx*4 Dolby Pro Logic IIx expands any 2-channel source for 7.1-channel playback. It provides a very natural and seamless surround-sound experience Dolby Pro Logic II that fully envelops the listener. As well as music and movies, video games PL Mo v i e can also benefit from the dramatic spatial effects and vivid imaging. If you’re not using any surround back speakers, Dolby Pro Logic II will be S used instead of Dolby Pro Logic IIx.
Listening Mode Description Neo:6 This mode expands any 2-channel source for up to 7.1-channel playback. It uses seven full-bandwidth channels of matrix decoding for matrix-encoded material, providing a very natural and seamless surround sound experience that fully envelops the listener. Ne o : 6 C i n ema Ne o : 6 Mu s i c Ne o : 6 Audyssey DSX*8 Audy s s e y DSX PL Mo v i e DSX PL Mu s i c DSX PL Game Input Source Speaker Layout • Neo:6 Cinema S Use this mode with any stereo movie (e.
Using the Home Menu Note *1 The Home menu provides you quick access to frequently used menus without having to go through the long standard menu. This menu enables you to change settings and view the current information. The Home menus appear only on a TV that is connected to the HDMI OUT. If your TV is connected to the MONITOR OUT V or the COMPONENT VIDEO OUT, use the AV receiver’s display when changing settings. 1 2 Press RECEIVER followed by HOME. The Home menu will be superimposed on the TV screen.
You can display various information about the current input source as follows. (Components connected to the UNIVERSAL PORT jack are excluded.) 1 Press RECEIVER followed by DISPLAY repeatedly to cycle through the available information. The following information can typically be displayed. Changing the Input Display When you connect an u-capable Onkyo component, you must configure the input display so that u can work properly. This setting can be done only from the front panel.
Muting the AV Receiver You can temporarily mute the output of the AV receiver. 1 Press RECEIVER followed by MUTING. The output is muted and the MUTING indicator flashes on the display. Tip • To unmute, press MUTING again or adjust the volume. • Muting is automatically cancelled when the AV receiver is set to standby. Using Headphones 1 Connect a pair of stereo headphones with a standard plug (1/4 inch or 6.3 mm) to the PHONES jack. Note • Always turn down the volume before connecting your headphones.
Advanced Operations Advanced Setup On-screen Setup Menus The on-screen setup menus appear only on a TV that is connected to the HDMI OUT. If your TV is connected to the composite video MONITOR OUT V or the COMPONENT VIDEO OUT, use the AV receiver’s display when changing settings. Common Procedures in Setup Menu Remote indicator RECEIVER This section describes the procedure for using the remote controller unless otherwise specified. ENTER q/w/e/r MENU 1. 2. 3. 4. 5. 6. 7. 8. 9.
Here are the default assignments. Input/Output Assign Main Menu Input/Output Assign Monitor Out Input selector Default assignment BD/DVD HDMI1 VCR/DVR HDMI2 CBL/SAT HDMI3 You can specify the output resolution for the HDMI OUT and have the AV receiver upconvert the picture resolution as necessary to match the resolution supported by your TV.
Component Video Input If you connect a video component to a component video input, you must assign that input to an input selector. For example, if you connect your Blu-ray Disc/DVD player to COMPONENT VIDEO IN 2, you must assign “IN2” to the “BD/DVD” input selector. Here are the default assignments.
■ Speaker Impedance (Chinese models) ` 4ohms: Select if the impedance of any speaker is 4 ohms or more but less than 6. ` 6ohms: Select if the impedances of all speakers are between 6 and 16 ohms. Note • (North American models) Speakers with an impedance of less than 6 ohms are not supported. ■ Speakers Type (Front) ` Normal: Select this if you’ve connected your front speakers normally. ` Bi-Amp: Select this if you’ve bi-amped your front speakers. ■ Powered Zone 2 ` No ` Yes: Zone 2 speakers can be used.
■ Double Bass This setting is NOT set automatically by Audyssey 2EQ® Room Correction and Speaker Setup (➔ page 29). `On `Off Turn this setting on to boost bass output by feeding bass sounds from the front left, right, and center channels to the subwoofer. Note • This function can be set only if the “Subwoofer” setting is set to “Yes”, and the “Front” setting is set to “Full Band”.
Audio Adjust Main menu Audio Adjust With the Audio Adjust functions and settings, you can adjust the sound and listening modes as you like. Multiplex/Mono ■ Multiplex Input Channel ` Main ` Sub ` Main/Sub This setting determines which channel of a stereo multiplex source is output. Use it to select audio channels or languages with multiplex sources, multilingual TV broadcasts, and so on.
DTS Source Setup ■ Neo:6 Music Items can be set individually for each input selector. Center Image `0 to 2 to 5 The DTS Neo:6 Music listening mode creates 6-channel surround sound from 2-channel stereo sources. With this setting, you can specify by how much the front left and right channel output is attenuated in order to create the center channel. Changing the value from “0” to “5” will spread the sound of the center channel to left and right (outwards).
■ Reference Level Audyssey Dynamic EQ® Reference Level Offset ` 0dB: This should be used when listening to movies. ` 5dB: Select this setting for content that has a very wide dynamic range, such as classical music. ` 10dB: Select this setting for jazz or other music that has a wider dynamic range. This setting should also be selected for TV content as that is usually mixed at 10 dB below film reference.
IntelliVolume Name input area ■ IntelliVolume `–12dB to 0dB to +12dB in 1 dB steps. With IntelliVolume, you can set the input level for each input selector individually. This is useful if one of your source components is louder or quieter than the others. Use e/r to set the level. If a component is noticeably louder than the others, use e to reduce its input level. If it’s noticeably quieter, use r to increase its input level.
Picture Adjust Using Picture Adjust, you can adjust the picture quality and reduce any noise appearing on the screen. To view the TV picture while setting, press ENTER. To return to the previous screen, press RETURN. ■ Wide Mode*1*6 This setting determines the aspect ratio. ` 4:3: ` Full: ` Zoom: ` Wide Zoom: ` Auto: According to the input signals and monitor output setting, the AV receiver automatically selects the “4 : 3”, “Full”, “Zoom” or “Wide Zoom” mode.
■ Color Temperature*2*4 `Warm `Normal `Cool With this setting you can adjust the color temperature. Note • “Picture Adjust” cannot be used with the NET input selector. *1 This procedure can also be performed on the remote controller by using the Home menu (➔ page 37). *2 When the “Picture Mode” setting is set to anything other than “Custom”, this setting cannot be used. *3 If the “Resolution” setting is set to “4K Upscaling” (➔ page 41), this setting is fixed at “Off”.
Listening Mode Preset You can assign a default listening mode to each input source that will be selected automatically when you select each input source. For example, you can set the default listening mode to be used with Dolby Digital input signals. You can select other listening modes during playback, but the mode specified here will be resumed once the AV receiver has been set to standby. Main menu 1 Listening Mode Preset Use q/w to select the input source that you want to set, and then press ENTER.
OSD Setup Tuner ■ On Screen Display `On `Off This preference determines whether operation details are displayed on-screen when an AV receiver function is adjusted. Even when “On” is selected, operation details may not be output if the input source is connected to an HDMI IN. For AM/FM tuning to work properly, you must specify the AM/FM frequency step used in your area. Note that when this setting is changed, all radio presets will be deleted.
■ HDMI Through ` Off ` Auto: Detects the signal and automatically selects the input source. ` BD/DVD, VCR/DVR, CBL/SAT, GAME, AUX, TV/CD, PORT: Selects the input source for which the HDMI Through function is enabled. ` Last: The HDMI Through function is activated on the input source selected at the time of setting the AV receiver to standby mode.
Network After modifying the network settings, you must confirm the changes by executing “Save”. ■ Network Control `Enable `Disable This setting enables or disables control over the network. ■ MAC Address This is the AV receiver’s MAC (Media Access Control) address. This address cannot be changed. • Perform the firmware update only when such an announcement is posted on the Onkyo web site. Visit the Onkyo web site for the latest information. • It takes maximum 60 minutes to complete the firmware update.
Remote Controller Setup Main menu Remote Controller Setup Remote Mode Setup See “Looking up for Remote Control Code” (➔ page 62). With this preference, you can protect your settings by locking the setup menus. Lock Setup ■ Setup ` Locked ` Unlocked When “Locked” is selected, the setup menus will be locked and you cannot change any setting. Using the Audio Settings You can change various audio settings from the Home menu (➔ page 37). 1 2 1 Press TONE repeatedly to select either “Bass” or “Treble”.
Late Night CinemaFILTER ■ Late Night For Dolby Digital and Dolby Digital Plus sources, the options are: `Off `Low: Small reduction in dynamic range. `High: Large reduction in dynamic range. ■ Cinema Filter `Off `On Turn this setting on to soften overly bright movie soundtracks, which are typically mixed for reproduction in a movie theater.
Zone 2 In addition to the main listening room, you can also enjoy playback in another room, which we call Zone 2. For either of the rooms, you can specify a different input source. Making Zone 2 Connections There are two ways you can connect Zone 2 speakers: 1. Connect them directly to the AV receiver. 2. Connect them to an amp in Zone 2. Connecting Your Zone 2 Speakers Directly to the AV receiver Connecting the Zone Speakers to an Additional Amplifier This setup allows 7.
Controlling Zone 2 Components ■ Operating on the AV receiver ZONE 2 OFF Input selector buttons MASTER VOLUME Adjusting the Volume for Zone 2 ■ Operating on the remote controller 1 2 Press ZONE2. Use VOL q/w to adjust the volume. ■ Operating on the AV receiver 1 To turn on Zone 2 and select an input source, press ZONE 2 followed by an input selector button within 8 seconds. 1 Press ZONE 2 (the Z2 indicator on the display flash). 2 Use MASTER VOLUME control within 8 seconds to adjust the volume.
Controlling Other Components iPod/iPhone Playback via Onkyo Dock Using the Onkyo Dock The Dock is sold separately. Models sold are different depending on the region. For the latest information on the Onkyo Dock components, see the Onkyo web site at: http://www.onkyo.com Before using the Onkyo Dock components, update your iPod/iPhone with the latest software, available from the Apple web site. For supported iPod/iPhone models, see the instruction manual of the Onkyo Dock.
■ Status Messages If either of the following messages is not displayed on the AV receiver’s display, check the connection to your iPod/iPhone. • PORT Reading The AV receiver is checking the connection with the dock. • PORT Not Support The AV receiver do not support the connected dock. • PORT UP-A1 UP-A1 Dock is connected. Note • The AV receiver displays the message “UP-A1” for several seconds after recognizing the UP-A1.
✔: Available buttons Press the appropriate REMOTE MODE first. Buttons ✔ a TOP MENU*1 a b ✔*2 ✔ PLAYLIST e/r ✔ ✔ f g h b q/w/e/r, ENTER c 1, 3, 2, 5, 4, 7, 6 ✔ ✔ i d REPEAT RANDOM ✔ ✔ j k c d u Dock e UP-A1 Dock Onkyo Dock ✔ ✔ ✔ e 8SOURCE*3 f DISPLAY*4 g MUTING ✔ ✔ ✔ ✔ h ALBUM +/– ✔ ✔ i VOL q/w ✔ ✔ j MENU k RETURN ✔ l MODE ✔*5 ✔ ✔*6 l • With some iPod/iPhone models, generations and RI Docks, certain buttons may not work as expected.
Controlling Other Components You can use the AV receiver’s remote controller to control your other AV components, including those made by other manufacturers. This section explains how to enter the remote control code (with the default underlined) for a component that you want to control: DVD, TV, CD, etc. 7 Use q/w to select a brand, and then press ENTER. A remote control code with its instructions are displayed. Follow the procedure.
Remote Control Codes for Onkyo Components Connected via u Onkyo components that are connected via u are controlled by pointing the remote controller at the AV receiver, not the component. This allows you to control components that are out of view, in a rack, for example. Resetting the Remote Controller You can reset the remote controller to its default settings. 1 While holding down RECEIVER, press and hold down HOME until the remote indicator lights (about 3 seconds).
✔: Available buttons Press the appropriate REMOTE MODE first.
Appendix Troubleshooting If you have any trouble using the AV receiver, look for a solution in this section. If you can’t resolve the issue yourself, contact your Onkyo dealer. If you can’t resolve the issue yourself, try resetting the AV receiver before contacting your Onkyo dealer. To reset the AV receiver to its factory defaults, turn it on and, while holding down VCR/DVR, press 8ON/STANDBY. “Clear” will appear on the display and the AV receiver will enter standby mode.
■ Only the front speakers produce sound ■ Can’t get 6.1/7.1 playback When the Stereo or Mono listening mode is selected, — only the front speakers and subwoofer produce sound. Check the Speaker Configuration. 43 ■ Only the center speaker produces sound If you use the Dolby Pro Logic IIx Movie, Dolby Pro — Logic IIx Music, or Dolby Pro Logic IIx Game listening mode with a mono source, such as an AM radio station or mono TV program, the sound is concentrated in the center speaker.
Make sure that each video component is properly connected. 16, 17 If your TV is connected to the HDMI OUT, select “- - - - -” in the “HDMI Input” setup to watch composite video, and component video sources. 41 If the video source is connected to a component video input, you must assign that input to an input selector, and your TV must be connected to either the HDMI OUT or COMPONENT VIDEO OUT.
Make sure the AV receiver is turned on, the correct — input source is selected, and the volume is turned up. Make sure the plugs are pushed in all the way. — Try resetting your iPod/iPhone. — ■ There’s no video Make sure that your iPod/iPhone model’s TV OUT setting is set to On. — Make sure the correct input is selected on your TV or the AV receiver. — Some versions of the iPod/iPhone do not output video.
Others ■ Standby power consumption 17, 52, In the following cases, the power consumption in standby mode may reach up to a maximum of 43 W: 53, 54 – You are using the Universal Port jack. – “Network Control” is set to “Enable” in the “Network” setting. – “HDMI Control (RIHD)” setting is set to “On”. (Depending on the TV status, the AV receiver will enter standby mode as usual.) – The “HDMI Through” setting is set to other than “Off”.
Important Note Regarding Video Playback The AV receiver can upconvert component video and composite video sources for display on a TV connected to the HDMI OUT. However, if the picture quality of the source is poor, upconversion may make the picture worse or disappear altogether. In this case, try the following: 1 If the video source is connected to a component video input, connect your TV to the COMPONENT VIDEO OUT.
Network/USB Features Connecting to the Network Network Requirements The following diagram shows how you can connect the AV receiver to your home network. In this example, it’s connected to a LAN port on a router, which has a 4-port 100Base-TX switch built-in. Internet radio Modem WAN LAN Computer or media server Router ■ Ethernet Network For the best results, a 100Base-TX switched Ethernet network is recommended.
Server Requirements ■ Server playback The AV receiver can play digital music files stored on a computer or media server and supports the following technologies: • Windows Media Player 11 • Windows Media Player 12 • Windows Media Connect 2.0 • DLNA-certified media server If the operating system of your computer is Windows Vista, Windows Media Player 11 is already installed. Windows Media Player 11 for Windows XP can be downloaded for free from the Microsoft web site.
Supported Audio File Formats For server playback and playback from a USB device, the AV receiver supports the following music file formats. Variable bit-rate (VBR) files are supported. However, playback time may not be display correctly. ■ LPCM (Linear PCM) • Sampling rates of 8 kHz, 11.025 kHz, 12 kHz, 16 kHz, 22.05 kHz, 24 kHz, 32 kHz, 44.1 kHz, 48 kHz, 64 kHz, 88.2 kHz, and 96 kHz are supported. • Quantization bit: 8 bit, 16 bit, 24 bit * Only for playback via network.
Firmware Update To update the firmware of the AV receiver, you can choose from the following two methods: update via network, or update via USB storage. Choose the one that best suits your environment. Before proceeding with the update, please read the corresponding explanations carefully. ■ Update via network You need a wired Internet connection to update the firmware. ■ Update via USB storage (➔ page 75) Please prepare a USB storage device such as a USB flash memory stick.
7 Using 8ON/STANDBY on the front panel, turn off and on the AV receiver. Do not use 8RECEIVER on the remote controller. Congratulations! You now have the latest firmware installed on your Onkyo AV receiver. Troubleshooting Case 1: If “No Update” is displayed on the front display of the AV receiver, it means that the firmware has already been updated. You do not need to do anything further. Case 2: If an error occurs, “Error!! *-** No media” is displayed on the front display of the AV receiver.
8 9 10 11 12 13 Select “Hardware Setup” and press ENTER. Select “Firmware Update” and press ENTER. Select “Via USB” and press ENTER. Select “Update” and press ENTER. The update process will begin. During the update process, the on-screen display may disappear depending on the updated program. When this occurs, you can still view the update progress on the front display of the AV receiver. The on-screen display will reappear after the update is complete, and upon turning the AV receiver off and on again.
Connection Tips and Video Signal Path The AV receiver supports several connection formats for compatibility with a wide range of AV equipment. The format you choose will depend on the formats supported by your components. Use the following sections as a guide. The on-screen setup menus appear only on a TV that is connected to the HDMI OUT. If your TV is connected to the MONITOR OUT V or the COMPONENT VIDEO OUT, use the AV receiver’s display when changing settings.
Audio Connection Formats Audio components can be connected by using any of the following audio connection formats: analog, optical, coaxial, or HDMI. When choosing a connection format, bear in mind that the AV receiver does not convert digital input signals for analog line outputs and vice versa. For example, audio signals connected to an optical or coaxial digital input are not output by the analog VCR/DVR OUT. Audio Signal Flow Chart Blu-ray Disc/DVD player, etc.
About HDMI Designed to meet the increased demands of digital TV, HDMI (High Definition Multimedia Interface) is a new digital interface standard for connecting TVs, projectors, Blu-ray Disc/DVD players, set-top boxes, and other video components. Until now, several separate video and audio cables have been required to connect AV components.
Using an RIHD-compatible TV, Player, or Recorder p, which stands for Remote Interactive over HDMI, is the name of the system control function found on Onkyo components. The AV receiver can be used with CEC (Consumer Electronics Control), which allows system control over HDMI and is part of the HDMI standard. CEC provides interoperability between various components, however, operation with components other than p-compatible components cannot be guaranteed.
■ How to connect and setup 1 3 Confirm the connecting and setting. 1. Connect the HDMI OUT jack to the HDMI input jack of the TV. Blu-ray Disc/DVD player, etc. HDMI connection AV receiver DIGITAL AUDIO connection (OPTICAL) HDMI connection TV, projector, etc. 2. Connect the audio output from the TV to the OPTICAL IN 2 jack of the AV receiver using an optical digital cable. Note • When the audio return channel (ARC) function is used with an ARC capable TV, this connection is not necessary (➔ page 53).
Specifications Amplifier Section General Rated Output Power All channels: Power Supply (North American) AC 120 V, 60 Hz (Chinese) AC 220 - 240 V, 50/60 Hz Power Consumption (North American) 6.2 A (Chinese) 610 W Stand-by Power Consumption (North American) 0.2 W (Chinese) 0.3 W Dimensions 435 mm × 173.
Video Resolution Chart The following tables show how video signals at different resolutions are output by the AV receiver.
ONKYO SOUND & VISION CORPORATION 2-1, Nisshin-cho, Neyagawa-shi, OSAKA 572-8540, JAPAN Tel: 072-831-8023 Fax: 072-831-8163 ONKYO U.S.A. CORPORATION 18 Park Way, Upper Saddle River, N.J. 07458, U.S.A. Tel: 800-229-1687, 201-785-2600 Fax: 201-785-2650 http://www.us.onkyo.com/ ONKYO EUROPE ELECTRONICS GmbH Liegnitzerstrasse 6, 82194 Groebenzell, GERMANY Tel: +49-8142-4401-0 Fax: +49-8142-4401-555 http://www.eu.onkyo.