
Instruction manual


Operations
En-12
Adjusting sound quality, etc.
∫ DIRECT
Audio is output through shortest path which is
advantageous to sound quality without passing the sound
quality adjustment circuit (BASS, TREBLE).
1. Press the DIRECT button.
DIRECT function is enabled and the DIRECT LED
lights up.
0 BASS, TREBLE, and LOUDNESS is disabled when
the DIRECT function is enabled.
To cancel the DIRECT function: Press the DIRECT
button again to cancel, and the DIRECT LED goes off.
∫ LOUDNESS
Bass and treble is enhanced when the volume is turned
down.
1. Press the LOUDNESS button.
LOUDNESS function is enabled and the
LOUDNESS LED lights up.
0 When the DIRECT function is enabled, LOUDNESS
function will not be enabled even when the
LOUDNESS button is pressed. Press the
LOUDNESS button after canceling the DIRECT
function by pressing the DIRECT button.
0 When the BASS or TREBLE is raised very high,
effect of the LOUDNESS will become smaller.
To cancel the LOUDNESS function: Press the
LOUDNESS button again to cancel, and the LOUDNESS
LED goes off. Also, the LOUDNESS function will be
canceled when the DIRECT function is enabled.
∫ BASS
Adjusts the bass.
1. Turn the BASS control.
0 BASS is disabled when the DIRECT function is
enabled.
0 When the LOUDNESS function is enabled,
adjustment range in i direction for BASS will
become smaller.
∫ TREBLE
Adjusts the treble.
1. Turn the TREBLE control.
0 TREBLE is disabled when the DIRECT function is
enabled.
0 When the LOUDNESS function is enabled,
adjustment range in i direction for TREBLE will
become smaller.
∫ BALANCE
Adjusts the audio output balance between the left and
right speakers.
1. Turn the BALANCE control.
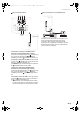
Using headphones
Turn down the volume, then connect your stereo
headphones with a standard plug (ø 6.3 mm, 1/4q) to the
PHONES jack. The speakers output no sound while
the headphones are connected.
Setting the Auto Standby function
This unit will go into standby mode automatically with
following conditions when the Auto Standby is set to On.
0 When there is no audio in the currently selected input
source and this unit is not operated for approximately
20 minutes
0 (North American and Continental European models)
When there is no PCM signal input in D 1 or D 2, and
this unit is not operated for approximately 20 minutes
The default Auto Standby setting is set as follows.
(North American models) Off
(Others) On
The setting can be changed with following procedure.
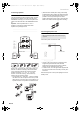
1. Press and hold the Í ON/STANDBY button while
the power is in standby. The power will come on when
the button is pressed, but keep on pressing the button.
The setting for the Auto Standby is changed, and it will
be displayed as follows.
(North American and Continental European models)
On: D 1 LED will blink for approximately 2 seconds.
Off: D 2 LED will blink for approximately 2 seconds.
(UK models)
On: ASB LED will light up.
Off: ASB LED will go off.
A-9010_eng.book 12 ページ 2014年12月25日 木曜日 午前10時48分