*En_A933_01.fm Page 1 Monday, December 20, 2004 1:23 PM Contents Integrated Amplifier Introduction .................................... 2 A-933 Instruction Manual Connections ................................. 10 Enjoying Audio Sources.............. 17 Thank you for purchasing an Onkyo Integrated Amplifier. Please read this manual thoroughly before making connections and plugging in the unit.
*En_A933_02.fm Page 2 Tuesday, January 25, 2005 1:46 PM WARNING: TO REDUCE THE RISK OF FIRE OR ELECTRIC SHOCK, DO NOT EXPOSE THIS APPARATUS TO RAIN OR MOISTURE. CAUTION: TO REDUCE THE RISK OF ELECTRIC SHOCK, DO NOT REMOVE COVER (OR BACK). NO USER-SERVICEABLE PARTS INSIDE. REFER SERVICING TO QUALIFIED SERVICE PERSONNEL.
*En_A933_02.fm Page 3 Tuesday, January 25, 2005 1:46 PM Precautions 1. Recording Copyright—Unless it’s for personal use only, recording copyrighted material is illegal without the permission of the copyright holder. 2. AC Fuse—The AC fuse inside the unit is not userserviceable. If you cannot turn on the unit, contact your Onkyo dealer. 3. Care—Occasionally you should dust the unit all over with a soft cloth. For stubborn stains, use a soft cloth dampened with a weak solution of mild detergent and water.
*En_A933_02.
*En_A933_02.fm Page 5 Tuesday, January 25, 2005 1:46 PM Table of Contents Introduction Important Safety Instructions .................................................................................... 2 Precautions .................................................................................................................. 3 Features ....................................................................................................................... 4 Supplied Accessories ..........................
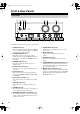
*En_A933_02.fm Page 6 Tuesday, January 25, 2005 1:46 PM Front & Rear Panels Front Panel 1 23 4 5 6 7 MD LINE TAPE /CDR CD STANDBY/ON TUNER ON(G) STANDBY(R) PHONO SUPER BASS POWER ON PHONES OFF 8 A SPEAKERS BASS B 9 TREBLE TO N E ( R ) DIRECT (G ) MAX 0 A B MAIN IN C D For detailed information, refer to the pages in parentheses. A POWER switch (17) This is the main power switch. When set to OFF, the A-933 is completely shutdown.
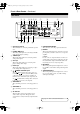
*En_A933_02.fm Page 7 Tuesday, January 25, 2005 1:46 PM Front & Rear Panels—Continued Rear Panel 1 2 3456 7 8 9 L GND L L R R SPEAKERS B A R PHONO (MM) TUNER L LINE CD AC OUTLET L L R L R SUBWOOFER PREOUT R MAIN IN R R OUT MD IN OUT IN TAPE/CDR REMOTE CONTROL MODEL NO.A-933 A or B : A + B: 4 OHMS MIN. /SPEAKER 8 OHMS MIN. /SPEAKER C A Grounding terminal This terminal is for connecting a turntable’s ground wire.
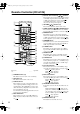
*En_A933_02.fm Page 8 Tuesday, January 25, 2005 1:46 PM Remote Controller (RC-613S) E Reverse & Fast Forward [ 1 2 3 4 STANDBY ON F VOLUME [ ]/[ ] buttons (18) 1 2 3 4 5 6 7 8 9 10/0 >10 GROUP These buttons adjust the volume of the A-933.
*En_A933_02.fm Page 9 Tuesday, January 25, 2005 1:46 PM Remote Controller (RC-613S)—Continued Q Previous & Next [ ]/[ ] (PRESET [ ] [ ]) buttons These buttons are used to select the previous or next track on an Onkyo Separate Collection CD, MD, cassette, or CDR component that’s connected via . Pressing them repeatedly selects earlier or later tracks. On an Onkyo Separate Collection tuner, they’re used to select radio presets.
*En_A933_02.fm Page 10 Tuesday, January 25, 2005 1:46 PM Connecting the A-933 About the System Functions If you connect another component from the Onkyo Separate Collection to the A-933 with the appropriate and audio cables, you can use the following system functions. cables are special cables solely for use with Onkyo products. (No cables are supplied with the A-933.) Connecting components from the Onkyo Separate Collection. See page 13 for more information.
*En_A933_02.fm Page 11 Tuesday, January 25, 2005 1:46 PM Connecting the A-933—Continued Before Making any Connections RCA Audio Connection Color Coding • Always refer to the instructions that came with the component that you are connecting. • Do not plug in the power cord until all connections have been properly made. • Do not bind audio cables with power cords and speaker cables. Doing so may adversely affect the sound quality.
*En_A933_02.fm Page 12 Tuesday, January 25, 2005 1:46 PM Connecting the A-933—Continued Connecting the Speaker Cables 1 Connecting a Subwoofer Strip about 15 mm of insulation from the ends of the speaker cables, and twist the bare wires tightly, as shown. 15 mm You can connect a subwoofer with a built-in power amplifier to the A-933’s SUBWOOFER PREOUT jack. L GND L L R R SPEAKERS B A R PHONO (MM) 2 TUNER Unscrew the terminal.
*En_A933_02.fm Page 13 Tuesday, January 25, 2005 1:46 PM Connecting the A-933—Continued Hookup Diagrams for Onkyo Separate Collection The A-933 can be used with the Onkyo Separate Collection C-733 CD Player and T-433 Tuner as shown below. T-433 A-933 To wall outlet L GND L L R R SPEAKERS B A R PHONO (MM) TUNER L L LINE CD AC OUTLET L R L R SUBWOOFER PREOUT R MAIN IN R OUT MD R IN OUT IN TAPE/CDR REMOTE CONTROL L AC 230-240V 50 Hz UNSWITCHED TOTAL 100W MAX.
*En_A933_02.fm Page 14 Tuesday, January 25, 2005 1:46 PM Connecting the A-933—Continued Audio Components Connecting a CD player Connecting a Tuner Use an analog audio cable to connect the A-933’s CD L/R jacks to the analog audio output jacks on the CD player, as shown. Use an analog audio cable to connect the A-933’s TUNER L/R jacks to the analog audio output jacks on the tuner, as shown.
*En_A933_02.fm Page 15 Tuesday, January 25, 2005 1:46 PM Connecting the A-933—Continued Connecting a Turntable Connecting a Preamp The A-933’s PHONO input jacks are for use with moving-magnet (MM) type cartridges. Use an analog audio cable to connect the A-933’s PHONO L/R jacks to the audio output jacks on the turntable, as shown. The A-933 can be used as a power amplifier with a separate preamp. In this case, use an analog audio cable to connect the A-933’s MAIN IN jacks to the preamp’s output jacks.
*En_A933_02.fm Page 16 Tuesday, January 25, 2005 1:46 PM Connecting the A-933—Continued Connecting Components With (Remote Interactive), you can control your -compatible Onkyo CD player, Tuner, and so on with the A-933’s remote controller. • To use , you must make an analog audio connection between the A-933 and each audio component. Connecting the Power Cord • Before connecting the power cord, connect all your speakers and audio components.
*En_A933_02.
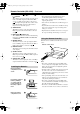
*En_A933_02.fm Page 18 Tuesday, January 25, 2005 1:46 PM Enjoying Audio Sources—Continued 2 3 Start playback on the selected component. A-933 Remote controller To adjust the volume, use the A-933’s Volume control, or the remote controller’s VOLUME [ ]/[ ] buttons. Turn VOLUME control clockwise to increase the volume or counterclockwise to decrease the volume. VOLUME Notes: • Always turn down the volume before connecting your headphones.
*En_A933_02.fm Page 19 Tuesday, January 25, 2005 1:46 PM Enjoying Audio Sources—Continued Using the MAIN IN Function Recording You can use the A-933 as power amplifier with a separate preamp. See page 15 for connection information.
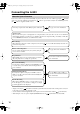
*En_A933_02.fm Page 20 Tuesday, January 25, 2005 1:46 PM Troubleshooting If you have any trouble using the A-933, look for a solution here. If you can’t resolve the issue yourself, contact your Onkyo dealer. Power Can’t turn on the A-933. • Make sure that the power cord is properly plugged into the wall outlet. • Unplug the power cord from the wall outlet, wait five seconds or more, then plug it in again.
*En_A933_02.fm Page 21 Tuesday, January 25, 2005 1:46 PM Troubleshooting—Continued Recording Can’t record. • The component connected to the MAIN IN jacks cannot be recorded. • When using the A-933 as a power amplifier (MAIN IN function), recording is not possible. Others The VOLUME control doesn’t work. • When using the A-933 as a power amplifier (MAIN IN function), the Volume control has no effect. Adjust the volume on the connected preamp instead. The Muting function doesn’t work.
*En_A933_02.fm Page 22 Tuesday, January 25, 2005 1:46 PM Specifications Speaker impedance: 80 W + 80 W (8 Ω, 1 kHz, DIN) 270 W + 270 W (3 Ω, Front) 220 W + 220 W (4 Ω, Front) 110 W + 110 W (8 Ω, Front) 0.08% (1 kHz, 1 W) 25 (Front, 1 kHz, 8 Ω) 200 mV, 50 kΩ (LINE) 2.5 mV, 50 kΩ (PHONO MM) 200 mV, 2.2 kΩ (REC OUT) 130 mV (MM, 1 kHz, 0.
*En_A933_02.
*En_A933_02.fm Page 24 Tuesday, January 25, 2005 1:46 PM Sales & Product Planning Div. : 2-1, Nisshin-cho, Neyagawa-shi, OSAKA 572-8540, JAPAN Tel: 072-831-8023 Fax: 072-831-8124 ONKYO U.S.A. CORPORATION 18 Park Way, Upper Saddle River, N.J. 07458, U.S.A. Tel: 201-785-2600 Fax: 201-785-2650 http://www.us.onkyo.com/ ONKYO EUROPE ELECTRONICS GmbH Liegnitzerstrasse 6, 82194 Groebenzell, GERMANY Tel: +49-8142-4401-0 Fax: +49-8142-4401-555 http://www.eu.onkyo.