> Before Start > Part Names > Install > Initial Setup > Playback > Advanced Manual Troubleshooting | Supplementary Information, etc. Basic Manual Before Start ............................................................................2 What's in the box......................................................................2 Part Names .............................................................................3 Part Names ..............................................................................
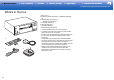
> Before Start > Part Names > Install > Initial Setup > Playback > Advanced Manual Troubleshooting | Supplementary Information, etc. What's in the box Before Start 1. Main unit (1) 2. Remote controller (RC-911R) (1), Batteries (AAA/R03) (2) 3. Speaker setup microphone (1) 0 Used during Initial Setup. 4. Indoor FM antenna (1) 5. AM loop antenna (1) 0 Quick Start Guide (1) 0 Basic Manual (This manual) 1 2 2 3 4 5 0 Connect speakers with 4 Ω to 16 Ω impedance.
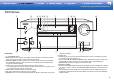
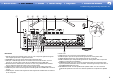
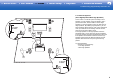
> Before Start > Part Names > Install > Initial Setup > Playback > Advanced Manual Troubleshooting | Supplementary Information, etc. Part Names Part Names Front Panel 1. Í ON/STANDBY button 2. PURE AUDIO button / indicator: The display and analog video circuits are turned off to switch the unit to Pure Audio mode and provide purer sound. 3.
> Before Start > Part Names > Install > Initial Setup > Playback > Advanced Manual Troubleshooting | Supplementary Information, etc. 15.PHONES jack: Headphones with a standard plug (Ø1/ 4"/ 6.3 mm) are connected. 16.Input selector buttons: Switches the input to be played. 17.SETUP MIC jack: The supplied speaker setup microphone is connected. 18.AUX INPUT jack: Connect a video camera, etc., using a stereo mini plug cable (Ø3.5 mm). (*)You can find details in the Advanced Manual.
> Before Start > Part Names > Install > Initial Setup > Playback > Advanced Manual Troubleshooting | Supplementary Information, etc. 90° 180° Rear Panel 1. DIGITAL IN OPTICAL/COAXIAL jacks: Input TV or AV component digital audio signals with a digital optical cable or digital coaxial cable. 2. ETHERNET port: Connect to the network with an Ethernet cable. 3. USB port: A USB storage device is connected so that music files stored in it can be played.
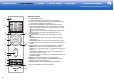
> Before Start > Part Names > Install > Initial Setup > Playback > Advanced Manual Troubleshooting | Supplementary Information, etc. Remote Controller 6 1. Í ON/STANDBY button 2. Input selector buttons: Switches the input to be played. 3. Q button: Press during play to display the QUICK MENU on the TV and display to adjust sound quality, etc. (*) 4. Cursor buttons and ENTER button: Select the item with the cursors and press ENTER to confirm your selection.
> Before Start > Part Names > Install > Initial Setup > Playback > Advanced Manual Troubleshooting | Supplementary Information, etc. Installation procedure Install This unit can be used in a number of ways, depending on the layout of the speakers you are installing, and the connections made to external devices. Read the following to help make the installation process smoother.
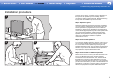
> Before Start > Part Names > Install > Initial Setup > Playback > Advanced Manual Troubleshooting | Supplementary Information, etc. Step1: Speaker Layout 7.1 Channel System *1 *2 *3 Front speakers output front stereo sound and a center speaker outputs center sound such as dialogs and vocals. Surround speakers create back sound field. Powered subwoofer reproduces bass sounds and creates rich sound field. This basic 5.1-Channel System with surround back speakers added is called a 7.
> Before Start > Part Names > Install > Initial Setup > Playback > Advanced Manual Troubleshooting | Supplementary Information, etc. 5.1.2 Channel System-1 (Front High Speakers/Rear High Speakers) This is a basic 5.1-channel system consisting of front speakers, a center speaker, surround speakers, and a powered subwoofer, with the addition of front height speakers or rear high speakers, which are both types of height speakers.
> Before Start > Part Names > Install > Initial Setup > Playback > Advanced Manual Troubleshooting | Supplementary Information, etc. 5.1.2 Channel System-2 (Ceiling Speakers) *3 *2 *1 This is a basic 5.1-channel system consisting of front speakers, a center speaker, surround speakers, and a powered subwoofer, with the addition of top front speakers, top middle speakers, or top rear speakers, which are types of height speakers.
> Before Start > Part Names > Install > Initial Setup > Playback > Advanced Manual Troubleshooting | Supplementary Information, etc. 5.1.2 Channel System-3 (Dolby Enabled Speakers (Dolby Speakers)) *1 *2 This is a basic 5.1-channel system consisting of front speakers, a center speaker, surround speakers, and a powered subwoofer, with the addition of Dolby enabled speakers (front) or Dolby enabled speakers (surround), which are both types of height speakers.
> Before Start > Part Names > Install > Initial Setup > Playback > Advanced Manual Troubleshooting | Supplementary Information, etc. Bi-Amping the Speakers It is possible to connect front speakers supporting Biamping to improve quality of the bass and treble. The maximum number of channels available with this connection is 5.1 because Bi-Amping speakers require one amplifier for the tweeter jacks and one amplifier for the woofer jacks.
> Before Start > Part Names > Install > Initial Setup > Playback > Advanced Manual Troubleshooting | Supplementary Information, etc. Speaker combinations 0 In any of the combinations, up to two powered subwoofers can be connected. Speaker Channels FRONT CENTER SURROUND SURROUND BACK HEIGHT Bi-Amp ZONE 2 2.1 ch (*) (*) 3.1 ch (*) (*) 4.1 ch (*) (*) 5.1 ch (*) (*) 6.1 ch 7.1 ch 2.1.2 ch 3.1.2 ch 4.1.2 ch 5.1.
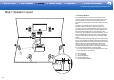
> Before Start > Part Names > Install > Initial Setup > Playback > Advanced Manual Troubleshooting | Supplementary Information, etc. Step2: Connect the Speakers Standard Connections (Pages 8 to 11) 1/2˝ (12 mm) Make correct connection between the unit's jacks and speaker's jacks (+ to + and – to –) for each channel. If connection is wrong, reverse phase may make bass output poor. Up to two powered subwoofers can be connected. The same signal is output from each of the SUBWOOFER PRE OUT jacks.
> Before Start > Part Names > Install > Initial Setup > Playback > Advanced Manual Troubleshooting | Supplementary Information, etc. Connecting with Bi-Amping Speakers (Page 12) 0 Refer to "Standard Connections (Pages 8 to 11)" (P14) to connect the center speaker, surround speakers, and powered subwoofer. Make sure you remove the jumper bar fitted between the woofer jacks and tweeter jacks of the front speakers.
> Before Start > Part Names > Install > Initial Setup > Playback > Advanced Manual Troubleshooting | Supplementary Information, etc. Step3: Connect the TV & AV Components 1. Connect the TV To ARC TV For a TV that supports the ARC (Audio Return Channel) (*) feature, use an HDMI cable and connect according to illustration "a". Choose an HDMI IN jack on the TV that supports ARC when connecting. Setup 0 Settings are required to use the ARC function. Select "Yes" in "5.
> Before Start > Part Names > Install > Initial Setup > Playback > Advanced Manual Troubleshooting | Supplementary Information, etc. 2. Connect the HDMI AV Component This is an example of connection with an AV component that has an HDMI jack.
> Before Start > Part Names > Install > Initial Setup > Playback > Advanced Manual Troubleshooting | Supplementary Information, etc. 3. Connect the Non-HDMI AV Component This is an example of connection with an AV component that does not have an HDMI jack. Make the connections to the AV component to match the jacks it has.
> Before Start > Part Names > Install > Initial Setup > Playback > Advanced Manual Troubleshooting | Supplementary Information, etc. 4. Connect the Audio Component Example of a connection with an audio component. Connect a CD player using a digital optical cable or analog audio cable. You can also connect a turntable that has an MM-type cartridge to the PHONO jack. 0 If the turntable has a built-in audio equalizer, connect it to another AUDIO IN jack.
> Before Start > Part Names > Install > Initial Setup > Playback > Advanced Manual Troubleshooting | Supplementary Information, etc. 5. Multi-zone Connection You can enjoy audio in the separate room by, for example, playing a Blu-ray Disc player in the main room (where this unit is located) and listening to internet radio in the separate room (ZONE 2). 0 DSD and Dolby TrueHD audio signals are not output to ZONE 2 when selected with the "NET" input selector.
> Before Start > Part Names > Install > Initial Setup > Playback > Advanced Manual Troubleshooting | Supplementary Information, etc. 6. Connect Other Cables Antenna Hookup Move the antenna around while playing the radio to find the position with the best reception. Use a thumb tack or similar to attach the indoor FM antenna to a wall. b 2 Network Hookup a d Connect this unit to the network using wired LAN or Wi-Fi (wireless LAN).
> Before Start > Part Names > Install > Initial Setup > Playback > Advanced Manual Troubleshooting | Supplementary Information, etc. Initial Setup with Auto Start-up Wizard Initial Setup Initial Setup Starts Automatically 1 INPUT TV When you turn the unit on for the first time after purchasing it, Initial Setup is automatically shown on the TV to enable you to make settings required for startup using simple operations following onscreen guidance. 1.
> Before Start > Part Names > Install > Initial Setup > Playback > Advanced Manual Troubleshooting | Supplementary Information, etc. measurement, so be careful of your surroundings. Keep the room as quiet as possible during measurement. 0 If you have connected a subwoofer, check the power and volume of the subwoofer. Set the subwoofer volume to more than halfway.
> Before Start > Part Names > Install > Initial Setup > Playback > Advanced Manual Troubleshooting | Supplementary Information, etc. Playback BLUETOOTH® Playback AV Component Playback 1 2 1 2 3 INPUT Onkyo TX-NR575 XXX TV Basic Operations 3. Start play on the AV component. You can play the audio from AV components such as Blu-ray Disc players through this unit. Perform the following procedure when the unit is on. 1. Switch the input on the TV to that assigned to the unit. 2.
> Before Start > Part Names > Install > Initial Setup > Playback > Advanced Manual Troubleshooting | Supplementary Information, etc. Network Functions 2 1 3 INPUT TV Basic Operations By connecting this unit to the network you can enjoy internet radio services such as TuneIn, streaming from Spotify Connect, and wireless playback using AirPlay® features. Furthermore, you can use the Music Server feature to stream music files stored on PCs or NAS devices that support the home network feature.
> Before Start > Part Names > Install > Initial Setup > Playback > Advanced Manual Troubleshooting | Supplementary Information, etc. USB Storage Device 2 1 3 4 INPUT TV Basic Operations You can play music files stored on a USB storage device. Perform the following procedure when the unit is on. 1. Switch the input on the TV to that assigned to the unit. 2. Plug your USB storage device with the music files into the USB port of this unit’s rear panel. 3.
> Before Start > Part Names > Install > Initial Setup > Playback > Advanced Manual Troubleshooting | Supplementary Information, etc. Listening To the AM/FM Radio 1 You can receive AM and FM radio stations on this unit with the built-in tuner. Perform the following procedure when the unit is on. ∫ Tuning into a Radio Station Tuning Automatically 1. Press TUNER (a) on the remote controller repeatedly to select either "AM" or "FM" on the display. 2.
> Before Start > Part Names > Install > Initial Setup > Playback > Advanced Manual Troubleshooting | Supplementary Information, etc. 1 2 3 ∫ Using RDS RDS stands for Radio Data System and is a method of transmitting data in FM radio signals. In regions using RDS, the radio station name is displayed when you tune into a radio station broadcasting program information. When you press on the remote controller in this state, you can use the following functions.
> Before Start > Part Names > Install > Initial Setup > Playback > Advanced Manual Troubleshooting | Supplementary Information, etc. Multi-zone 1 2 3 ZONE 2 on the remote controller. Alternatively press OFF on the main unit. Playing in ZONE 2 only: If you turn the unit to standby during multizone playback, the Z2 indicator is dimmed and the playback mode is switched to playback in a separate room only.
> Before Start > Part Names > Install > Initial Setup > Playback > Advanced Manual Troubleshooting | Supplementary Information, etc. Listening Mode This unit is equipped with a variety of listening modes, and you can select the optimum listening mode for movies, TV, music, and games using MOVIE/TV, MUSIC, and GAME (b). The basic operations are introduced in the Basic Manual. For more details, see the Advanced Manual.
License and Trademark BLACKFIRE Manufactured under license from Dolby Laboratories. Dolby, Dolby Atmos, Dolby Surround, Dolby Vision and the double-D symbol are trademarks of Dolby Laboratories. This Mark Certifies that this product is compliant with the BLACKFIRE ALLIANCE Standard. Please refer to WWW.BLACKFIREALLIANCE.COM for more information. BLACKFIRETM is a Registered Trademark (No. 85,900,599) of BLACKFIRE RESEARCH CORP. All rights reserved. For DTS patents, see http://patents.dts.com.
2-3-12 Yaesu, Chuo-ku, Tokyo 104-0028 JAPAN http://www.onkyo.com/ 18 Park Way, Upper Saddle River, N.J. 07458, U.S.A. For Dealer, Service, Order and all other Business Inquiries: Tel: 201-785-2600 Fax: 201-785-2650 http://www.us.onkyo.com/ For Product Support Team Only: 1-800-229-1687 http://www.us.onkyo.com/ Gutenbergstrasse 3, 82178 Puchheim, Germany Tel: +49-8142-4401-0 Fax: +49-8142-4208-213 http://www.eu.onkyo.
Advan >>Specifications >>Advanced Setup >>Listening Modes >>Network Functions >>Basic Manual Troubleshooting | Supplementary Information, etc. Advanced Manual Specifications General Specifications............................................................. 2 About HDMI ............................................................................. 4 Playback from USB storage devices ....................................... 5 Playback from the Music Server ..............................................
>>Specifications >>Advanced Setup >>Listening Modes >>Network Functions >>Basic Manual Troubleshooting | Supplementary Information, etc.
>>Specifications >>Advanced Setup >>Listening Modes >>Network Functions >>Basic Manual Troubleshooting | Supplementary Information, etc. Maximum Video Resolution 4k 60 Hz (YCbCr 4:4:4) ■ Video Inputs Composite IN1 (GAME), IN2 (CBL/SAT) ■ Compatible input resolutions HDMI input 4K, 1080p/24, 1080p, 1080i, 720p, 480p/576p Composite input 480i/576i • The output from the HDMI OUT jack to the TV is the same resolution as the input.
>>Specifications >>Advanced Setup >>Listening Modes >>Network Functions >>Basic Manual Troubleshooting | Supplementary Information, etc. About HDMI ■ Compatible functions HDMI (High Definition Multimedia Interface) is a digital interface standard for connecting TVs, projectors, Bluray Disc/DVD players, set-top boxes, and other video components. Until now, several separate video and audio cables have been required to connect AV components.
>>Specifications >>Advanced Setup >>Listening Modes >>Network Functions >>Basic Manual Troubleshooting | Supplementary Information, etc. Playback from USB storage devices ■ USB Storage Device Requirements • This unit can use USB storage devices that comply with the USB mass storage device class standard. • FAT16 or FAT32 file system format. • If the USB storage device has been partitioned, each section will be treated as an independent device.
>>Specifications >>Advanced Setup >>Listening Modes >>Network Functions >>Basic Manual Troubleshooting | Supplementary Information, etc. Playback from the Music Server ■ Supported Audio Formats This unit supports the following music file formats. Remote play of FLAC and DSD is not supported. MP3 (�mp3/�MP3): • Supported formats: MPEG-1/MPEG-2 Audio Layer 3 • Supported sampling rates: 44.1 kHz, 48 kHz • Supported bitrates: Between 8 kbps and 320 kbps. WMA (�wma/�WMA): • Supported sampling rates: 44.
>>Specifications >>Advanced Setup >>Listening Modes >>Network Functions >>Basic Manual Troubleshooting | Supplementary Information, etc. 1� Input/Output Assign Setup Menu The unit allows you to configure advanced settings to provide you with an even better experience. Operation: Use the on-screen displays (OSD) that appear on the TV to make the settings. on the remote controller to display the Setup menu. Press Setup 1. Input/Output Assign 1. TV Out / OSD 2. Speaker 2. HDMI Input 3.
>>Specifications >>Advanced Setup >>Listening Modes >>Network Functions >>Basic Manual Troubleshooting | Supplementary Information, etc. Setting Item Default Value Setting Details Mini Player OSD Always On You can play on the TV the images from another input selected immediately prior while you are playing the audio from NET or BLUETOOTH input.
>>Specifications >>Advanced Setup >>Listening Modes >>Network Functions >>Basic Manual Troubleshooting | Supplementary Information, etc. Setting Item Default Value Setting Details TV --- "HDMI 1 (HDCP 2.2)" to "HDMI 4 (HDCP 2.2)": Assign a desired HDMI IN jack to the TV button. If you do not assign a jack, select "---". To select an HDMI IN jack already assigned to another input selector, change its setting to "---" first. PHONO --- "HDMI 1 (HDCP 2.2)" to "HDMI 4 (HDCP 2.
>>Specifications >>Advanced Setup >>Listening Modes >>Network Functions >>Basic Manual Troubleshooting | Supplementary Information, etc. ■ 5� Analog Audio Input 2� Speaker You can change input assignment between the input selectors and AUDIO IN jacks. If you do not assign a jack, select "---". 10 Setting Item Default Value Setting Details BD/DVD --- "AUDIO 1" to "AUDIO 3": Assign a desired AUDIO IN jack to the BD/DVD button.
>>Specifications >>Advanced Setup >>Listening Modes >>Network Functions >>Basic Manual Troubleshooting | Supplementary Information, etc. Setting Item Default Value Setting Details Bi-Amp No Set whether the front speakers are bi-amp connected. "No": When front speakers are not bi-amp connected "Yes": When front speakers are bi-amp connected • This item will be fixed to "No" when the "Zone Speaker" setting is "Zone 2".
>>Specifications >>Advanced Setup >>Listening Modes >>Network Functions >>Basic Manual Troubleshooting | Supplementary Information, etc. Setting Item Default Value Setting Details Surround 100Hz Select the crossover frequency from "40Hz" to "200Hz" to start outputting frequencies for each channel. "Full Band": Full band will be output. • "Full Band" can be selected only when "Front" is set to "Full Band".
>>Specifications >>Advanced Setup >>Listening Modes >>Network Functions >>Basic Manual Troubleshooting | Supplementary Information, etc. ■ 4� Level Calibration Setting Item Default Value Setting Details Front Left 0 dB Select a value between "−12 dB" and "+12 dB" (in 1 dB increments). A test tone will be output each time you change the value. Select the desired level. Center 0 dB Select a value between "−12 dB" and "+12 dB" (in 1 dB increments).
>>Specifications >>Advanced Setup >>Listening Modes >>Network Functions >>Basic Manual Troubleshooting | Supplementary Information, etc. Setting Item Default Value Setting Details Center 0 dB After selecting the speaker frequency from between "25 Hz" and "16 kHz" with the cursors / , adjust the volume of that frequency between "−6 dB" and "+6 dB" with / .
>>Specifications >>Advanced Setup >>Listening Modes >>Network Functions >>Basic Manual Troubleshooting | Supplementary Information, etc. ■ 3� DTS Setting Item Default Value Setting Details DTS Auto Surround On When inputting DTS signals that include extended channel information, the optimum listening mode is automatically selected according to the extended information contained in the input signal and the speaker configuration of this unit when playing in the straight decoding listening mode.
>>Specifications >>Advanced Setup >>Listening Modes >>Network Functions >>Basic Manual Troubleshooting | Supplementary Information, etc. 4� Source Make settings for input sources, such as volume difference adjustments for each input selector for the connected equipment. ■ 1� IntelliVolume Adjust the volume level difference between the devices connected to the unit. Select the input selector to configure.
>>Specifications >>Advanced Setup >>Listening Modes >>Network Functions >>Basic Manual Troubleshooting | Supplementary Information, etc. Setting Item Default Value Setting Details PCM Fixed Mode Off Select whether to fix input signals to PCM (except multi-channel PCM) when you have selected "HDMI", "COAXIAL", or "OPTICAL" in the "Audio Select" setting. Set this item to "On" if noise is produced or truncation occurs at the beginning of a track when playing PCM sources. Select "Off" normally.
>>Specifications >>Advanced Setup >>Listening Modes >>Network Functions >>Basic Manual Troubleshooting | Supplementary Information, etc. 18 Setting Item Default Value Setting Details Setting Item Default Value Setting Details HDMI Standby Through Off When this is set to anything other than "Off", you can play the video and audio of an HDMI connected player on the TV even if the unit is in standby mode. Only "Auto" and "Auto(Eco)" can be selected if "HDMI CEC" is set to "On".
>>Specifications >>Advanced Setup >>Listening Modes >>Network Functions >>Basic Manual Troubleshooting | Supplementary Information, etc. ■ 2� Network • When LAN is configured with a DHCP, set "DHCP" to "Enable" to configure the setting automatically. ("Enable" is set by default) To assign fixed IP addresses to each components, you must set "DHCP" to "Disable" and assign an address to this unit in "IP Address" as well as set information related to your LAN, such as Subnet Mask and Gateway.
>>Specifications >>Advanced Setup >>Listening Modes >>Network Functions >>Basic Manual Troubleshooting | Supplementary Information, etc. Setting Item Default Value AirPlay Password 20 Setting Details You can set a password of up to 31 characters so that only registered users can use AirPlayR. 1. Press ENTER to display the Edit screen. 2. Select a character or symbol with the cursors and press ENTER. Repeat it to input 31 or less characters. "A/a": Switches between upper and lower cases.
>>Specifications >>Advanced Setup >>Listening Modes >>Network Functions >>Basic Manual Troubleshooting | Supplementary Information, etc. Setting Item Default Value Setting Details Pairing Information - You can initialize the pairing information saved on this unit. Pressing ENTER when "Clear" is displayed initializes the pairing information stored in this unit. • This function does not initialize the pairing information on the BLUETOOTH wireless technology enabled device.
>>Specifications >>Advanced Setup >>Listening Modes >>Network Functions >>Basic Manual Troubleshooting | Supplementary Information, etc. Setting Item Default Value Setting Details Network Standby On When this feature is turned "On", you can turn on the power of the unit via the network using an application such as Onkyo Remote that can control this unit. • When "Network Standby" is used, the power consumption increases even when the unit is on standby.
>>Specifications >>Advanced Setup >>Listening Modes >>Network Functions >>Basic Manual Troubleshooting | Supplementary Information, etc. ■ 3� Firmware Update 7� Miscellaneous Change the frequency step for the tuner, update the firmware, and perform Initial Setup, etc. Setting Item Default Value Setting Details Update Notice Enable Availability of a firmware update will be notified via network.
>>Specifications >>Advanced Setup >>Listening Modes >>Network Functions >>Basic Manual Troubleshooting | Supplementary Information, etc. listening to some sound. Subwoofer: Adjust the speaker level of the subwoofer while listening to some sound. Quick Menu You can quickly adjust settings you frequently use, such as tone adjustments, etc. Operation: You can make the settings on the TV screen while playing something. Press Q on the remote controller to display the Quick Menu.
>>Specifications >>Advanced Setup >>Listening Modes >>Network Functions >>Basic Manual Troubleshooting | Supplementary Information, etc. the MAC address and IP address for this unit. Web Setup You can make the settings for network features for this unit in an internet browser on a PC, smartphone, etc. Network Connection: You can select how to connect to the network. If you select "Wireless", select an access point from "Wi-Fi Setup" to connect. DHCP: You can change DHCP settings.
>>Specifications >>Advanced Setup >>Listening Modes >>Network Functions >>Basic Manual Troubleshooting | Supplementary Information, etc. Firmware Update The updating function on this unit This unit has functionality to update the firmware (the system software) over a network or by the USB port. This enables us to make improvements to a variety of operations and to add features. • For the latest information on updates, visit our company's website.
>>Specifications >>Advanced Setup >>Listening Modes >>Network Functions >>Basic Manual Troubleshooting | Supplementary Information, etc. Setup 1. Input/Output Assign 1. Tuner 2. Speaker 2. Remote ID 3. Audio Adjust 3. Firmware Update 4. Source 4. Initial Setup 5. Hardware 5. Lock 6. Multi Zone 7. Miscellaneous • If "Firmware Update" is grayed out and cannot be selected, wait for a while until it starts up. • You will not be able to select "Update via NET" if there is nothing to update. 3.
>>Specifications >>Advanced Setup >>Listening Modes >>Network Functions >>Basic Manual Troubleshooting | Supplementary Information, etc. 4. Connect the USB storage device to the USB port of the unit. • If you connect a USB hard disk drive to the USB port of the unit, we recommend that you use its AC adapter to power it. • If the USB storage device has been partitioned, each section will be treated as an independent device. 5. Press on the remote controller. The Setup menu is displayed on the TV screen.
>>Specifications >>Advanced Setup >>Listening Modes >>Network Functions >>Basic Manual Troubleshooting | Supplementary Information, etc. Selecting Listening Modes Select the optimum listening mode for movies, TV, music, and games by repeatedly pressing the MOVIE/TV, MUSIC, and GAME buttons. 1. During play, press one of the following three buttons on the remote controller.
>>Specifications >>Advanced Setup >>Listening Modes >>Network Functions >>Basic Manual Troubleshooting | Supplementary Information, etc. Listening Mode Effects In alphabetical order ■ AllCh Stereo This mode is ideal for background music. Stereo sound is played through the surround speakers as well as the front speakers, creating a stereo image. ■ Direct This listening mode can be selected for all input signals.
>>Specifications >>Advanced Setup >>Listening Modes >>Network Functions >>Basic Manual Troubleshooting | Supplementary Information, etc. reproduction is achieved by recording the content at a sampling rate of 96 kHz at a resolution of 24 bits. • To enable transfer of this audio format, connect via digital cable and set audio output on the player to bitstream output. ■ DTS Express This mode faithfully reproduces the sound design recorded in the DTS Express audio format.
>>Specifications >>Advanced Setup >>Listening Modes >>Network Functions >>Basic Manual Troubleshooting | Supplementary Information, etc. feature. Activating the Multi-zone feature while this mode is selected automatically switches the listening mode to Direct. ■ Stereo In this mode, sound is output from the front left and right speakers and subwoofer. ■ Studio-Mix Suitable for rock or pop music.
>>Specifications >>Advanced Setup >>Listening Modes >>Network Functions >>Basic Manual Troubleshooting | Supplementary Information, etc. Selectable Listening Modes You can select a variety of listening modes to suit the audio format of the signal being input. Refer to the following for the listening mode choices. • Listening modes available when headphones are connected are: Pure Audio, Mono, Direct, and Stereo.
>>Specifications >>Advanced Setup >>Listening Modes >>Network Functions >>Basic Manual Troubleshooting | Supplementary Information, etc. Input Format Listening Mode Input Format Listening Mode Input Format Listening Mode Dolby D Direct Dolby D+ Direct DTS Direct Dolby D Dolby D+ 1 2 Dolby Surround DTS Neural:X TV Logic TV Logic TV Logic 3 Full Mono Full Mono 4 3 4 Cannot be selected when the input format is 2 ch. A center speaker or surround speakers need to be installed.
>>Specifications >>Advanced Setup >>Listening Modes >>Network Functions >>Basic Manual Troubleshooting | Supplementary Information, etc.
>>Specifications >>Advanced Setup >>Listening Modes >>Network Functions >>Basic Manual Troubleshooting | Supplementary Information, etc. ■ MUSIC button This is a list of listening modes you can select according to the audio format of the input signal.
>>Specifications >>Advanced Setup >>Listening Modes >>Network Functions >>Basic Manual Troubleshooting | Supplementary Information, etc.
>>Specifications >>Advanced Setup >>Listening Modes >>Network Functions >>Basic Manual Troubleshooting | Supplementary Information, etc.
>>Specifications >>Advanced Setup >>Listening Modes >>Network Functions >>Basic Manual Troubleshooting | Supplementary Information, etc. Input Format DTS:X Listening Mode ■ GAME button Input Format Listening Mode Pure Audio This is a list of listening modes you can select according to the audio format of the input signal.
>>Specifications >>Advanced Setup >>Listening Modes >>Network Functions >>Basic Manual Troubleshooting | Supplementary Information, etc. Input Format Listening Mode Input Format Listening Mode Input Format Listening Mode Dolby Atmos • You can select the Dolby Digital Plus or Dolby TrueHD listening modes if surround back speakers or height speakers are not connected.
>>Specifications >>Advanced Setup >>Listening Modes >>Network Functions >>Basic Manual Troubleshooting | Supplementary Information, etc.
>>Specifications >>Advanced Setup >>Listening Modes >>Network Functions >>Basic Manual Troubleshooting | Supplementary Information, etc. ■ Internet radio service menus LINKS Internet Radio You can use internet radio services such as TuneIn Radio, Pandora, Deezer, and TIDAL by connecting this unit to a network that has an internet connection. • Depending on the internet radio service, the user may need to register from their computer first.
>>Specifications >>Advanced Setup >>Listening Modes >>Network Functions >>Basic Manual Troubleshooting | Supplementary Information, etc. Spotify Spotify Connect play is possible by connecting this unit to the same network as a smart phone or tablet. • To play Spotify Connect, you need to install the Spotify application on your smartphone or tablet. You also need to create a Spotify premium account. • Refer to the following for Spotify settings: www.spotify.
>>Specifications >>Advanced Setup >>Listening Modes >>Network Functions >>Basic Manual Troubleshooting | Supplementary Information, etc. AirPlay® You can wirelessly enjoy the music files on an iPhone®, iPod touch®, or iPad® connected to the same access point as this unit. • Update the OS version on your iOS device to the latest version. • There may be some differences in the operations screens and how operations are performed on the iOS device depending on the iOS version.
>>Specifications >>Advanced Setup >>Listening Modes >>Network Functions >>Basic Manual Troubleshooting | Supplementary Information, etc. Music Server Overview Streaming play of music files stored on PCs or NAS devices connected to the same network as this unit is supported. • The network servers this unit is compatible with are those PCs with players installed that have the server functionality of Windows MediaR Player 11 or 12, or NAS that are compatible with home network functionality.
>>Specifications >>Advanced Setup >>Listening Modes >>Network Functions >>Basic Manual Troubleshooting | Supplementary Information, etc. levels deep. • Depending on the media server, the unit may not recognize it, or may not be able to play its music files. Controlling Remote Playback from a PC You can use this unit to play music files stored on your PC by operating the PC inside your home network. The unit supports remote playback with Windows MediaR Player 12.
>>Specifications >>Advanced Setup >>Listening Modes >>Network Functions >>Basic Manual Troubleshooting | Supplementary Information, etc. Supplementary information for player functions Due to firmware (the software for the system) updates after you make your purchase or firmware changes during production of the product, there may be additions or changes to the features available compared to what is in the instruction manual.
>>Specifications >>Advanced Setup >>Listening Modes >>Network Functions >>Basic Manual Troubleshooting | Supplementary Information, etc. LINKS Troubleshooting Before starting the procedure Problems may be solved by simply turning the power on/ off or disconnecting/connecting the power cord, which is easier than working on the connection, setting and operating procedure. Try the simple measures on both the unit and the connected device.
>>Specifications >>Advanced Setup >>Listening Modes >>Network Functions >>Basic Manual Troubleshooting | Supplementary Information, etc. Audio • Make sure that the speaker setup microphone is not still connected. • Confirm that the connection between the output jack on the device and the input jack on this unit is correct. • Make sure that none of the connecting cables are bent, twisted, or damaged. • If the MUTE indicator on the display flashes, press on the remote controller to cancel muting.
>>Specifications >>Advanced Setup >>Listening Modes >>Network Functions >>Basic Manual Troubleshooting | Supplementary Information, etc. Listening Modes • To enjoy digital surround playback, such as Dolby Digital, the audio signals need to pass through a connection via HDMI cable, digital coaxial cable, or digital optical cable. Audio output should be set to bitstream output on the connected Blu-ray Disc player or other device.
>>Specifications >>Advanced Setup >>Listening Modes >>Network Functions >>Basic Manual Troubleshooting | Supplementary Information, etc. ■ Images flicker • It is possible that the resolution of the player is not compatible with the TV's resolution. If you have connected the player to this unit with an HDMI cable, try changing the output resolution on the player. There also may be an improvement if you change the screen mode on the TV.
>>Specifications >>Advanced Setup >>Listening Modes >>Network Functions >>Basic Manual Troubleshooting | Supplementary Information, etc. closer to the unit or remove any obstacle between the BLUETOOTH wireless technology enabled device and this unit. Network function • If you cannot select a network service, it will become selectable when the network function is started. It may take about a minute to start up. • When NET is blinking, this unit is not properly connected to the home network.
>>Specifications >>Advanced Setup >>Listening Modes >>Network Functions >>Basic Manual Troubleshooting | Supplementary Information, etc. Wireless LAN Network • Try plugging/unplugging the power supply of wireless LAN router and the unit, check the wireless LAN router power-on status, and try reboot of the wireless LAN router. Check the following if the above does not fix the problem: ■ Cannot access wireless LAN network • The wireless LAN router setting may be switched to Manual.
>>Specifications >>Advanced Setup >>Listening Modes >>Network Functions >>Basic Manual Troubleshooting | Supplementary Information, etc. Information about products with Wi-Fi/ BLUETOOTH features ■ Radio Wave Caution Products with Wi-Fi/BLUETOOTH use radio waves in the 2.4 GHz and 5 GHz frequency bands. There are nations and regions where the use of particular 5 GHz bands are prohibited outdoors, so do not use these products outside. 2.
>>Specifications >>Advanced Setup >>Listening Modes >>Network Functions >>Basic Manual Troubleshooting | Supplementary Information, etc. LINKS Supplementary Information Due to firmware (the software for the system) updates after you make your purchase or firmware changes during production of the product, there may be additions or changes to the settings and operation available compared to what is in the instruction manual.
>>Specifications >>Advanced Setup >>Listening Modes >>Network Functions >>Basic Manual Troubleshooting | Supplementary Information, etc. License and Trademark Manufactured under license from Dolby Laboratories. Dolby, Dolby Atmos, Dolby Surround, Dolby Vision and the double-D symbol are trademarks of Dolby Laboratories. For DTS patents, see http://patents.dts.com. Manufactured under license from DTS, Inc.
2-3-12 Yaesu, Chuo-ku, Tokyo 104-0028 JAPAN http://www.onkyo.com/ 18 Park Way, Upper Saddle River, N.J. 07458, U.S.A. For Dealer, Service, Order and all other Business Inquiries: Tel: 201-785-2600 Fax: 201-785-2650 http://www.us.onkyo.com/ For Product Support Team Only: 1-800-229-1687 http://www.us.onkyo.com/ Gutenbergstrasse 3, 82178 Puchheim, Germany Tel: +49-8142-4401-0 Fax: +49-8142-4208-213 http://www.eu.onkyo.