Contents BLU-RAY DISC PLAYER BD-SP309 Introduction . . . . . . . . . . . . . .2 Connection . . . . . . . . . . . . .15 Playback . . . . . . . . . . . . . . .19 Instruction Manual Settings . . . . . . . . . . . . . . . .39 Troubleshooting . . . . . . . . .50 Appendix . . . . . . . . . . . . . . .54 Thank you for purchasing an Onkyo BLU-RAY DISC PLAYER. Please read this manual thoroughly before making connections and plugging in the unit.
WARNING: TO REDUCE THE RISK OF FIRE OR ELECTRIC SHOCK, DO NOT EXPOSE THIS APPARATUS TO RAIN OR MOISTURE. CAUTION: TO REDUCE THE RISK OF ELECTRIC SHOCK, DO NOT REMOVE COVER (OR BACK). NO USERSERVICEABLE PARTS INSIDE. REFER SERVICING TO QUALIFIED SERVICE PERSONNEL.
Precautions 1. Recording Copyright—Unless it’s for personal use only, recording copyrighted material is illegal without the permission of the copyright holder. 2. AC Fuse—The AC fuse inside the unit is not user-serviceable. If you cannot turn on the unit, contact your Onkyo dealer. 3. Care—Occasionally you should dust the unit all over with a soft cloth. For stubborn stains, use a soft cloth dampened with a weak solution of mild detergent and water. Dry the unit immediately afterwards with a clean cloth.
12. Region Codes—The BD/DVD standard uses region codes to control how discs can be played around the world, the world being divided into three regions (BD) or six regions (DVD). This unit will only play BD/ DVD discs that match its region code, which can be found on its rear panel. 13. About this Manual—This manual explains how to use all of this unit’s functions.
Contents Introduction Important Safety Instructions. . . . . . . . . . . . . . . 2 Precautions . . . . . . . . . . . . . . . . . . . . . . . . . . . . . 3 Contents . . . . . . . . . . . . . . . . . . . . . . . . . . . . . . . . 5 Getting Started . . . . . . . . . . . . . . . . . . . . . . . . . . 6 Symbols Used in this Manual . . . . . . . . . . . . . . . 6 Supplied Accessories . . . . . . . . . . . . . . . . . . . . . 6 About Media Types . . . . . . . . . . . . . . . . . . . . . . . 7 Blu-ray Disc . . . .
Getting Started Symbols Used in this Manual Note Indicates special notes and operating features. Supplied Accessories Remote control unit (1) Caution Indicates cautions for preventing possible damage from abuse. A section whose title has one of the following symbols are applicable only to the disc represented by the symbol. Indicates the functions that can be performed for BD Video discs. Indicates the functions that can be performed for BD-RE discs.
About Media Types Blu-ray Disc Disc Type Blu-ray Disc is the ultimate next generation optical media format, offering the following key features: • Largest capacity (25 GB single layer – 50 GB dual layer) - with over 5 times the amount of content possible with current DVDs, particularly well suited for high de nition feature lms with extended levels of interactive features • Pristine picture quality with the capability for full high de nition 1920 x 1080p resolution • Best audio possible with uncompressed
Discs that Cannot Be Used with This Player The following discs cannot be played back or will not play back properly on this Player. If such a disc is mistakenly played back, speaker damage may occur. Never attempt to play back these discs. CDG, Video CD, Photo CD, CD-ROM, CD-TEXT, SVCD, SACD, PD, CDV, CVD, DVD-RAM, DVD Audio, BD-RE with the cartridge, CD-WMA Discs with unusual shapes cannot be played. • Discs with unusual shapes (heart-shaped or hexagonal discs, etc.) cannot be used.
You may experience one or more of the following symptoms when playing les. • It may take some time to play les depending on the number of folders, number of les and volume of data involved. • EXIF information will not be displayed. EXIF stands for Exchangeable Image File Format, and is a standard for storing interchange information in image les, especially those using JPEG compression. (Refer to http://exif.org for more information.
About Disc Contents 1 2 BD Video Enjoy BD-speci c functions including BONUSVIEW (BD-ROM Pro le 1 Version 1.1), such as picture in picture, and BD-LIVE (Page 24). For the BD video discs compatible with BONUSVIEW/BD-LIVE, you can enjoy additional contents by copying the data from the discs or downloading it via the Internet. For instance, this function is capable of playing the original movie as the primary video while playing video commentary from the lm director on a small screen as a secondary video.
Important Information Disc Precautions Be Careful of Scratches and Dust • BD, DVD and CD discs are sensitive to dust, ngerprints and especially scratches. A scratched disc may not be able to be played back. Handle discs with care and store them in a safe place. Proper Disc Storage Place the disc in the centre of the disc case and store the case and disc upright. Avoid storing discs in locations subject to direct sunlight, close to heating appliances or in locations of high humidity.
License and Copyright Audio-visual material may consist of copyrighted works which must not be recorded without the authority of the owner of the copyright. Refer to relevant laws in your country. • “This item incorporates copy protection technology that is protected by U.S. patents and other intellectual property rights of Rovi Corporation. Reverse engineering and disassembly are prohibited.
Major Components Main unit (Front) 1 1 2 3 4 2 3 4 5 6 7 5 USB (front) terminal (p.28) 6 Remote control sensor (p.19) 7 (open/close) (p.22) ON/STANDBY (p.20) (pause) (p.28) (stop) (p.22) (play) (p.22) Main unit (Rear) 1 2 1 2 3 4 5 ETHERNET terminal (p.18) USB (rear) terminal (p.24) HDMI OUT terminal (p.16) DIGITAL AUDIO OUT OPTICAL terminal (p.17) AC INLET terminal (p.19) 3 4 5 NOTE • When you insert or remove a USB memory device, be sure to turn the main power off.
Remote Control Unit 1 2 3 L M 4 5 N O P Q 6 7 8 9 F R G S H I J T K U RC-826DV En 14 1 2 3 4 5 6 7 8 9 F G H I J K L M N O P Q R S T U (on/standby) (p.20) OPEN/CLOSE (p.22) AUDIO (p.35), SUBTITLE (p.35) Number buttons (p.38) REPEAT (p.34) (rewind) (p.33) (forward) (p.33) (pause) (p.33) (play) (p.22) HOME (p.20) Cursor buttons ( / / / ), ENTER (p.39) POP UP MENU/MENU (p.24) A (Red), B (Green), C (Yellow), D (Blue) (p.25) FUNCTION (p.37) EXIT (p.
Connecting to a TV/projector You can enjoy high quality digital picture and sound using an HDMI cable. (Only TVs/projectors with an HDMI terminal can be connected to this player.) Make sure to use a certi ed HDMI cable. 1. Be sure to turn off this Player and the TV/projector before making any connections. 2. Firmly connect an HDMI cable (commercially available) to the HDMI OUT terminal on the player (1) and the HDMI IN terminal of the TV/projector (2).
Connecting to an ampli er/AV receiver You can connect this player to an ampli er/AV receiver to enjoy digital surround sound. With this player, the audio connection can be made using either one of the following methods depending on the capabilities of the ampli er/AV receiver you connect. • HDMI connection • Digital audio connection NOTE • Be sure to turn off this Player and the equipment before making any connections. • For details on output of audio formats, see page 49.
Digital audio connection You can connect an ampli er/AV receiver using an optical digital audio cable (commercially available). Optical digital cable* Ampli er/AV receiver * Commercially available NOTE • When using OPTICAL DIGITAL AUDIO OUT, 5.1ch Digital Output is available. (7.1ch Digital Output is not available.) After connecting • If necessary, perform the Audio Video Settings. (Page 40) • Prepare the desired disc or content and start playback.
Broadband Internet Connection By connecting this player to the Internet, you can enjoy a variety of content on your TV using BD-LIVE functions, home networks and also perform software updates. In this player, the Internet connection can be made using the following methods. NOTE • Be sure to turn off this Player and the equipment before making any connections. CAUTION • When using a broadband Internet connection, a contract with an Internet service provider is required.
Before Starting Playback Loading the Batteries in the Remote Control 1 Hold in the tab on the battery cover and pull the cover towards the direction of the arrow. • Remove the batteries if you will not use the remote control unit for an extended period of time. Approximate operating range of remote control Remote control sensor Approx. 5m 2 Load the two “AA” size batteries (R-06 size, UM/SUM-3). Place batteries with their terminals corresponding to the and indications in battery compartment.
Home screen Turning the Power On After all of the necessary connections are complete, Turn on your TV and switch to the appropriate AV input (Refer to your TV’s operation manual). (This may be labeled HDMI/EXT/AUX etc.) 1 2 3 4 ON/STANDBY Turning the power on 1 2 3 4 5 5 Main menu Icon for disc inserted Icon for USB memory device connected Icon for LAN connection Button Guide Language Setting Press on the remote control or on the Player to turn on the power of the Player.
NOTE: • When you turn on this player for the rst time after purchase, the language setting screen will be displayed. • To select the DVD disc language, such as subtitle language, etc., see page 23. Operating ONKYO AV Receiver Using the Remote Control The Universal Remote Control may operate the basic functions of ONKYO AV Receiver. ONKYO AV Receiver NOTE • HDMI Control is available only when the TV is connected by an HDMI cable, and when it supports HDMI Control feature.
Video/Picture/Music Playback Loading a Disc ON/STANDBY Load a disc. • Playback may begin automatically, depending on the disc. • Playback begins from the rst title. • The menu may be displayed rst, depending on the disc. Perform playback operation by following the directions on the screen. • When loading a disc containing 3D content (3D BD video) with “Yes” selected in the “3D Notice” setting (Page 42), playback will be stopped and the 3D notice will be displayed on the TV screen.
Displaying the disc information Press DISPLAY during playback. • Each time you press DISPLAY, the display switches as follows.
Using the pop-up menu 1 Press POP UP MENU/MENU during playback. • The pop up menu screen is displayed. • The menu contents displayed vary depending on the disc. For details on how to see and operate the pop up menu, refer to the manual for the disc. Example Pop-up menu Previous page Next page 2 Press / / / to select the desired item, then press ENTER. 3 Press POP UP MENU/MENU to exit. • The pop up menu will automatically disappear for some discs.
Virtual Package For BD-Video discs compatible with Virtual Package, data is copied from the discs or Internet to local storage. It is automatically copied to the local storage prior to playback. You can enjoy a variety of additional functions including secondary video, secondary audio, subtitles, movie trailers, etc. • The playback methods vary depending on the disc. For details, refer to the disc manual.
Title Name Playback by selecting a title Program 1 1 Load a recorded disc. • The Title List screen is displayed. Example: Thumbnail screen 1 Program 1 2 Program 2 3 Program 3 4 Program 4 5 Program 5 6 Program 6 Program 1 Program 1 21/5 Fri 9:30 AM 110 Min. Program 1 Program 2 Program 4 A Select Title Name B Program 3 Program 5 Enter By Chapter C A Program 6 Return Playlist D Exit Functions • If the Title List screen is not displayed, press TOP MENU.
Playback by selecting a Playlist 1 Press C (Yellow) while the Title List screen is displayed. • The Playlist screen is displayed. Example: Thumbnail screen Audio CD Playback This Player can play back audio CDs. • For a description of other playback functions, refer to “Playback Functions” on page 33. Program 1 21/5 Fri 9:30 AM 110 Min.
Playback by selecting a track 1 Press / to select the track, then press ENTER during playback or when playback is stopped. • Playback of the selected track will begin. 2 Press Audio Data (MP3 File) Playback This Player can play back audio data (MP3 les) recorded on CD-R/RW discs, DVD-R/RW discs and USB memory devices or via a home network. • For details on the audio data that you can play using this player, refer to page 9.
4 Press / to select a folder or le. • When you select a folder, press ENTER to open it, and then press / to select a le in the folder. Press ENTER to play back the selected le. • Playback of the selected le will begin. 5 Displaying Still Images (JPEG files) This Player can display still images (JPEG les) recorded on CD-R/RW discs, DVD-R/RW discs and USB memory devices or via a home network. • For details on the still images that you can display using this player, refer to page 9.
4 Press / to select a folder or le. • When you select a folder, press ENTER to open it, and then press / to select a le in the folder. Operational buttons during still image display Buttons Description / Go to the previous/next picture in the same directory. / / / RETURN Return to the selection screen. C (Yellow) Rotate the picture by 90 degrees to the left. D (Blue) Rotate the picture by 90 degrees to the right. Play back Slide Show. • Return to slide show playback when paused.
Accessing UPnP* servers The player can browse and play movies, music and photos stored on your UPnP compatible media servers connected within your home network. * UPnP: Universal Plug and Play About a home network This Player can display and play movies, photos and music content from your UPnP compatible digital media servers (such as a PC and consumer electronics).
Playback by selecting a le list 1 Press / to select Video/Music/Picture, then press or ENTER. 2 Press / to select “Home Network” in the sub window. 5 Press / to select the folder or le which you want to access, then press ENTER. • When you select a folder, the le list of the folder is displayed. Press / to select the le which you want to play, then press ENTER. • Playback starts. Sub Window 3 4 En 32 Press ENTER or .
Playback Functions Skipping to the Next or the Start of the Current Chapter (Track/Title) The Skipping (to the beginning of a chapter, track or title) function is enabled when / or / is pressed during playback. Pause/Frame Advance Playback The Pause function is enabled when is pressed during playback. (If you are playing back an audio CD, audio data [MP3 les] or still images [JPEG les], these will also pause.
Slow Playback (Forward/Reverse) The Slow Playback (Forward/Reverse) function or / is pressed for is enabled when / more than 2 seconds during pause. Press to return to normal playback. NOTE • This doesn’t work for audio CDs. • You cannot perform Slow Playback between titles. At the end of the title, Slow Playback will be cancelled and normal playback will automatically resume. • Reverse Slow Playback cannot be performed for BD video and DVD discs in AVCHD format.
Partial Repeat Playback (Repeat Playback of a Specified Part) 1 2 Displaying the Audio Information You can display the audio information on the disc currently being played back by pressing AUDIO. The displayed contents vary depending on the disc. Press REPEAT during playback. Press / to select “Scene Selection”, then press ENTER. • “Set Start Point” displays. The audio channel currently being played back will be displayed.
Switching the Angle If multiple angles are recorded, you can switch between them. 1 Press FUNCTION during playback. • The Function Control screen is displayed on the TV. 2 Press / to select the Angle Number column, then press ENTER. BD-VIDEO 1/3 5 / 25 00 : 20 : 30 2 English 1 1 DTS Off 3 Press / to select the desired Angle Number, then press ENTER. 4 Press RETURN or FUNCTION to close the Function Control screen. NOTE • The displayed items vary depending on the disc.
Settings During Playback Function Control Function control operation procedure This allows you to adjust various settings at once, like subtitles, angle settings and the title selection for Direct Playback. You can adjust the video and audio to suit your preferences. The operations are the same for BD and DVD. Function Control screen 1 BD-VIDEO 1/3 5 / 25 00 : 20 : 30 2 English 1 1 DTS Off Select Exit ENTER 2 1 Press FUNCTION during playback. • The Function Control screen is displayed on the TV.
Functions which can be set Title/Track Number (Direct Title/Track Skip) • Shows the title number being played back (or track number when playing back an audio CD). You can skip to the start of the title (or track). • To skip to the start of a selected title (or track), press the Number buttons to enter the title (or track) number when this option is highlighted. Chapter Number (Direct Chapter Skip) • Shows the chapter number being played back. You can skip to the start of the chapter.
SETTINGS Common operations The “menu” enables various audio/visual settings and adjustments on the functions using the remote control unit. You need to call up the On Screen Display to perform settings for this player. The following is the explanation for the basic operations of the “menu”. Basic Operation for Playback Setting Example: Setting “Parental Control” under “Playback Setting” 1 Press / to select “Settings”, then press or ENTER. 2 Press / to select “Playback Settings”, then press or ENTER.
Audio Video Settings HDMI Video Out This sets the resolution of the video output for the HDMI terminal of this player. Normally set to “Auto” (factory preset value). ` Item Auto*, 1080p, 1080i, 720p, 576/480p NOTE • When the BD player is connected to a 1080p 24 Hz compatible TV and the “HDMI Video Out” is set to “Auto”, 1080p 24 Hz will automatically be displayed when compatible discs are played back.
SUPER PICTURE This enhances the quality of video streaming images with pixel by pixel processing technology. ` Item On*, Off Smart Settings Auto Power Off This sets the Player so that power is automatically shut off if playback is stopped and you do not perform any operations for about 10 minutes. ` Item Yes*, No HDMI Control This lets you set the Player to receive the control signal from the remote control via the HDMI cable.
PIN Code Setting 3D Notice This sets the PIN code for setting or changing the Parental Control Level. This sets whether or not a notice is displayed (“Yes” or “No”) on the connected TV every time 3D content (3D BD video) is played. ` Item Yes: Enter the 4-digit number. No NOTE • When you forget the PIN code, you can reset the current PIN code using “System Reset” under “Settings”. (see page 42) • You can also set the new PIN code if desired.
Communication Setup This allows you to perform and/or change the communication settings and select the type of Internet connection from Cable. This setting is required to use BD-LIVE functions, home networks and software updates that connect to the Internet. NOTE • Make sure that the LAN cable is connected to this player (see page 18). • For manually performing the setting, the following information of the connected router or modem is required. Con rm the information prior to the setting.
The operation procedure for inputting numbers manually Before using the USB memory device NOTE • Numeric characters such as IP address can be entered on the input screen either by selecting each of the characters in the “Numeric” mode or using the Number buttons on the remote control. CAUTION • Do not remove the USB memory device or unplug the AC cord while the operations are being performed. • Do not use a USB extension cable. IP Address Netmask Gateway 123 USB Memory Management 1.
5. Press / to select “Erase” or “Format”, then press ENTER. Erase: Deletes only BD-VIDEO data written on the USB memory device such as BDLIVE data. Format: Be aware that all data including BDVIDEO data and software update data will be deleted. • If you want to delete only the unneeded software update data after the software is updated, delete the data on the USB memory device using a PC. Erase Erases BD-VIDEO data on USB memory. Format Erase all contents on USB memory including protected contents. 6.
Update process Manual Update from Network 1. When this player is turned on, the Internet connection starts automatically. • “Accessing...” blinks on the screen. • The current version of this unit software and the latest version of the update le on the network are displayed when latest version of rmware has been found. To update this player software with update le, select “Yes”, and go to step 2. Latest version of firmware has been found. Firmware update is available.
• If the Internet connection has failed, an error message appears. Retry the update after checking if the broadband Internet connection (Page 18) and communication settings (Page 43) are performed properly. 6. Press ENTER to start updating. NOTE • Do not extract the rmware update le to any folders other than the root directory on the USB memory device. The rmware update le must be only one le directly in the root directory. Downloading latest firmware… Version : yyyyyyyyyy 30% 7.
2. Press to turn on the power. 3. Press / to select “Settings”, then press or ENTER. 4. Press / to select “Software Update Settings”, then press or ENTER. 5. Press / to select “Manual Update”, then or ENTER. press 6. Press / to select “USB Memory”, then press ENTER. • If you have not yet set the PIN code, go to step 8. 7. Enter the 4-digit number using 0–9. Enter 4-digit PIN code 8. Press ENTER to start checking data in the USB memory device. Insert USB memory device containing the software update file.
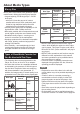
About Output of Audio Formats Audio format Dolby TrueHD DTS-HD Master Audio PCM Bitstream PCM Bitstream 7.1ch *3 7.1ch *4 2ch *2 5.1ch *1/*3 *3 5.1ch *4 2ch *2 5.1ch *1/*3 7.1ch *4 2ch *2 5.1ch *1/*3 7.1ch *4 2ch *2 5.1ch *1/*3 7.1ch (48 kHz) 7.1ch (48 kHz/96 kHz) 5.1ch (192 kHz) DTS-HD High Resolution Audio 7.1ch (48 kHz/96 kHz) LPCM *1. *2. *3. *4. *5. DIGITAL OUT 7.1ch (48 kHz/96 kHz) 5.1ch (192 kHz) Dolby Digital PLUS HDMI Maximum number of channels 5.1ch 7.1ch 7.
Troubleshooting The following problems do not always suggest a defect or malfunction of this Player. Refer to the problems and lists of possible solutions below before calling for service. Power Problem Possible causes and solutions The Player power cannot be turned on. • Is the power cord rmly plugged into the AC outlet? (Page 19) The Player power is turned off.
Playback Problem Possible causes and solutions The Player cannot play a disc. • Take out the disc and clean it. (Page 11) • Make sure that the disc is loaded properly (aligned in disc tray and labelside up). (Page 22) • Make sure that region code on the disc matches that of this Player. (Page 7) • Allow any condensation in or near the Player to dry. (Page 11) • Check that the disc is recorded in the compatible TV system (PAL or NTSC). • The Player cannot play back video which was not recorded normally.
Picture Problem Possible causes and solutions No picture. • Make sure that the cable is connected correctly. (Page 15) • Make sure that the connected TV or the AV receiver is set to the correct input. (Page 16) • Take out the disc and clean it. (Page 11) • Make sure that region code on the disc matches that of this Player. (Page 7) • There is no picture from the HDMI output. - Are the settings performed correctly? Please check the settings. (Page 40) Screen freezes and operation buttons do not work.
Network Problem Possible causes and solutions Cannot connect to the Internet. • Is the LAN cable connected properly? • Is the wrong cable such as a modular cable used? Connect a LAN cable to the ETHERNET terminal. (Page 18) • Is the power for the connected equipment, such as a broadband router or modem turned on? • Is the broadband router and/or modem properly connected? • Is the proper value(s) set in the network setting? Check “Communication Setup”. (Page 43) Cannot download BDLIVE contents.
On-screen Error Messages The following messages appear on the TV screen in case of an error during operation. Error message Possible Error Cannot play. • The disc cannot be played back with this Player. Incompatible disc. • If you load a disc which cannot be played with this Player (i.e. a scratched disc), or if you load a disc upside down, this message will appear, and the disc tray will automatically pop out.
Speci cations Signal System HDMI PAL/NTSC Resolution 576p/480p, 720p, 1080i, 1080p, 1080p 24 Hz Audio Format LPCM, Dolby Digital, Dolby Digital Plus, Dolby True HD, DTS, DTS-HD Support Deep Colour / x.v.Colour (JPEG only) Connector A Type Audio Output (Digital) Optical General Power Supply AC 100 ~ 240 V, 50/60 Hz Power Consumption 16 W Stand-by Power Consumption 0.4 W Dimensions (W x H x D) 435 mm x 57.3 mm x 201 mm Weight 1.
Glossary AVCHD (Page 7) AVCHD (Advanced Video Codec High De nition) refers to a recording format (speci cation) for digital video cameras which can record to a disc such as 8 cm DVD disc and play back digital high de nition images. Blu-ray Disc (BD) (Page 7) A disc format developed for recording/playing highde nition (HD) video (for HDTV, etc.), and for storing large amounts of data. A single layer Blu-ray Disc holds up to 25 GB, and a dual-layer Blu-ray Disc holds up to 50 GB of data.
DTS-HD High Resolution Audio DTS-HD High Resolution Audio is a new technology developed for the next generation high de nition optical disc format. DTS-HD Master Audio DTS-HD Master Audio is a lossless audio compression technology developed for the next generation high de nition optical disc format. DTS-HD Master Audio | Essential DTS-HD Master Audio | Essential is a lossless audio compression technology developed for the next generation high de nition optical disc format.
Multi Angle (Page 36) This is a feature of DVD and BD video discs. In some discs, the same scene is shot from different angles, and these are stored in a single disc so you can enjoy playback from each angle. (This function can be enjoyed if the disc is recorded with multiple angles.) Multi Audio This is a feature of DVD and BD video discs. This function makes it possible to record different audio tracks for the same video, so you can enhance your enjoyment by switching the audio.
About Software License Information on the Software License for This Product Software composition The software included in this product is comprised of various software components whose individual copyrights are held by third parties.
2-1, Nisshin-cho, Neyagawa-shi, OSAKA 572-8540, JAPAN Tel: 072-831-8023 Fax: 072-831-8163 http://www.onkyo.com/ 18 Park Way, Upper Saddle River, N.J. 07458, U.S.A. Tel: 800-229-1687, 201-785-2600 Fax: 201-785-2650 http://www.us.onkyo.com/ Liegnitzerstrasse 6, 82194 Groebenzell, GERMANY Tel: +49-8142-4401-0 Fax: +49-8142-4401-555 http://www.eu.onkyo.