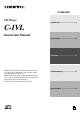
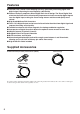
Contents CD Player Introduction .................................... 2 C-1VL Instruction Manual Connections ................................. 10 Operation...................................... 12 Thank you for purchasing an Onkyo CD Player. Please read this manual thoroughly before making connections and plugging in the unit. Following the instructions in this manual will enable you to obtain optimum performance and listening enjoyment from your new CD Player.
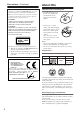
WARNING: TO REDUCE THE RISK OF FIRE OR ELECTRIC SHOCK, DO NOT EXPOSE THIS APPARATUS TO RAIN OR MOISTURE. CAUTION: TO REDUCE THE RISK OF ELECTRIC SHOCK, DO NOT REMOVE COVER (OR BACK). NO USER-SERVICEABLE PARTS INSIDE. REFER SERVICING TO QUALIFIED SERVICE PERSONNEL.
Precautions 1. Recording Copyright Unless it’s for personal use only, recording copyrighted material is illegal without the permission of the copyright holder. 2. AC Fuse The AC fuse inside the C-1VL is not user serviceable. If you cannot turn on the C-1VL, contact your Onkyo dealer. 3. Care Occasionally you should dust the C-1VL all over with a soft cloth. For stubborn stains, use a soft cloth dampened with a weak solution of mild detergent and water.
About CDs Precautions—Continued This unit contains a semiconductor laser system and is classified as a “CLASS 1 LASER PRODUCT.” So, to use this model properly, read this Instruction Manual carefully. In case of any trouble, please contact the store where you purchased the unit. To prevent exposure to the laser beam, do not try to open the enclosure. DANGER: Important notes on handling CDs • Carefully lift the disc from the disc case, making sure to hold the disc by its edges or the hole in the middle.
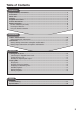
Table of Contents Introduction Important Safety Instructions ..................................................................................................2 Precautions................................................................................................................................3 About CDs..................................................................................................................................4 Features ............................................................
Features ■ The new VLSC (Vector Linear Shaping Circuitry) generates pure analog signal from digital signal, improving the sound quality substantially. ■ Features Onkyo’s proprietary Direct Digital Path circuit design. The Direct Digital Path minimizes the effect on the sound quality improvement circuits caused by digital signals from the digital input, making the sound image clearer and the sound quality more refined.
Front & Rear Panels Front Panel & Display POWER DIGITAL OUTPUT DISPLAY COMPACT DISC PLAYER C-1VL 7 [ / ] button Press to select the previous or next track. Press and hold to fast reverse and fast forward when playing CDs. 8 DIGITAL OUTPUT button Display Press to turn on/off the digital output on the C-1VL. 1 POWER button 9 Play/Pause indicators Press to turn on and off the C-1VL. Illuminate in play or pause mode.
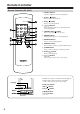
Remote Controller Remote Controller (RC-544C) 1 Number buttons Use these buttons to enter a track number. 2 Pause [ ] button Press to pause the playback. 3 Stop [ ] button Press to stop the playback. OPEN / CLOSE 1 2 3 4 [ / ] buttons Press and hold to fast reverse and fast forward when playing CDs. REPEAT 4 5 6 7 8 9 >10 10 / 0 CLEAR RANDOM 5 OPEN/CLOSE [ ] button Press to open and close the disc tray. MEMORY 6 REPEAT button During playback, press to repeat playback.
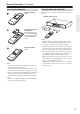
Remote Controller—Continued Inserting the Batteries Detach the battery cover. Using the Remote Controller Point the remote controller toward the remote control sensor. Remote control sensor POWER DISPLAY Insert the two R6 (size AA) batteries. Be sure to match the + and – ends of the batteries to the diagram inside the battery compartment. Attach the battery cover. Notes: • Do not mix new batteries with old batteries. Do not mix different kinds of batteries.
Cables and Connectors RCA Audio Connection Color Coding Before Making Any Connections • Red connector is used for the right channel and white connector is used for the left channel. • Always refer to the instructions that came with the component that you are connecting. • Do not plug in the power cord until all connections have been properly made. Optical Digital Terminals The optical digital terminals are provided with protection caps.
Connections The C-1VL is equipped with three types of output terminals: AUDIO OUTPUT ANALOG, AUDIO OUTPUT DIGITAL (OPTICAL), and AUDIO OUTPUT DIGITAL (COAXIAL). Make appropriate connections according to your audio devices such as amplifier and recorder. . Making Digital Connections to Making Analog Connections to Amplifier and Recorder Amplifier and Recorder When you enjoy analog audio sound or perform analog recording, make analog connection.
Turning On the C-1VL Connecting the Supplied Power Cord Plug the supplied power cord into this AC INLET. • Before you plug in the C-1VL, confirm that all connections have been made properly. • Turning on the power may cause a momentary power surge, which might interfere with other electrical equipment on the same circuit, such as computers. If this happens, use a wall outlet on a different circuit. • Do not use a power cord other than the one supplied with the C-1VL.
Playing CDs OPEN/ CLOSE PAUSE STOP PLAY PLAY / / DISPLAY Playing CDs 1 ■ To Stop Playback Press the [ disc tray. ] button to open the Press the Stop [ ] button. ■ To Pause Playback Press the Pause [ ] button. The Pause indicator appears. To resume playback, press the Play [ ] button or [ ] button again. 2 3 4 Put the CD on the tray with the label-side facing up. Be sure to put 8-cm discs in the center of the tray. Label side Press the [ ] button again to close the tray.
Playing CDs—Continued Selecting Tracks by Number Displaying the Remaining Time You can use the number buttons to select specific tracks. POWER DISPLAY DIGITAL OUTPUT COMPACT DISC PLAYER C-1VL DISPLAY Number buttons 1 During playback, press the [DISPLAY] button on the C-1VL repeatedly to display the informations. Elapsed track time: Remaining track time: Remaining disc time: 1 14 Use the number buttons to enter a track number. Use the [>10] button to enter track numbers above 10.
Playing CDs—Continued Random Playback Repeat Playback With the Random function you can play tracks in random order. With the Repeat function you can play all tracks repeatedly. REPEAT RANDOM 1 Press the [RANDOM] button. The RANDOM indicator appears on the display and random playback starts. 2 To cancel random playback, stop playback, or press the [RANDOM] button so that the RANDOM indicator disappears. Note: During random playback, pressing the [ not move to the previous track.
Playing CDs—Continued ■ To Cancel Memory Playback Memory Playback With the Memory function you can make a custom program of your favorite tracks. Tips: • During normal playback, you can add playing track to your program by pressing MEMORY button. • During memory playback, you can add tracks to your program by using number buttons. Number buttons MEMORY 1 While stopped, press the [MEMORY] button. The MEMORY indicator appears on the display. 2 To add a track to your program, use the number buttons.
Troubleshooting If you have any trouble using your C-1VL, check the following table for possible causes and remedies. If you still can’t resolve the issue yourself, please contact your Onkyo dealer. Trouble No power. Possible Cause The power cord is not connected properly. The batteries are flat. The batteries are installed incorrectly. You’re not pointing the remote controller at the C-1VL’s remote sensor. The remote controller does not work. You’re too far away from the C-1VL.
Specifications Power Supply Power Consumption Dimensions (W × H × D) Weight Operation Condition Temperature/Humidity Frequency Response SN Ratio Audio Dynamic Range THD (Total Harmonic Distortion) Audio Output Digital Optical Digital Coaxial Analog AC 230-240 V, 50 Hz 9W 435 W × 82 H × 356 D mm 6.8 kg 5 ~ 35 °C / 5 ~ 85 % (no condensation) 5 Hz ~ 20 kHz 110 dB 96 dB 0.002 % –22.5 dBm 0.5 Vp-p / 75 Ω 2.
Memo 19
Sales & Product Planning Div. : 2-1, Nisshin-cho, Neyagawa-shi, OSAKA 572-8540, JAPAN Tel: 072-831-8023 Fax: 072-831-8124 ONKYO U.S.A. CORPORATION 18 Park Way, Upper Saddle River, N.J. 07458, U.S.A. Tel: 201-785-2600 Fax: 201-785-2650 http://www.onkyousa.com ONKYO EUROPE ELECTRONICS GmbH Liegnitzerstrasse 6, 82194 Groebenzell, GERMANY Tel: +49-8142-4401-0 Fax: +49-8142-4401-555 http://www.onkyo.net ONKYO CHINA LIMITED Units 2102-2107, Metroplaza Tower I, 223 Hing Fong Road, Kwai Chung, N.T.