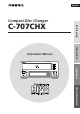
English Compact Disc Changer Before using C-707CHX Connections Instruction Manual DUAL OPTICAL OUTPUT COMPACT DISC CHANGER DISC 1 DISC 2 3 DISC CHANGER DISC MODE STANDBY DISPLAY DISC C-707CHX Operations DISC 3 STANDBY / ON Other Information
Thank you for purchasing ... Thank you for purchasing the Onkyo C-707CHX Compact Disc Changer. Please read this manual thoroughly before making connections and plugging in the unit. Following the instructions in this manual will enable you to obtain the optimum performance and listening enjoyment from your new Compact Disc Changer. Please retain this manual for future reference.
Important Safeguards 1. Read Instructions – All the safety and operating instructions should be read before the appliance is operated. 2. Retain Instructions – The safety and operating instructions should be retained for future reference. Heed Warnings – All warnings on the appliance and in the operating instructions should be adhered to. 4. Follow Instructions – All operating and use instructions should be followed. 5.
Precautions 1. Warranty Claim You can find the serial number on the rear panel of this unit. In case of warranty claim, please report this number. 2. Power WARNING BEFORE PLUGGING IN THE UNIT FOR THE FIRST TIME, READ THE FOLLOWING SECTION CAREFULLY. The voltage of the available power supply differs according to country or region. Be sure that the power supply voltage of the area where this unit will be used meets the required voltage (e.g., AC 230 V, 50 Hz or AC 120 V, 60 Hz) written on the rear panel.
CAUTION: The user changes or modifications not expressly approved by the party responsible for compliance could void the user’s authority to operate the equipment. Operations NOTE: This equipment has been tested and found to comply with the limits for a Class B digital device, pursuant to Part 15 of the FCC Rules. These limits are designed to provide reasonable protection against harmful interference in a residential installation.
Precautions For Canadian model For British model NOTE: Replacement and mounting of an AC plug on the power supply cord of this unit should be performed only by qualified service personnel. THIS CLASS B DIGITAL APPARATUS COMPLIES WITH CANADIAN ICES-003. For models having a power cord with a polarized plug: CAUTION: TO PREVENT ELECTRIC SHOCK, MATCH WIDE BLADE OF PLUG TO WIDE SLOT, FULLY INSERT.
Table of contents Before Using Checking the supplied accessories ............................................... Below Connections Operations Playing CDs ................................................................................ 12~17 Memory play .............................................................................. 18~20 Other play modes ....................................................................... 21~22 Before Using Connecting to Onkyo Separate Collection series components ....
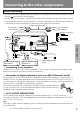
Connecting to Onkyo Separate Collection series components This section introduces you to the other Onkyo Separate Collection series components and their convenient system functions, followed by instruction on how to connect the system. The following Onkyo Separate Collection series components are commercially available: • R-805X ....... FM Stereo/AM Tuner Amplifier • A-905X ....... Integrated Stereo Amplifier • T-405X ........ Stereo Tuner • K-505X ....... Stereo Cassette Tape Deck (Not available in U.
Connecting to the other components Before connecting • Do not connect the AC power cord (mains lead) until you complete all the other connections including the connections on the next page. • On each pair of connectors, a red connector (marked R) corresponds to the right channel, and a white connector (marked L) to the left channel. Connect white plugs of audio connection cables to L connectors and connect red plugs of audio connection cables to R connectors.
Connecting to the other components (continued) Connecting for remote control ( ) If your other components are made by ONKYO and those components are equipped with the tors, you can control this unit with the amplifier’s remote controller. connec- Before connecting system hookups for control operations. • The amplifier must be connected in the • Each component has two connectors. There is no difference between those connectors. • The components may be connected in any order.
Connecting the power cord (mains lead) Insert the AC power cord (mains lead) into a wall outlet. The STANDBY indicator lights. STANDBY Remote controller RC-414S/RC-456S When the remote controller RC-414S/RC-456S supplied with the amplifier R-805X is used, operate the remote controller pointing towards the amplifier’s remote sensor. Be sure to make the connection securely. If the connection is incomplete, you cannot use the remote controller to operate the unit.
Playing CDs POWER CLOCK SLEEP G.
POWER CLOCK SLEEP G.
Playing CDs (continued) POWER CLOCK SLEEP G.
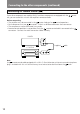
Understanding the meaning of disc indicators DISC 1 DISC 2 DISC 3 Note: The disc indicator stays lit until the presence/ absence detection is completed, even if the disc tray holds no discs. DISC 1 Connections Changing the discs during playback Before Using Boxed: The disc is playing or ready for playback. On: A disc is loaded in the disc tray. Flashing:The disc tray is open. Off: No disc is loaded in the disc tray.
Playing CDs (continued) DUAL OPTICAL OUTPUT COMPACT CD CHANGER DISC 1 DISC 2 3 DISC CHANGER DISC 3 STANDBY / ON DISC MODE STANDBY DISPLAY DISC C-707CHX DISC MODE Selecting the disc mode DISC MODE TR-1 Each time you press the DISC MODE button, the disc mode will change in the following sequence: TR-1 1 DISC Off TR-1 1DISC Normal play (No indication made) (The current disc mode is shown by the disc mode indicators.
DUAL OPTICAL OUTPUT COMPACT CD CHANGER DISC 1 DISC 2 3 DISC CHANGER DISC 3 STANDBY / ON DISC MODE STANDBY DISPLAY DISC C-707CHX Changing the display The display changes each time you press the DISPLAY button during play.
Memory play POWER CLOCK SLEEP G.
POWER CLOCK SLEEP G.EQUALIZER EFFECT MODE TUNER PRESET FM AM INPUT TAPE RC-414S (Supplied with R-805X) DVD PAUSE/STEP MD REPEAT SCROLL PLAY MODE CLEAR REPEAT RANDOM MEMORY CLEAR REC DISC , CD MEMORY DISC CDR REPEAT PLAY MODE CLEAR 1 2 3 4 5 6 7 8 9 10/0 ACOUSTIC PRESENCE UP/DOWN REC MUTING 3 VOLUME ENTER --/--- OFF 1 2 3 3 Press the or button once or more to select Track 3 on the display. Then, press the MEMORY button on the remote controller to store the track.
Memory play (continued) POWER CLOCK SLEEP G.EQUALIZER MODE EFFECT TUNER PRESET FM AM INPUT TAPE RC-414S (Supplied with R-805X) DVD PAUSE/STEP MD REPEAT SCROLL PLAY MODE CLEAR REPEAT RANDOM MEMORY CLEAR REC CD CLEAR DISC CDR REPEAT PLAY MODE TONE CLEAR TIMER 1 2 3 4 5 6 7 8 9 UP/DOWN REC MUTING VOLUME ENTER --/--- 10/0 ACOUSTIC PRESENCE Number buttons OFF 1 2 3 7 Press the or button once or more to select Track 12 on the display.
Other play modes POWER CLOCK SLEEP G.
Other play modes (continued) DUAL OPTICAL OUTPUT COMPACT CD CHANGER DISC 1 DISC 2 3 DISC CHANGER DISC 3 STANDBY / ON DISC MODE STANDBY DISPLAY DISC C-707CHX DISC DISC MODE Playing the first tracks only (TR-1 play) In this mode, you can play the first tracks of several CD-singles one after another. You can replace non-playing discs while one disc is playing. The TR-1 play mode is useful for making your own MD, CD-R or tape from your favorite CD-singles. 1 Place discs in all the disc trays.
Handling CDs Playable discs Taking the CD out of the disc case This unit can play back the follwing discs. Disc Contents mark Audio Maximum playback time 12 cm Approx. 74minutes 8 cm Approx. (CD single) 20 minutes You cannot play back discs other than those listed above. Do not use discs that are not audio discs (eg.CDROMs for use with personal computers), as these could damage the speakers and amplifier. one hand and pull the cover upward with the other hand to open the disc case.
Troubleshooting If you have any problems with the unit, please check the troubleshooting table below first. For any problems not described in the table, please consult your nearest Onkyo authorized service center. Symptom Cause Remedy STANDBY button is pressed, but power does not come on. • Power cord plug is not properly • Insert the plug firmly. Disc is loaded in the disc tray, but playback will not begin. • Disc is in the disc tray upside down. • Load the disc with the label facing upward.
Specifications Wow and Flutter Below threshold of measurability D/A converter 1 bit D/A converter Output level 2 volts r.m.s. Frequency response 5 Hz – 20 kHz Power supply rating AC 120V, 60 Hz Total harmonic distortion 0.005% (at 1 kHz) Power consumption 14 watts Channel separation 85 dB(at 1 kHz) Dimensions (W x H x D) 205 × 91 × 334 mm 8-1/16" × 3-9/16" × 13-3/16" Dynamic range 96 dB Signal to noise ratio 90 dB Weight 3.0 kg, 6.6 lbs.
Index to parts and controls For operational instructions, refer to the page indicated in parentheses.
Remote controller RC-414S (supplied with R-805X) POWER CLOCK SLEEP G.
Sales & Product Planning Div. : 2-1, Nisshin-cho, Neyagawa-shi, OSAKA 572-8540, JAPAN Tel: 072-831-8111 Fax: 072-833-5222 ONKYO U.S.A. CORPORATION 18 Park Way, Upper Saddle River, N.J. 07458, U.S.A. Tel: 201-785-2600 Fax: 201-785-2650 E-mail: onkyo@onkyousa.com ONKYO EUROPE ELECTRONICS GmbH Industriestrasse 20, 82110 Germering, GERMANY Tel: 089-849-320 Fax: 089-849-3265 E-mail: info@onkyo.de ONKYO CHINA LIMITED Units 2102-2107, Metroplaza Tower I, 223 Hing Fong Road, Kwai Chung, N.T.