Contents Important Safety Instructions 2 Precations 3 Features 5 Before Using This Product 6 Super Audio CD / CD Player C-S5VL Instruction Manual Thank you for purchasing an Onkyo C-S5VL Super Audio CD / CD Player. Please read this manual thoroughly before making connections and plugging in the unit. Following the instructions in this manual will enable you to obtain optimum performance and listening enjoyment from your new C-S5VL. Please retain this manual for future reference.
WARNING: TO REDUCE THE RISK OF FIRE OR ELECTRIC SHOCK, DO NOT EXPOSE THIS APPARATUS TO RAIN OR MOISTURE. CAUTION: TO REDUCE THE RISK OF ELECTRIC SHOCK, DO NOT REMOVE COVER (OR BACK). NO USER-SERVICEABLE PARTS INSIDE. REFER SERVICING TO QUALIFIED SERVICE PERSONNEL.
Precautions 1. Recording Copyright—Unless it’s for personal use only, recording copyrighted material is illegal without the permission of the copyright holder. 2. AC Fuse—The AC fuse inside the unit is not userserviceable. If you cannot turn on the unit, contact your Onkyo dealer. 3. Care—Occasionally you should dust the unit all over with a soft cloth. For stubborn stains, use a soft cloth dampened with a weak solution of mild detergent and water. Dry the unit immediately afterwards with a clean cloth.
Precautions—Continued This unit contains a semiconductor laser system and is classified as a “CLASS 1 LASER PRODUCT”. So, to use this model properly, read this Instruction Manual carefully. In case of any trouble, please contact the store where you purchased the unit. To prevent being exposed to the laser beam, do not try to open the enclosure. CAUTION: CLASS 1M VISIBLE AND INVISIBLE LASER RADIATION WHEN OPEN. DO NOT VIEW DIRECTLY WITH OPTICAL INSTRUMENTS. THIS PRODUCT UTILIZES A LASER.
Features - Exclusive Onkyo VLSC Technology - High-Grade Wolfson 192 kHz / 24-Bit D/A Converter (WM8742) - Crystal Oscillator Thermal Regulation / Jitter Cleaner Circuitry to Stabilize Clock Frequency - Super Audio CD / Audio CD / CD-R / CD-RW / MP3 CD / WMA CD Playback Capability - Digital Out On/Off - 19 mm (3/4")-pitch Audio Terminals for HighGrade Cable - 2 Digital Outputs (Optical / Coaxial) - 4-Mode Display Dimmer (Standard -> Dimmer -> Dim -> Off) - Digital Filter Control (CD:5Modes / Super Audio CD:
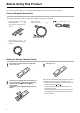
Before Using This Product This section describes things to check and important information to know before using this product. Check the Supplied Accessories After opening the package, make sure that all the supplied accessories are included. - Remote controller (RC-749C)[1] - AA (R6) batteries.................. [2] (Not supplied with products for China.) - Audio connection cable (1 m / 3.3ft)................. [1] - cord 㧔0.8 m / 2.6ft) ......[1] - Power cord (2 m / 6.5ft)........
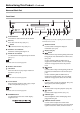
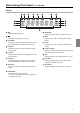
Before Using This Product—Continued Names of Each Part Front Panel POWER button This button is used to turn the unit on and off. Disc tray Insert discs into this tray. (See p.17) button Open and close the disc tray. (See p.17) DIGITAL OUT indicator Illuminates when digital output is on. DIGITAL OUT button Use this button to turn digital output on and off. (See p.17) Notes This button cannot be used during playback. Remote control sensor CD button Select the CD area to play a Super Audio CD hybrid disc.
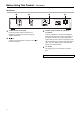
Before Using This Product—Continued Rear Panel AUDIO OUTPUT ANALOG Connect the analog audio in terminal of an amplifier or similar to this terminal, using the supplied audio cable. jack Connect an Onkyo amplifier or similar with an terminal to this jack. AUDIO OUTPUT DIGITAL (OPTICAL/ COAXIAL) Connect an amplifier or similar with a digital in terminal to this terminal. Connect components to the optical terminal using a commercial optical digital cable for audio.
Before Using This Product—Continued Display Displayed during playback. MEMORY Displayed during memory playback. (See p.24) Displayed when playback is paused. MP3 Displayed when a disc containing MP3 tracks is played. FOLDER Displayed together with the folder number when a disc containing MP3 or WMA tracks is played. TRACK Displayed together with the track number when a disc is played. TOTAL Displayed when the total and remaining time of the track are shown.
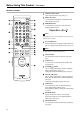
Before Using This Product—Continued Remote controller OPEN/CLOSE buttons Open and close the disc tray. (See p.17) DISPLAY button Use this button to change the information on the unit's display. (See p.22) DIMMER button Use this button to select one of the unit's four display-brightness levels. Notes If the brightness is set to "Off," operating the unit will cause it to illuminate for five seconds. SA-CD/CD button Select the playback area (Super Audio CD/CD) to play on a Super Audio CD hybrid disc. (See p.
Before Using This Product—Continued A-B button Use this button to set the start and end positions for A-B repeat. (See p.23) ENTER button Finalize your selection. Using the Remote Controller Point the remote controller toward the remote control sensor, within the field shown in the drawing. RANDOM button Press this button for random playback. (See p.23) REPEAT button Press this button for repeat playback. (See p.23) button Use this button to pause playback. When paused, this resumes playback. (See p.
Before Using This Product—Continued Supported CD Types Discs with the following logos on their labels can be played back. Disc Type Logo File Format/File Type Audio CD PCM Super Audio CD DSD CD-R Audio CD, MP3, WMA Limitations on Playback of MP3 and WMA Files - Use discs recorded using the ISO 9660 Level 1 or 2 file system, and the extended format (Joliet). (The supported directory depth, however, is the same as ISO 9660 Level 1 (8).
Before Using This Product—Continued Limitations on Playback of WMA Files Precautions for Rental Discs - WMA is an abbreviation of "Windows Media®Audio." It is an audio compression technology developed by Microsoft Corporation. This unit supports WMA files encoded using Windows Media®Player versions 7, 7.1, and 8. - Only WMA files with the ".wma" or ".WMA" file extension can be played back. - Encode WMA files using an application approved by Microsoft Corporation.
Connecting to Other Devices Connect to amplifiers, recording devices, and other equipment. There are two ways of connecting: analog and digital. Select the connection type matching the type of audio you wish to enjoy. Analog Connections Digital Connections Connect the supplied audio cable to the unit's AUDIO OUTPUT ANALOG terminal and the audio component's analog audio in terminal. Use digital connections with audio components having digital audio in terminals.
Connecting to Other Devices—Continued COAXIAL Connect the component using a commercial coaxial digital cable. C-S5VL Connecting to Components Capable You can control audiovisual amplifiers and receivers using the supplied remote controller by connecting Onkyo audiovisual amps and receivers with jacks. Use a cable to connect the unit's terminal with the amp or receiver's terminal.
Connecting to Other Devices—Continued Connecting the Power Cord ! Caution - Before connecting the power cord, connect all the other components. Turn off the unit before plugging or unplugging the power cord. Connect the other components. (See p.14) Make sure that the unit is turned off. Connect the supplied power cord to the unit's AC INLET. ! Caution - Always use the supplied power cord. Never plug the power cord into the outlet before connecting it to the unit.
Disc Playback CD And Super Audio CD Playback Press the button. Press the POWER button on the front of the unit to turn it on. The tray closes, and playback begins. Notes - - When connecting an amplifier, you can reduce the impact on the speakers by first turning on the unit, then the amplifier. To turn off the unit, press the POWER button again. If an amplifier is connected, first turn off the amplifier, then the unit. If there is already a disc in the unit, playback will begin.
Disc Playback—Continued Super Audio CD Hybrid Disc Playback You can select to play back the CD area or Super Audio CD area. Press the CD or SA-CD button on the player, or the SA-CD/CD button on the remote controller. The indicator of the selected area illuminates. MP3 and WMA Playback Press the POWER button on the front of the unit to turn it on. Notes Notes - - The 2-channel area of the Super Audio CD area is played back. The multi-channel area cannot be selected.
Disc Playback—Continued Press the to close the disc tray. Press the FOLDER / buttons on the remote controller, or the / buttons on the player to select the folder in which the track to play is located. Notes Numbers are automatically assigned to the folders and tracks. 001 Notes ROOT If you press the TRACK / buttons, "**-RTN" will appear. When this appears, press the ENTER button to move up one folder in the hierarchy. Folder 002.
Available Actions During Playback Stop Playback Select Tracks Press the Press the button to return to the start of the track being played. Press it again to return to the previous track. Press the button to advance to the next track. button. Pause Playback Press the button. Specify a Track (CD or Super Audio CD) You can specify the track to play by number using the number keys on the remote controller.
Available Actions During Playback—Continued Play a Specific Location on a Track When playing a CD or Super Audio CD, you can specify the track number and the start time from which to play back the track. When using a disc containing MP3 or WMA tracks, you can specify the folder number and track number. - If you press the TRACK / buttons, "**-RTN" will appear. When this appears, press the ENTER button to move up one folder in the hierarchy.
Available Actions During Playback—Continued Eject the Disc During MP3/WMA Playback Press the button to open the disc tray. After removing the disc, press the button again to close the tray. Each time you press the DISPLAY button, the display changes as follows. Elapsed track time Current track name (ID3 tag track name) Folder name Total number of folders Change the Displayed Information (The screen image shows an example of MP3 playback.) Notes You can change the information on the unit's display.
Playback Methods In addition to listening to tracks in the order they were recorded on the disc, there are four other playback methods: Repeat, A-B Repeat, Random, and Memory. You can also mix multiple playback methods (for example, repeat + random or repeat + memory). Repeat (Loop) Press the remote controller's A-B button at the location where you wish to end loop playback.
Playback Methods—Continued Memory Playback Press the button. You can use this mode to play any tracks you choose, in any order. Notes You can store up to 32 tracks. Configure CD/Super Audio CD Playback While playback is stopped, press the MEMORY button on the remote controller. Playback begins. Configure MP3/WMA Playback While playback is stopped, press the MEMORY button on the remote controller. Use the number keys to enter the number of a track you wish to play.
Playback Methods—Continued When TRACK flashes, enter the number of the desired track using the number keys. Check Your Stored Tracks Example: To enter track 13, press "1" and "3". Press the TRACK / buttons to check the folder and track numbers that have been stored in memory. When they appear, press the CLR button to erase the flashing item. Stop Memory Playback Press the ENTER button. The track you entered is stored, and the screen for storing the next track appears.
Playback Methods—Continued Add a New Track to Memory Press the MEMORY button on the remote controller. SACD/CD Erase a Track from Memory Press the MEMORY button on the remote controller. Press the TRACK / buttons to select the track you wish to erase. Press the CLR button. The selected track is erased. MP3/WMA Notes The currently playing track cannot be erased. Press the TRACK / buttons to select the location to add. SACD/CD MP3/WMA Press the ENTER button.
Setup Setup Menu List FIL 1 Frequency Response Ripple Characteristic 0.1 FIL1(*) FIL2ㅜFIL5 Response (dB x 10 -3) PCM FILTER Response (dB) 0 -50 -100 -150 -200 0 -0.1 44.1 88.2 132.3 0 Frequency (kHz) DSD FILTER DIRECT(*) FIL 2 FIL1ㅜFIL4 Frequency Response Ripple Characteristic 0.1 INVERT Response (dB x 10 -3) NORMAL(*) Response (dB) 0 PHASE -50 -100 -150 -200 0 -0.1 44.1 88.2 132.3 0 Frequency (kHz) AREA PRIORITY SACD(*) Frequency Response Ripple Characteristic 0.
Setup—Continued DSD FILTER PHASE When using analog output while playing a Super Audio CD, you can apply a digital filter to the DSD data before it is passed through the D/A converter. The digital filter can switch the properties in the audible or inaudible frequency ranges. Select the setting that you prefer. The default setting is DIRECT. When a Super Audio CD is playing, this setting is enabled when the unit's DIGITAL OUT is switched off. FIL 1 Set whether to invert the phase of the analog output.
Setup—Continued Making Settings ! Caution If this setting is changed during playback, it may not be possible to store the changed settings in memory. If you have changed the settings during playback, stop playback and other actions, and then turn off the power. Press the SETUP button on the remote controller. The last item to be configured the last time you performed setup appears. Press the FOLDER / buttons, and select the item you wish to configure.
Troubleshooting If you run into problems with the unit, look for a solution below. The problem could also be caused by one of the components connected to the unit, so please also check the manuals of each device. ! Caution - This unit contains a sophisticated microcomputer for signal processing and control functions. In very rare situations, however, severe interference, noise from an external source, or static electricity may cause it to lock up.
Troubleshooting—Continued Playing Music CDs with Copy Control Functions Problem Solution See Page There is noise during playback, or the audio skips You are playing back a music CD with a copy control function. Some music CDs with copy control functions do not meet CD standards. Since these are special discs, this unit may not be able to play them.
Troubleshooting—Continued Devices Problem The system features do not work. Solution See Page Make sure that both the 15 cable and audio cable are connected correctly to the component. The system will not function if only the cable and digital cable are connected. Check the amplifier and AV receiver input. Also check the manual of each device, because there may be settings that prevent connected devices from operating.
Specifications Audio Output Frequency Response Signal to Noise Ratio Audio Dynamic Range THD (Total Harmonic Distortion) Output/Impedance : CD Super Audio CD : CD Super Audio CD : At least 100 dB : 0.0025 % : Digital/Optical Digital/Coaxial Analog 4 Hz to 20 kHz 4 Hz to 50 kHz 114 dB 110 dB -22.5 dBm 0.5 V (p-p) / 75 Ohms 2.
Memo 34
Memo 35
Sales & Product Planning Div. : 2-1, Nisshin-cho, Neyagawa-shi, OSAKA 572-8540, JAPAN Tel: 072-831-8023 Fax: 072-831-8163 ONKYO U.S.A. CORPORATION 18 Park Way, Upper Saddle River, N.J. 07458, U.S.A. Tel: 201-785-2600 Fax: 201-785-2650 http://www.us.onkyo.com/ ONKYO EUROPE ELECTRONICS GmbH Liegnitzerstrasse 6, 82194 Groebenzell, GERMANY Tel: +49-8142-4401-0 Fax: +49-8142-4401-555 http://www.eu.onkyo.