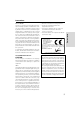
English Audio CD Recorder Before using CDR-201A Connections Operating Instructions AUDIO CD RECORDER STANDBY / ON FINALIZE CD DUBBING MULTI JOG REC EDIT / NO YES PUSH TO ENTER STANDBY DISPLAY Operations INPUT CDR-201A Other Information
Before using Thank you for purchasing ... Thank you for purchasing the ONKYO CDR-201A CD Recorder. Please read this manual thoroughly before making connections and plugging in the unit. Following the instructions in this manual will enable you to obtain the optimum performance and listening enjoyment from your new CDR-201A. Please retain this manual for future reference. Main Features • • • • • • CD/CD-R/CD-RW Disc Compatibility • Auto Finalizing Function 32kHz/44.
Important Safeguards uneven surfaces may cause the appliance and cart combination to overturn. 11. Power Sources – The appliance should be operated only from the type of power source indicated on the marking label. If you are not sure of the type of power supply to your home, consult your appliance dealer or local power company. 12. Grounding or Polarization – The appliance may be equipped with a polarized alternating current line plug (a plug having one blade wider than the other).
Precautions 1. Recording Copyright Recording of copyrighted material for other than personal use is illegal without permission of the copyright holder. 2. Power WARNING BEFORE PLUGGING IN THE UNIT FOR THE FIRST TIME, READ THE FOLLOWING SECTION CAREFULLY. The voltage of the available power supply differs according to country or region. Be sure that the power supply voltage of the area where this unit will be used meets the required voltage (e.g.
Precautions For U.S. model In compliance with Federal Regulations, the certification, identification and the period of manufacture are indicated on the rear panel. FCC INFORMATION FOR USER CAUTION: The user changes or modifications not expressly approved by the party responsible for compliance could void the user’s authority to operate the equipment.
Precautions For Canadian model For British model NOTE: THIS CLASS B DIGITAL APPARATUS Replacement and mounting of an AC plug on the power supply cord of this unit should be performed only by qualified service personnel. COMPLIES WITH CANADIAN ICES-003. For models having a power cord with a polarized plug: CAUTION: TO PREVENT ELECTRIC SHOCK, MATCH WIDE BLADE OF PLUG TO WIDE SLOT, FULLY INSERT.
Table of contents Before Using Before using Thank you for purchasing ... ............................................................... 2 Important Safeguards ......................................................................... 2 Precautions ........................................................................................ 4 Table of contents ................................................................................ 7 Supplied accessories .................................................
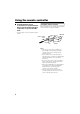
Using the remote controller ■ Using the RC-466S remote controller that is supplied with the Onkyo Separate Collection R-801A components to operate the CDR201A. Using the remote controller When operating the remote controller, point it toward the remote control sensor of the tuner amplifier. • For more details, refer to the R-801A operation manual.
Using the remote controller ■ Using the RC-448C remote controller that is supplied with the CDR-201A to operate the CDR201A When operating the remote controller, point it toward the remote control sensor of the CDR-201A. CDR-201A Remote control sensor Before using Installing the remote controller batteries Using the remote controller 1 Push the battery cover in the direction of the arrows shown and remove it.
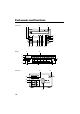
Part names and functions 3 1 2 Front Panel 4 AUDIO CD RECORDER INPUT FINALIZE CD DUBBING MULTI JOG EDIT / NO YES REC 5 PUSH TO ENTER STANDBY / ON 6 7 8 STANDBY DISPLAY CDR-201A 16 15 14 13 12 11 10 9 A Display L K J I B DISC TRACK ANALOG IN DIGITAL IN 1 2 CD-RW FINALIZE LEVEL- SYNC L 40 20 10 4 2 0 OVER R MEMORY RANDOM REPEAT 1 H G F E 20 Rear Panel 19 INPUT 2 INPUT 1 21 OUTPUT OPTICAL DIGITAL 18 17 AC OUTLET ANALOG INPUT OUTPUT REMOTE CONTROL AC 230-240 V 5
Part names and functions The numbers within the brackets are the pages where the part is introduced. Front panel STANDBY/ON button and STANDBY indicator [20] 2 Remote control sensor [9] 3 Disc tray [20] 4 r (tray open/close) button [20] Press to open and close the disc tray. 5 q MULTI JOG w dial [21] Use to jump to tracks prior to or later than the one currently playing. Use while playback is stopped to select the track to play.
Part names and functions STANDBY/ ON OPEN / CLOSE 1 2 3 4 Alphabetic letters/Symbols/Numeric/(1 to 10) buttons [36] Press to enter a disc name and track titles. 5 d/f (rewind/fast forward) buttons [36, 44] Press to rewind or fast forward through the track currently playing. Press to move the cursor forward or backward when changing the name of a disc. 6 13 14 o REC (recording) button [23] For analog and digital recording, press to place the CDR-201A in the recording standby state.
Notes on usable CDs Notes on usable discs • CD-Recordable (CD-R) and CD-ReWritable (CD-RW) discs When recording with the CDR-201A, you must use compact discs with the following marks printing on them: *1 *2 (A disc with any of the above markings.) Recording cannot be performed on discs that do not have one of the above markings.
Notes on usable CDs ■ Cleaning Notes on discs Never use heart-shaped, octagonal, or other special shaped discs as they may damage the internal mechanisms of the CDR-201A. Do not play CD-ROMs intended for computer use or non-audio compact discs. Doing so may cause highpitched noises or other unpredictable results that may damage speakers, amplifiers, and other connected components. ■ Handling discs Be careful not to touch the data side of the disc (the side that does not have printing on it).
Connections Connecting to the Onkyo Separate Collection This section introduces you to the other Separate Collection Series system components and their convenient system functions, followed by connecting instructions. The following Separate Collection series components are commercially available: • R-801A ....... FM Stereo/AM Tuner Amplifier (Not available in U.S.A. and Canada) • MD-101A ... MD Recorder (Not available in U.S.A. and Canada) • K-501A ....... Stereo Cassette Tape Deck (Not available in U.S.A.
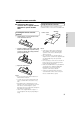
Connecting the CDR-201A ■ Connecting to other components The CDR-201A contains components that are extremely heat sensitive, so do not place the CDR201A on the amplifier. Always complete all connections before inserting the power cord into the wall outlet.
Connecting the CDR-201A 1 Connecting to an amplifier/Tuner amplifier Connect the CDR-201A to the CDR, TAPE or MD terminal on the amplifier/Tuner amplifier. • Connect the red connectors of the supplied audio connection cables to the R-channel terminals and the white connectors to the L-channel terminals. • Make sure the connectors are properly inserted all the way. If the connectors are not properly connected, noise or improper operation may result.
Operations Recording modes Cautions during recording In the following situations, recording is not possible even if the o REC or CD DUBBING button is pressed. • The CD indicator is lit (a CD or finalized CD-R has been inserted). • The CD-RW and FINALIZE indicators are lit (a finalized CD-RW has been inserted). • The inserted disc is full and "Disc Full" is displayed. • The 99th track has been recorded and "Disc Full" is displayed. • The disc is not for audio use or when "Pro Disc" is displayed.
Recording modes Normal recording mode When not connected to a component system, there are a few methods that you can perform to record the signal in from the analog input or digital input of the CDR-201A. ■ Analog recording (see page 26) This method records the signal at the analog inputs. The recording level can be adjusted manually. If the digital signal includes the track number information, the track numbers will be automatically assigned.
Inserting a disc RC-448C Disc tray STANDBY/ON r STANDBY/ ON STANDBY /ON AUDIO CD RECORDER OPEN / CLOSE 1 GHI ABC DEF 2 3 JKL 4 5 PQRS TUV 7 8 MNO INPUT FINALIZE CD DUBBING REC EDIT / NO YES >10 NAME SCROLL 6 W XYZ CLEAR 9 DISPLAY MULTI JOG r OPEN/CLOSE RANDOM MEMORY REPEAT ENTER 10/0 PUSH TO ENTER STANDBY / ON REC STANDBY DISPLAY CDR-201A 1 Turn on the CDR-201A. Press the STANDBY/ON button. The STANDBY indicator turns off. STANDBY / ON 2 Press the r button.
CD dubbing (component system operation) CD DUBBING EDIT/NO AUDIO CD RECORDER q MULTI JOG w INPUT INPUT STANDBY / ON FINALIZE CD DUBBING MULTI JOG REC EDIT / NO YES PUSH TO ENTER STANDBY YES DISPLAY CDR-201A Perform CD dubbing to digitally record all the tracks from a music CD to a CD-R or CD-RW. The dubbing mode is selected at the EDIT menu. Preparation • Turn on the CDR-201A (see page 20). • Place the music CD in the CD player. (Refer to the instruction manual for the C-701A.
CD dubbing (component system operation) 5 Press the CD DUBBING button. CD dubbing begins. CD DUBBING During CD dubbing, the level sync function turns on. The CD player begins a search for the peak level and the CDR-201A set the optimum recording level to match that peak level (DLA* Link 2 function). Then the music CD is digitally recorded from the first track to the last track. Auto finalization To use auto finalization, press the FINALIZE button repeatedly during recording until "Auto On" appears.
Synchronous recording (component system operation) RC-448C oREC STANDBY/ ON OPEN / CLOSE RANDOM MEMORY REPEAT AUDIO CD RECORDER ABC 1 GHI 2 JKL DEF 5 6 TUV W XYZ 7 8 >10 10/0 STANDBY / ON FINALIZE CD DUBBING MULTI JOG REC EDIT / NO YES SCROLL CLEAR 9 DISPLAY INPUT NAME 3 MNO 4 PQRS ENTER PUSH TO ENTER oREC STANDBY REC DISPLAY CDR-201A INPUT When connected to a component system, the synchronous recording operations given below are possible.
Synchronous recording (component system operation) (4) After adjusting the recording level, press the MULTI JOG dial. 4 Adjust the recording level. (1) Press the EDIT/NO button and turn the MULTI JOG dial until "Rec Level?" appears. MULTI JOG Pressing the YES button provides the same operation. MULTI JOG EDIT / NO PUSH TO ENTER PUSH TO ENTER 5 Stop the CD player. (2) Press the MULTI JOG dial. Pressing the YES button provides the same operation.
Synchronous recording (component system operation) Synchronous recording from an MD recorder or tape deck to the CDR201A. Preparation • Turn on the CDR-201A (see page 20). • Place the MD or cassette in the MD deck or tape deck. (Refer to the instruction manual for the MD-101A or K-501A.) • Place a recordable CD-R or CD-RW in the CDR201A (see page 20). 1 Repeatedly press the INPUT button until "Analog In" appears. INPUT 6 Press the s button at the MD recorder or tape deck.
Analog recording RC-448C oREC STANDBY/ ON OPEN / CLOSE RANDOM MEMORY REPEAT AUDIO CD RECORDER ABC DEF 1 2 3 GHI JKL MNO 4 5 6 PQRS TUV 7 8 >10 10/0 W XYZ FINALIZE CD DUBBING MULTI JOG REC EDIT / NO YES CLEAR 9 DISPLAY INPUT NAME SCROLL ENTER PUSH TO ENTER STANDBY / ON n STANDBY DISPLAY oREC REC s CDR-201A INPUT EDIT/NO YES Perform analog recording to record the signal input to the analog input terminal of the CDR-201A.
Digital recording RC-448C oREC STANDBY/ ON OPEN / CLOSE RANDOM MEMORY REPEAT AUDIO CD RECORDER ABC 1 GHI 2 JKL DEF 5 6 TUV W XYZ 7 8 >10 10/0 STANDBY / ON FINALIZE CD DUBBING MULTI JOG REC EDIT / NO YES SCROLL CLEAR 9 DISPLAY INPUT NAME 3 MNO 4 PQRS ENTER PUSH TO ENTER n STANDBY DISPLAY oREC REC s CDR-201A INPUT EDIT/NO YES Perform digital recording to record the signal input to the optical digital input terminal of the CDR201A.
Digital recording 4 Adjust the recording level. Refer to page 24, step 4 "Adjust the recording level." 5 Stop the playback of the recording source. 6 Press the n button (or the remote controller s button) and start the recording source. Recording starts. The track numbers are automatically recorded as well. 28 To pause the recording Press the n button (or the remote controller g button). To resume recording, press the n button (or the remote controller s button) when the time display appears.
Synchronous recording by input signal detection (Signal synchronous recording) RC-448C oREC STANDBY/ ON OPEN / CLOSE RANDOM MEMORY REPEAT AUDIO CD RECORDER ABC DEF 1 2 3 GHI JKL MNO 4 5 6 PQRS TUV 7 8 >10 10/0 W XYZ STANDBY / ON FINALIZE CD DUBBING MULTI JOG REC EDIT / NO YES CLEAR 9 DISPLAY INPUT NAME SCROLL ENTER PUSH TO ENTER oREC STANDBY REC DISPLAY CDR-201A INPUT When recording with portable MD players, or other components that are not equipped with an z conne
Synchronous recording by input signal detection (Signal synchronous recording) 4 Adjust the recording level. Refer to page 24, step 4 "Adjust the recording level." 5 Stop the playback of the recording source. 6 Press the o REC button (or the remote controller REC o button) The CDR-201A enters the input standby state, "Signal Rec" appears in the display, and then "Signal Wait" appears flashing alternately with the time display.
Using the level sync function Using the level sync function During analog recording, the track numbers are assigned automatically since the level sync function is turned on. Even so, you can press the o REC (or the remote controller o REC button) to assign the track numbers manually. To disable the automatic assignment of track numbers during recording, turn off the level sync function.
Using the level sync function Setting the level sync level When the level sync function is turned on, the track numbers are automatically adjusted through the detection of music and digital signals during recording. The CDR-201A enables you to set the detection level of the sound used to signal the changes between tracks. 4 Press the MULTI JOG dial. Pressing the YES button provides the same operation. MULTI JOG 1 Press the EDIT/NO button and turn the MULTI JOG dial until "L. Sync. Lvl?" appears.
Changing the display RC-448C STANDBY/ ON OPEN / CLOSE RANDOM MEMORY REPEAT ABC AUDIO CD RECORDER 1 GHI 2 JKL DEF 5 6 TUV W XYZ 7 8 >10 10/0 FINALIZE CD DUBBING MULTI JOG REC EDIT / NO YES SCROLL CLEAR 9 DISPLAY INPUT NAME 3 MNO 4 PQRS ENTER DISPLAY PUSH TO ENTER STANDBY / ON REC STANDBY DISPLAY CDR-201A DISPLAY Display during recording Repeatedly pressing the DISPLAY button during recording changes the display as shown below.
Entering names RC-448C EDIT/NO q MULTI JOG w STANDBY/ ON OPEN / CLOSE RANDOM MEMORY REPEAT AUDIO CD RECORDER ABC DEF 1 2 3 GHI JKL MNO 4 5 6 PQRS TUV W XYZ 7 8 9 >10 10/0 DISPLAY INPUT FINALIZE CD DUBBING STANDBY / ON MULTI JOG REC EDIT / NO YES NAME SCROLL NAME CLEAR ENTER PUSH TO ENTER REC STANDBY DISPLAY CDR-201A Name function • The name function can be used for non-finalized CD-Rs or CD-RWs. You cannot enter names on finalized discs.
Entering names RC-448C q MULTI JOG w STANDBY/ ON OPEN / CLOSE RANDOM MEMORY REPEAT AUDIO CD RECORDER ABC DEF 1 2 3 GHI JKL MNO 4 5 6 PQRS TUV 7 8 >10 10/0 W XYZ FINALIZE CD DUBBING MULTI JOG REC EDIT / NO YES CLEAR 9 DISPLAY INPUT NAME SCROLL ENTER DISPLAY PUSH TO ENTER STANDBY / ON REC STANDBY DISPLAY CDR-201A DISPLAY YES 2 Press the MULTI JOG dial. MULTI JOG PUSH TO ENTER Pressing the YES button provides the same operation. The cursor appears flashing.
Entering names RC-448C EDIT/NO q MULTI JOG w STANDBY/ ON OPEN / CLOSE RANDOM MEMORY REPEAT AUDIO CD RECORDER Numeric buttons ABC DEF 1 2 3 GHI JKL MNO 4 5 6 PQRS TUV W XYZ 7 8 9 >10 10/0 DISPLAY INPUT FINALIZE CD DUBBING MULTI JOG REC EDIT / NO YES d/ f PUSH TO ENTER STANDBY / ON NAME SCROLL NAME CLEAR ENTER REC q/ w STANDBY DISPLAY CDR-201A d/f (2) Turn the MULTI JOG dial to select the desired character and press the MULTI JOG dial to enter it.
Entering names RC-448C EDIT/NO q MULTI JOG w STANDBY/ ON OPEN / CLOSE RANDOM MEMORY REPEAT AUDIO CD RECORDER ABC DEF 1 2 3 GHI JKL MNO 4 5 6 PQRS TUV W XYZ 7 8 9 >10 10/0 DISPLAY INPUT FINALIZE CD DUBBING MULTI JOG REC EDIT / NO YES NAME NAME SCROLL CLEAR ENTER PUSH TO ENTER STANDBY / ON REC STANDBY DISPLAY CDR-201A YES 4 Press the YES button to end name Entering track names input. Or, press the NAME button on the remote controller (RC-448C).
Entering names RC-448C EDIT/NO q MULTI JOG w STANDBY/ ON OPEN / CLOSE RANDOM MEMORY REPEAT AUDIO CD RECORDER ABC DEF 1 2 3 GHI JKL MNO 4 5 6 PQRS TUV W XYZ 7 8 9 >10 10/0 DISPLAY INPUT FINALIZE CD DUBBING MULTI JOG REC EDIT / NO YES NAME SCROLL NAME CLEAR ENTER PUSH TO ENTER STANDBY / ON REC STANDBY DISPLAY CDR-201A DISPLAY YES 3 Press the MULTI JOG dial.
Finalization AUDIO CD RECORDER INPUT FINALIZE STANDBY / ON CD DUBBING MULTI JOG REC EDIT / NO YES PUSH TO ENTER STANDBY DISPLAY CDR-201A FINALIZE Finalization is a process of writing the TOC data (track numbers etc.) and the name information retained in the CDR-201A to the special area (PMA) of the disc. YES When finalization finishes “Complete” appears in the display and finalization automatically stops. To stop the finalization process After finalization CD-Rs can be played in CD players.
Erasing recordings (CD-RW discs only) EDIT/NO q MULTI JOG w AUDIO CD RECORDER INPUT STANDBY / ON FINALIZE CD DUBBING MULTI JOG REC EDIT / NO YES PUSH TO ENTER STANDBY DISPLAY CDR-201A YES The data recorded on CD-RW discs can be erased and the disc can be used again as many times as desired. The erasing methods are given below. ■ Erasing data on unfinalized CD-RWs All track erase: Erases all tracks. Last track erase: Erases only the last track.
Erasing recordings (CD-RW discs only) ■ Erasing the last track 1 Press the EDIT/NO button and turn the MULTI JOG dial until "Last Erase?" appears. MULTI JOG EDIT / NO PUSH TO ENTER 2 Press the MULTI JOG dial. Pressing the YES button provides the same operation. MULTI JOG PUSH TO ENTER "Last Ers ??" appears. Operations 3 Press the MULTI JOG dial. Pressing the YES button provides the same operation. MULTI JOG Flashing PUSH TO ENTER Erasing begins.
Erasing recordings (CD-RW discs only) Erasing data on finalized CD-RWs ■ Unfinalizing the disc (TOC erase) 1 Press the FINALIZE button. ■ Erasing all tracks 1 Press the EDIT/NO button and turn the FINALIZE MULTI JOG dial until "All Erase?" appears. MULTI JOG EDIT / NO "Unfinalize?" appears. 2 Press the YES button. PUSH TO ENTER YES 2 Press the MULTI JOG dial. Pressing the YES button provides the same operation. MULTI JOG PUSH TO ENTER "All Ers ??" appears. 3 Press the MULTI JOG dial.
Erasing recordings (CD-RW discs only) Erasing entire disc 1 Insert the CD-RW to be erased. 2 Press the EDIT/NO button and turn the MULTI JOG dial until "Disc Erase?" appears. MULTI JOG EDIT / NO The display of the remaining time is only a guide and the actual time until the process is completed may be a little before or after. When the deletion is completed, the tray opens automatically. Stopping an erase Press the e button for approx. 5 seconds.
Playing CDs RC-448C q MULTI JOG w RC-466S STANDBY/ ON STANDBY/ ON OPEN / CLOSE ACOUSTIC PRESENCE CDR/PC TAPE CD/ DVD MD INPUT SELECTOR RANDOM MEMORY REPEAT AUDIO CD RECORDER ABC DEF 1 2 3 GHI JKL MNO 4 INPUT FINALIZE CD DUBBING d/ f MULTI JOG EDIT / NO YES REC 5 PQRS TUV 7 8 >10 10/0 NAME q/ w SCROLL 6 W XYZ CLEAR 9 DISPLAY ENTER AM q/ w UP TAPE REW TAPE FF MUTING DOWN SLEEP CLOCK TIMER MODE TAPE REPEAT CD/DVD ENTER d/ f PUSH TO ENTER STANDBY / ON
Playing CDs RC-448C RC-466S STANDBY/ ON STANDBY/ ON OPEN / CLOSE ACOUSTIC PRESENCE CDR/PC TAPE CD/ DVD MD INPUT SELECTOR RANDOM RANDOM MEMORY REPEAT ABC DEF 1 2 3 GHI JKL MNO NAME REPEAT FM UP TAPE REW 4 PQRS 5 TUV 7 8 >10 10/0 REC MUTING CLEAR DOWN 9 ENTER REPEAT s Random playback With playback stopped, press the RANDOM button With the RC-466S remote controller, repeatedly press the MODE button to select the random mode.
Playing CDs RC-448C Numeric buttons RC-466S STANDBY/ ON STANDBY/ ON OPEN / CLOSE ACOUSTIC PRESENCE CDR/PC TAPE CD/ DVD MD INPUT SELECTOR RANDOM MEMORY REPEAT ABC DEF 1 2 3 GHI JKL MNO NAME MEMORY FM UP TAPE REW 4 PQRS 5 TUV 7 8 >10 10/0 TAPE FF SCROLL 6 W XYZ MUTING CLEAR 9 DISPLAY AM VOLUME ENTER CLEAR REC DOWN SLEEP s CLOCK TIMER MODE TAPE REPEAT CD/DVD CLEAR MD MODE CLEAR s CDR SCROLL 1 ENTER 2 3 4 8 5 6 7 9 10/0 --/--- Numeric buttons
Timer playback (component system operation) When connected to the R-801A component, playback using the timer is possible. For more information on how to set the timer, refer to the instruction manual with the R-801A. 1 Insert a disc for playback. 2 Set the timer for the R-801A. Other Information Display messages Explanation Pages Open Disc tray is opening. − Welcome Disc tray is closing. − Rec Setup Setting initial settings for recording. Please wait.
Troubleshooting guide If the CDR-201A begins to operate improperly, use the troubleshooting guide below to help you ascertain the problem. Because the unit contains a microcomputer to provide advanced functions, it may malfunction due to external noise or static electricity. If this happens, disconnect the power cord and then plug it in again after about 5 seconds. If it still does not operate properly, press and hold the STANDBY/ON button until the standby indicator and display turn off (approx.
Troubleshooting guide Messages during recording (continued) Display Cause Remedy CD Dub Fail CD dubbing cannot be performed because "Digital In 1" is not selected for the input source. Select "Digital In 1" for the input source. CD dubbing cannot be performed because the connected component (Onkyo separate collection's cassette deck or MD recorder) is in the recording or recording standby state. Cancel the recording or recording standby state on the connected component.
Troubleshooting guide Trouble Cause The power does The power cord is not properly not turn on plugged in. Remedy Plug the power cord properly into a mains power supply. The component where the power cord is plugged into is not turned on. Turn on the component into which the power cord is plugged. No sound is output from the speakers The speakers are not properly connected. Connect the speakers following the procedure given in "Connecting the CDR-201A"on page 16.
Rules concerning digital recording Guide to the serial copy management system You cannot use digital recording to create a secondgeneration copy, a copy of a copy created through digital recording, with a CD-R or CD-RW. This is because the unit conforms to the Serial Copy Management System and permits only one generation of digital-to-digital copying (the recording of the original digital signals as they are). The Serial Copy Management System is based on the following three rules.
Specifications System Compact disc recorder Recording/playing time Max. 80 min (Approx., when using an 80-min disc) D/A converter Advanced Multi bit Digital filter 8 times oversampling Connections 1 analog output, 1 analog input 2 digital input (optical), 1 digital output (optical) Frequency response 10 Hz to 20 kHz Playback total harmonic distortion 0.012 % (1 kHz) Playback dynamic range 85 dB Playback signal-to-noise ratio 98 dB Recording total harmonic distortion 0.