Contents CD Receiver CR-505DAB Introduction 2 Connections 11 Getting Started 16 CD/MP3 Playback 20 DAB 24 FM/AM 28 Using Other Functions 31 Appendix 35 Instruction Manual Thank you for purchasing an Onkyo CD Receiver. Please read this manual thoroughly before making connections and turning on the power. Following the instructions in this manual will enable you to obtain optimum performance and listening enjoyment from your new CD Receiver. Please retain this manual for future reference.
WARNING: TO REDUCE THE RISK OF FIRE OR ELECTRIC SHOCK, DO NOT EXPOSE THIS APPARATUS TO RAIN OR MOISTURE. CAUTION: TO REDUCE THE RISK OF ELECTRIC SHOCK, DO NOT REMOVE COVER (OR BACK). NO USER-SERVICEABLE PARTS INSIDE. REFER SERVICING TO QUALIFIED SERVICE PERSONNEL.
Precautions 1. Recording Copyright Unless it’s for personal use only, recording copyrighted material is illegal without the permission of the copyright holder. 2. AC Fuse The AC fuse inside the CR-505DAB is not user-serviceable. If you cannot turn on the CR-505DAB, contact your Onkyo dealer. 3. Care Occasionally you should dust the CR-505DAB all over with a soft cloth. For stubborn stains, use a soft cloth dampened with a weak solution of mild detergent and water.
Precautions—Continued This unit contains a semiconductor laser system and is classified as a “CLASS 1 LASER PRODUCT.” So, to use this model properly, read this Instruction Manual carefully. In case of any trouble, please contact the store where you purchased the unit. To prevent exposure to the laser beam, do not try to open the enclosure. DANGER: VISIBLE AND INVISIBLE LASER RADIATION WHEN OPEN AND INTERLOCK FAILED OR DEFEATED. DO NOT STARE INTO BEAM. CAUTION: THIS PRODUCT UTILIZES A LASER.
Table of Contents Introduction Important Safety Instructions ................ 2 Precautions ............................................. 3 Features ................................................... 6 Supplied Accessories............................. 6 Before Using the CR-505DAB ................ 7 Installing the Remote Controller Batteries...... 7 Using the Remote Controller .......................... 7 Controls & Connectors........................... 8 Front Panel........................................
Features Amp Tuner ■ 25W/Ch into 6 ohms (1 kHz, 10%) ■ DAB Tuning ■ 59 Presets for DAB ■ High Current, Low Impedance Drive ■ 40 Presets for AM and FM ■ Discrete Output Stage Circuitry ■ Automatic FM Scan Tuning ■ Tone Control for Treble and Bass ■ Tone Direct ■ RDS (CT/PS/RT) ■ 3 Audio Inputs and 2 Outputs for TAPE, MD, LINE Others ■ Optical Digital Output ■ Aluminum Volume Knob & Front Panel CD Player ■ ■ Plays Music CDs and MP3 CDs ■ 5-Mode Timer (Timer 1, 2, 3, 4/Sleep) -Compatible Remo
Before Using the CR-505DAB Installing the Remote Controller Batteries 1 Open the battery compartment, as shown. Using the Remote Controller To use the remote controller, point it at the CR-505DAB’s remote control sensor, as shown below. CR-505DAB Remote control sensor 5m 2 Insert the two supplied batteries (AAA/ -58 C 1S 3 Close the battery compartment. R R03) in accordance with the polarity diagram inside the battery compartment.
Controls & Connectors Front Panel For detailed information, refer to the pages in parentheses. 1 2 Disc Tray 3 4 Display VOLUME MIN STANDBY / ON PHONES INPUT MENU DIRECT BASS TREBLE MAX PRESET PUSH TO ENTER 5 6 7 8 9 0 A 1 Remote control sensor (7) Receives control signals from the remote controller. 2 Standby indicator (16) Lights up when the CR-505DAB is in Standby mode. 3 VOLUME control (19) Adjusts the volume. 4 [ ] button (20) Opens and closes the disc tray.
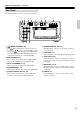
Controls & Connectors—Continued Rear Panel For detailed information, refer to the pages in parentheses. 3 4 1 2 5 6 OPTICAL REMOTE CONTROL DAB FM75 AM ANTENNA DIGITAL OUT 7 SUB WOOFER R SPEAKERS L PRE OUT L IN IN IN TAPE MD LINE OUT OUT R L R 8 9 0 1 REMOTE CONTROL (15) This (Remote Interactive) connector can be connected to the connector on another Onkyo component.
Controls & Connectors—Continued A CLOCK CALL button— Used to display the current Remote Controller time. B TIMER button— Used to set the timers. C Up [ ] & Down [ ] buttons— Used to set the timSTANDBY/ ON 1 4 7 2 CLOCK CALL 3 TIMER 5 6 8 9 --/--- ENTER REPEAT SLEEP MUTING G REPEAT button— Used with repeat playback. H INPUT [ ] [ ] selector buttons— Used to select sound sources. MODE DISPLAY D CLEAR button— Used with memory playback. E ENTER button— Used to set the timers.
Connecting Your Speakers Before you connect your speakers, read the following: • Disconnect the power cord from the wall outlet. • Read the instructions supplied with your speakers. • Pay close attention to speaker wiring polarity. In other words, connect positive (+) terminals only to positive (+) terminals, and negative (–) terminals only to negative (–) terminals. If you get them the wrong way around, the sound will be out of phase and will sound odd.
Connecting an Antenna This chapter explains how to connect the supplied indoor FM antenna, AM loop antenna, and DAB antenna and how to connect commercially available outdoor FM and AM antennas. The CD Receiver won’t pick up any radio signals without any antenna connected, so you must connect an antenna to use the tuner. Connecting the AM Loop Antenna The supplied indoor AM loop antenna is for indoor use only. 1 Assemble the AM loop antenna, inserting the tabs into the base, as shown.
Connecting an Antenna—Continued Connecting an Outdoor FM Antenna Connecting an Outdoor AM Antenna If you cannot achieve good reception with the supplied indoor FM antenna, try using a commercially available outdoor FM antenna instead. If good reception cannot be achieved using the supplied AM loop antenna, an outdoor AM antenna can be used in addition to the loop antenna, as shown.
Connecting Your Other Components to the CR-505DAB RCA Connection Color Coding Before Making Any Connections RCA-type connections are usually color coded: red and white. Use red plugs to connect right-channel audio inputs and outputs (typically labeled “R”). Use white plugs to connect left-channel audio inputs and outputs (typically labeled “L”). • Read the manuals supplied with your components. • Don’t connect the power cord until you’ve completed and double-checked all connections.
Connecting -compatible Components With (Remote Interactive) you can control your compatible Onkyo cassette tape deck or MD recorder with the CR-505DAB’s remote controller, and use the following special functions: ■ Auto Power On When you turn on a component connected via while the CR-505DAB is in Standby, the CR-505DAB automatically turns on and selects that component as the input source. This function doesn’t work if the CR-505DAB is already on.
Powering Up and Setting the Clock ACCUCLOCK Function VOLUME STANDBY/ ON MIN STANDBY / ON PHONES INPUT MENU DIRECT BASS TREBLE 1 MAX 2 CLOCK CALL 3 TIMER ENTER ENTER PRESET 4 PUSH TO ENTER 7 6 5 8 9 --/--- CLEAR DISPLAY MODE 10/0 STANDBY/ON DISPLAY CLOCK CALL TIMER REPEAT SLEEP Standby indicator MUTING INPUT Powering Up the CR-505DAB DAB Before connecting the power cord, complete all connections (see pages 11 to 15). 1 Connect the power cord to a suitable wall outlet.
Powering Up and Setting the Clock—Continued ■ Setting ACCUCLOCK to Use a Specific Station If the wrong time is displayed, you can specify which FM station the ACCUCLOCK function should use. This must be an FM station that supports RDS CT (Clock Time) information. 1 Press the [FM] button to select FM. 2 Press the [TIMER] button repeatedly until ■ Turning Off ACCUCLOCK If you don’t want ACCUCLOCK to calibrate the clock automatically at 2 AM, 3 AM and 2 PM everyday, you can turn it off as follows.
Powering Up and Setting the Clock—Continued 5 Press the [ENTER] button. The time flashes. STANDBY/ ON 1 4 7 2 3 5 6 TIMER 8 9 --/--- CLEAR DISPLAY MODE 10/0 CLOCK CALL TIMER 6 Use the Up/Down [ ]/[ ] buttons to set the time. ENTER ENTER REPEAT SLEEP MUTING DAB CLOCK CALL FM AM INPUT DIRECT 7 Press the [ENTER] button to set the clock. “Adjusted” appears on the display.
Using the CR-505DAB VOLUME control Adjusting the Volume 1 To adjust the volume, use the [VOLUME] VOLUME control, or the remote controller’s VOLUME [ ]/[ ] buttons. MIN STANDBY / ON PHONES INPUT MENU TREBLE BASS DIRECT Turn the [VOLUME] control clockwise to increase the volume; counterclockwise to decrease it. MAX PRESET PUSH TO ENTER Using Headphones INPUT You can connect a pair of stereo headphones to the CR505DAB’s PHONES jack for private listening, as shown.
Playing CDs ■ To Fast Forward or Fast Reverse (remote controller only) During playback or while playback is paused, press and hold the [ ] button to fast forward, or the [ ] button to fast reverse. For MP3, fast reverse only works within the MP3 track that is currently playing. If you press the button for more than four seconds, the fast forward or fast reverse speed increases.
Playing CDs—Continued ■ MP3 Disc STANDBY/ ON 1 4 7 2 3 5 6 Elapsed track time: The length of time that the current track has been playing (default display). TIMER 8 9 --/--- CLEAR DISPLAY MODE 10/0 DISPLAY CLOCK CALL ENTER REPEAT SLEEP MUTING INPUT Track name: Name of the current track. DIRECT Displaying Information This section explains how to display various information, including the remaining track time, remaining disc time, and ID3 tag for MP3 tracks.
Various Playback VOLUME STANDBY/ ON 1 Number buttons 4 7 2 3 5 6 TIMER 8 9 --/--- CLEAR DISPLAY MODE 10/0 MODE CLOCK CALL MIN ENTER REPEAT SLEEP MUTING CLEAR ENTER --/--REPEAT STANDBY / ON PHONES INPUT MENU DIRECT BASS MAX PRESET TREBLE PUSH TO ENTER MENU / Play/ Pause INPUT Random Playback DAB FM AM DIRECT CD Repeat Playback With the Repeat function you can play a track, a folder or a disc repeatedly.
Various Playback—Continued Memory Playback With the Memory function you can make a custom program of your favourite tracks. 1 While stopped, press the remote controller’s [MODE] button repeatedly until the “Mem” indicator appears on the display. 2 To add a track to your program, use the [ ]/[ ] buttons to select it, and then press the [ENTER] button. You can add up to 20 tracks to your program. Tracks can also be added by using the number buttons.
Using DAB You can use the Auto Tuning function manually: You may want to re-tune at a later date if you move the CR505DAB or if you want to receive a newly introduced ensemble. 1. Press the [MENU] button. 2. Turn the [ / ] control to select “Auto Tuning” and push the [ / ] control. 3. The Auto Tuning starts and scans the Band III frequencies. The number of scanned components are shown during scanning.
Using DAB—Continued Component Search Mode You can select a component for listening from the list of scanned components produced by using the Auto Tuning function. 1 Press the [MENU] button. 2 Turn the [ / ] control to select “Search Mode” and push the [ 3 Turn the [ / 4 Turn the [ / / ] control. ] control to select “Component” and push the [ / ] control. Sorted List Search Mode You can select any component for listening from the list of sorted components. 1 Press the [MENU] button.
Using DAB—Continued Preset Search Mode VOLUME You can select previously stored presets as follows. MIN STANDBY / ON PHONES INPUT MENU 1 Press the [MENU] button. 2 Turn the [ / ] control to select “Search MAX PRESET TREBLE BASS DIRECT PUSH TO ENTER Mode” and push the [ / MENU 3 Turn the [ / and push the [ STANDBY/ ON 1 2 3 5 6 / ] control. ] control to select “Preset” / ] control.
Using DAB—Continued Copying Preset Channels You can copy a preset channel to another channel. 1 Select the preset that you want to copy. 2 Press the [MENU] button. 3 Turn the [ / ] control to select “Preset Edit” and push the [ 4 Turn the [ / ] control. ] control until “Preset Copy?” appears on the display. 5 Push the [ / / 3. Bit Rate + mono/stereo Displays the current station mode (stereo or mono) and the bit rate at which the audio signal is being transmitted.
Using the Radio ■ Tuning into weak FM stations VOLUME MIN STANDBY / ON PHONES INPUT TREBLE BASS DIRECT MENU If a station has poor signal strength, you may not be able to tune into that station properly, or reception may be noisy. In this case, switch the FM Mode to Mono, then tune the band. Switching the FM Mode to Mono: MAX PRESET 1 Press the [MODE] button. 2 Use the [ ]/[ ] buttons to display “FM PUSH TO ENTER INPUT / MENU Mode” and press [ENTER].
Using the Radio—Continued Presetting FM Stations Automatically With the Auto Preset function you can automatically preset all the FM stations available in your area. 4 Use the [ ]/[ ] buttons to display “Preset Write?,” and then press the [ENTER] button. The preset number flashes. 1 Press the [FM] button. 2 Press the [MODE] button. 3 Use the [ ]/[ ] buttons to display “Preset Edit,” and then press the [ENTER] button.
Using the Radio—Continued 6 While the preset number is flashing, use Deleting Presets the [ ]/[ ] buttons to select a preset number from 1 to 40. You can delete unwanted presets as follows. 1 Select the preset that you want to delete. 2 Press the [MODE] button and use the [ ]/ [ ] buttons to display “Preset Edit.” 3 Press the [ENTER] button. 4 Use the [ ]/[ ] buttons to display “Preset Erase?.” 5 Press the [ENTER] button. 7 Press the [ENTER] button.
Other Functions Adjusting the Bass & Treble VOLUME With the Bass and Treble functions you can adjust the tone of the sound to your personal preference. MIN STANDBY / ON PHONES INPUT MENU MAX 1 Press the [DIRECT] button to select “Tone PRESET TREBLE BASS DIRECT Direct Off.” PUSH TO ENTER DIRECT TREBLE BASS STANDBY/ ON 1 4 7 2 3 5 6 8 9 --/--- CLEAR CLOCK CALL TIMER 10/0 2 Use the [BASS] or [TREBLE] control on the CR-505DAB to adjust the bass or treble.
Timers About the Timers STANDBY/ ON The CR-505DAB has four timers so that you can turn it on and off automatically at certain times and on certain days of the week, in order to listen to, or record your favourite programs. Timers can be used to start and stop playback (Play), or to start and stop radio or LINE input recording (Rec) with an Onkyo cassette tape deck or Mini Disc recorder connected via .
Timers—Continued 4 Use the Up/Down [ ]/[ ] buttons to select “Once” or “Every,” and then press [ENTER]. 7 Use the [ ]/[ ] buttons to set the OFF time, and then press [ENTER]. Once: For single use. Every: For weekly use. 8 Use the Up/Down [ ]/[ ] buttons to select “Timer ON,” and then press [ENTER]. 5 Use the Up/Down [ The TIMER indicator appears, as shown. ]/[ ] buttons to select one of the following options, and then press [ENTER].
Timers—Continued Using the Sleep Timer STANDBY/ ON 1 4 7 2 3 5 6 8 9 --/--- CLEAR 10/0 TIMER TIMER ENTER ENTER MODE DISPLAY SLEEP CLOCK CALL REPEAT SLEEP MUTING INPUT Turning Timers Off With the sleep timer you can set the CR-505DAB so that it automatically turns off after a specified period. 1 Press the [SLEEP] button repeatedly to select the required sleep time. With the [SLEEP] button you can set the sleep time from 90 to 10 minutes in 10 minute increments.
Disc Notes Supported Discs Discs Made on Personal Computers The CR-505DAB supports the following discs. Discs made on personal computers, including those of a compatible format, may not work properly in the CR505DAB because of incorrect settings in the disc burning software. Check the manual supplied with your disc burning software for additional compatibility information.
Disc Notes—Continued Handling Discs • Never touch the underside of a disc. Always hold discs by the edge, as shown. Underside • Never attach adhesive tape or sticky labels to discs. Cleaning Discs • For best results, keep your discs clean. Fingerprints and dust can affect the sound quality and should be removed as follows. Using a clean soft cloth, wipe from the center outwards, as shown. Never wipe in a circular direction.
Troubleshooting If you have any trouble using your CR-505DAB, check the following table for possible causes and remedies. If you still can’t resolve the issue yourself, please contact your Onkyo dealer. Trouble Can’t turn on the CR505DAB? Possible Cause Remedy The power cord is not connected properly. Connect the power cord properly to a suitable wall outlet (page 16).
Troubleshooting—Continued Trouble Possible Cause Remedy Switch the FM Mode to Mono (page 28). You’re too far away from the transmitter. Or, your FM antenna is in the wrong position or pointing in the wrong direction. Or, the station’s signal strength is poor. The radio presets no longer work? The power cord has not been connected to a wall outlet, or the power has been turned off for an extended period. Preset your favourite radio stations again (pages 26 and 29).
Troubleshooting—Continued Trouble Possible Cause The CR-505DAB was already on at the specified ON time. The timer didn’t work? No sound is output when a timed playback or recording task starts? doesn’t work. Standby indicator flashes. Remedy Set the CR-505DAB to Standby (page 33). The CR-505DAB must be in Standby mode, otherwise the timed task will not work. You must set the recording devices to standby The -connected cassette tape deck or MD recorder had not been in standby mode. mode too.
Specifications AMP DAB 20 W + 20 W (4 Ω, 1 kHz, DIN) 25 W + 25 W (4 Ω, 1 kHz, JEITA) Dynamic power: 30 W + 30 W (4 Ω) THD (Total Harmonic Distortion): 0.2% (5 W Output, 4 Ω) Damping Factor: 25 (1 kHz, 8 Ω) Input Sensitivity and Impedance: 200 mV/50 kΩ (LINE) Output Level and Impedance: 200 mV/2.2 kΩ (REC OUT) Frequency Response: 10 Hz-50 kHz/+3 dB, –3 dB (LINE) Tone Control: +9 dB, –8.