CR-L5_E.book Page 1 Monday, May 19, 2003 4:05 PM Contents Introduction CD Receiver CR-L5 Important Safeguards .................................... 2 Precautions .................................................... 4 Features ......................................................... 5 Supplied Accessories .................................... 6 Disc Notes ..................................................... 6 Before Using the CR-L5 ............................... 7 Controls & Connectors..................
CR-L5_E.book Page 2 Monday, May 19, 2003 4:05 PM WARNING: TO REDUCE THE RISK OF FIRE OR ELECTRIC SHOCK, DO NOT EXPOSE THIS APPLIANCE TO RAIN OR MOISTURE. CAUTION: TO REDUCE THE RISK OF ELECTRIC SHOCK, DO NOT REMOVE COVER (OR BACK). NO USER-SERVICEABLE PARTS INSIDE. REFER SERVICING TO QUALIFIED SERVICE PERSONNEL.
CR-L5_E.book Page 3 Monday, May 19, 2003 4:05 PM Important Safeguards—Continued 18. Object and Liquid Entry—Never push objects of any kind into the appliance through openings as they may touch dangerous voltage points or short-out parts that could result in a fire or electric shock. Never spill liquid of any kind on the appliance. 19. Servicing—Do not attempt to service the appliance yourself as opening or removing covers may expose you to dangerous voltage or other hazards.
CR-L5_E.book Page 4 Monday, May 19, 2003 4:05 PM Precautions 1. Recording Copyright Unless it’s for personal use only, recording copyrighted material is illegal without the permission of the copyright holder. 2. AC Fuse The AC fuse inside the CR-L5 is not user-serviceable. If you cannot turn on the CR-L5, contact your Onkyo dealer. 3. Care Occasionally you should dust the CR-L5 all over with a soft cloth. For stubborn stains, use a soft cloth dampened with a weak solution of mild detergent and water.
CR-L5_E.book Page 5 Monday, May 19, 2003 4:05 PM Precautions—Continued This unit contains a semiconductor laser system and is classified as a “CLASS 1 LASER PRODUCT.” So, to use this model properly, read this Instruction Manual carefully. In case of any trouble, please contact the store where you purchased the unit. To prevent exposure to the laser beam, do not try to open the enclosure. DANGER: VISIBLE AND INVISIBLE LASER RADIATION WHEN OPEN AND INTERLOCK FAILED OR DEFEATED. DO NOT STARE INTO BEAM.
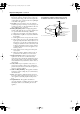
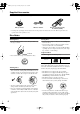
CR-L5_E.book Page 6 Monday, May 19, 2003 4:05 PM Supplied Accessories Check that the following accessories are supplied with this unit. AM loop antenna FM indoor antenna Remote controller (RC-535S) two batteries (AA/R6) * In catalogs and on packaging, the letter added to the end of the product name indicates the color of the CR-L5. Specifications and operation are the same regardless of color. Disc Notes Handling Discs Storing Discs • Never touch the underside of a disc.
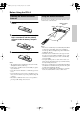
CR-L5_E.book Page 7 Monday, May 19, 2003 4:05 PM Before Using the CR-L5 Installing the Remote Controller Batteries 1 Open the battery compartment, as Using the Remote Controller To use the remote controller, point it at the CR-L5’s remote control sensor, as shown below. Remote control sensor shown.
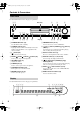
CR-L5_E.book Page 8 Monday, May 19, 2003 4:05 PM Controls & Connectors Front Panel For detailed information, refer to the pages in parenthesis. 12 3 Disc Tray 4 5 VOLUME STANDBY / ON STANDBY PAUSE STOP PLAY PHONES SPEAKERS A / B CLEAR 6 INPUT DISPLAY MEMORY FM MODE PRESET TUNING 7 89 J DIRECT K L M Display A STANDBY/ON button (16) N O I FM MODE button (22–23) Sets the CR-L5 to On or Standby. Used to select stereo or mono for FM radio.
CR-L5_E.book Page 9 Monday, May 19, 2003 4:05 PM Controls & Connectors—Continued 1 TRACK indicator 8 MUTING indicator (25) Appears when the CD input source is selected. Lights up when the CR-L5 is muted. 2 MEMORY indicator (21) 9 RDS indicator (17, 23) Lights up when memory playback is used. Lights up when the CR-L5 is tuned to a radio station that supports RDS (Radio Data System). 3 RANDOM indicator (21) 0 A & B speaker indicators (19) Lights up when random playback is used.
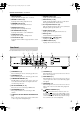
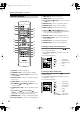
CR-L5_E.book Page 10 Monday, May 19, 2003 4:05 PM Controls & Connectors—Continued K TONE button— Used to set the tone. L TIMER button— Used to set the timers. M Up [ ] & Down [ ] buttons— Used to set the tim- Remote Controller ers and tone. 1 2 3 ON STANDBY TONE INPUT TIMER 1 2 3 4 5 6 7 8 9 >10 10/0 ENTER 4 5 K L M SLEEP N VOLUME 7 8 9 J O MUTING CLOCK CALL DOWN select the previous or next track when playing CDs, or to select presets when using the radio.
CR-L5_E.book Page 11 Monday, May 19, 2003 4:05 PM Connecting Your Other Components to the CR-L5 RCA/phono Audio Cable Color Coding • Don’t connect the power cord until you’ve completed all connections, including connections on page 12, speaker connections on page 13, and antenna connections on page 14. • Refer to the manuals supplied with your other components before connecting them. RCA/phono audio cables are usually color coded: red and white.
CR-L5_E.book Page 12 Monday, May 19, 2003 4:05 PM Connecting -compatible Components With (Remote Interactive) you can control your compatible Onkyo cassette tape deck or CD recorder with the CR-L5’s remote controller, and use the following special functions: ■ Auto Power On To use , you need to connect the CR-L5’s connector to an connector on the other component by using an cable. An cable is supplied with each -compatible Onkyo cassette tape deck and CD recorder.
CR-L5_E.book Page 13 Monday, May 19, 2003 4:05 PM Connecting Your Speakers You can use two sets of speakers with your CR-L5: speaker set A and speaker set B. Speaker set A consists of front left and right speakers and a subwoofer and should be installed in your main listening room. Speaker set B consists of front left and right speakers and can be installed in another room, such as a dining room or kitchen.
CR-L5_E.book Page 14 Monday, May 19, 2003 4:05 PM Connecting Antenna This chapter explains how to connect the supplied indoor FM antenna and AM loop antenna, and how to connect commercially available outdoor FM and AM antennas. FM antenna connector AM antenna push terminals FM 75 AM SPEAKERS A SPEAKERS B L The supplied indoor AM loop antenna is for indoor use only. 1 Assemble the AM loop antenna, inserting the tabs into the base, as shown.
CR-L5_E.book Page 15 Monday, May 19, 2003 4:05 PM Connecting Antenna—Continued Connecting an Outdoor FM Antenna If you cannot achieve good reception with the supplied indoor FM antenna, try a commercially available outdoor FM antenna instead. Connecting an Outdoor AM Antenna If good reception cannot be achieved using the supplied AM loop antenna, an outdoor AM antenna can be used in addition to the loop antenna, as shown.
CR-L5_E.book Page 16 Monday, May 19, 2003 4:05 PM Powering Up and Setting the Clock STANDBY/ON STANDBY / ON STANDBY PAUSE STOP PLAY ON STANDBY ON STANDBY ▼ ▲ TONE INPUT TIMER PHONES SPEAKERS A / B MEMORY FM MODE CLEAR INPUT DISPLAY 1 2 3 4 5 6 ▲ ▼ TIMER PRESET TUNING STANDBY indicator DIRECT DISPLAY 7 8 9 >10 10/0 ENTER SLEEP ENTER VOLUME UP Powering Up the CR-L5 Before connecting the power cord, complete all connections (see page 11 to 15).
CR-L5_E.book Page 17 Monday, May 19, 2003 4:05 PM Powering Up and Setting the Clock—Continued Displaying the Time in Standby Mode You can set the CR-L5 so that the time is displayed while the CR-L5 is in Standby mode. 1 With the CR-L5 turned on, press and hold the CR-L5’s [STANDBY/ON] button for more than 2 seconds. To turn off the time display, repeat this procedure. Notes: • Setting the CR-L5 to display the time will slightly increase the power consumption in Standby mode.
CR-L5_E.book Page 18 Monday, May 19, 2003 4:05 PM Powering Up and Setting the Clock—Continued Setting the Clock Manually If you cannot set the clock by using the ACCUCLOCK function, you can set it manually. In this case, the ACCUCLOCK function will not automatically update the clock each day. You can set the clock while the CR-L5 is on or in Standby. 4 Use the Up/Down [ ]/[ ] buttons to select a day. 5 Press the [ENTER] button. ON STANDBY ▼ ▲ 1 2 3 4 5 6 ▲ ▼ The time flashes.
CR-L5_E.book Page 19 Monday, May 19, 2003 4:05 PM Using the CR-L5 VOLUME control VOLUME PAUSE SPEAKERS A / B MEMORY FM MODE CLEAR STOP INPUT DISPLAY PLAY SPEAKERS A/B When you connect two sets of speakers, you can listen to set A, set B, or both. DIRECT 1 Use the [SPEAKERS A/B] button to PRESET TUNING Selecting Speaker Sets select the following options: A, B, A+B, or off.
CR-L5_E.book Page 20 Monday, May 19, 2003 4:05 PM Playing CDs PAUSE ■ To Fast Forward or Fast Reverse STOP PLAY VOLUME PAUSE SPEAKERS A / B MEMORY FM MODE CLEAR STOP PLAY INPUT DISPLAY DIRECT During playback or while playback is paused, press and hold the [ ] button to fast forward, or the [ ] button to fast reverse. If you press the button for more than four seconds, the fast forward or fast reverse speed increases.
CR-L5_E.book Page 21 Monday, May 19, 2003 4:05 PM Playing CDs—Continued In this example, track #8 is the fifteenth track to be added to the program. Repeat Playback With the Repeat function you can play all tracks repeatedly. 1 During playback, press the remote controller’s [REPEAT] button. The REPEAT indicator appears on the display and all tracks are played repeatedly. The total memory playback time is displayed. 2 To cancel Repeat playback, press the [REPEAT] button again.
CR-L5_E.
CR-L5_E.book Page 23 Monday, May 19, 2003 4:05 PM Using the Radio—Continued Selecting Presets You can select previously stored presets as follows. 1 Use the INPUT [ ]/[ ] buttons, or the remote controller’s INPUT [ ]/[ ] buttons to select AM or FM. 2 Use the PRESET [ ]/[ ] buttons, or the remote controller’s [ ]/[ ] buttons to select a preset. Deleting Presets You can delete unwanted presets as follows. 1 Select the preset that you want to delete.
CR-L5_E.book Page 24 Monday, May 19, 2003 4:05 PM Using the Radio—Continued Naming Presets Editing Preset Names You can edit the names of presets as follows. You can name your radio presets for easy identification. Names can be up to eight characters long. 1 Select the preset whose name you DISPLAY want to edit. STANDBY / ON STANDBY PAUSE STOP PLAY PHONES SPEAKERS A / B MEMORY FM MODE CLEAR INPUT DISPLAY DIRECT PRESET TUNING See page 23 for information on selecting presets.
CR-L5_E.book Page 25 Monday, May 19, 2003 4:05 PM Other Functions Adjusting the Bass & Treble ON STANDBY ▼ ▲ INPUT 1 2 3 4 5 6 ▲ 7 8 9 ▼ >10 10/0 TONE TONE With the Bass and Treble functions you can adjust the tone of the sound to your personal preference. TIMER SLEEP 1 Use the remote controller’s [TONE] ENTER ENTER button to select “Bass” or “Treble”.
CR-L5_E.book Page 26 Monday, May 19, 2003 4:05 PM Timers About the Timers The CR-L5 has four timers that you can use to automatically turn it on and off at certain times and on certain days of the week, so you can listen to, or record your favorite programs. Timers can be used to start and stop playback (Play), or to start and stop radio or TV/LINE input recording (Rec) with an Onkyo cassette tape deck connected via .
CR-L5_E.book Page 27 Monday, May 19, 2003 4:05 PM Timers—Continued If you select AM or FM, use the Up/Down [ ]/[ ] buttons to select a preset, and then press [ENTER]. In this example, preset #2 has been selected. 6 Use the number buttons to enter the ON time, and then press [ENTER]. To enter, for example, 7:29, press [10/0], [7], [2], and [9]. 4 Use the Up/Down [ ]/[ ] buttons to select Once or Every, and then press [ENTER]. Once: For one-off use. Every: For weekly use.
CR-L5_E.book Page 28 Monday, May 19, 2003 4:05 PM Timers—Continued Turning Timers Off Checking Timer Settings You can turn timers on or off as necessary. This can be useful when, for example, you’re on holiday and you don’t want to be woken up by the timer that you normally use as an early-morning radio alarm. You can check a timer’s settings as follows. 1 Press the [TIMER] button repeatedly to select the timer that you want to check. In this example, timer #1 is selected.
CR-L5_E.book Page 29 Monday, May 19, 2003 4:05 PM Troubleshooting If you have any trouble using your CR-L5, check the following table for possible causes and remedies. If you still can’t resolve the issue yourself, please contact your Onkyo dealer. Trouble Can’t turn on the CR-L5? Possible Cause Remedy The power cord is not connected properly. Connect the power cord properly to a suitable wall outlet (page 16).
CR-L5_E.book Page 30 Monday, May 19, 2003 4:05 PM Troubleshooting—Continued Trouble AM reception is hindered by a high-pitched noise? Possible Cause Interference caused by your TV. Remedy Move the AM loop antenna as far away as possible from your TV. Move the CR-L5 as far away as possible from your TV. Install an outdoor antenna as far away as possible from nearby roads.
CR-L5_E.book Page 31 Monday, May 19, 2003 4:05 PM Troubleshooting—Continued Trouble Possible Cause Remedy The disc is dirty. Remove the disc and clean it (page 6). The disc is very scratched. Buy a new disc. The clock is wrong? CT (Clock Time) information has been taken from a radio station in another time zone. Set ACCUCLOCK to use a specific station (page 17). The CR-L5 turns itself on unexpectedly? The ACCUCLOCK function is updating the clock. This is not a malfunction.
CR-L5_E.book Page 32 Monday, May 19, 2003 4:05 PM Specifications AMPLIFIER 2 × 50 watts at 4 Ω 1 kHz DIN 2 × 41 watts at 6 Ω 1 kHz DIN 2 × 35 watts at 8 Ω 1 kHz DIN Dynamic power: 2 × 62 watts at 4 Ω 2 × 40 watts at 8 Ω Total harmonic distortion: 0.2% at 25 watts output IM distortion: 0.