English CD RECEIVER 2 CR-N1 Before using Instruction Manual Controls & connectors 12 Getting connected 18 Basic operation 30 Playing CDs 35 Listening to the radio 41 Using the timer 47 Using USB 51 Appendix 58 Thank you for purchasing the ONKYO CR-N1 CD Receiver. Please read this manual thoroughly before making any connection or turning on the power. Follow these instructions to obtain optimum performance and maximum listening enjoyment from your new CR-N1.
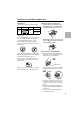
WARNING: TO REDUCE THE RISK OF FIRE OR ELECTRIC SHOCK, DO NOT EXPOSE THIS APPLIANCE TO RAIN OR MOISTURE. CAUTION: TO REDUCE THE RISK OF ELECTRIC SHOCK, DO NOT REMOVE COVER (OR BACK). NO USER-SERVICEABLE PARTS INSIDE. REFER SERVICING TO QUALIFIED SERVICE PERSONNEL.
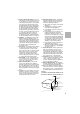
14. Outdoor Antenna Grounding – If an outside antenna or cable system is connected to the appliance, be sure the antenna or cable system is grounded so as to provide some protection against voltage surges and built-up static charges.
Precautions 1. Recording Copyright Recording of copyrighted material for other than personal use is illegal without permission of the copyright holder. 2. AC Fuse The fuse is located inside the chassis and is not user-serviceable. If power does not come on, contact your Onkyo authorized service station. 3. Care From time to time you should wipe the front and rear panels and the cabinet with a soft cloth.
DANGER: INVISIBLE LASER RADIATION WHEN OPEN AND INTERLOCK FAILED OR DEFEATED. AVOID DIRECT EXPOSURE TO BEAM. CAUTION: THIS PRODUCT UTILIZES A LASER. USE OF CONTROLS OR ADJUSTMENTS OR PERFORMANCE OF PROCEDURES OTHER THAN THOSE SPECIFIED HEREIN MAY RESULT IN HAZARDOUS RADIATION EXPOSURE. For U.S. model The laser is covered by a housing which prevents exposure during operation or maintenance.
Precautions For European model Trademarks This unit contains a semiconductor laser system and is classified as a “CLASS 1 LASER PRODUCT”. So, to use this model properly, read this Instruction Manual carefully. In case of any trouble, please contact the store where you purchased the unit. To prevent being exposed to the laser beam, do not try to open the enclosure. Apple, Mac, Power Macintosh, and PowerBook are registered trademarks and iBook and iMac are trademarks of Apple Corporation, Inc.
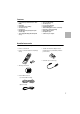
Features • 2 x 10 watts per channel into 4 ohms (DIN) • USB input • USB input/source mixing • Acoustic Presence • Energy Save • RDS (Radio Data System) (European model only) • Timer play (Weekday, Weekend) and Sleep • • • • • • • • • Auto scan FM tuning 30 radio presets Preset station naming FM tuning indicator Audio muting (from remote controller) Battery-less memory backup Optical digital output Headphone jack Subwoofer pre-output Bundled accessories Make sure that the following items are included with
Remote controller basics Installing the batteries 1. Open the battery compartment, as shown. Using the remote controller Remote control sensor 2. Insert the batteries (AA, R6, UM-3) as shown, observing the correct polarity (positive + and negative -). About 5 m (16 feet) For reliable operation, point the remote controller toward the CR-N1’s remote control sensor, as shown. 3. Close the battery compartment, as shown.
Precautions for handling compact discs Playable discs Taking the CD out of the disc case This unit can play back the following discs. 1. Hold the disc case in the palm of one hand and pull the cover upward with the other hand to open the disc case. Disc logo Audio CDs Contents Disc size 12 cm Audio 8 cm (CD single) You cannot play back discs other than those listed above. Do not play CD-ROMs intened for computer use or non-audio compact discs.
Contents Before Using................................................................................................... 2 Important Safeguards ......................................................................................................... 2 Precautions ......................................................................................................................... 4 Features....................................................................................................................
Contents Playing CDs................................................................................................... 35 Loading discs.................................................................................................................... 35 Starting playback.............................................................................................................. 35 Pausing playback............................................................................................................
Controls & connectors Front panel P A Q R S B C D T E V F G W U H I X J K L 12 M N O
Controls & connectors A CD compartment [35] CDs are loaded here. B USB indicator [53, 56] This indicator lights up when the CR-N1 is successfully recognized by the PC or Mac connected to the USB port. C ACOUSTIC PRESENCE indicator [34] This indicator lights up when the Acoustic Presence function is set to either A. PR 1 or A. PR 2. D ENERGY SAVE indicator [30] This indicator lights up when the Energy Save function is on.
Controls & connectors Display A B CD TIMER CD W.DAY W.END MEMORY REPEAT SLEEP RANDOM NO P A B C D E F G H I J 14 E F G H TRACK AUTO MONO AM PM Q R TIMER indicator CD indicator MEMORY indicator Play/Pause indicators TRACK indicator AUTO indicator MONO indicator AM/PM indicators RDS indicator (European model) Single track remaining time indicator I JK L RDS S T S STEREO MIN MUTING kHz S.
Controls & connectors Rear panel Connector cover Push up the tab to release the cover. 9 Replace the cover when nothing is connected to these connectors.
Controls & connectors Remote controller A STANDYBY/ON button [30] J A B C K L B SETTING buttons [31, 47–49] These buttons are used in conjunction with the timer functions C TIMER button [31, 47–49] D M E This button is used to turn on the CR-N1 and select Standby mode. N This button is used to select the various Timer functions. D CD, LINE, FM, AM, USB INPUT SELECTOR buttons [33] These buttons are used to select the CD, LINE, FM, AM, and USB input sources. F E A.
Controls & connectors N MUTING button [34] This button is used to temporarily mute the sound output. O Stop button [36] This button is used to stop CD playback. P PLAY button [35] This button is used to start CD playback. Q Pause button [36] This button is used to pause CD playback. R Previous/Next buttons [36, 39] The Previous button is used to select the beginning of the current track or previous tracks. The Next button is used to select the next track or subsequent tracks.
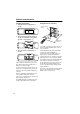
Getting connected Connecting speakers • Connect speakers only as shown here. Incorrect connections may damage the CR-N1 and the speakers. • The minimum impedance for each speaker is 4 ohms. • Unnecessarily long, or very thin speaker cables may affect the sound quality and should be avoided. • Do not connect more than one speaker to each pair of terminals. • Turn off the CR-N1 before connecting any speakers. Failure to do so may damage the CR-N1 or the speakers.
Getting connected Incorrect speaker wiring Never connect speakers as shown below, as this will damage the CR-N1 or the speakers. Make sure that the terminals are gripping the bare wires, not the insulation. A short between the positive and negative speaker terminals may damage the CR-N1, so make sure that the speaker cables are attached securely to the speaker terminals and that there is no chance of any bare wires touching each other. Attaching the wires 1. Push up the lever to open the terminal. 2.
Getting connected Using with a TV or computer D-N1 speakers Note that the D-N1 speakers are not supplied with all models. Location precautions • The speaker cabinets are made from wood, making them sensitive to extreme temperatures and humidity. • Do not put the speakers in locations subject to direct sunlight or in humid places, such as near an air conditioner, bathroom, or kitchen.
Getting connected Connecting • Connect the speakers only as shown here. Incorrect connections may damage the CR-N1 or the speakers. Right speaker • Use the supplied speaker cables. Unnecessarily long, or very thin speaker cables may affect the sound quality and should be avoided. • Turn off the CR-N1 before connecting any speakers. Failure to do so may damage the CR-N1 or the speakers.
Getting connected Removing the speaker grilles Speaker care The D-N1 speakers can be used either with or without the grilles, which can be removed and replaced as follows. 1. Hold the grille at the top using both hands and pull it gently away from the speaker to release the top two fasteners. 2. Hold the grille at the bottom using both hands and pull it gently away from the speaker to release the bottom two fasteners. 3.
Getting connected Connecting an AM antenna The bundled AM loop antenna is designed for indoor use only. Using the bundled AM loop antenna 1. Assemble the AM antenna, as shown. Make sure that the wires are attached securely and that the terminals are gripping the bare wires, not the insulation. Once the CR-N1 is ready for use, you’ll need to tune into an AM radio station and adjust the position of the AM antenna in order to achieve the best possible reception.
Getting connected Connecting an FM antenna The bundled indoor FM antenna is designed for indoor use only. Using an outdoor FM antenna If good reception cannot be achieved using the bundled indoor FM antenna, an outdoor FM antenna can be used instead, as shown. Using the bundled FM antenna 1. Attach the FM antenna, as shown. U.S. and Canadian models Strip the insulation from the end of the cable and insert the bare wires fully into the FM terminal, as shown.
Getting connected Connecting 75 ohm coaxial cable Using the 75/300 ohm FM antenna adapter (The 75/300 ohm antenna adapter is not included with the U.S., Canadian, and European models.) The 75/300 ohm antenna adapter can be used to connect an FM antenna with 300 ohm flat twin-core cable, or to connect an FM antenna with a 75 ohm coaxial cable with no connector attached. 1. Using a small screwdriver or your fingernails, push the tabs outwards and remove the adapter’s cover, as shown. 2.
Getting connected Connection notes • Do not connect the AC power cord to a wall outlet until you’ve completed all other connections, including speakers (see page 18) and antenna (see page 23). • For audio connections, the red connector (marked “R”) corresponds to the right channel, and the white connector (marked “L”), to the left channel. Always connect white plugs to connectors labeled “L,” and red plugs to the connectors labeled “R.
Getting connected Connecting a digital recorder A digital recorder such as an MD, DAT, or CDR can be connected to the CR-N1’s OPTICAL DIGITAL OUTPUT for digital recording. Only CD playback signals are output via the OPTICAL DIGITAL OUTPUT. Optical digital cable Digital recorder Connecting a subwoofer A powered subwoofer can be connected to the CR-N1’s SUBWOOFER PRE OUT phono jack for enhanced bass performance.
Getting connected Connecting a computer By connecting a computer to the CR-N1’s UP USB port, audio from the computer can be listened to with high quality. USB cable Before connecting your computer, see “Windows USB setup” on page 52 or “Macintosh USB setup” on page 56. Connecting headphones Stereo headphones can be connected to the CR-N1’s rear-panel headphone mini-jack for private listening. The speakers are disconnected while the headphone plug is inserted into the PHONES jack.
Getting connected Connecting the power cord Once you’ve completed all the other connections, it’s time to connect the power cord. 1. Connect the AC power cord to a suitable wall outlet. AC power cord To wall outlet (Illustration shows European model) The CR-N1 switches to Standby mode and “--:--” appears on the display. Once the clock has been set (see page 31), the day and time are displayed in Standby mode.
Basic operation STANDBY/ON ENERGY SAVE indicator STANDBY/ON ENERGY SAVE Turning the CR-N1 on & off 1 Press the STANDBY/ON ( ) button on the CR-N1 or remote controller. Remote controller Using Energy Save The Energy Save function reduces power consumption while the CR-N1 is in Standby mode. 1 In Standby mode, press the ENERGY SAVE button on the CR-N1 (the ENERGY SAVE indicator lights up and the clock display disappears). 2 To turn off Energy Save mode, press the ENERGY SAVE button again.
Basic operation TIMER ENTER SETTING ( / ) Numeric keypad The remote controller is used to set the clock. Note that the clock must be set to the 24 hour format in order to use the numeric keypad to set the day and time. Setting the day & time 3 Setting the clock 1 Press the TIMER button repeatedly until “ADJUST” appears on the display, and then press the ENTER button. Use the SETTING ( / ) buttons, or the numeric keypad to set the time, and then press the ENTER button (the clock is now set.).
Basic operation CLOCK CALL ENTER SETTING ( / ) TIMER Selecting 12 or 24 hour display The CR-N1 can display time in the 12- or 24-hour format. 1 Press the TIMER button repeatedly until “24H/12H” appears on the display, and then press the ENTER button. Calling the clock The time can be displayed at anytime by using the Clock Call function. 1 Press the CLOCK CALL button. The day and time are displayed. After a few seconds, the day display is replaced by the selected input source (e.g.
Basic operation INPUT SELECTOR VOLUME UP / VOLUME DOWN VOLUME UP / VOLUME DOWN INPUT Selecting input sources The following input sources can be selected: Input source CD 1 Description CR-N1’s CD player LINE Rear panel LINE inputs USB Rear panel USB port FM CR-N1’s FM radio AM CR-N1’s AM radio Press the INPUT button on the CR-N1 repeatedly, or use the CD, LINE, FM, AM, or USB INPUT SELECTOR buttons on the remote controller to select the required input source.
Basic operation MUTING A.PRESENCE ACOUSTIC PRESENCE indicator ACOUSTIC PRESENCE Muting the output Using Acoustic Presence Sound output can be muted temporarily by using the Muting function. 1 Press the MUTING button on the remote controller (the output is muted and the MUTING indicator flashes). The Acoustic Presence function adds super-bass reality to music sources, increasing your listening pleasure. 1 Remote controller MUTING Press the ACOUSTIC PRESENCE button on the CR-N1, or the A.
Playing CDs OPEN/CLOSE PLAY/PAUSE CD PLAY INPUT Loading discs The CR-N1 features a vertical disc loading compartment. 1 Starting playback 1 To open the disc compartment, press the OPEN/CLOSE ( ) button on the CR-N1 (the door slides open). To select the CD input source, press the INPUT button on the CR-N1 repeatedly until “CD” appears on the display, or press the CD button on the remote controller (the CD indicator appears).
Playing CDs PLAY/PAUSE STOP PLAY / Pausing playback 1 To pause CD playback, press the PLAY/PAUSE ( ) button on the CR-N1, or the PAUSE ( ) button on the remote controller (the pause indicator appears). Remote controller 2 Selecting tracks Remote controller CD To resume CD playback, press the PLAY/PAUSE ( ) button on the CR-N1, or the PAUSE ( ) or PLAY ( ) button on the remote controller (the pause indicator disappears).
Playing CDs Numeric keypad 3 Tracks can also be selected by using the numeric keypad. Searching tracks You can search tracks during playback or while playback is paused by using the Review ( ) and Preview ( ) buttons on the CR-N1. Use buttons 1 to 9 to select tracks 1 to 9. Use button 10/0 to select track 10. To select track 11 and upwards, press the --/--- button followed by the corresponding two number buttons. Examples: 1 To search forwards, press and hold the Preview ( ) button.
Playing CDs RANDOM REPEAT Random playback / Repeat playback CD tracks are normally played in sequential order. With Random Playback, tracks are played in a random order. CD playback normally stops once the last track has been played. With Repeat Playback, the CD is played repeatedly. 1 1 To start Random Playback, press the RANDOM button on the remote controller (the RANDOM indicator appears and playback starts after a few seconds).
Playing CDs PLAY/PAUSE STOP MEMORY PLAY / MEMORY Numeric keypad Memory playback Remote controller CD tracks are normally played in sequential order. With Memory Playback, you can choose the playback order of up to 20 tracks. 1 With playback stopped, press the MEMORY button on the CR-N1 or remote controller (the MEMORY indicator appears). Note that tracks can be memorized using the numeric keypad during playback, in which case it’s not necessary to stop playback before pressing the MEMORY button.
Playing CDs 5 6 7 Once you’ve memorized all your tracks and are ready to start playback, press the PLAY/PAUSE ( ) button on the CR-N1, or the PLAY ( ) button on the remote controller. Tracks are played in the order memorized, and playback stops when the last memorized track has been played. To stop Memory Playback, press the STOP ( ) button. To start Memory Playback again, press the PLAY/PAUSE ( ) button again. To cancel Memory Playback, press the MEMORY button (the MEMORY indicator disappears).
Listening to the radio AM FM INPUT You must connect the antenna in order to use the radio. See “Connecting an AM antenna” on page 23 and “Connecting an FM antenna” on page 24 for information. Tuning the radio 1 To select either FM or AM, press the INPUT button on the CR-N1 repeatedly until “FM” or “AM” appears on the display, or press the FM or AM button on the remote controller.
Listening to the radio FM MEMORY INPUT The entire FM frequency band is scanned from low to high and up to 30 stations are assigned to the presets automatically. The process is complete when the frequency value stops changing. Presetting FM stations automatically The FM Auto function searches for all receivable FM stations and assigns them to presets automatically. Note that previously stored presets will be overwritten by this function.
Listening to the radio AM FM PRESET ( / ) MEMORY 3 INPUT While “– –” is flashing, use the Tuning ( / ) buttons to select a preset from 1 through 30. Selecting preset stations Preset stations can be selected as follows. 1 STEREO To select either FM or AM, press the INPUT button on the CR-N1 repeatedly until “FM” or “AM” appears on the display, or press the FM or AM button on the remote controller.
Listening to the radio DISPLAY MEMORY 4 Naming presets Presets can be named using up to eight characters as follows. 1 2 Select the preset that you want to name. See “Selecting preset stations” on page 43 for more information. AUTO Press and hold the DISPLAY button until the flashing cursor appears “–”. 3 Use the Tuning ( / tons to select characters.
Listening to the radio DISPLAY FM MODE MEMORY Editing preset names Deleting presets You can edit preset names as follows. You can delete presets as follows. 1 Select the preset whose name you want to edit. See “Selecting preset stations” on page 43 for more information. 1 Select the preset that you want to delete. See “Selecting preset stations” on page 43 for more information. 2 Press and hold the DISPLAY button until the first character of the name starts flashing.
Listening to the radio FM MODE Listening to stereo broadcasts 46 DISPLAY Using RDS (European models) There are two FM radio modes: Auto and Mono. In Auto mode, the CR-N1 automatically switches to Stereo mode if the signal strength of tuned FM station is strong enough. In this case, the STEREO indicator appears. If the signal is not strong enough, stereo reception may be noisy and the STEREO indicator may flash. In this case, you may prefer to listen in Mono mode.
Using the timer (remote controller only) ENTER SETTING ( / ) TIMER The timer can be used to automatically turn on and off the CD player or radio at a specified time. You can set independent on and off times for weekdays and weekends, configure which days are weekdays and which are weekend days, and turn each timer on or off independently. The sleep timer can be used to automatically turn off the CR-N1 after a specified amount of time. Note that you must set the clock in order to use the timer.
Using the timer (remote controller only) STANDBY/ON TIMER 5 ENTER SETTING ( / ) CR-N1 will automatically enter Standby mode after the specified sleep time has elapsed, ignoring the timer’s OFF setting. The timer still works when the Energy Save function is on. If you selected the FM or AM source, use the SETTING ( / ) buttons to select a preset station. Turning the timers on & off TIMER W.DAY MHz The timers can be turned on and off independently as follows.
Using the timer (remote controller only) ENTER SETTING ( / ) TIMER 2 Configuring weekdays & weekends You can configure days as weekdays, weekend days, or both. Configuring days as both allows you to turn the CR-N1 on and off twice on such days. Initially, Monday through Friday are configured as weekdays, and Saturday and Sunday, as weekend days, as shown. Use the SETTING ( / ) buttons to select WEEKDAY or WEEKEND, and then press the ENTER button.
Using the timer (remote controller only) SLEEP Using the sleep timer The sleep timer automatically turns off the CR-N1 after a specified amount of time. 1 Turn on the CR-N1 and play a CD, radio station, or other source. 2 Press the SLEEP button repeatedly to set the required sleep time (the SLEEP indicator appears). MIN SLEEP The sleep time can be set from 10 to 90 minutes in 10-minute steps. After the specified sleep time has elapsed, the CR-N1 will automatically enter Standby mode.
Using USB USB USB MIX MIX LEVEL INPUT SELECTOR INPUT By connecting the USB port on your computer to the USB port on the CR-N1, you can listen to music and other sounds from your computer with high quality. Before connecting your computer to the USB port, see “Windows USB setup” on page 52 or “Macintosh USB setup” on page 56. Note: If you turn the CR-N1 on or off, or connect or disconnect the USB cable while your computer is outputting sound (e.g.
Using USB 4 To turn off the USB Mix function, press the USB MIX button again (the USB MIX ON indicator goes out and the SOURCE DIRECT indicator lights up). The USB Mix can be heard through the speakers and headphones, but only the selected source signal is output from the LINE OUT. Checking your PC’s USB ports Before connecting the CR-N1, it’s a good idea to check that your PC’s USB ports are working properly. 1 From the Start menu, select Settings → Control panel, and open the System control panel.
Using USB Connecting the CR-N1 (driver installation) 1 Turn on your PC and wait until the Windows startup is complete. 2 Connect the USB cable from the CR-N1 to a USB port on your PC. The CR-N1’s USB indicator lights up. If the USB indicator does not light, make sure that the USB cable is connected correctly between the CR-N1 and PC. Note that it may take up to 10 seconds for your PC to recognize the CR-N1. Do not disconnect the CR-N1 during this time.
Using USB Checking audio output & volume control operation 3 If you are using Windows 98/98SE, click the Playback button. If you are using Windows 2000/Me, click the Volume button. The Volume Control opens, as shown. 4 Set the Volume slider for each device to maximum, close the window, and then click OK to close the Multimedia control panel. For correct operation, check the Windows audio output and volume control settings as follows. 1 Open the Multimedia control panel.
Using USB Enabling digital CD audio Windows 2000/Me In order to listen to CDs in your computer’s CD-ROM drive via USB, you must enable digital CD audio for your CD-ROM drive as follows. 1 Open the System control panel. 2 If you are using Windows 2000, click the Hardware tab, and then click the Device Manager. If you are using Windows Me, click the Device manager tab. 3 Select your CD-ROM drive from the list, and then click the Properties button.
Using USB Macintosh USB setup The CR-N1 USB interface supports “hot plugging,” so USB cables can be connected or disconnected even while your Macintosh is on. However, it’s recommended that you turn down the CR-N1 volume beforehand. Use only standard USB cables that support high-speed transmission. Operation cannot be guaranteed when using USB ports that are not standard equipment (e.g., USB ports on a third-party PCI interface card). The following procedures and screen shots are based on Mac OS 9.0.
Using USB Sound control panel confirmation Using Platinum Sounds In order to output audio from your Macintosh via USB, you must set the audio output as follows. In order to listen to Platinum Sounds via USB, follow the procedure below. If you do not follow this procedure, Platinum Sounds may not work properly. 1 Open the Sound control panel. 2 Select Output, and make sure that “Choose a device for sound output:” is set to Built-in, as shown. Mac OS 9.0.
Troubleshooting If you are having trouble operating your CR-N1, look up the symptoms in the following table and then try the suggested remedy. If you cannot resolve the issue yourself, contact your nearest Onkyo dealer. Symptom Cannot turn on the CR-N1. There’s no sound from the speakers. Sound is coming from only one speaker. There’s no sound when the timer turns on the CR-N1.
Troubleshooting Symptom Possible cause The received signal is too weak? FM reception is hindered by hiss and the tuning and stereo indicators are flashing. The radio presets no longer work. Stereo FM transmissions travel only half the distance of regular transmissions? Remedy Install an outdoor FM antenna. See page 24. Try changing the position and direction of the outdoor antenna. Set the FM mode to Mono. See page 46.
Specifications Amplifier 2 x 6.5 watts min., RMS at 8 ohms, 50 Hz–20 kHz, with no more than 0.6% total harmonic distortion (FTC) Power output (U.S. & Canadian models) 2 x 9.5 watts min., RMS at 4 ohms, 50 Hz–20 kHz, with no more than 0.8% total harmonic distortion (FTC) 2 x 15 watts at 4 ohms (EIAJ) 2 x 10 watts at 4 ohms, 1 kHz (DIN) 2 x 8.5 watts at 6 ohms, 1 kHz (DIN) Power output (Other models) 2 x 7 watts at 8 ohms, 1 kHz (DIN) 2 x 6.5 watts min., RMS at 8 ohms, 1 kHz, no more than 0.
Specifications Tuner 87.9–107.9 MHz (200 kHz steps) (U.S. & Canadian model) FM 87.5–108.00 MHz (50 kHz steps) (Other area models) 530–1710 kHz (10 kHz steps) (U.S. & Canadian model) Tuning range 522–1611 kHz (9 kHz steps) (European & Australian models) AM 531–1602 kHz (9 kHz steps) (Asian models) Mono Usable sensitivity FM Stereo AM 50 dB quieting sensitivity FM Capture ratio FM Image rejection ratio IF rejection ratio Signal to noise ratio Selectivity 17.2 dBf, 2.0 µV (75 ohms IHF) 17.
MEMO 62
MEMO 63
Specifications Sales & Product Planning Div. : 2-1, Nisshin-cho, Neyagawa-shi, OSAKA 572-8540, JAPAN Tel: 072-831-8111 Fax: 072-833-5222 http://www.onkyo-intl.com ONKYO U.S.A. CORPORATION 18 Park Way, Upper Saddle River, N.J. 07458, U.S.A. Tel: 201-785-2600 Fax: 201-785-2650 http://www.onkyousa.com ONKYO EUROPE ELECTRONICS GmbH Liegnitzerstasse 6, 82194 Groebenzell, GERMANY Tel: +49-8142-4401-0 Fax: +49-8142-4401-555 http://www.onkyo.