Contents CD Receiver CR-N7 Instruction Manual Getting Started .......................... 2 Connections ............................ 14 Playing a Disc.......................... 22 Listening to the Radio ........... 34 Clock and Timer ...................... 44 Miscellaneous ......................... 53 Thank you for purchasing an Onkyo CD Receiver. Please read this manual thoroughly before making any connections and plugging it in.
WARNING: TO REDUCE THE RISK OF FIRE OR ELECTRIC SHOCK, DO NOT EXPOSE THIS APPARATUS TO RAIN OR MOISTURE. CAUTION: TO REDUCE THE RISK OF ELECTRIC SHOCK, DO NOT REMOVE COVER (OR BACK). NO USER-SERVICEABLE PARTS INSIDE. REFER SERVICING TO QUALIFIED SERVICE PERSONNEL.
Precautions 1. Recording Copyright—Unless it’s for personal use only, recording copyrighted material is illegal without the permission of the copyright holder. 2. AC Fuse—The AC fuse inside the unit is not userserviceable. If you cannot turn on the unit, contact your Onkyo dealer. 3. Care—Occasionally you should dust the unit all over with a soft cloth. For stubborn stains, use a soft cloth dampened with a weak solution of mild detergent and water. Dry the unit immediately afterwards with a clean cloth.
Precautions—Continued This unit contains a semiconductor laser system and is classified as a “CLASS 1 LASER PRODUCT”. So, to use this model properly, read this Instruction Manual carefully. In case of any trouble, please contact the store where you purchased the unit. To prevent being exposed to the laser beam, do not try to open the enclosure. Features Amplifier VISIBLE AND/OR INVISIBLE LASER RADIATION WHEN OPEN AND INTERLOCK FAILED OR DEFEATED. DO NOT STARE INTO BEAM.
Before Using This Unit Installing the Batteries 1 Detach the battery cover by pressing the tab and pulling up the cover. Using the Remote Controller To use the remote controller, point it at the CD receiver’s remote control sensor, as shown below. Remote control sensor 5 x. pro ) p A ft. (16 2 3 Insert two AA-size batteries into the battery compartment. Carefully follow the polarity diagram (positive + and negative - symbols) inside the battery compartment.
Table of Contents Basic Operations Advanced Operations Getting Started Important Safety Instructions...............................2 Precautions .........................................................3 Features ..............................................................4 Supplied Accessories ..........................................4 Before Using This Unit ........................................5 Installing the Batteries .....................................5 Using the Remote Controller ...........
Table of Contents—Continued Basic Operations Listening to the Radio Programming Radio Stations ............................ 34 Programming FM/AM Stations One by One – Preset Write................................................ 34 Programming FM Stations Automatically – Auto Preset ......................................................... 36 Listening to an FM/AM Station.......................... 37 Adjusting the Antenna ................................... 37 Using the Remote Controller.....................
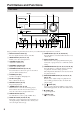
Part Names and Functions Front Panel Display 1 4 5 6 7 2 8 9 J K L 3 M NOPQR The page numbers in parentheses show where you can find the main explanation for each item. A Remote control sensor (5) L TIMER button (21, 44, 45, 48, 49, 52) Receives signals from the remote controller. Press this button to enable the timer function or set current time. B INPUT buttons (22, 34, 36, 37) Enable you to select an input source.
Part Names and Functions—Continued Display 1 2 3 4 5 CD MUTING S.BASS AUTO FM ST RDS 1GR MEM RDM NORMAL REPEAT 1 SOURCE GROUP TITLE TRACK TIMER 1 2 6 MP3 ALBUM ARTIST GROUP TRACK NAME DISC TOTAL REMAIN 3 4 SLEEP 7 8 9J K L 1 MUTING indicator This indicator flashes while the CD receiver is muted. B S.BASS indicator This indicator lights up when the super bass is selected. C Tuning indicators : This indicator lights up when the CD receiver is tuned into a radio station.
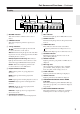
Part Names and Functions—Continued Rear Panel 1 B C D L R 5 ANTENNA 6 G PRE OUT IN OUT R IN L SPEAKERS CAUTION: SPEAKER IMPEDANCE 4 OHMS MIN. /SPEAKER OUT IN R L REMOTE CONTROL OPTICAL DIGITAL OUT H 9 The page numbers in parentheses show where you can find the main explanation for each item. A HDD IN/OUT (19) I OPTICAL DIGITAL OUT (20) Here you can connect an RI Dock or a CD recorder.
Remote Controller H Operation buttons for an Onkyo RI Dock or RC-628S A B 3 K L M I N O 4 P Q 5 R S 6 7 T 8 V 9 W J X J K U L M DISPLAY button (25, 28, 39, 43) N The page numbers in parentheses show where you can find the main explanation for each item. A STANDBY/ON button (22, 51) Switches between power standby and on. B SLEEP button (48) Used to program the Sleep timer, which turns off the power to the unit at a specified time.
Disc Notes Supported Discs Discs Made on Personal Computers The CD receiver supports the following discs. Discs made on personal computers, including those of a compatible format, may not work properly in the CD receiver because of incorrect settings in the disc burning software. Check the manuals supplied with your disc burning software for additional compatibility information.
Disc Notes—Continued • The following ID3 tags are supported: versions 1.0/1.1 and 2.2/2.3/2.4. Versions 2.5 and later are not supported. Normally, version 2.2/2.3/2.4 tags have priority and will be displayed regardless of the ID3 VER 1 preference on page 32. • For ID3 version 2 tags, the tag information recognized will be those embedded in the beginning of the file. We recommend that you include only title, artist name, and album name information in ID3 tags.
Connecting Antenna This section explains how to connect the supplied indoor FM antenna and AM loop antenna, and how to connect commercially available outdoor FM and AM antennas. The CD receiver won’t pick up any radio signals without any antenna connected, so you must connect the antenna to use the tuner. Connecting the AM Loop Antenna The supplied indoor AM loop antenna is for indoor use only. 1 Assemble the AM loop antenna, inserting the tabs into the base, as shown.
Connecting Antenna—Continued Connecting an Outdoor FM Antenna Connecting an Outdoor AM Antenna If you cannot achieve good reception with the supplied indoor FM antenna, try a commercially available outdoor FM antenna instead. If good reception cannot be achieved using the supplied AM loop antenna, an outdoor AM antenna can be used in addition to the loop antenna, as shown.
Connecting Speakers Connecting the Speakers • Connect the right channel speaker to the R speaker connector on the CD receiver, and the left channel speaker to the L speaker connector. • Connect the “+” connector on each speaker to the “+” connectors on the CD receiver, and connect the “–” connector on each speaker to the “–” connectors on the CD receiver. Use the red wires of the speaker cables to connect the “+” connectors. Left channel speaker 1.
Connecting External Devices About Connections • Push plugs in all the way to make good connections (loose connections can cause noise or malfunctions). • To prevent interference, keep audio cables away from power cords and speaker cables. • Before making any connections, read the manuals supplied with your other components. • Don’t connect the power cord until you’ve completed and double-checked all connections. Connection Color Coding RCA-type audio connections are usually color-coded: red and white.
Connecting External Devices—Continued Connection for TV Audio Signal Connect the LINE IN terminal on the CD receiver and an audio output terminal on the TV. CD receiver’s rear panel R L white IN OUT red IN red white OUT Analog audio cable (RCA) IN R L : Signal flow Tip: To output sound from TV, switch the input selector to LINE. Connecting an Onkyo Stereo Cassette Tape Deck The following diagram illustrates how to connect an optional Onkyo stereo cassette tape deck.
Connecting External Devices—Continued Connecting an RI Dock (Remote Interactive Dock) The following diagram illustrates how to connect the Onkyo Remote Interactive Dock (RI Dock). Connect the HDD IN jacks on the CD receiver to the AUDIO OUT jacks on the RI Dock.
Connecting External Devices—Continued Connecting an Onkyo Compact Disc Recorder The following diagram illustrates how to connect an optional Onkyo compact disc recorder. Connect the CD receiver HDD OUT jacks to the disc recorder’s IN (REC) jacks. Connect the CD receiver HDD IN jacks to the disc recorder’s OUT (PLAY) jacks. About the OPTICAL DIGITAL OUT Connector You can connect a CD or DAT recorder that has an optical digital audio input to the CD receiver for digital recording.
Connecting the Power Cord When the power cord is connected to the AC outlet, the CD receiver enters Standby mode. The STANDBY indicator lights up. When you want to set the clock using the CD receiver’s ACCUCLOCK function, the FM antenna needs to be connected for receiving the RDS radio broadcasts. For more information, see page 14.
Understanding Common Operations STANDBY/ ON VOLUME INPUT buttons INPUT buttons VOLUME / STANDBY/ON STANDBY indicator Turning the Unit On and Standby CD receiver Remote controller Press STANDBY/ON on the unit or on the remote controller. If you press the same button again, the unit will turn off and enter Standby mode.
Understanding Common Operations—Continued Adjust sound quality during playback with CD or radio, etc. MUTING 2 1 S.BASS Adjusting Bass Adjusting Treble 1 Press TONE repeatedly to select “Bass.” 1 Press TONE repeatedly to select “Treble.” 2 Press / to adjust, and ENTER to set. • The factory default value is set to “±0”; you can adjust the value by increment or decrement of 2 steps between –10 and +10. • To adjust treble, press ENTER.
Playing a CD 1- 1 Selecting the Track to Play Display 1- 2 2 MULTI JOG 1 Insert a CD (Compact Disc). 1 Press to extend the disc tray. 2 Place the CD in the tray with the label side facing up. If you play a 8 cm CD, place it in the center circle of the tray. Audio-CD “DISC TOTAL” Lights up while the disc information is displayed.
Playing a CD—Continued Using the Remote Controller Press the number buttons as described in the examples below to play back the desired track. The track to play Press 8 Press to change display information. 10 34 Adjust the volume level. Press VOLUME to raise the level and VOLUME to lower the level. represents the tens digit. For MP3 discs, tracks in the current group can be selected. Press to switch the source to CD. Press to locate a particular point in a track. Press to stop playback.
Playing a CD—Continued Selecting MP3s 1 While playback is stopped, press GROUP for 2 seconds. The CD receiver enters Navigation mode. MP3 CDs may store a group containing groups across some hierarchies as shown in the illustration below. In MP3 CDs, you can use the Navigation and All Group modes to locate track stored on the CDs. When locating a track, the Navigation mode allows you to trace through the hierarchies while the All Group mode to select the group directly.
Playing a CD—Continued Selecting MP3 Tracks in All Group Mode If you want to operate the control during playback, press GROUP and select a group by using MULTI JOG, and then press it. Playback is switched to the group, now you can select any track by using MULTI JOG. 2-4 ■ Pausing the Selected Track To pause the selected track, press / To resume playback, press / . . ■ Cancelling Navigation or All Group mode To cancel Navigation mode or All Group mode while selecting MP3 tracks, press .
Playing a CD—Continued Selecting MP3 Tracks in 1-Group Mode Displaying Information on MP3 Discs Perform the procedures below to select one group for playback. This operation is available in Normal mode. 1 While playback is stopped, press GROUP. The CD receiver enters All Group mode and the name of the first group appears on the display.
Various Ways to Play CDs Different playback modes are available in addition to normal playback. • “--:--” appears when the total time meets or exceeds 99 minutes 59 seconds. • You can program up to 25 tracks for a CD. If you try to program more tracks, the unit displays “Memory Full.” Memory Playback You can select and store track numbers (up to 25) in a desired playback order. 3 Press / to start Memory play.
Various Ways to Play CDs—Continued Random Playback Repeat/1 Track Repeat Playback All tracks on the disc will be shuffled, then played back. Display • The 1 Track Repeat mode repeatedly plays back one track on the CD. • You can combine Repeat mode with Memory, 1GR (MP3 CD only), or Random playback mode. The 1 Track Repeat mode is available only in combination with normal playback. 2 1 • You can execute this function only when the input source is CD and the unit is stopped.
Various Ways to Play CDs—Continued Cancelling the Playback Mode Using the remote controller 2 Display REPEAT 1 2 1 REPEAT Cancels Memory and Random modes • You can execute this function only when the input source is CD and the unit is stopped. 1 Press 2 Press YES/MODE repeatedly until NORMAL indicator lights in the display. to stop playback. Cancels Repeat or 1 Track Repeat mode Press REPEAT repeatedly until neither the REPEAT or REPEAT 1 indicator lights in the display.
MP3 Preferences Setting the MP3 Preferences This section explains how to set various preferences for MP3 discs. Using the remote controller 1 2-5 2, 4 1 3, 5 You can set the MP3 preferences while the disc playback is stopped during normal playback mode. 1 Press EDIT/NO/CLEAR. CD MP3 NORMAL Items 2 3 4 5 Turn MULTI JOG to select the desired item. For details on the preferences, see the next section. Press MULTI JOG. Turn MULTI JOG to select your preferred option. Press MULTI JOG.
MP3 Preferences—Continued CD Extra? (Audio/MP3) This preference applies to CD Extra discs and determines whether music in the audio session or MP3 tracks in the data session are played. Joliet? (Use SVD/ISO9660) This preference applies to MP3 discs in Joliet format and determines whether the CD receiver reads the SVD data or treats the disc as an ISO 9660 disc. Normally, this preference doesn’t need to be changed.
Programming Radio Stations Programming FM/AM Stations One by One – Preset Write You can store the frequencies of stations one by one manually into the preset memory channels. This is useful when you want to program the stations in your favorite order. In addition to this method, FM has “Auto Preset” mode to store frequencies automatically. Before auto presetting Display • You can preset up to 30 channels including both FM and AM stations.
Programming Radio Stations—Continued If “Overwrite?” appears Using the remote controller The channel you’ve selected is registered already. • To register the new radio station by deleting the existing radio station • To cancel presetting 3 Press YES/MODE. Press EDIT/NO/CLEAR. If “Memory Full” appears 1 2 5 4, 6 The FM/AM stations have already been programmed into all 30 channels. Delete unnecessary stations (page 41) and try again. 7 Repeat steps 2 to 6 to preset the next channel.
Programming Radio Stations—Continued Programming FM Stations Automatically – Auto Preset Auto presets store the frequencies of radio stations into memory so you can select your favorite channels without tuning manually. Radio station signals can be automatically located and stored. This function does not apply to AM stations (see page 34). Before auto presetting Display If any radio stations are preset before you start the auto preset procedure, they will be replaced with new presets.
Listening to an FM/AM Station First, program the stations into preset channels (see pages 34 and 36). Display Using the remote controller 1 2 Turn on the power to the unit before you start the procedure. 1 1 2 Select FM or AM. Press the INPUT or button to select FM or AM. The channel selected most recently will be recalled. AUTO FM ST SOURCE 2 Turn MULTI JOG or press the dial repeatedly to select the desired preset channel.
Listening to an FM/AM Station—Continued Using the Remote Controller Press the number buttons as described in the examples below to select the desired preset channel. Preset channel Press 8 10 22 Adjust the volume level. (Pressing VOLUME increases the volume level, and pressing VOLUME decreases the level.) represents the tens digit. Selects an FM/AM station. Selects a preset channel. Enables you to manually tune in a broadcast station.
Listening to an FM/AM Station—Continued Switching the Display Information DISPLAY DISPLAY Repeatedly pressing DISPLAY on the remote controller or on the unit toggles between two types of information display. FM/AM Frequency SOURCE Preset channel name (*) NAME * If a given preset channel is not named, the unit displays “No Name,” then indicates the frequency. See “Naming a Preset Channel” on page 42.
Changing the FM/AM Preset Channels Using the delete and copy functions, you can delete preset stations, copy a preset station to another channel, or change the channel number. 3 Tips for Changing the Preset Channels Press MULTI JOG. SOURCE To change the channel number: Use the copy and delete functions. For example, if you wish to change channel 4 (which has an FM station programmed) to channel 6 (an empty channel): 4 1 Copy the station in channel 4 to channel 6. 2 Delete the station in channel 4.
Changing the FM/AM Preset Channels—Continued Erasing a Preset Channel – Preset Erase Using the remote controller 2 Display 2-4 2 2 1 3, 4 Call the preset channel you wish to erase. SOURCE 2 Press EDIT/NO/CLEAR and turn MULTI JOG until “PresetErase?” appears in the display. 3 Press MULTI JOG. A message requesting confirmation appears in the display. To stop erasing, press EDIT/NO/ CLEAR. 4 Press MULTI JOG. “Complete” appears in the display. The preset channel is erased.
Naming Preset Channels You can name FM/AM preset channels. 4 Naming a Preset Channel Turn MULTI JOG to select the character, then press it to enter. Repeat this step for the next character. If you wish to change the type of characters, repeat Step 3, then proceed with this step. After you select the preset channel to name, execute “Entering a name” as described below. You can enter up to eight characters per name. To cancel the characters, press and hold EDIT/NO/CLEAR for more than two seconds.
Naming Preset Channels—Continued Inserting a Character 1 Press EDIT/NO/CLEAR. 2 Press ENTER. 3 Press DISPLAY repeatedly until the character type you wish to enter appears in the display. Each press of the DISPLAY button switches the type of characters. If the unit is not in “Name In” mode, execute steps 1 and 2 in “Entering a Name,” then follow the steps below. 1 Press / repeatedly until the character following the desired point of insertion flashes.
Setting the Clock Setting ACCUCLOCK to Use a Specific Station The ACCUCLOCK function normally uses the FM station with the strongest signal to set the clock. If the clock cannot be set properly using that station, you can specify which FM station the ACCUCLOCK function should use. This must be an FM station that supports RDS CT (Clock Time) information. 1 Press TIMER. “Clock” appears on the display. If the clock has already been set, a timer option appears instead.
Setting the Clock—Continued Setting the Clock Manually You can select either the 12-hour or 24-hour display. (This section explains how to set the time based on the 24-hour display.) 7 Turn MULTI JOG to set the current time. You can also use the number buttons on the remote controller. Display DISPLAY button To switch between the am and pm indicators, press the >10 button on the remote controller. EDIT/ NO/ CLEAR STANDBY/ON 1 2-8 1 Press TIMER repeatedly until “Clock” appears in the display.
Setting the Clock—Continued Checking the Time and the Day of the Week To check the time and the day of the week, press CLOCK CALL on the remote controller. CLOCK CALL The clock appears for eight seconds in Standby mode. To Switch between the 12-hour and 24-hour Displays Press DISPLAY while the current time is indicated on the display.
Using the Timer Functions The CD receiver features three timer functions: Sleep, Once, and Every timer. About the Timers Selecting a timer number You can set up to four timers. Timer operation types • Timer Play: The specified component starts playback at the specified time. • Timer Rec: The specified component starts recording at the specified time. • The Timer Rec operation is available for recording on an Onkyo cassette tape deck that features an connector connected to the CD receiver.
Using the Timer Functions—Continued Using the Sleep Timer Using the unit Using the remote controller The Sleep timer can be set for 10 to 90 minutes, in intervals of 10 minutes. SLEEP You can set the Sleep timer for 10 to 90 minutes, in intervals of 10 minutes. It is also possible to set the timer from 1 to 99 in one-minute increments is also possible using MULTI JOG. Display 1, 2 Press SLEEP. “Sleep 90” appears in the display, indicating the unit will turn off in 90 minutes.
Using the Timer Functions—Continued Programming a Timer Before programming a timer for an AM/FM broadcast, program the desired broadcast stations to the preset channels. (See pages 34 and 36) Notes: • You cannot use the timer functions unless the clock is set. • If you do not operate the buttons for 60 seconds during the timer setting, the unit returns to its normal display. • The following procedures are performed on the unit.
Using the Timer Functions—Continued 4 CD receiver Press MULTI JOG. Remote controller (Only for Timer Rec) Check connections and settings to the cassette tape decks. 5 CD receiver Turn MULTI JOG to select “Once” or “Every.” Remote controller The Once timer operates only one time. The Every timer operates every week. After selecting one, press MULTI JOG. If you selected “Once,” the timer operates only one time on the specified day. Turn MULTI JOG to select the day(s) of the week.
Using the Timer Functions—Continued 6 CD receiver Remote controller Turn MULTI JOG to set the On time of the timer operation. You can also use the number buttons on the remote controller. When the desired time is displayed, press MULTI JOG. For example, to set 7:29, press 10/0, 7, 2, then 9. Notes: • When you set the On time, the Off time is automatically set to one hour later. • During timer recording, the first few seconds may not be recorded. Set the On time to one minute earlier.
Using the Timer Functions—Continued Switching the Timer On and Off Viewing the Timer Settings • You can use this function to cancel or resume the programmed timer operation. • You cannot program the timers unless the clock is set. Display 1 Display 1, 2 1 2 1 1 Repeatedly press TIMER to display the desired timer number, then press MULTI JOG. 2 Press MULTI JOG to view the subsequent timer settings. Repeatedly press TIMER to display the desired timer number.
Troubleshooting Problems may be caused by any component connected to this unit. Please check the table below, cross-referencing the instruction manuals for the other components. Power The power to the system is not turned on. • Make sure that the power cable is plugged into the AC outlet. • Unplug the power cable from the AC outlet, wait for 10 seconds or more, then plug the cable in again. The power is turned off during the operation.
Troubleshooting—Continued The disc will not play. • Make sure that the disc has been loaded on the disc tray correctly. The disc should be inserted with the playback side facing down. • Check to see if the disc’s surface is dirty. • If condensation is suspected, wait for about one hour after you turn on the power to the unit before playing the disc. • The CD-R/RW disc is nonstandard. See “Disc Notes” on page 12. It takes a long time until playback starts.
Troubleshooting—Continued No sound is heard from the connected device. • Make sure that the optical digital cable is not bent or damaged. • Set the digital output to PCM, because the CD receiver supports only PCM signals. The turntable sounds still. • Make sure the turntable has a built in phono equalizer. • If the turntable has no phono equalizer built in, you must provide one separately. Timer Function Timer playback or recording does not work. • The clock should be set correctly.
Specifications General Tuner Section Power Supply: AC 230–240 V, 50 Hz Power Consumption: 68 W Stand-by Power Consumption: 0.3 W Dimensions (W x H x D):205 W x 147 H x 356 D mm Weight: 4.