Getting Started .......................... 2 CD Receiver System Connections ............................ 13 CS-245BT Basic Operations .................... 16 CD Receiver (CR-245BT) Speakers (D-T05) Playing CDs ............................. 18 Instruction Manual Playing Your iPod/iPhone/iPad ..................... 21 Playing Back via Bluetooth ................................. 22 Listening to the Radio ............ 23 Thank you for purchasing an Onkyo CD Receiver System.
WARNING: TO REDUCE THE RISK OF FIRE OR ELECTRIC SHOCK, DO NOT EXPOSE THIS APPARATUS TO RAIN OR MOISTURE. CAUTION: TO REDUCE THE RISK OF ELECTRIC SHOCK, DO NOT REMOVE COVER (OR BACK). NO USER-SERVICEABLE PARTS INSIDE. REFER SERVICING TO QUALIFIED SERVICE PERSONNEL.
Precautions 1. Recording Copyright—Unless it’s for personal use only, recording copyrighted material is illegal without the permission of the copyright holder. 2. AC Fuse—The AC fuse inside the unit is not userserviceable. If you cannot turn on the unit, contact your Onkyo dealer. 3. Care—Occasionally you should dust the unit all over with a soft cloth. For stubborn stains, use a soft cloth dampened with a weak solution of mild detergent and water. Dry the unit immediately afterwards with a clean cloth.
Precautions—Continued THIS PRODUCT UTILIZES A LASER. USE OF CONTROLS OR ADJUSTMENTS OR PERFORMANCE OF PROCEDURES OTHER THAN THOSE SPECIFIED HEREIN MAY RESULT IN HAZARDOUS RADIATION EXPOSURE. The label on the right is applied on the rear panel. 1. This unit is a CLASS 1 LASER PRODUCT and employs a laser inside the cabinet. 2. To prevent the laser from being exposed, do not remove the cover. Refer servicing to qualified personnel.
Precautions—Continued Hierbij verklaart Onkyo Corporation dat het toestel l CR-245BT in overeenstemming is met de essentiële eisen en de andere relevante bepalingen van richtlijn 1999/5/EG. Niniejszym Onkyo Corporation deklaruje że CR-245BT jest zgodny z zasadniczymi wymaganiami i innymi właściwymi postanowieniami Dyrektywy 1999/5/EC. Eu, Onkyo Corporation, declaro que o CR-245BT cumpre os requisitos essenciais e outras provisões relevantes da Directiva 1999/5/EC.
Package Contents When using the remote controller, point it toward the CD receiver’s remote control sensor, as shown below. Make sure you have the following items: CD Receiver (CR-245BT) CR-245BT Remote controller (RC-854C) Remote control sensor Indoor FM antenna Power cord (Connector type varies from country to country.) Speakers (D-T05) Speaker cables (1 6 ft.
Features General • • • • • • Super Bass (S.
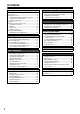
Contents Getting Started Playing Your iPod/iPhone/iPad Important Safety Instructions..................................... 2 Precautions................................................................ 3 Package Contents ..................................................... 6 Using the Included Floor Pads for speakers.......... 6 Using the Remote Controller ................................. 6 Replacing the Battery ............................................ 6 Features ......................................
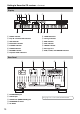
Getting to Know the CD receiver Top and Front Panels Top Panel a b c d e f g Front Panel h i j k l m For detailed information, see the pages in parentheses.
Getting to Know the CD receiver—Continued Display a b c i d e f j k l g m h n o a SLEEP indicator i TIMER indicators b Play 1 and Pause 3 indicators j Tuning indicators c USB indicator k RDS indicator d Bluetooth indicators l FILE indicator e FOLDER indicator m TRACK indicator f S.
Getting to Know the CD receiver—Continued Remote Controller a b m c n d e f g h i j k l o p q r s t For detailed information, see the pages in parentheses.
Disc (Audio CD and MP3) and USB Flash Drive (MP3) Notes Precautions for Playback Playback from USB Flash Drives Compact discs (CDs) with the following logo on the label surface can be used. Do not use discs designed for purposes other than audio, such as CD-ROMs for PC use. Abnormal noise could damage the CD receiver. MP3 files recorded on a USB flash drive can be played with the CD receiver. • USB flash drives formatted in FAT16 or FAT32 are supported. • Only MP3 files with the extension “.MP3” or “.
Disc (Audio CD and MP3) and USB Flash Drive (MP3) Notes—Continued Precautions for Inkjet Printable Discs Caring for Discs Do not leave a CD-R/CR-RW having a label printed with an inkjet printer in the CD receiver for a long time. The disc could get stuck in the CD receiver, or could damage the CD receiver. Remove the disc from the CD receiver when not being played, and store it in a case. A freshly printed disc will stick easily, and should not be played immediately.
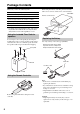
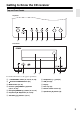
Connecting FM Antenna—Continued ■ Using a TV / FM Antenna Splitter It’s best not to use the same antenna for both FM and TV reception, as this can cause interference problems. If circumstances demand it, use a TV / FM antenna splitter, as shown. TV / FM antenna splitter To CD receiver To TV (or VCR) Connecting Speakers Right speaker Left speaker Speaker cable Red line side • Pay close attention to speaker wiring polarity.
Connecting Other Components CD receiver Analog audio cable (RCA) Powered subwoofer To wall outlet (Connector type varies from country to country.) e.g., cassette tape deck About Connections • Before making any connections, read the manuals supplied with your other components. • Don’t connect the power cord until you’ve completed and double-checked all connections. Push plugs in all the way to make good connections (loose connections can cause noise or malfunctions).
Basic Operations This section describes the procedure for using the remote controller, unless otherwise specified. Turning On the CD receiver Press the On/Standby [8] button. The CD receiver comes on, and the display lights up. Press the On/Standby [8] button again to set the CD receiver to Standby. You can also use the [8 ON/STANDBY] button on the CD receiver.
Basic Operations—Continued Adjusting the Bass and Treble Press the [BASS] or [TREBLE] button, and then use the [q]/[w] buttons to adjust the bass or treble, respectively. The default setting is “0”. You can adjust the bass and treble from –5 to +5. While adjusting the bass or treble, you can press the [CLEAR] button to return the setting to “0”. Note: • If you press no buttons for about 5 seconds, the previous display will appear automatically. Using Super Bass To turn on Super Bass, press the [S.
Playing CDs This section describes the procedure for using the remote controller, unless otherwise specified. Playing CDs 1 Press the CD receiver’s [0] button to open the disc tray. Tip: • Pressing the [0] button while the CD receiver is on Standby will turn on the CD receiver and open the disc tray. 2 Place CD on the tray with the label-side facing up. Place 8 cm CDs in the center of the tray. 3 To start playback, press the CD receiver’s [1/3] button.
Playing CDs—Continued Selecting MP3 Files The files on an MP3 CD can be located at the disc’s root level or within a folder. A folder can contain additional folders, with other folders inside them in a hierarchical structure. A maximum of 648 files and folders (total) can be shown within a folder. Files and folders are listed alphabetically without distinction. If you don’t select a specific MP3 file or folder for playback, all of the MP3 files will be played in numerical order starting with file #1.
Playing CDs—Continued Random Playback With random playback, all of the tracks on the disc are played in random order. Random playback can also be used in conjunction with repeat playback. Note: • In the case of MP3 files, the same song might be played. Random playback can be set when the input source is set to CD or USB. 1 Press the [SHUFFLE] button until the RANDOM indicator appears. 2 To start random playback, press the Play/ Pause [1/3] button.
Playing Your iPod/iPhone/iPad This section describes the procedure for using the remote controller, unless otherwise specified. • Before using your iPod/iPhone/iPad with the CD receiver, be sure to update your iPod/iPhone/iPad with the latest software, available from the Apple Web site. • Depending on your iPod/iPhone/iPad, or the type of content being played, some functions may not work as expected.
Playing Back via Bluetooth Listening to an audio from Bluetooth device Note: • If your mobile phone supports A2DP protocol, its music will play through the CD receiver. • You can build a Bluetooth connection with a mobile phone, an iPod or any other Bluetooth-enabled devices. 1 Press the [INPUT] button on the top panel repeatedly to select the “Bluetooth” input. Tip: • Alternatively, you can use the remote controller’s [ /LINE] button. 2 Press the [ Bluetooth PAIRING] button on the top panel.
Listening to the Radio This section describes the procedure for using the remote controller, unless otherwise specified. Tuning into FM Radio Stations When tuned to a station, the Tuned ( ) indicator appears. When receiving a stereo FM signal, the FM ST indicator appears as well. The [MODE] button is used to select Auto mode or Mono mode. In Auto mode, the output will be stereo or mono depending on the station being received. In Mono mode, the output will be mono regardless of the station.
Listening to the Radio—Continued Presetting FM Stations Manually With the Preset Write function, you can manually preset individual FM radio stations. Presets make it easy to select your favorite stations and eliminate the need to tune the radio manually each time you want to change stations. FM stations can also be preset automatically (see page 23). Receiving RDS Press the [DISPLAY] button repeatedly to display the following RDS information.
Playing a USB Flash Drive This section describes the procedure for using the remote controller, unless otherwise specified. Setting the Clock This section describes the procedure for using the remote controller, unless otherwise specified. Setting the Clock 1 Press the [iPod] button to select “iPod”. Alternatively, you can use the CD receiver’s [INPUT] button. 1 Press the [TIMER] button repeatedly until “Clock” appears. 2 Press and hold the [MODE] button until “USB” appears (about 3 seconds).
Using the Timer This section describes the procedure for using the remote controller, unless otherwise specified. The CD receiver has a programmable timer for automated playback, and a sleep timer for turning the CD receiver off after a specified period. You can also use the alarm playback function of your iPod to initiate timer playback on the CD receiver. The timer can be used to start FM, CD, iPod/USB, or LINE playback at a specified time.
Using the Timer—Continued Turning Timer On and Off Once a timer has been programmed, you can turn it on or off as necessary. For example, while you’re on holiday, you may want to turn off the timer you use as an early morning alarm. 1 Press the [TIMER] button repeatedly until “Timer On” or “Timer Off” appears. 2 Use the arrow [q]/[w] buttons to select either “Timer On” (set) or “Timer Off” (cancel), and then press the [ENTER] button.
Troubleshooting If you have any trouble using the CD receiver, look for a solution in this section. If you can’t resolve the issue yourself, try resetting the CD receiver before contacting your Onkyo dealer. To reset the receiver to its factory defaults, turn it on and, while holding down the CD receiver’s Previous [7] button, press the [8 ON/STANDBY] button. When the display indicates “RESET”, release the buttons. After a while, the CD receiver will enter standby mode.
Troubleshooting—Continued Audio performance. • Audio performance will be at its best about 10 to 30 minutes after the CD receiver has been turned on and had time to warm up. • Using cable ties to bundle audio cables with speaker or power cables may degrade the sound quality, so don’t do it. CD Playback The disc will not play. • • • • Make sure the disc has been loaded correctly, with the label-side facing up. Check to see if the surface of the disc is dirty (see page 12).
Troubleshooting—Continued Bluetooth Bluetooth connection cannot be built. • When building a Bluetooth connection between the CD receiver and your device for the first time, if the connection is fail, you need to power off your device and power on again to clear the device name, and build the connection again (see page 22). USB Flash Drive Playback Can’t access the music files on a USB flash drive. • Check if “USB” appears on the display of the CD receiver.
Troubleshooting—Continued External Components No sound is heard from your turntable. • Make sure the turntable has a built-in phono equalizer. If the turntable doesn’t have a phono equalizer built-in, you must provide one. Timer The timer doesn’t work. • Make sure the clock has been set correctly (see page 25). • Timed operation will fail if the CD receiver is on at the specified On time, so make sure it’s set to Standby (see page 26).
Specifications Amplifier General Rated output power (IEC) 2ch × 15 W (6 Ω, 1 kHz, 2ch driven) THD + N (total harmonic distortion + N ) 10% (Power Rated) 0.5% (1 kHz 1W) Damping factor 60 (1 kHz, 8 Ω) Input sensitivity and impedance 1000 mV/47 kΩ (LINE) Frequency response 40 Hz - 20 kHz/+0 dB, –3 dB Tone control +10 dB, –10 dB, 100 Hz (BASS) +10 dB, –10 dB, 10 kHz (TREBLE) +4 dB/+8 dB, 80 Hz (S.
Memo 33
Memo 34
Memo 35
2-1, Nisshin-cho, Neyagawa-shi, OSAKA 572-8540, JAPAN Tel: 072-831-8023 Fax: 072-831-8163 http://www.onkyo.com/ 18 Park Way, Upper Saddle River, N.J. 07458, U.S.A. Tel: 800-229-1687, 201-785-2600 Fax: 201-785-2650 http://www.us.onkyo.com/ Liegnitzerstrasse 6, 82194 Groebenzell, GERMANY Tel: +49-8142-4401-0 Fax: +49-8142-4208-213 http://www.eu.onkyo.