Contents CD Receiver CR-545 CR-545UKD Getting Started.................................... 2 Connections .................................... 13 Instruction Manual Basic Operations ............................ 18 Disc Playback ................................. 20 iPod / iPhone Playback .................... 27 Thank you for purchasing an Onkyo CD receiver. Please read this manual thoroughly before making any connections and plugging it in.
WARNING: TO REDUCE THE RISK OF FIRE OR ELECTRIC SHOCK, DO NOT EXPOSE THIS APPARATUS TO RAIN OR MOISTURE. CAUTION: TO REDUCE THE RISK OF ELECTRIC SHOCK, DO NOT REMOVE COVER (OR BACK). NO USER-SERVICEABLE PARTS INSIDE. REFER SERVICING TO QUALIFIED SERVICE PERSONNEL.
Precautions 1. Recording Copyright—Unless it’s for personal use only, recording copyrighted material is illegal without the permission of the copyright holder. 2. AC Fuse—The AC fuse inside the unit is not userserviceable. If you cannot turn on the unit, contact your Onkyo dealer. 3. Care—Occasionally you should dust the unit all over with a soft cloth. For stubborn stains, use a soft cloth dampened with a weak solution of mild detergent and water. Dry the unit immediately afterwards with a clean cloth.
Precautions—Continued This unit contains a semiconductor laser system and is classified as a “CLASS 1 LASER PRODUCT”. So, to use this model properly, read this Instruction Manual carefully. In case of any trouble, please contact the store where you purchased the unit. To prevent being exposed to the laser beam, do not try to open the enclosure. CAUTION: CLASS 1M VISIBLE AND INVISIBLE LASER RADIATION WHEN OPEN. DO NOT VIEW DIRECTLY WITH OPTICAL INSTRUMENTS. THIS PRODUCT UTILIZES A LASER.
Features Amplifier • • • Supplied Accessories Make sure you have the following accessories: Digital Amplifier 1 Audio Input Subwoofer Pre Out CD Player • • • • Plays CDs, MP3 / WMA*1, CD-Rs and CD-RWs*2 25 Track Programming 3 Repeat Modes (Track / Full / 1 Folder) 4 Play Modes (Normal / Random / Memory / 1 Folder) Remote controller and two batteries (R6 / AA) Indoor FM antenna (CR-545) iPod / iPhone *3 • • • Made for iPod touch (1st and 2nd generation), iPod classic, and iPod nano (2nd, 3rd, 4th, a
Before Using the CD Receiver Installing the Batteries 1 Open the battery compartment, as shown. Using the Remote Controller When you operate the remote controller, point it at the CD receiver’s remote control sensor. Remote control sensor 2 3 Insert two batteries (R6 / AA) into the battery compartment. Carefully follow the polarity diagram (positive (+) and negative (–) symbols) inside the battery compartment. After the batteries are installed and seated correctly, attach the compartment cover.
Contents Getting Started iPod / iPhone Playback Important Safety Instructions ................ 2 Precautions .......................................... 3 Features ............................................... 5 Supplied Accessories ........................... 5 Before Using the CD Receiver ............. 6 Installing the Batteries ....................... 6 Using the Remote Controller ............. 6 Getting to Know the CD Receiver ........ 8 Front Panel .......................................
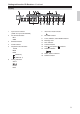
Getting to Know the CD Receiver Front Panel 1 INPUT button 9 2 ON/STANDBY button 10 Disc tray 3 STANDBY indicator 11 4 Remote control sensor Previous / Next [ or PRESET [ ] / [ 5 Display 12 Stop [ ] button 6 VOLUME control knob 13 Play/Pause [ 7 TONE/BALANCE button / knob 14 Open/Close [ 8 PHONES jack USB port ]/[ ] buttons ] buttons ] button ] button Rear Panel 1 LINE IN 5 SUBWOOFER PRE OUT 2 VIDEO OUT 6 Power cord 3 AM ANTENNA (CR-545) 7 FM ANTENNA (CR-545) 4 SP
Getting to Know the CD Receiver—Continued Display 1 Input source indicator (“DAB” is only for CR-545UKD) 7 iPod menu mode indicator 2 File format indicators 8 MUTING indicator MP3 9 TITLE, ARTIST, and ALBUM indicators WMA 10 Message area 3 S.
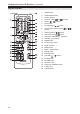
Getting to Know the CD Receiver—Continued Remote Controller 1 10 SLEEP button 2 ON/STANDBY button 3 Number buttons 4 Previous / Next [ 5 INPUT [ 6 STOP button 7 CD Play/Pause [ 8 Fast Reverse / Fast Forward [ buttons 9 USB Play/Pause [ ] button 10 iPod Play/Pause [ ] button 11 PLAYLIST / FOLDER [] / []buttons 12 ALBUM [] / [] buttons 13 TIMER button 14 CLOCK CALL button 15 DISPLAY button 16 MODE button ]/[ ]/[ ] buttons ] buttons ] button 17 MENU / CLEAR button 1
Disc Notes Precautions for Playback • A disc recorded on a personal computer may not play because of the application settings or environment. Record the disc with the proper format. (Contact the application maker for details.) • A disc with insufficient storage capacity may not playback properly. Compact discs (CDs) with the following logo on the label surface can be used. Do not use discs designed for purposes other than audio, such as CD-ROMs for PC use.
Disc Notes—Continued Precautions for Rental Discs Do not use discs with residue from cellophane tape, rental discs with labels which are peeling off, or discs with decorative labels. This type of disc could get stuck in the CD receiver, or could damage the CD receiver. Precautions for Inkjet Printable Discs Do not leave a CD-R/CR-RW having a label printed with an inkjet printer in the CD receiver for a long time. The disc could get stuck in the CD receiver, or could damage the CD receiver.
Connecting Antennas This section explains how to connect the supplied indoor FM antenna and AM loop antenna, and how to connect commercially available outdoor FM antenna. The CD receiver won’t pick up any radio signals without an antenna connected, so you must connect the antenna to use the tuner. Connecting the AM Loop Antenna (CR-545) The supplied indoor AM loop antenna is for indoor use only. 1 Assemble the AM loop antenna, inserting the tabs into the base, as shown.
Connecting Antennas—Continued Connecting the DAB / FM Antenna (CR-545UKD) The supplied indoor DAB / FM antenna is for indoor use only. 1 Attach the DAB / FM antenna, as shown. 2 Use thumbtacks or something similar to fix the DAB / FM antenna into position. Thumbtacks, etc. Caution: Be careful that you don’t injure yourself when using thumbtacks.
Connecting Speakers -Terminal postsStrip about 15 mm (5/8") of insulation from the ends of the speaker cables, and twist the bare wires tightly. Unscrew the terminal. Fully insert the bare wire, making sure that it’s touching the threaded shaft in the center. Screw the terminal tight. • • • • • Connect the right speaker to the CD receiver’s right (R) SPEAKERS terminals. Connect the left speaker to the left (L) SPEAKERS terminals.
Connecting Other Components About Connections • • Before making any connections, read the manuals supplied with your other components. Don’t connect the power cord until you’ve completed and double-checked all connections. Connection Color Coding RCA-type audio connections are usually color-coded: red and white. Use red plugs to connect right-channel audio inputs and outputs (typically labeled “R”). Use white plugs to connect left-channel audio inputs and outputs (typically labeled “L”).
Connecting Other Components —Continued Connecting a TV The CD receiver has a VIDEO OUT jack, which outputs video signal. When you see the contents of “videos” and “photos” in your iPod on TV, connect the cable as follows. Notes: • Before connecting the power cord, connect all of your speakers and AV components. • Turning on the CD receiver may cause a momentary power surge that might interfere with other electrical equipment on the same circuit.
Basic Operations Turning On the CD Receiver Using Headphones To turn on the CD receiver, press the [ON/STANDBY] button on the CD receiver or remote controller. The STANDBY indicator goes off. Press the [ON/STANDBY] button again to set the CD receiver to Standby. The STANDBY indicator lights up. Turn down the volume, then connect your stereo headphones to the PHONES minijack. The speakers output no sound while the headphones are connected.
Basic Operations —Continued Adjusting the Bass, Treble and Balance 1 Press the [TONE] button to select “Bass”. 2 Use the [ ]/[ ] buttons to adjust the bass. Press [ENTER], and then use the [ ]/[ ] buttons to adjust the treble. The default setting is “0”. You can adjust the bass and treble from –4 to +4. Press [ENTER], and then use the [ ]/[ ] buttons to adjust the balance. The default setting is “0”. You can adjust the balance from L+5 to 0, then 0 to R+5.
Disc Playback Using the CD Receiver 1 2 3 • MP3 / WMA DISC Display Press the [ ] button to open the disc tray. Tip: Pressing the [ ] button while the CD receiver is on Standby will turn on the CD receiver and open the disc tray. Place the CD on the tray with the label-side facing up. Place 8 cm CDs in the center of the tray. To start playback, press the [ ] button. The disc tray closes and playback starts. Then the “ ” indicator appears. To stop playback: Press the [ ] button.
Disc Playback—Continued Using the Remote Controller Press to select tracks • • Press the Previous [ ] button to locate the beginning of the currently playing or paused track. Press it repeatedly to select earlier tracks. Press the Next [ ] button repeatedly to select subsequent tracks. On MP3 / WMA DISC, you can select files in other folders (see page 22).
Disc Playback—Continued Selecting / Playing MP3 / WMA Files 2 On an MP3 / WMA DISC, MP3 / WMA files may be organized hierarchically, with folders containing files and subfolders, as shown below. On the CD receiver, all folders appear at the same level, making it easy to select folders regardless of the hierarchy. Use the [ ]/[ ] buttons to select the other folders. You can select any folder that contains MP3 / WMA files. To play the first file in the selected folder, go to Step 4.
Disc Playback—Continued 3 Use the number buttons to enter the file number. Playback starts. If a folder contains more than 99 MP3 / WMA files, doubledigit file numbers must be preceded by zeros. To specify file #5, press [>10], [0], [0], and [5]. - Artist name Name of the album (if tag present). - Album name Name of the album (if tag present).
Disc Playback—Continued 3 To start playback, press the [ENTER] or [ ] button. Playback will start with the first MP3 / WMA file in the specified folder and continue until all of the MP3 / WMA files in that folder have been played. Repeat Playback With repeat playback, you can play an entire CD repeatedly or play one track repeatedly. Random Playback With random playback, all of the tracks on the disc are played in random order. Random playback can be set only when playback is stopped.
Disc Playback—Continued 2 Removing Tracks from the Playlist • While memory playback is stopped, press the [MENU / CLEAR] button. Each press removes the last track from the playlist. • The playlist will be deleted when you cancel memory playback, select random playback, press the [ ] button to open the disc tray, or turn off the CD receiver. Use the [ ]/[ ] buttons to select the first track you want to add to the playlist, then press [ENTER].
Disc Playback—Continued Preferences MP3 / WMA Info? Select the MP3 / WMA file information to be displayed at the start of playback. The related information can be also switched with the [DISPLAY] button. File Name: (default) Title: File name, Folder name, Sampling rate, and Bitrate Title of the current file, Artist name, Album title Info Scroll? Select the method of scrolling the titles displayed at the start of playback. Not Display: The title is not displayed.
iPod / iPhone Playback When you select iPod as the input source, the headphones output no sound. If use headphones, connect it directly to iPod. Before using your iPod with the CD receiver, be sure to update your iPod with the latest software, available from the Apple Web site. If you leave your iPod paused when using it on its own, eventually it will go into hibernation. If you insert it into the CD receiver dock in this state, you’ll need to wait a few moments before your iPod is ready for use.
iPod / iPhone Playback—Continued Using the iPod / iPhone menu (only remote control) 1 Press the [MENU / CLEAR] button to display iPod menu on iPod. A dot indicator (iPod menu mode indicator) appears on the CD receiver’s display. To go to the upper iPod menu, press the [MENU / CLEAR] button. iPod menu mode indicator 2 3 Press the [ ]/[ ] button, and move the iPod menu item (highlight). Press the [ENTER] button to select the item. Notes: • iPod menu items can be moved only when the indicator is lit.
iPod / iPhone Playback—Continued Setting for iPod / iPhone Dimmer? Select the CD receiver’s display brightness. 1 Remove the iPod. 2 Press [MENU]. (default) 3 Select the desired setting item with the [ ]/[ ] buttons. 1: Dim 4 Press [ENTER]. 2: Dimmer 5 Select the desired selection with the [ ]/[ ] buttons. 6 Press [ENTER]. Off: Normal Preferences Charging? Select the method for charging iPod, which inserted to the CD receiver’s dock, during the standby state.
USB Playback The CD receiver can playback MP3 / WMA files that have been stored on USB Flash Drives. USB Flash Drive Folders and Files Supported USB Flash Drive and files On the USB Flash Drive, MP3 or WMA files may be organized in a hierarchically, with folders containing files and subfolders, as shown below. All folders appear at the same level regardless of the hierarchy. • • • • FAT16 and FAT32 formats (32K bytes or less cluster size) MPEG-1 Audio LAYER-3 files and files with sampling rate 32, 44.
USB Playback—Continued Playing Music Files on a USB Flash Drive This section explains how to play music files on a USB Flash Drive. Connect a USB Flash Drive as shown below. USB Port 1 Insert USB Flash Drive 2 Use the INPUT [ ] / [ ] buttons to select “USB”. • When no USB Flash Drive is connected, “USB No Media” will be displayed. • When there is no MP3 or WMA file in the USB Flash Drive, “No Files” will be displayed. 3 4 To start playback, press the [ ] button.
USB Playback—Continued • If non-compliant file chosen, “Not Support” appears on the display and playback the next compliant file. USB Flash Drive supports 65,280 files and 255 folders (root involved). The elapsed time may not appear accurately, when using variable bitrates (VBR) format files. Any copyrighted WMA files cannot be played.
USB Playback—Continued Displaying Music File Information You can display various information about the MP3 / WMA files currently playing, including tags such as title, artist name, and album name. During playback, press the [DISPLAY] button repeatedly to display the following music file information. File name: - Elapsed time: The length of time that the current MP3 or WMA file has been playing (default display). - Album name: Name of the album (if tag present).
Listening to the Radio Tuning into FM /AM Radio Stations Adjusting the Antennas Adjusting and installing the DAB / FM antenna Choose a location for the FM antenna while listening to an FM station. (For CR-545UKD, adjust the DAB antenna in the same way.) 1 When tuned into a station, the Tuned indicator appears. When tuned into a stereo FM station, the FM Stereo indicator appears as well.
Listening to the Radio—Continued Displaying FM/ AM Radio Information RT data is being received. *2 If the selected preset has no name, it will be skipped and the next Program Service Name will be displayed. Listening to DAB Digital Radio (CR-545UKD) Press the remote controller’s [DISPLAY] button repeatedly to display more radio information. FM / AM Frequency Preset name *1 *1 If the selected preset has no name, “No Name” appears briefly and then the frequency is displayed.
Listening to the Radio—Continued Selecting DAB Stations (CR-545UKD) 1 Use the [ ]/[ ] buttons to select the DAB stations. If a secondary service is available, a right angle bracket (>) is displayed. Press the [ ] button to listen to the secondary service. While the secondary service is selected, a left angle bracket (<) is displayed. Press the [ ] button to return to the primary service. When you select a station that you’ve selected a lot in the past, the letter F (short for Favorite) is displayed. 3.
Listening to the Radio—Continued • Tuning Aid? With the Tuning Aid, you can adjust the position and direction of the DAB antenna (see page 34 for adjusting the antenna) while monitoring the signal strength on the display. If the letter “B” appears on the display, it means the signal strength is Bad. If the letter “G” appears, it means the signal strength is Good. To make the letter “G” appear, adjust the antenna to get the best signal strength.
Listening to the Radio—Continued Presetting FM / AM Stations Manually With the Preset Write function, you can manually preset individual FM and AM radio stations. Presets make it easy to select your favorite stations and eliminate the need to tune the radio manually each time you want to change stations. FM stations can also be preset automatically (see page 37). 4 Use the [ ]/[ select a preset. 5 To store the station, press [ENTER].
Listening to the Radio—Continued Selecting Preset Stations Naming Presets (FM / AM only) You must store some presets before you can select them (see pages 37 and 38). You can name presets for easy identification. The preset name may contain of up to twelve characters. 1 2 Use the [TUNER] or INPUT [ ] / [ ] buttons to select “FM” or “AM”. (CR-545) The preset you selected the last time will still be selected. Use the [ ]/[ ] buttons to select a preset. Press the [ ] button to select the previous preset.
Listening to the Radio—Continued • Deleting characters: To delete characters, press the [CLEAR] button. The character at the cursor position will be deleted. If there is no character at the cursor position or to the right of it, the character to the left of the cursor will be deleted. • To continue inputting characters assigned to same button: Use the INPUT [ ] button, move the cursor and input the next character.
Listening to the Radio—Continued Erasing a Preset’s Name (FM / AM only) Adjusting the Display's Brightness With the following operation, all the preset’s names are erased. 1 Select the preset name you want to erase (see page 39). 2 Press the [MENU / CLEAR] button, and then use the [ ]/[ ] buttons to select “NameErase?”. 3 To erase the preset’s name, press the [ENTER] button. The preset’s name is erased and “Complete” appears on the display.
Setting the Clock 8 Press [ENTER]. The clock is set and the second dot starts flashing. The AccuClock function sets the clock automatically the very first time the CD receiver is plugged into a wall outlet (see page 17). If for some reason the clock cannot be set automatically, use the following procedure to set it manually. Note that when the clock is set manually, it will not be updated automatically. 1 Press the [TIMER] button repeatedly until “Clock” appears.
Setting the Clock—Continued 5 Use the [ ]/[ ]buttons to specify the frequency of a station that’s broadcasting RDS CT information. 6 Press [ENTER] The specified frequency will be used the next time the AccuClock function runs. If the specified station is not broadcasting RDS, “Not RDS” will be displayed, in which case you should return to step 5 and specify another frequency.
Using the Timers The CD receiver has four programmable timers for automated playback, and a sleep timer for turning the CD receiver off after a specified period. The timers can be used to start all the playback at a specified time. You could, for example, use a timer to turn on the CD receiver every morning, just like a radio alarm clock. About the Timers The various settings for the four programmable timers are explained here. For details on the sleep timer, see page 46.
Setting the Clock—Continued 3 (CR-545) If you selected FM or AM, use the [ ]/[ ] buttons to select the radio preset, and then press [ENTER]. (CR-545UKD) If you selected DAB or FM, use the [ ]/[ ] buttons to select the radio preset, and then press [ENTER]. 8 You can also use the remote controller’s number buttons to enter the time. For example, to enter 7:29, press [7], [2], and [9]. Note: Once the On time is set, the Off time is automatically set to one hour later.
Using the Timers—Continued Turning Timers On and Off Using the Sleep Timer Once a timer has been programmed, you can turn it on or off as necessary. For example, while you’re on holiday, you may want to turn off the timer you use as an early-morning alarm. With the sleep timer, you can set the CD receiver so that it automatically turns off after a specified period. 1 Press the [TIMER] button repeatedly to select timer 1, 2, 3, or 4. 2 Use the [ ]/[ ] buttons to select “Timer On” or “Timer Off”.
Troubleshooting If you have any trouble using the CD receiver, look for a solution in this section. How to reset to factory default? 1. Before unplug the power-supply coRD, set the CD receiver in the STANDBY state. 2. While holding down the [ON/STANDBY] button on the main unit, plug the power-supply coRD. "RESET" appears on the display, then the CD receiver is in the STANDBY state. Power Can’t turn on the CD receiver. • Make sure that the power cord is properly plugged into the wall outlet (see page 17).
Troubleshooting—Continued CD Playback Playback jumps. • The CD receiver is being subjected to vibration or the disc is scratched or dirty (see page 11 to 12). Can’t add tracks to the playlist for memory playback. • Make sure there’s a disc in the CD receiver. Also, you can only add valid track numbers. For example, if the CD contains 11 tracks, you cannot add track #12. The disc will not play. • Make sure the disc has been loaded correctly, with the label-side facing up.
Troubleshooting—Continued Can’t adjust the frequency of the radio. • Use the remote controller’s [ ]/[ ] buttons to change the frequency of the radio. RDS doesn’t work. • The FM station you are tuned to doesn’t support RDS. • Install an outdoor FM antenna (see page 14). • Change the location and position of your outdoor FM antenna. • Move the FM antenna as far away as possible from fluorescent lights.
Troubleshooting—Continued Clock The time is not displayed in Standby mode. • The clock is not displayed in Standby mode. Press CLOCK CALL, the clock display appears for eight seconds. • If there is a power failure, the clock will stop and “Adjust” will appear when the clock is displayed with the CLOCK CALL button. Set the clock in this case. If AccuClock is enabled, the clock will be set automatically. Others “RESET” appears after the power cord is connected.
Specifications General Power Supply: Power Consumption: Stand-by Power Consumption: Dimensions (W × H × D): Weight: Audio Inputs Analog Inputs: Audio Outputs Subwoofer Pre Output: Speaker Outputs: Phones: Video Output: AC 220 - 230 V, 50/60 Hz 36 W 0.5 W (iPod not charging) 215 × 98 × 334 mm (8-7/16" × 3-7/8" × 13-1/8") 4.2 kg (9.3 lbs.
Sales & Product Planning Div. : 2-1, Nisshin-cho, Neyagawa-shi, OSAKA 572-8540, JAPAN Tel: 072-831-8023 Fax: 072-831-8163 ONKYO U.S.A. CORPORATION 18 Park Way, Upper Saddle River, N.J. 07458, U.S.A. Tel: 800-229-1687, 201-785-2600 Fax: 201-785-2650 http://www.us.onkyo.com/ ONKYO EUROPE ELECTRONICS GmbH Liegnitzerstrasse 6, 82194 Groebenzell, GERMANY Tel: +49-8142-4401-0 Fax: +49-8142-4401-555 http://www.eu.onkyo.