Network CD Receiver CR-N755 Getting Started ........................ 2 Connections .......................... 14 Basic Operations .................. 17 Instruction Manual Playing CDs ........................... 19 Using USB interface/Network Service ............................... 23 iPod / iPhone Playback ......... 29 Thank you for purchasing an Onkyo CD receiver. Please read this manual thoroughly before making any connections and plugging it in.
WARNING: TO REDUCE THE RISK OF FIRE OR ELECTRIC SHOCK, DO NOT EXPOSE THIS APPARATUS TO RAIN OR MOISTURE. CAUTION: TO REDUCE THE RISK OF ELECTRIC SHOCK, DO NOT REMOVE COVER (OR BACK). NO USER-SERVICEABLE PARTS INSIDE. REFER SERVICING TO QUALIFIED SERVICE PERSONNEL.
Precautions 1. Recording Copyright—Unless it’s for personal use only, recording copyrighted material is illegal without the permission of the copyright holder. 2. AC Fuse—The AC fuse inside the unit is not userserviceable. If you cannot turn on the unit, contact your Onkyo dealer. 3. Care—Occasionally you should dust the unit all over with a soft cloth. For stubborn stains, use a soft cloth dampened with a weak solution of mild detergent and water. Dry the unit immediately afterwards with a clean cloth.
Precautions—Continued • Do not use this unit when there’s the possibility of moisture condensation occurring. Doing so may damage your discs and certain parts inside this unit. If condensation does occur, unplug the power cord and leave the unit for two to three hours in the room temperature. This unit contains a semiconductor laser system and is classified as a “CLASS 1 LASER PRODUCT”. So, to use this model properly, read this Instruction Manual carefully.
Precautions—Continued For British models Replacement and mounting of an AC plug on the power supply cord of this unit should be performed only by qualified service personnel.
Features Amplifier • • • • • • • WRAT (Wide Range Amplifier Technology) Symmetrical Designed Power Amplifier Circuitry 2 Digital Inputs (1 Optical/1 Coaxial) 3 Audio Inputs and 1 Output Optimum Gain Volume Circuitry 3 Stage Inverted Darlington Amplifier Design Subwoofer Pre Out VLSC™ is a trademark of Onkyo Corporation. Music Optimizer™ is a trademark of Onkyo Corporation.
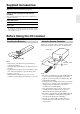
Supplied Accessories Make sure you have the following accessories: Remote controller (RC-850S) and two batteries (AAA/R03) (Note for China: The battery for the remote controller is not supplied for this unit.) Indoor FM antenna AM loop antenna Power cord * In catalogs and on packaging, the letter at the end of the product name indicates the color. Specifications and operations are the same regardless of color.
Contents Getting Started iPod / iPhone Playback Important Safety Instructions..................................... 2 Precautions................................................................ 3 Features .................................................................... 6 Supplied Accessories ................................................ 7 Before Using the CD receiver.................................... 7 Installing the Batteries ...........................................
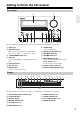
Getting to Know the CD receiver Front Panel a c d e b f g h i jk l m n The page numbers in parentheses show where you can find the main explanation for each item. a Display (9) h TONE button Used to adjust the tone. b VOLUME control This control is used to adjust the volume of the CD receiver to “Min”, “1” through “41”, “Max”. i Open/Close [0] button (19) j RETURN button (22) c 8ON/STANDBY button (17) k Stop [2] button (19) d USB port Connect an iPod/iPhone or USB flash drive to this port.
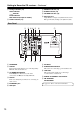
Getting to Know the CD receiver—Continued k Tuning indicators (31) AUTO indicator indicator FM ST indicator RDS indicator (European models) m REMAIN indicator (19) n SLEEP indicator (18) o FOLDER indicator (19) p Message area Digit number: 15-digit code (North American and European models), 10-digit code (Other models) l TOTAL indicator (19) Rear Panel a h b cd e i f j k a SPEAKERS g AC INLET b LINE IN These analog audio inputs are for connecting Onkyo RI Dock and cassette deck, etc.
Getting to Know the CD receiver—Continued Remote Controller a b c The page numbers in parentheses show where you can find the main explanation for each item. n o d a On/Standby [8] button (17) b DISPLAY button Used to change the information shown on the display.
Disc Notes Precautions for Playback Compact discs (CDs) with the following logo on the label surface can be used. Do not use discs designed for purposes other than audio, such as CD-ROMs for PC use. Abnormal noise could damage the speakers or amplifier. * This CD receiver supports CD-R and CD-RW discs. Note that some discs may not playback because of the disc characteristics, scratches, contamination or the recording state. A disc recorded with an audio CD record will not playback unless it is finalized.
Disc Notes—Continued Handling Discs Caring for Discs Hold discs by the edge, or by the center hole and edge. Avoid touching the playback surface (surface with nothing printed on it). If the disc is dirty, the CD receiver will have a hard time reading signals, and the audio quality may drop. If the disc is dirty, gently wipe off fingerprints and dust with a soft cloth. Lightly wipe from the center outwards.
Connecting Antennas This section explains how to connect the supplied indoor FM antenna and AM loop antenna. The CD receiver won’t pick up any radio signals without an antenna connected, so you must connect the antenna to use the tuner. North American and Asian models Push. Insert wire. Release. Assembling the AM loop antenna Insert the plug fully into the jack. European models Insert the plug fully into the jack. Caution: • Be careful not to injure yourself when using thumbtacks. Thumbtacks, etc.
Connecting Speakers Connecting Your Speakers • Connect the right speaker to the CD receiver’s right (R) SPEAKERS terminals. Connect the left speaker to the left (L) SPEAKERS terminals. • Connect the positive (+) terminal on each speaker to the corresponding positive (+) terminal on the CD receiver. Connect the negative (–) terminal on each speaker to the corresponding negative (–) terminal on the CD receiver. Use the red wires to connect the positive (+) terminals.
Connecting Other Components—Continued Connecting an Onkyo RI Dock (Remote Interactive Dock) The following diagram shows how to connect an optional Onkyo RI Dock (Remote Interactive Dock). Connect either of them. R L ANALOG AUDIO OUT ON /ST AN DB Y ST AN RI Dock DB Y iPo d PC UN SYN SY C/ NC Digital Media Transport What can you do with u? • Connecting an Onkyo RI Dock to the CD receiver with an u cable allows you to control the RI Dock with the CD receiver’s remote controller.
Basic Operations This manual describes the procedure for using the remote controller, unless otherwise specified. Turning On the CD receiver To turn on the CD receiver, press the On/Standby [8] button on the remote controller. Press the On/Standby [8] button again to set the CD receiver to Standby. You can also use the [8ON/STANDBY] button on the CD receiver. Tip: • For details on power management settings, see “ASb (Auto Standby)” (see page 35), “SleepCharge” (see page 35).
Basic Operations—Continued Setting the Display Brightness You can adjust the brightness of the CD receiver’s display. 1 Press the [DIMMER] button repeatedly to cycle through the following patterns: • Normal brightness. • Dim brightness. • Dimmer brightness. Using Headphones Turn down the volume, then connect your stereo headphones to the Phones minijack. The speakers output no sound while the headphones are connected.
Playing CDs 1 Press the Open/Close [0] button to open the disc tray. 2 Place the CD on the tray with the label-side facing up. Place 8 cm CDs in the center of the tray. 3 To start playback, press the Play [1] button. The disc tray closes and playback starts. The Play 1 indicator appears. To stop playback: Press the Stop [2] button. To pause playback: Press the Pause [3] button. The Pause 3 indicator appears. To resume playback, press the Pause [3] or Play [1] button again.
Playing CDs—Continued 4 5 To access files or subfolders inside another folder, select the folder, and then press Play [1] button. Use the Previous and Next [7]/[6] buttons to select the files and subfolders within that folder. To move up a level, press the Pause [3] button. To start playback, press the [ENTER] or Play [1] button. Tip: • You can also use the Stop [2] button and [MENU/ENTER] jog dial on the CD receiver.
Playing CDs—Continued Memory Playback With memory playback, you can create a playlist of up to 25 tracks. This mode can only be used while playback is stopped. 1 Press the [MEMORY] button. The memory icon appears on the display. 2 Use the Previous and Next [7]/[6] buttons to select the first track you want to add to the playlist, and then press the Play [1] button. Repeat this step to add additional tracks to the playlist. You can also use the number buttons on the remote controller to select tracks.
Playing CDs—Continued Setting MP3/WMA Preferences With the MP3/WMA preferences, you can change the way MP3/WMA file information is displayed and the way MP3/WMA CDs are played. This mode can only be used while playback is stopped. 1 Press the [MENU] button, and then use the Arrow [!]/["] buttons to select “MP3 Setting”. 2 3 Press [ENTER]. Use the Arrow [!]/["] buttons to select the preference you want to change. The preferences are explained in the next column. 4 5 Press [ENTER]. 6 Press [ENTER].
Using USB interface/Network Service Controlling Contents of USB Flash Drive or Network Devices To start playback: Press the Play [1] button. Select the type of Repeat Playback When playing back the music files, all files will be played according to repeat playback. The type of Repeat playback can be selected. To return to the beginning of the music file currently playing, press the Previous [7] button. Press the [REPEAT] button repeatedly to select the type of repeat playback.
Using USB interface/Network Service—Continued Understanding Icons on the Display This section describes icons that appear on the CD receiver’s display during media playback. Icon Description Folder Playing Music Files on a USB Flash Drive This section explains how to play music files on a USB flash drive. Connect a USB flash drive as shown below.
Using USB interface/Network Service—Continued • Do not connect the CD receiver’s USB port to a USB port on your computer. Music on your computer cannot be played through the CD receiver in this way. • Operation with all USB flash drives including the ability to power them is not guaranteed. • Do not connect your USB flash drive via a USB hub. The USB flash drive must be connected directly to the CD receiver’s USB port.
Using USB interface/Network Service—Continued Registering Other Internet Radio Internet radio URLs in the following formats are supported: PLS, M3U, and podcast (RSS). However, depending on the type of data or audio format used by the Internet radio station, you may not be able to listen to some stations. To listen to other Internet radio stations, you must register your station in “My Favorites” of the network service menu, as described below. Note: • Services available may vary depending on the region.
Using USB interface/Network Service—Continued Windows Media Player 11 Setup This section explains how to configure Windows Media Player 11 so that the CD receiver can play the music files stored on your computer. 1 2 Start Windows Media Player 11. 3 Select the “Share my media” check box, and then click “OK”. A list of the supported devices appears. 4 Select the CD receiver in the list, and then click “Allow”. The corresponding icon will be checked. 5 Click “OK” to close the dialog box.
Using USB interface/Network Service—Continued Playing Music Files on a Shared Folder This section explains how to play music files on a computer or NAS (Network Attached Storage) through the CD receiver. In order to enjoy Home Media, you must first create a shared folder on your computer. 1 Press the [NET] button. The network service menu appears. Windows 7 Setup 2 Use the Arrow [!]/["]/[#]/[$] buttons to select “Home Media”, and press [ENTER].
iPod / iPhone Playback Playing an iPod/iPhone via USB Tip: • You can also use the [INPUT] button, [2] button and [MENU/ENTER] jog dial on the front panel. • The [RETURN] button is used as a menu button. • For the basic button operation and play mode, refer to “Using USB interface/Network Service” (see page 23). With some iPod/iPhone models and generations, certain buttons may not work as expected. Note: • The USB port (rear) cannot be used for the playback of iPod/iPhone.
iPod / iPhone Playback—Continued iPod/iPhone Playback via Onkyo Dock • Before using the Onkyo Dock components, update your iPod/iPhone with the latest software, available from the Apple web site. • Set the CD receiver’s Input Display to “DOCK”. For details, refer to “Sel Change” (see page 35). 1 Use the [INPUT SELECTOR] button to select “DOCK”. 2 To start playback, press [ENTER] or the Play [1] button. To pause playback: Press the [3] button. To resume playback, press the [3] button again.
Listening to the Radio Tuning into Radio Stations Band Frequency (Actual display depends on country) Tuning into weak stereo FM stations If the signal from a stereo FM station is weak, it may be impossible to get good reception. In this case, switch to Manual Tuning mode and listen to the station in mono. Presetting FM Stations Automatically (Auto Preset) With the Auto Preset function, you can automatically preset all of the FM radio stations available in your area in one go.
Listening to the Radio—Continued Presetting AM/FM Stations Manually With the Preset Write function, you can manually preset individual AM and FM radio stations. You can store a combination of up to 40 of your favorite AM/FM radio stations as presets. 1 Tune into the station that you want to store as a preset. 2 Press the [MENU] button, and then use the Arrow [!]/["] buttons to select “Tuner Setting”. 3 4 Press [ENTER]. 5 Use the Arrow [!]/["] buttons to select “Preset Write”. Press [ENTER].
Listening to the Radio—Continued Copying Presets With the Preset Copy function, you can organize your presets in the order you want. When you copy a preset, its name is also copied. 1 Select the preset you want to copy (see page 32). 2 Press the [MENU] button, and then use the Arrow [!]/["] buttons to select “Tuner Setting”. 3 4 Erasing Presets 1 Select the preset you want to erase (see page 32). 2 Press the [MENU] button, and then use the Arrow [!]/["] buttons to select “Tuner Setting”.
Listening to the Radio—Continued Naming Presets Space: Enters a space character. Shift*1: Toggles between lower and upper case characters. (Left)/ (Right): Moves the cursor left or right in the Name input area. BS (Back Space)*2: Moves the cursor backward and deletes one character. OK: Confirms your entry. You can name presets for easy identification. The preset name may contain of up to 15 or 10 characters. Note: • The number of characters on massage area depends on country.
Custom Setup The common setting for each input selector is explained below. Go through the following steps for setup. 1 Press the [MENU] button, and then use the Arrow [!]/["] buttons to select the preference you want to change. 2 3 Press [ENTER]. 4 Press [ENTER]. Use the Arrow [#]/[$] buttons to select the preference’s options. Tip: • You can also use the [MENU/ENTER] jog dial on the CD receiver.
Custom Setup—Continued Net Setting After modifying the network settings, you must confirm the changes by executing “Network Save ?”. If your router’s DHCP server is enabled, you don’t need to change any of these settings, as the CD receiver is set to use DHCP to configure itself automatically by default (i.e., DHCP is set to “Enable”).
Firmware Update To update the firmware of the CD receiver, you can choose from the following two methods: CR via network, or CR via USB storage. Choose the one that best suits your environment. Before proceeding with the update, please read the corresponding explanations carefully. ■ Update via network You need a wired Internet connection to update the firmware. ■ Update via USB storage (see page 39) Please prepare a USB flash drive such as a USB flash memory stick.
Firmware Update—Continued Update Procedure Troubleshooting 1 Press the [MENU] button, and then use the Arrow [!]/["] buttons to select “Update”. 2 Press [ENTER]. Note that the message “Not Available” appears and “Update” option cannot be selected for a short while after the CD receiver is turned on. Please wait until it becomes operable. Case 1: If an error occurs, “Error!! *-**” is displayed on the CD receiver’s display. (Alpha-numeric characters on the front display are denoted by asterisks.
Firmware Update—Continued Updating the Firmware via USB The CD receiver allows you to update the firmware using a USB flash drive. Note: • Never unplug or turn off the CD receiver during the update process. • Never plug or unplug a USB flash drive during the update process. • Never unplug the USB flash drive containing the firmware file or the AC power cord during the update process. • Do not attempt to access the CD receiver from your PC while it is being updated.
Firmware Update—Continued Troubleshooting Case 1: If an error occurs, “Error!! *-**” is displayed on the CD receiver’s display. (Alpha-numeric characters on the front display are denoted by asterisks.) Refer to the following table and take appropriate action. ■ Errors during an update via USB Error Code Description * The USB flash drive was not detected. Make sure the USB flash memory or USB cable is properly connected to the USB port.
Troubleshooting If you have any trouble using the CD receiver, look for a solution in this section. If you can’t resolve the issue yourself, try resetting the CD receiver before contacting your Onkyo dealer. Note that resetting the CD receiver will delete your radio presets and custom settings. To reset the CD receiver to its factory defaults, turn it on and, while holding down the Stop [2] button, press the [8ON/STANDBY] button.
Troubleshooting—Continued CD Playback Playback jumps. • The CD receiver is being subjected to vibration or the disc is scratched or dirty (see page 12). Can’t add tracks to the playlist for memory playback. • Make sure there’s a disc in the CD receiver. Also, you can only add valid track numbers. For example, if the CD contains 11 tracks, you cannot add track #12. The disc will not play. • Make sure the disc has been loaded correctly, with the label-side facing up.
Troubleshooting—Continued USB flash drive Playback Can’t access the music files on a USB flash drive. • If the message “No Storage” or “No Item” appears , make sure that the USB flash drive is connected correctly and that the USB flash drive is one that is supported (see page 24). • The CD receiver supports USB flash drives that support the USB Mass Storage Class. However, playback may not be possible with some USB flash drives even if they conform to the USB Mass Storage Class.
Network/USB Features Connecting to the Network Network Requirements The following diagram shows how you can connect the CD receiver to your home network. In this example, it’s connected to a LAN port on a router, which has a 4-port 100Base-TX switch built-in. Internet radio Modem WAN LAN Computer or media server Router ■ Ethernet Network For the best results, a 100Base-TX switched Ethernet network is recommended.
Network/USB Features—Continued Server Requirements ■ Server playback The CD receiver can play digital music files stored on a computer or media server and supports the following technologies: • Windows Media Player 11 • Windows Media Player 12 • Windows Media Connect 2.0 • DLNA-certified media server If the operating system of your computer is Windows Vista, Windows Media Player 11 is already installed. Windows Media Player 11 for Windows XP can be downloaded for free from the Microsoft web site.
Network/USB Features—Continued Supported Audio File Formats For server playback and playback from a USB flash drive, the CD receiver supports the following music file formats. Variable bit-rate (VBR) files are supported. However, playback times may not display correctly. Note: • With remote playback, the CD receiver does not support the following music file formats: FLAC, Ogg Vorbis and DSD. • In the case of server playback, the above-mentioned file formats may not be played depending on the server type.
Specifications Amplifier Section General Rated Output Power All channels: Power Supply (North American) 22 watts minimum continuous power per channel, 4 ohm loads, 2 channels driven at 1 kHz, with a maximum total harmonic distortion of 0.4% (FTC) (European) 2 ch × 22 W at 4 ohms, 1 kHz, 2 ch driven of 0.4% (IEC) Damping Factor 22 (Front, 1 kHz, 8 Ω) THD+N (Total Harmonic Distortion+Noise) 0.
2-1, Nisshin-cho, Neyagawa-shi, OSAKA 572-8540, JAPAN Tel: 072-831-8023 Fax: 072-831-8163 http://www.onkyo.com/ 18 Park Way, Upper Saddle River, N.J. 07458, U.S.A. Tel: 800-229-1687, 201-785-2600 Fax: 201-785-2650 http://www.us.onkyo.com/ Liegnitzerstrasse 6, 82194 Groebenzell, GERMANY Tel: +49-8142-4401-0 Fax: +49-8142-4208-213 http://www.eu.onkyo.