Contents Before Using Your DVD Receiver 2 DVD Receiver Getting Started DR-90 6 Instruction Manual Basic Operation 20 Advanced DVD/ Audio CD Operation 33 Additional Operation 58 Others 61 THIS DVD RECEIVER IS MANUFACTURED FOR PLAYBACK OF REGION 2 (EUROPE) ENCODED DVD SOFTWARE. USE OF SOFTWARE NOT INTENDED FOR REGION 2 PLAYBACK MAY RESULT IN UNDESIRABLE PLAYER PERFORMANCE. Thank you for purchasing the ONKYO DVD Receiver.
WARNING: TO REDUCE THE RISK OF FIRE OR ELECTRIC SHOCK, DO NOT EXPOSE THIS APPLIANCE TO RAIN OR MOISTURE. WARNING AVIS RISK OF ELECTRIC SHOCK DO NOT OPEN RISQUE DE CHOC ELECTRIQUE NE PAS OUVRIR The lightning flash with arrowhead symbol, within an equilateral triangle, is intended to alert the user to the presence of uninsulated “dangerous voltage” within the product’s enclosure that may be of sufficient magnitude to constitute a risk of electric shock to persons.
Precautions For British model This unit contains a semiconductor laser system and is classified as a “CLASS 1 LASER PRODUCT.” So, to use this model properly, read this Instruction Manual carefully. In case of any trouble, please contact the store where you purchased the unit. To prevent being exposed to the laser beam, do not try to open the enclosure. DANGER: INVISIBLE LASER RADIATION WHEN OPEN AND INTERLOCK FAILED OR DEFEATED. AVOID DIRECT EXPOSURE TO BEAM. CAUTION: THIS PRODUCT UTILIZES A LASER.
Precautions 1. Warranty Claim You can find the serial number on the rear panel of this unit. In case of warranty claim, please report this number. 2. Recording Copyright Recording of copyrighted material for other than personal use is illegal without permission of the copyright holder. 3. AC Fuse The fuse is located inside the chassis and is not user-serviceable. If power does not come on, contact your Onkyo authorized service center. 4.
Table of Contents Important Safeguards/Precautions/Table of Contents ......................................................... 2–5 Getting Started 6 Features .................................................................................................................................. 6 Supplied Accessories .............................................................................................................. 7 Preparing the Remote Controller ....................................................
Getting Started Features A/V Digital Receiver Features All channels 55 watts per channel min. RMS. into 6 ohms two channel driven, 1,000 Hz with no more than 0.2 % total harmonic distortion. (FTC) All channels 50 watts per channel min. RMS.
Supplied Accessories Make sure your box contains everything listed below. If any pieces are missing, contact your nearest ONKYO dealer. The number of accessories is indicated in brackets.
Preparing the Remote Controller Inserting the Batteries LEVEL SETUP DVD RECEIVER 1 Detach the battery cover. 2 Insert the two R6 (size AA) batteries. Be sure to match the + and – ends of the batteries with the diagram inside the battery compartment. 3 Attach the battery cover. Set the switch to LEVEL SETUP when adjusting each speaker’s relative volume balance. See pages 19 and 32. LEVEL SETUP DVD RECEIVER 1 TV TV 3 2 Set the switch to TV when you wish to control your TV.
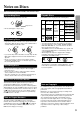
Notes on Discs This section shows you how to handle, clean, and store discs. On Handling Discs Playable Discs • Do not touch the playback side of the disc. This DVD Receiver can play back the following discs. Playback side • Do not attach paper or tape to discs. DVD videos Audio + Video (moving pictures) 12 cm 8 cm 12 cm On Cleaning Discs • Fingerprints and dust on the disc cause picture and sound deterioration. Wipe the disc from the center outwards with a soft cloth.
Connecting to a TV Before connecting • Refer also to the instruction manual of the TV. • When you connect the DVD Receiver to the TV, be sure to turn off the power and unplug both the units from the mains before making any connections. • Connect the DVD Receiver to the TV directly. If you connect the DVD Receiver to a VCR, TV/VCR combination, or video selector, the playback picture may be distorted as DVD videos are copy protected. • Connect the plugs securely.
Connecting to Audio/Video Equipment Before connecting • Connect the plugs securely. • Refer also to the instruction manual of each component to be connected. • When you connect the DVD Receiver to audio/video equipment, be sure to turn off the power and unplug all the units from the mains before making any connections. • About the VIDEO 1 jacks/connectors The video input and output connections are also necessary even if you make the S video input and output connections.
Connecting Speakers Before connecting • To prevent damage to circuits, never short-circuit the positive (+) and negative (–) speaker wires. • Refer also to the instruction manuals of the speakers. • This DVD Receiver is designed to reproduce optimum sound quality when speakers with the specified impedances below are connected. Please check the following information and choose speakers with appropriate impedances for the connections. Front speakers: 6 ohms min. per speaker Center speaker: 6 ohms min.
Positioning Speakers Speaker placement plays an important role in the reproduction of Surround sound. The placement of the speakers varies depending on the size of the room and the wall coverings used in the room. The illustration below shows an example of a layout for standard speaker placement. Refer to this example when you position the speakers in order to experience the best of Surround sound.
Making Aerial Connections Connecting the Supplied FM and AM Indoor Aerials ANTENNA S VIDEO CENTER SUBWOOFER DIGITAL OUTPUT MONITOR OUT DIGITAL INPUT OPTICAL OPTICAL VIDEO 1 COAXIAL VIDEO 2 PRE OUT (REC) AM FM 75 OUT OUT VIDEO 1 TAPE / MD IN (PLAY) IN AC CONNECTOR CENTER SPEAKER SURROUND SPEAKERS R L Do not connect the mains lead at this time.
Connecting FM Outdoor Aerial If the FM reception is not very clear with the supplied aerial, connect the outdoor FM outdoor aerial instead of FM indoor aerial. FM outdoor aerial Connecting coaxial cable to a 75/300 ohm aerial adapter 3 Remove the transformer wire A from slit B and insert it into slit C. ANTENNA Slit B 6 3 FM 75 AM 6 mm mm mm 15 mm Connecting 300 ohm ribbon wire to a 75/300 ohm aerial adapter Loosen the screws and wrap the wire around these screws.
Connecting to AC OUTLET on the Rear Panel You can connect the mains lead of another audio/video component to the AC outlet (AC OUTLET) on the rear panel of the DVD Receiver. The power supply to AC OUTLET stops: • When the main power of the DVD Receiver is switched off (see next page) or • When the DVD Receiver is in standby mode (see next page).
Connecting the Power/Turning on the DVD Receiver Before connecting • Make sure that all the connections from pages 10 to 16 are completed (the connection to the TV is required). • Turning on the DVD Receiver may cause a momentary power surge, which might interfere with other electrical equipment such as computers. If this happens, use a wall outlet on a different circuit. STANDBY indicator (lights up when in standby mode) To the mains Getting Started Thank you for your purchase of Our DVD-Video Player.
Speaker Setup Before operating your stereo system, you need to set up the speaker configuration and the distance from the listening position to each speaker. MASTER VOLUME OPEN/CLOSE DOWN UP PAUSE STOP PLAY UP DO W N STANDBY/ ON Note STANDBY Re - EQ POWER It is not necessary to set the parameters again once you have completed the setup (with one exception*) unless you change the speaker configuration. ON SPEAKER SETUP CH L MODE Press SPEAKER SETUP to display the subwoofer configuration.
LEVEL SETUP TV DVD RECEIVER SENDING/ LEARNED POWER SLEEP ON STANDBY TITLE MENU SURROUND MODE SETUP VIDEO 1 TAPE VIDEO 2 TUNER 3 2,4 AUDIO SUBTITLE ANGLE ZOOM CH SEL 1 2 TEST TONE LEVEL 4 5 6 8 9 0 FR PAUSE Press ENTER, then press MODE ADJ / repeatedly to enter the distance between your listening position and the center speaker.
Basic Operation Playing DVD Videos/Audio CDs This section shows you the basics on how to play discs. Before playing • DVD Videos and audio CDs can be played with the DVD Receiver (see “Playable Discs” on page 9). Do not play anything else. • When playing DVD videos, turn on the TV and set the TV to the DVD Receiver’s input. About the DVD CD DVD DVD and CD marks in the pages related to DVD video/audio CD operation means “The function or title is related to DVD operation.
DVD DVD If the screen on the right appears – Screen Saver Occasionally, some picture noise not usually visible during a normal broadcast may appear on the TV screen while playing a DVD video because the high resolution pictures on these discs include a lot of information. While the amount of noise depends on the TV you use, you should generally adjust the TV to reduce sharpness when viewing DVD videos. If you pause a picture for a long while, the screen saver operates. (You can set this function to Off.
Playing DVD Videos/Audio CDs (continued) To play in fast reverse or fast forward DVD CD Press FR (Fast Reverse) or FF (Fast Forward) during playback. DVD Two times the normal speed ×2 Eight times the normal speed ×8 → ← TV screen LEVEL SETUP TV DVD RECEIVER SENDING/ LEARNED The playback speed becomes two times the normal speed.
Locating a Specific Title/Chapter/Track/Location Normally, DVD videos are divided into titles, and the titles are subdivided into chapters. Audio CDs are divided into tracks.
Playing DVD Videos/Audio CDs (continued) 4 3 Press the number button(s) to enter the chapter number for the desired chapter. 5 6 e.g. To select chapter 25 7 8 9 +10 0 CH SEL 1 2 TEST TONE LEVEL 4 2 5 You can locate the desired track by entering the number. 1 Title: 2 25 Chapter : CH SEL 1 2 TEST TONE LEVEL 4 5 6 7 8 9 3 +10 0 Press the number button(s) to enter the track number for the desired track. e.g. To select track 25 2 5 Press PLAY.
LEVEL SETUP TV DVD RECEIVER SENDING/ LEARNED POWER SLEEP ON STANDBY TITLE SURROUND MODE SETUP VIDEO 1 TAPE VIDEO 2 TUNER AUDIO SUBTITLE INPUT SELECTOR DVD TV ENTER RETURN CH SEL UP PAUSE STOP VIDEO 1 TAPE/MD PHONES VIDEO 2 SEARCH CLEAR DISPLAY SPEAKER SETUP CH LEVEL PRESET / MODE ADJ ENTER TUNING TV SURROUND MODE DVD INPUT SELECTOR OFF FM 8 0 ANGLE ZOOM CLEAR OPEN/ CLOSE MUTING 9 UP Re - EQ POWER 7 +10 3 6 SEARCH STANDBY ON 5 PLAY DO W N DOWN 2 LEVEL
Listening to the Radio There are two ways to select radio stations: one is manual tuning and the other is presetting radio stations then selecting the preset channels.
LEVEL SETUP TV DVD RECEIVER POWER SLEEP ON STANDBY TITLE SURROUND MODE SETUP VIDEO 1 TAPE VIDEO 2 TUNER INPUT SELECTOR DVD TV ENTER RETURN CH SEL 1 2 TEST TONE 3 LEVEL 4 5 UP PAUSE STOP 8 7 PLAY OPEN/ CLOSE MUTING MASTER VOLUME OPEN/CLOSE STANDBY/ ON DOWN UP PAUSE STOP PLAY PAUSE FF POWER LATE NIGHT DOWN PLAY UP CHANNEL P 0 FR U +10 SURROUND MODE STANDBY Re - EQ POWER VIDEO 1 VIDEO 2 DVD INPUT SELECTOR OFF TAPE/MD PHONES CLEAR 1 9 SEARCH STANDBY ON
Playing the Connected Source LEVEL SETUP TV DVD RECEIVER SENDING/ LEARNED POWER SLEEP ON STANDBY SURROUND MODE SETUP VIDEO 1 TAPE VIDEO 2 TUNER AUDIO SUBTITLE INPUT SELECTOR DVD TV ENTER CH SEL MASTER VOLUME OPEN/CLOSE DOWN UP PAUSE STOP 1 2 TEST TONE LEVEL 4 5 6 7 8 9 SEARCH STANDBY Re - EQ POWER VIDEO 1 ON VIDEO 2 TAPE/MD PHONES DISPLAY SPEAKER SETUP CH LEVEL PRESET / MODE ADJ ENTER TUNING TV FM ANGLE ZOOM CLEAR OPEN/ CLOSE MUTING +10 0 FR PAUSE FF POWER
Various Functions Common to all the Sources LEVEL SETUP TV DVD RECEIVER SENDING/ LEARNED POWER SLEEP ON STANDBY TITLE SURROUND MODE SETUP VIDEO 1 TAPE VIDEO 2 TUNER AUDIO SUBTITLE CH SEL MASTER VOLUME OPEN/CLOSE DOWN UP PAUSE STOP PLAY UP DO W N STANDBY/ ON STANDBY Re - EQ POWER ON VIDEO 1 VIDEO 2 TAPE/MD TV DISPLAY SPEAKER SETUP CH LEVEL PRESET / MODE ADJ ENTER TUNING 2 TEST TONE LEVEL FM 3 4 5 6 7 8 9 SEARCH DVD INPUT SELECTOR OFF PHONES SURROUND MODE 1 LAT
Enjoying the Sound Effects The surround sound of the DVD Receiver enables you to enjoy the presence of a movie theater or concert hall in your room. Before using any sound effect, make sure the Speaker Setup configurations have been set (see page 18). The speaker configuration is very important for the surround sound. See "Connecting Speakers" on page 12 and "Positioning Speakers" on page 13. Following are the sound systems the DVD Receiver can reproduce.
Selecting the Sound Effect The DVD Receiver will automatically detect the sound system when DOLBY DIGITAL Surround ( ), DTS Surround ( PCM DIGITAL (2 channel digital stereo) is played back. The sound system appears in the DVD Receiver's display. ), or D I G I T A L Lights up when PCM DIGITAL (2 channel digital stereo) sound is reproduced. Lights up when DOLBY DIGITAL Surround sound is reproduced. Lights up when DTS Surround sound is reproduced.
LEVEL SETUP TV DVD RECEIVER SENDING/ LEARNED POWER SLEEP ON STANDBY Enjoying the Sound Effects (continued) TITLE MENU SURROUND MODE SETUP VIDEO 1 TAPE VIDEO 2 TUNER AUDIO SUBTITLE CH SEL CH SEL TEST TONE MASTER VOLUME OPEN/CLOSE DOWN UP PAUSE STOP PLAY UP DO W N STANDBY/ ON 1 2 TEST TONE LEVEL 3 4 5 6 7 8 9 STANDBY SURROUND MODE Re - EQ POWER ON VIDEO 1 VIDEO 2 TAPE/MD TV INPUT SELECTOR OFF PHONES DISPLAY SPEAKER SETUP CH LEVEL PRESET / MODE ADJ ENTER TUNING
Advanced DVD/Audio CD Operation Playing Repeatedly LEVEL SETUP TV DVD RECEIVER SENDING/ LEARNED POWER SLEEP ON STANDBY TITLE SURROUND MODE SETUP VIDEO 1 TAPE VIDEO 2 TUNER AUDIO SUBTITLE INPUT SELECTOR DVD TV ENTER RETURN CH SEL 1 2 TEST TONE LEVEL 3 4 5 6 7 8 9 SEARCH REPEAT A-B You can play a specific title, chapter, track, or segment repeatedly (Title repeat, chapter/track repeat, A-B repeat).
Playing in a Favorite Order LEVEL SETUP TV DVD RECEIVER SENDING/ LEARNED POWER SLEEP ON STANDBY TITLE 2 RETURN MENU SETUP CH SEL Title : 2 Chapter : 25 Title : 2 Chapter : 12 Title : 1 Chapter : 1 2 1 2 TEST TONE LEVEL 4 5 7 8 REPEAT You can combine your favorite titles, chapters, or tracks and play them in any order. You can program up to 28 selections into the memory (Memory playback).
Playing in Random Order LEVEL SETUP TV DVD RECEIVER SENDING/ LEARNED POWER SLEEP ON STANDBY TITLE SURROUND MODE SETUP VIDEO 1 TAPE VIDEO 2 TUNER AUDIO SUBTITLE INPUT SELECTOR DVD TV ENTER RETURN CH SEL TITLE Title : 1: 1 CHAPTER Chapter : 3: 3 Title : 2 Chapter : 2 Number buttons Title : 3 Chapter : 1 PLAY RANDOM You can play titles, chapters within a title, or tracks in random order (Random playback).
Zooming a Picture LEVEL SETUP TV DVD RECEIVER SENDING/ LEARNED POWER SLEEP ON STANDBY TITLE SURROUND MODE SETUP VIDEO 1 TAPE VIDEO 2 TUNER AUDIO SUBTITLE INPUT SELECTOR DVD TV ENTER / / / RETURN RETURN CH SEL 1 2 TEST TONE LEVEL 3 4 5 6 7 8 9 +10 0 FR PAUSE DIMMER DISPLAY MENU ANGLE ZOOM SEARCH CLEAR OPEN/ CLOSE FF POWER MUTING DOWN PLAY UP CHANNEL RANDOM STOP SLOW TUNER PRESET REPEAT A-B MEMORY ZOOM CLEAR TV/ VCR VOLUME You can magnify areas within a
LEVEL SETUP TV DVD RECEIVER SENDING/ LEARNED Selecting the Camera Angle POWER SLEEP ON STANDBY TITLE 2 SURROUND MODE SETUP VIDEO 1 TAPE VIDEO 2 TUNER AUDIO SUBTITLE INPUT SELECTOR DVD TV ENTER RETURN CH SEL Angle : 1 Angle : 2 Angle : 3 1 2 TEST TONE LEVEL 4 5 6 8 9 0 FR PAUSE ANGLE ZOOM SEARCH CLEAR OPEN/ CLOSE FF POWER MUTING DOWN PLAY UP CHANNEL RANDOM STOP SLOW TUNER PRESET REPEAT A-B MEMORY REMOTE CONTROLLER You can select a preferred camera angle to
Selecting Subtitles Included on the DVD LEVEL SETUP TV DVD RECEIVER SENDING/ LEARNED POWER SLEEP ON STANDBY TITLE SURROUND MODE SETUP VIDEO 1 TAPE VIDEO 2 TUNER AUDIO SUBTITLE INPUT SELECTOR DVD TV ENTER / / / RETURN CH SEL 1 2 TEST TONE LEVEL 3 4 5 6 7 8 9 SEARCH Good evening! Bon soir! ¡Buenas tardes! You can display subtitles on the TV screen and select a subtitle language from those included on the DVD video.
Selecting Audio Language/Sound Included on the Disc LEVEL SETUP TV DVD RECEIVER SENDING/ LEARNED POWER SLEEP ON STANDBY MENU 2 TITLE SURROUND MODE SETUP VIDEO 1 TAPE VIDEO 2 TUNER AUDIO SUBTITLE INPUT SELECTOR DVD TV ENTER RETURN CH SEL Good morning! Bon jour! 1,2 ¡Buenos días! 1 2 TEST TONE LEVEL 3 4 5 6 7 8 9 SEARCH CLEAR DIMMER DISPLAY MENU ANGLE ZOOM CLEAR OPEN/ CLOSE MUTING +10 0 FR PAUSE FF POWER DOWN PLAY UP CHANNEL RANDOM STOP SLOW TUNER PRESET
Changing the Sound Signal Conversion Method LEVEL SETUP TV DVD RECEIVER SENDING/ LEARNED POWER SLEEP ON STANDBY DIMMER DISPLAY MENU SURROUND MODE SETUP VIDEO 1 TAPE VIDEO 2 TUNER AUDIO SUBTITLE TITLE The reproduced disc sound will be output in the most suitable format automatically through the connected speakers and output connector/jacks on the DVD Receiver when “Audio Out Select” in the setting menu is set to “Bitstream” (see page 50).
DVD DVD Changing the DOLBY DIGITAL Surround Sound Format to the Digitally Recordable Frequency (kHz)/Quantization (bit) Changing the MPEG2 Sound Format to the Analog Signals for Recording Digital recording of MPEG2 sounds is impossible regardless of the sound signal conversion methods, though, analog recording of MPEG2 is possible if you change the sound signal conversion method.
Using Information on the On-Screen Display and the DVD Receiver’s Display You can view information about a disc and its operational status on the TV screen and the DVD Receiver’s display. DVD CD Checking the Total Number of the Titles/Tracks, Current Title/Chapter/Track, Remaining and Elapsed Time, etc. When the disc is inserted in the DVD Receiver The following information appears in the DVD Receiver’s display for about five seconds. DVD video* e.g. Audio CD e.g.
LEVEL SETUP TV DVD RECEIVER SENDING/ LEARNED POWER SLEEP ON STANDBY TITLE MENU SETUP CH SEL MASTER VOLUME OPEN/CLOSE DOWN UP PAUSE STOP 2 TEST TONE LEVEL 4 5 6 7 8 9 UP SEARCH STANDBY Re - EQ POWER VIDEO 1 ON TAPE/MD PHONES VIDEO 2 DISPLAY SPEAKER SETUP CH LEVEL PRESET / MODE ADJ ENTER TUNING TV SURROUND MODE DVD INPUT SELECTOR OFF FM VIDEO 1 TAPE VIDEO 2 TUNER AUDIO SUBTITLE 3 PLAY DO W N STANDBY/ ON 1 DISPLAY SURROUND MODE INPUT SELECTOR DVD TV ENTER RETU
Customizing the Function Settings LEVEL SETUP TV DVD RECEIVER SENDING/ LEARNED POWER SLEEP ON STANDBY TITLE 2 SURROUND MODE SETUP VIDEO 1 TAPE VIDEO 2 TUNER AUDIO SUBTITLE INPUT SELECTOR DVD TV ENTER RETURN CH SEL 1 2 TEST TONE LEVEL 4 5 7 8 3 DVD ANGLE ZOOM CLEAR OPEN/ CLOSE MUTING 9 +10 0 FR PAUSE FF POWER DOWN PLAY UP CHANNEL RANDOM STOP SLOW TUNER PRESET REPEAT A-B MEMORY REMOTE CONTROLLER 1 6 SEARCH When you insert a DVD Video or audio CD, the vari
Setting Details Page DVD To select a preferred language for on-screen displays 46 Disc menu Language DVD To select a preferred language for disc menus 46 Audio Language DVD To select a preferred language for the sound track 47 Subtitle Language DVD To select preferred language for subtitles 47 TV Shape Black Level DVD To select a picture size according to the aspect ratio of your TV To select the black level of playback pictures 48 48 PAL/Auto DVD To select the video system of a disc
Customizing the Function Settings (continued) After you select LANGUAGE (see page 44), change the settings according to your preference. DVD CD LANGUAGE Setting 3 (Continued from page 45) Press / to select the item, then press ENTER. ENTER On-Screen Language DVD CD ENTER Select a preferred language by pressing / , then press ENTER.
LEVEL SETUP TV DVD RECEIVER SENDING/ LEARNED POWER SLEEP ON STANDBY TITLE 3 RETURN SURROUND MODE SETUP VIDEO 1 INPUT SELECTOR DVD TV ENTER RETURN CH SEL 1 2 TEST TONE LEVEL 4 5 7 8 If you press RETURN while a menu appears on the screen, you will return to the previously displayed menu screen.
Customizing the Function Settings (continued) After you select PICTURE (see page 44), change the settings according to your preference. DVD PICTURE Setting 3 (Continued from page 45) Press / to select the item, then press ENTER. ENTER DVD TV Shape ENTER PICTURE TV Shape Black Level PAL/Auto Video Out Select 4:3LB NRML Auto S Video 4:3 LetterBox Select when a 4:3 TV is connected. Displays widescreen images with masking bars above and below the picture.
LEVEL SETUP TV DVD RECEIVER SENDING/ LEARNED POWER SLEEP ON STANDBY TITLE 3 RETURN SURROUND MODE SETUP VIDEO 1 TAPE VIDEO 2 TUNER AUDIO SUBTITLE INPUT SELECTOR DVD TV ENTER RETURN CH SEL 1 2 TEST TONE LEVEL 4 5 7 8 DIMMER DISPLAY MENU 3 4 6 ANGLE ZOOM CLEAR OPEN/ CLOSE MUTING 9 SEARCH +10 0 FR PAUSE FF POWER DOWN PLAY UP CHANNEL RANDOM STOP SLOW TUNER PRESET REPEAT A-B MEMORY TV/ VCR RETURN If you press RETURN while a menu appears on the screen, you will
Customizing the Function Settings (continued) After you select AUDIO (see page 44), change the settings according to your preference. DVD CD Audio Setting 3 (Continued from page 45) Press / to select the item, then press ENTER. ENTER Audio Out Select DVD CD The output sound format can be changed according to your purpose and preference by changing the sound signal conversion method.
LEVEL SETUP TV DVD RECEIVER SENDING/ LEARNED POWER SLEEP ON STANDBY TITLE 3 SURROUND MODE SETUP VIDEO 1 TAPE VIDEO 2 TUNER AUDIO SUBTITLE INPUT SELECTOR DVD TV ENTER RETURN RETURN CH SEL 1 2 TEST TONE LEVEL 4 5 7 8 3 If you press RETURN while a menu appears on the screen, you will return to the previously displayed menu screen.
Customizing the Function Settings (continued) After you select DISPLAY (see page 44), change the settings according to your preference. DVD CD DISPLAY Setting 3 (Continued from page 45) Press / to select the item, then press ENTER. ENTER ON-Screen Display DVD CD On: Off: ENTER DISPLAY On-Screen Displays OSD Background Color Extended Subtitle Features Screen Saver On Gray Off On Operational modes are displayed on-screen. (e.g. “PLAY”, Operational modes are not displayed.
LEVEL SETUP TV DVD RECEIVER SENDING/ LEARNED POWER SLEEP ON STANDBY TITLE 3 RETURN SURROUND MODE SETUP VIDEO 1 TAPE VIDEO 2 TUNER AUDIO SUBTITLE INPUT SELECTOR DVD TV ENTER RETURN CH SEL 1 2 TEST TONE LEVEL 4 5 7 8 DIMMER DISPLAY MENU 4 3 6 ANGLE ZOOM CLEAR OPEN/ CLOSE MUTING 9 SEARCH +10 0 FR PAUSE FF POWER DOWN PLAY UP CHANNEL RANDOM STOP SLOW TUNER PRESET REPEAT A-B MEMORY TV/ VCR RETURN If you press RETURN while a menu appears on the screen, you will
Customizing the Function Settings (continued) After you select OPERATION (see page 44), change the settings according to your preference. DVD OPERATION Setting 3 (Continued from page 45) Press / to select the item, then press ENTER. ENTER DVD Pause / Still Auto: Frame: ENTER OPERATION Pause/Still Parental Lock Title Stop Auto Off Off For normal use. The image can be paused without shaking.
LEVEL SETUP TV DVD RECEIVER SENDING/ LEARNED POWER SLEEP ON STANDBY TITLE 3 RETURN SURROUND MODE SETUP VIDEO 1 TAPE VIDEO 2 TUNER AUDIO SUBTITLE INPUT SELECTOR DVD TV ENTER RETURN CH SEL Number buttons RETURN STOP If you press RETURN while a menu appears on the screen, you will return to the previously displayed menu screen. ENTER FRANCE Viewable GERMAN Level8 Level7 Level6 Level5 Level4 Level3 Level2 Level1 ENTER U.
LEVEL SETUP TV DVD RECEIVER SENDING/ LEARNED Customizing the Function Settings (continued) POWER SLEEP ON STANDBY TITLE 3 RETURN SURROUND MODE SETUP VIDEO 1 TAPE VIDEO 2 TUNER AUDIO SUBTITLE INPUT SELECTOR DVD TV ENTER RETURN CH SEL 1 2 TEST TONE LEVEL 4 5 7 8 DIMMER DISPLAY MENU 3 ANGLE ZOOM CLEAR OPEN/ CLOSE MUTING 9 SEARCH +10 0 FR PAUSE FF POWER DOWN PLAY UP CHANNEL RANDOM STOP SLOW TUNER PRESET REPEAT A-B MEMORY RETURN If you press RETURN while a men
Table of Languages Table of Languages and Their Abbreviations Abbreviation Language of the Language ––– EO ET EU FA FI FJ FO FY GA GD GL GN GU HA HI HR HU HY IA IE IK IN IS IW JI JW KA KK KL KM KN KS KU KY LA Esperanto Estonian Basque Persian Finnish Fiji Faroese Frisian Irish Scottish,Gaelic Galician Guarani Gujarati Hausa Hindi Croatian Hungarian Armenian Interlingua Interlingue Inupiak Indonesian Icelandic Hebrew Yiddish Javanese Georgian Kazakh Greenlandic Cambodian Kannada Kashmiri Kurdish Kirghiz L
Additional Operation Recording Using the Connected Equipment You can record according to the following using the connected recording equipment: • Sound/picture of discs played back by the DVD Receiver, • Sound of FM/AM programs, and • Sound/picture of the connected source. Note Many discs and sources are copy protected. Copy protected sources are impossible to record. Simplified diagram of the connected equipment (See also pages 10 and 11 for the actual connections.
Recording the Picture and Sound From Different Sources at the Same Time Digital recording from a DVD video played by the DVD Receiver The picture from the VIDEO 2 source continues to be output through the VIDEO OUT jacks even if you change to another audio source (TAPE/MD, FM, or AM) or TV.
Customizing the Remote Controller to Your TV You can customize the supplied remote controller (RC-399M) to operate your TV.
Others Troubleshooting Check the following guide for the possible cause of a problem before contacting service. Refer also to the respective instruction manuals of the connected components and TV. Symptoms Causes Remedies Pages The DVD Receiver doesn’t switch on. • The mains lead is disconnected. • Check the connection of the mains lead. 17 • The main power is set to OFF. • There is external noise in the computer circuits of the DVD Receiver. • Turn on the main power.
Remote controller Recording Tuner Troubleshooting (continued) Symptoms Causes Remedies Pages Too much noise is heard or sound is interrupted occasionally. (“STEREO” indicator does not light steadily.) • FM stereo waves may produce a hiss noise when a certain level is reached. • Switch the frequency receiving mode to mono. • Lower the treble level. • Adjust the position, height, and direction of the FM aerial. • Connect an outdoor FM aerial. Try to use an aerial with more elements.
Specifications AMPLIFIER SECTION Power Output (FTC) All channels 50 watts per channel min. RMS. into 6 ohms two channel driven, 1,000 Hz with no more than 0.2 % total harmonic distortion. Continuous power output (DIN) All channels 50 watts per channel min. RMS. into 6 ohms two channel driven, 1,000 Hz Total Harmonic Distortion 0.2 % at rated power 0.2 % at 1 watt output IM Distortion 0.2 % at rated power 0.
Index to Parts and Controls For operational instructions, refer to the page indicated in brackets.
Display 1 2 3 4 5 H I J 6 78 9 0 A BCD E F G K 1 REPEAT indicator B TUNED indicator 2 Inserted disc indicator C FM STEREO indicator 3 SLEEP indicator D REMAIN (remaining time) indicator 4 PCM DIGITAL indicator E FM MUTE indicator 5 TITLE/TRACK/CHP (chapter) indicator F MEMORY indicator 6 DOLBY DIGITAL indicator G RDS indicator 7 DOLBY PRO LOGIC indicator H Angle icon indicator 8 DTS indicator I Play mode indicator 9 DSP indicator J FM/AM indicator 0 STEREO indicator K Multipurpo
Index to Parts and Controls (continued) Rear Panel 1 7 89 2 34 5 6 ANTENNA S VIDEO CENTER SUBWOOFER 0 A B DIGITAL OUTPUT MONITOR OUT DIGITAL INPUT OPTICAL OPTICAL VIDEO 1 COAXIAL VIDEO 2 PRE OUT (REC) AM FM 75 OUT OUT VIDEO 1 TAPE / MD IN (PLAY) IN AC CONNECTOR MONITOR OUT TV I N CENTER SPEAKER SURROUND SPEAKERS L R FRONT SPEAKERS R OUT L VIDEO 1 IN VIDEO 2 IN R C L D R E 1 FM ANTENNA connector [14] 2 AM ANTENNA connectors [14] 3 TV IN jacks [10] 4 TAPE/MD IN (PLAY)/OUT (R
Remote controller A LEVEL / buttons [19, 32] B Number buttons [23] C SEARCH button [23, 25, 35] 1 2 3 POWER SLEEP ON STANDBY 4 TITLE 5 6 7 DIMMER DISPLAY SURROUND MODE INPUT SELECTOR DVD TV ENTER RETURN 8 9 0 MENU SETUP CH SEL 1 2 TEST TONE LEVEL 4 5 6 7 8 9 +10 0 FR PAUSE TAPE VIDEO 2 TUNER ANGLE SEARCH FF CLEAR POWER PLAY UP CHANNEL RANDOM STOP SLOW TUNER PRESET A-B V SUBTITLE Y ZOOM [ DOWN REPEAT P Q R S T U W 3 A B C D E F G H I J K L M N O VI
Sales & Product Planning Div. : 2-1, Nisshin-cho, Neyagawa-shi, OSAKA 572-8540, JAPAN Tel: 072-831-8111 Fax: 072-833-5222 ONKYO U.S.A. CORPORATION 200 Williams Drive, Ramesy, N.J. 07446, U.S.A. Tel: 201-825-7950 Fax: 201-825-8150 E-mail: onkyo@onkyousa.com ONKYO EUROPE ELECTRONICS GmbH Industriestrasse 20, 82110 Germering, GERMANY Tel: 089 84 93 20 Fax: 089 84 93 226 E-mail: info@onkyo.de ONKYO CHINA LIMITED Units 2102-7, Metroplaza Tower I, 223 Hing Fong Road, Kwai Chung, N.T.