Contents BLU-RAY DISC PLAYER Introduction ............................................................ 2 DV-BD507 Connections ............................................................ 13 Instruction Manual Playback ..................................................................... 19 Function Setup ..................................................... 33 Others ........................................................................... 50 Thank you for purchasing an Onkyo BLU-RAY DISC PLAYER.
WARNING: TO REDUCE THE RISK OF FIRE OR ELECTRIC SHOCK, DO NOT EXPOSE THIS APPARATUS TO RAIN OR MOISTURE. CAUTION: TO REDUCE THE RISK OF ELECTRIC SHOCK, DO NOT REMOVE COVER (OR BACK). NO USER-SERVICEABLE PARTS INSIDE. REFER SERVICING TO QUALIFIED SERVICE PERSONNEL.
PRECAUTIONS Do not place the unit on the furniture that is capable of being tilted by a child and an adult leaning, pulling, standing or climbing on it. A falling unit can cause serious injury or even death. 1. Recording Copyright—Unless it’s for personal use only, recording copyrighted material is illegal without the permission of the copyright holder. 2. AC Fuse—The AC fuse inside the unit is not userserviceable. If you cannot turn on the unit, contact your Onkyo dealer. 3.
PRECAUTIONS • Do not use this unit when there’s the possibility of moisture condensation occurring. Doing so may damage your discs and certain parts inside this unit. If condensation does occur, remove all discs and leave this unit turned on for two to three hours. By this time, the unit will have warmed up and any condensation will have evaporated. 12.
PRECAUTIONS Supplied Accessories remote control with batteries (AAx2) RCA audio / video cables instruction manual quick start guide Instruction Manual Note about Recycling • This unit’s packaging materials are recyclable and can be reused. Please dispose of any materials in accordance with your local recycling regulations. • Batteries should never be thrown away or incinerated but disposed of in accordance with your local regulations concerning chemical wastes.
PRECAUTIONS Trademark Information “BD-LIVE” logo is trademark of Blu-ray Disc Association. HDMI, the HDMI logo and High-Definition Multimedia Interface are trademarks or registered trademarks of HDMI Licensing LLC. Manufactured under license from Dolby Laboratories. Dolby and the double-D symbol are trademarks of Dolby Laboratories. Manufactured under license under U.S. Patent #’s: 5,451,942; 5,956,674; 5,974,380; 5,978,762; 6,226,616; 6,487,535; 7,392,195; 7,272,567; 7,333,929; 7,212,872 & other U.S.
CONTENTS Introduction Function Setup PRECAUTIONS . . . . . . . . . . . . . . . . . . . . . . . . . . . . . . . . . . . 3 FEATURES . . . . . . . . . . . . . . . . . . . . . . . . . . . . . . . . . . . . . . . 8 Features . . . . . . . . . . . . . . . . . . . . . . . . . . . . . . . . . . . . . . . . . . . .8 Symbols Used in this Manual . . . . . . . . . . . . . . . . . . . . . . . .8 FUNCTIONAL OVERVIEW . . . . . . . . . . . . . . . . . . . . . . . . . 9 Front Panel . . . . . . . . . . . . . . . . . . . . .
FEATURES Features Full high-definition video playback Watch movies in the highest picture quality available for your HDTV. This unit offers full high-definition video playback up to 1080p resolution for an amazing viewing experience. A highly detailed picture and increased sharpness delivers a more true-to-life picture. Upconvert DVD for enhanced picture quality Your current DVD will look even better than before thanks to video upconversion.
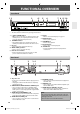
FUNCTIONAL OVERVIEW Front Panel 12 * 3 4* 5 6 7 8 9* 10 The unit can also be turned on by pressing these buttons. y ON / STANDBY button 1. I /y • Press to turn on the unit, or to turn the unit into the standby mode. (To completely shut down the unit, you must unplug the AC power cord) 2. STANDBY indicator • This indicator lights up in red when the unit is in standby mode and turns off when the unit is active. 3. Disc tray • Place a disc when opening the disc tray. 4.
FUNCTIONAL OVERVIEW Remote Control 1 14 2 15* 16 3 17 4 18 19 20 5 11* 6 21 7 22 8 23 9 24 10 25 12 27 13 28 * 26 The unit can also be turned on by pressing these buttons. 1. DISPLAY button • Press to display the on-screen display menu. y button 2. ON/STANDBY I /y • Press to turn on the unit, or to turn the unit into the standby mode. (To completely shut down the unit, you must unplug the AC power cord) 3. Number buttons • Press to enter the title, chapter, track or file number.
FUNCTIONAL OVERVIEW Installing the Batteries in the Remote Control Install the batteries (AAx2) matching the polarity indicated inside battery compartment of the remote control. 1 Open the cover. 2 Insert batteries. Using a Remote Control Keep in mind the following when using the remote control: • Make sure that there are no obstacles between the remote control and the infrared sensor window on the unit.
FUNCTIONAL OVERVIEW Front Panel Display 1 2 • Brightness of the display can be adjusted. Refer to “Panel Display” in “FUNCTION SETUP” on page 43. 1. Displays playback status icon. Refer to the table below. 2. Displays various kinds of information such as title number, elapsed time, repeat mode, etc.
CONNECTIONS Connection to the TV • Make one of the following connections, depending on the capabilities of your existing device.
CONNECTIONS HDMI Output Mode and Actual Output Signals Press [RESOLUTION] to change the resolution of the video signal being output from HDMI OUT jack. The video resolution changes as follows every time [RESOLUTION] is pressed.
CONNECTIONS ■ Audio signals output from HDMI OUT jack “HDMI Audio Out” setting “BD Audio Mode” setting Media *1 *2 *3 *4 *5 *6 *7 “HD Audio Output” “Mix Audio Output” “HD Audio Output” “Mix Audio Output” Dolby Digital Dolby Digital Dolby Digital Dolby Digital Dolby Digital Plus Dolby Dolby Digital TrueHD Multi PCM Multi PCM Downmix 2ch PCM Downmix 2ch PCM Multi PCM*1 Multi PCM*2 Downmix 2ch PCM*1 Downmix 2ch PCM*2 Multi PCM*3 Multi PCM*4 Multi PCM*7 Dolby Digital LPCM Dolby Digital DTS LPC
CONNECTIONS Connection to an Audio System • When you change the connections, all devices should be turned off. • Refer to the manual accompanying external devices for more information.
CONNECTIONS ■ Audio signals output from AUDIO OUTPUT (DIGITAL OPTICAL / COAXIAL) jacks For the settings in the “Digital Out” to take effect, “HDMI Audio Out” should be set to “Audio Mute”. Otherwise, the settings made in the “HDMI Audio Out” will have a priority, and the same signal as being output from the HDMI OUT jack will be output from the AUDIO OUTPUT (DIGITAL OPTICAL / COAXIAL) jacks as well.
CONNECTIONS Network Connection with LAN • You can use a disc which offers BD-Live function by connecting the unit to the Internet. (For BD-Live information, please refer to page 29) Telecommunications equipment (modem, etc.) Hub or broadband router WAN LAN LAN 5 4 3 2 1 LAN cable LAN cable Internet this unit No supplied cables are used in this connection: Please purchase the necessary cables at your local store. Note • After connecting to the Internet, set up necessary network settings.
INFORMATION ON PLAYBACK Before you start playing back a disc, read the following information. Readable cards Playable Discs and Files This unit is compatible to play back the following discs / files. To play back a disc / file, make sure that it meets the requirements for region codes and color systems as described below. You can play back discs that have the following logos. Other disc types are not guaranteed to play back. Playable discs Blu-ray Disc - BD-video (single / double layer) - BD-RE* (ver. 2.
INFORMATION ON PLAYBACK On-Screen Display Color Systems BD-video and DVD-video are recorded in different color systems throughout the world. The most common color system is NTSC (which is used primarily in the United States and Canada). This unit employs NTSC color system, so the disc you play back must be recorded in the NTSC system. You cannot play back the disc recorded in other color systems. You can check information about the current disc by pressing [DISPLAY].
INFORMATION ON PLAYBACK ■ Chapter information ■ HDMI information
1 2 1 1 / 10 3 4 5 3 <chapter information for dvd> CHAPTER 2 6 3/5 0 : 01 : 02 Video Info : Audio Info : Max Channel : B T B 1 Current title number 2 Current chapter number / Total number of chapters 3 Current repeat setting (Only when repeat setting is active) (C: Chapter repeat, T: Title repeat, AB : A-B repeat) 4 Indicates that the multi camera angle images are available on</p></li><li><h6><a class="text-decoration-none text-link fw-bold" href=/manual/onkyo/dv-bd507/blu-ray-disc-player-instruction-manual/page-22.html>PAGE 22</a></h6><p>BASIC PLAYBACK Playing Back a BD, DVD or a Disc with AVCHD Files BD-V DVD-V AVCHD 1 Press [ON /STANDBY I /y]. 2 Turn on the TV and select the appropriate input on the TV to which the unit is connected. 3 4 Press [OPEN / CLOSE A ] to open the disc tray. Place the disc on the disc tray with its label side facing up. Align the disc to the disc tray guide. 5 Press [OPEN / CLOSE A ] to close the disc tray. It may take a while to load the disc. Some discs may start playback automatically.</p></li><li><h6><a class="text-decoration-none text-link fw-bold" href=/manual/onkyo/dv-bd507/blu-ray-disc-player-instruction-manual/page-23.html>PAGE 23</a></h6><p>BASIC PLAYBACK Operations Using Title Menu, Disc Menu, and Pop-up Menu BD-V DVD-V AVCHD Many of BD-video and DVD-video disc contains title menu (BD-video / DVD-video / AVCHD), disc menu (DVD-video) or pop-up menu (BD-video) which guides you through the available functions in the disc. The contents of the menus may differ depending on the discs. Pause 1 During playback, press [PAUSE F ]. • Playback will be paused. 2 Press [PLAY B ] to return to normal playback.</p></li><li><h6><a class="text-decoration-none text-link fw-bold" href=/manual/onkyo/dv-bd507/blu-ray-disc-player-instruction-manual/page-24.html>PAGE 24</a></h6><p>BASIC PLAYBACK It is recommended that MP3 files to be played back in this unit are recorded under the following specifications: • Sampling frequency: 32 kHz, 44.1 kHz or 48 kHz • Constant bit rate: 112 kbps - 320 kbps Playing Back an Audio CD or a Disc with MP3 Files CD 1 MP3 Insert an audio CD or a disc with MP3 files. • The file list will appear on the TV screen. • The system can recognize up to 255 folders / 999 files To return to the first item: • Press [TOP MENU].</p></li><li><h6><a class="text-decoration-none text-link fw-bold" href=/manual/onkyo/dv-bd507/blu-ray-disc-player-instruction-manual/page-25.html>PAGE 25</a></h6><p>BASIC PLAYBACK Reading the SD Memory Card AVCHD MP3 You can play back the AVCHD/MP3 files in an SD Memory Card. With the SD Memory Card, you can also enjoy the special additional contents for BD-ROM ver. 2 (Profile 2.0/ Profile 1.1) which can be downloaded from the Internet. You can store the contents on an SD Memory Card via computer and play them back with the BD-video. For more information about the special additional contents, please refer to the instruction book that came with the disc.</p></li><li><h6><a class="text-decoration-none text-link fw-bold" href=/manual/onkyo/dv-bd507/blu-ray-disc-player-instruction-manual/page-26.html>PAGE 26</a></h6><p>SPECIAL PLAYBACK Fast Forward / Fast Reverse BD-V 1 DVD-V AVCHD CD MP3 During playback, press [FWD D] repeatedly for fast forward. During playback, press [REV E] repeatedly for fast reverse. Every time you press [FWD D] or [REV E], the playback speed will change. 2 Press [PLAY B] to return to normal playback. Note • For BD, DVD and AVCHD, speed changes in 5 different levels. • For audio CD and MP3, speed changes in 3 different levels.</p></li><li><h6><a class="text-decoration-none text-link fw-bold" href=/manual/onkyo/dv-bd507/blu-ray-disc-player-instruction-manual/page-27.html>PAGE 27</a></h6><p>SPECIAL PLAYBACK A-B Repeat DVD-V BD-V AVCHD Program Playback CD You can play back the specific part (between point A and point B) repeatedly. 1 2 During playback, press [A-B] at the desired starting point A. During playback, press [A-B] at the desired ending point B. CD MP3 You can play back the disc in your desired order. 1 In stop mode, press [MODE]. • The program screen will appear. 2 Use [K / L] to select a track / file, then press [ENTER].</p></li><li><h6><a class="text-decoration-none text-link fw-bold" href=/manual/onkyo/dv-bd507/blu-ray-disc-player-instruction-manual/page-28.html>PAGE 28</a></h6><p>SPECIAL PLAYBACK 3 Press [PLAY B ] to start program playback. Random Playback • Program playback will start. CD To exit from the program playback mode: • Press [RETURN] in stop mode. MP3 This function shuffles the playback order of tracks / files. 1 In stop mode, press [MODE] twice. • The random screen will appear.</p></li><li><h6><a class="text-decoration-none text-link fw-bold" href=/manual/onkyo/dv-bd507/blu-ray-disc-player-instruction-manual/page-29.html>PAGE 29</a></h6><p>SPECIAL PLAYBACK Rapid Playback DVD-V BD-V Enjoying BD-Live Discs with Internet AVCHD BD-V This function plays back approximately at 1.3 times the normal playback while keeping the sound output. This function is available only on discs recorded in the Dolby Digital format. 1 During playback, press [MODE] repeatedly until the Rapid playback setting appears. Off 2 3 Press [ENTER] or [s / B] to switch off. (x1.</p></li><li><h6><a class="text-decoration-none text-link fw-bold" href=/manual/onkyo/dv-bd507/blu-ray-disc-player-instruction-manual/page-30.html>PAGE 30</a></h6><p>SEARCH Using [SKIP H / G ] 1 Using [the Number buttons] (Direct Search) During playback, press [SKIP G] to move to the next track. Press it repeatedly to skip to subsequent tracks. Press [SKIP H ] once to go back to the beginning of the current track. Press it repeatedly to go to the previous tracks. Note • For BD and DVD, if title contains no chapters, [SKIP H / G ] changes the title. Title Search 1 In stop mode, enter the title number you want to search using [the Number buttons].</p></li><li><h6><a class="text-decoration-none text-link fw-bold" href=/manual/onkyo/dv-bd507/blu-ray-disc-player-instruction-manual/page-31.html>PAGE 31</a></h6><p>SPECIAL SETTINGS You can select the format of audio and video as you prefer depending on the contents of the disc you are playing back. Switching Subtitles Switching Audio Soundtrack Some BD and DVD may have subtitles in 1 or more languages. For commercially available discs, the supported languages can be found on the disc case. Follow the steps below to switch the subtitle languages during playback.</p></li><li><h6><a class="text-decoration-none text-link fw-bold" href=/manual/onkyo/dv-bd507/blu-ray-disc-player-instruction-manual/page-32.html>PAGE 32</a></h6><p>SPECIAL SETTINGS Setting the BD Audio Mode BD-V There are 2 ways to set “BD Audio Mode” setting; whether to output the secondary and interactive audio accompanied by the primary audio or only the primary audio. Depending on the setting of the mode, Dolby Digital, Dolby Digital Plus, Dolby TrueHD, DTS, or DTS-HD output changes between multi LPCM and bitstream. 1 2 In stop mode with BD inserted, press [MODE]. Use [K / L] to select your desired setting.</p></li><li><h6><a class="text-decoration-none text-link fw-bold" href=/manual/onkyo/dv-bd507/blu-ray-disc-player-instruction-manual/page-33.html>PAGE 33</a></h6><p>FUNCTION SETUP Using the Setup Menu In the setup menu you can change the setting for audio, video, language, etc. You cannot change the setting during playback. Setting items displayed in gray indicates they are not available under the conditions at the time. Quick “Quick” menu contains setting items extracted from “Custom” menu which may be used frequently. 1 In stop mode, press [SETUP]. 2 Use [K / L] to select [ENTER]. 3 Use [K / L] to select your desired setting items.</p></li><li><h6><a class="text-decoration-none text-link fw-bold" href=/manual/onkyo/dv-bd507/blu-ray-disc-player-instruction-manual/page-34.html>PAGE 34</a></h6><p>FUNCTION SETUP Custom “Custom” menu contains all the setting items. 1 2 3 In stop mode, press [SETUP]. Use [K / L] to select [ENTER]. , then press Use [K / L] to select your desired setting category, then press [ENTER]. : Language : Video : Audio : Parental : Others • For “Parental” menu, follow the procedure on page 42. 4 Use [K / L] to select your desired setting items. 5 Follow the procedure below depending on the setting items.</p></li><li><h6><a class="text-decoration-none text-link fw-bold" href=/manual/onkyo/dv-bd507/blu-ray-disc-player-instruction-manual/page-35.html>PAGE 35</a></h6><p>FUNCTION SETUP ■ Language Language Audio Original Subtitle Off Disc Menu English Player Menu English • For how to select the setting items and options, refer to “Custom” on page 34. Setting items Audio Sets the language for audio. Subtitle Sets the language for subtitle. Disc Menu Sets the language for disc menu or pop-up menu. Player Menu Sets the language for OSD (on-screen display).</p></li><li><h6><a class="text-decoration-none text-link fw-bold" href=/manual/onkyo/dv-bd507/blu-ray-disc-player-instruction-manual/page-36.html>PAGE 36</a></h6><p>FUNCTION SETUP ■ Video Video TV Aspect 16:9 Wide HDMI Video Resolution Auto HDMI Deep Color Auto Component Output 480i Progressive Mode Auto Still Mode Auto • For how to select the setting items and options, refer to “Custom” on page 34. Setting items TV Aspect Sets the picture size according to aspect ratio of the connected TV. HDMI Video Resolution Sets the HDMI video resolution. HDMI Deep Color Sets whether to output the picture from HDMI OUT jack with Deep Color or not.</p></li><li><h6><a class="text-decoration-none text-link fw-bold" href=/manual/onkyo/dv-bd507/blu-ray-disc-player-instruction-manual/page-37.html>PAGE 37</a></h6><p>FUNCTION SETUP Setting items Still Mode*1 Adjusts picture resolution and quality in still mode. Options Auto*: Automatically selects the best resolution setting (“Frame” or “Field”) based on the data characteristics of the pictures. Field: Stabilizes the pictures, although the picture quality may become coarse due to the limited amount of data. Select “Field” when the pictures are still unstable even if “Auto” is selected. Frame: Displays relatively motionless pictures in higher resolution.</p></li><li><h6><a class="text-decoration-none text-link fw-bold" href=/manual/onkyo/dv-bd507/blu-ray-disc-player-instruction-manual/page-38.html>PAGE 38</a></h6><p>FUNCTION SETUP ■ Audio Audio BD Audio Mode HD Audio Output HDMI Audio Out HDMI Multi (Normal) Down Sampling On DRC Auto • For how to select the setting items and options, refer to “Custom” on page 34. Setting items BD Audio Mode For BD, selects whether to output the secondary and interactive audio with primary audio if it is available or only the primary audio. Refer to “Setting the BD Audio Mode” on page 32. Options HD Audio Output*: Outputs only the primary audio.</p></li><li><h6><a class="text-decoration-none text-link fw-bold" href=/manual/onkyo/dv-bd507/blu-ray-disc-player-instruction-manual/page-39.html>PAGE 39</a></h6><p>FUNCTION SETUP ■ Digital out setting When “Audio Mute” is selected in “HDMI Audio Out” setting, HDMI audio signal will be muted and the audio signals output from AUDIO OUTPUT (DIGITAL OPTICAL / COAXIAL) jacks change depending on “Digital Out” setting. Quick HDMI Audio Out Audio Mute Digital Out Bitstream*: When playing back discs recorded in Dolby Digital, Dolby Digital Plus, Dolby TrueHD, DTS or DTS-HD, the corresponding core stream (Dolby Digital or DTS) are output.</p></li><li><h6><a class="text-decoration-none text-link fw-bold" href=/manual/onkyo/dv-bd507/blu-ray-disc-player-instruction-manual/page-40.html>PAGE 40</a></h6><p>FUNCTION SETUP How to navigate through “HDMI Multi(LPCM)”. 1 2 Use [K / L] to select your desired menu item then press [ENTER]. Use [K / L] to select your setting items. • Press [RETURN] to go back to the previous screen. 3 Use [s / B] to select desired options. (Except for “Test Tone”, “Default” and setting options in “Speaker Size” setting.) For setting options in “Speaker Size” setting: Press [ENTER] to select desired options.</p></li><li><h6><a class="text-decoration-none text-link fw-bold" href=/manual/onkyo/dv-bd507/blu-ray-disc-player-instruction-manual/page-41.html>PAGE 41</a></h6><p>FUNCTION SETUP Menu Delay Time This is a parameter for optimizing the timing at which the sound is output from the speakers according to their distance from the listening position. Setting items Distance Options Feet* Meters Front 0ft to 60ft (12ft*) (0m to 18m (3.6m*)) 0ft to 60ft (12ft*) (0m to 18m (3.6m*)) 0ft to 60ft (10ft*) (0m to 18m (3.0m*)) 0ft to 60ft (10ft*) (0m to 18m (3.0m*)) Center Surround Surround Back Default Descriptions Set the desired measure system.</p></li><li><h6><a class="text-decoration-none text-link fw-bold" href=/manual/onkyo/dv-bd507/blu-ray-disc-player-instruction-manual/page-42.html>PAGE 42</a></h6><p>FUNCTION SETUP ■ Parental Ratings control allows you to set a limit, which prevents your children from viewing inappropriate materials. Playback will be stopped if the ratings exceed the levels you set, and it will require you to enter a password before playing back the disc. Parental BD Rating Level All DVD Rating Level All Password Change 1 2 Use [K / L] to select , then press [ENTER]. Use [the Number buttons] to enter your 4-digit password.</p></li><li><h6><a class="text-decoration-none text-link fw-bold" href=/manual/onkyo/dv-bd507/blu-ray-disc-player-instruction-manual/page-43.html>PAGE 43</a></h6><p>FUNCTION SETUP ■ Others Others Angle Icon On Auto Power Off On Panel Display Auto HDMI CEC On Media Select Disc Network Connection Enable(Easy) Software Upgrade • For how to select the setting items and options, refer to “Custom” on page 34. Setting items Angle Icon Auto Power Off Panel Display Sets the brightness of the front panel display. HDMI CEC Sets whether to utilize HDMI CEC function. Media Select Selects the media to playback.</p></li><li><h6><a class="text-decoration-none text-link fw-bold" href=/manual/onkyo/dv-bd507/blu-ray-disc-player-instruction-manual/page-44.html>PAGE 44</a></h6><p>FUNCTION SETUP Setting items Network Connection Options Enable (Custom) Proxy Setting Do Not Use* Use Proxy Address Proxy Port Connection Auto* Speed 10BASE Half 10BASE Full 100BASE Half Set the proxy server. In most cases, you can connect to the Internet without using proxy server. Set the connection speed. In most cases, you can connect to the Internet without making any changes to the default setting.</p></li><li><h6><a class="text-decoration-none text-link fw-bold" href=/manual/onkyo/dv-bd507/blu-ray-disc-player-instruction-manual/page-45.html>PAGE 45</a></h6><p>FUNCTION SETUP Enable(Easy) Network Connection Set up the network connection settings in order to use the BD-Live function with a BD-Live disc. Network settings are set to the following settings initially. (In most cases, you can connect to the Internet without making any changes to the default settings.</p></li><li><h6><a class="text-decoration-none text-link fw-bold" href=/manual/onkyo/dv-bd507/blu-ray-disc-player-instruction-manual/page-46.html>PAGE 46</a></h6><p>FUNCTION SETUP If you select “Manual”, follow the following instruction to set the IP address and DNS. 3-a) Use [K / L] to select “IP Address”, “Subnet Mask” or “Default Gateway”, then press [ENTER]. IP address setting screen will appear. Enter IP address, subnet mask and default gateway with cursor buttons and number buttons. 3-d) After you enter all correctly, press [ENTER]. • Confirmation message will appear. Select “Yes” to complete the settings.</p></li><li><h6><a class="text-decoration-none text-link fw-bold" href=/manual/onkyo/dv-bd507/blu-ray-disc-player-instruction-manual/page-47.html>PAGE 47</a></h6><p>FUNCTION SETUP 3-a) Use [K / L] to select “Proxy Address”, then press [ENTER]. Proxy address setting screen will appear. Enter proxy address. • The keyboard screen will appear. • Connection Speed You can set connection speed as your preference. (The default setting is “Auto”.) 1 Others 2 Proxy Address _ 3 3 4 5 b c d l m n v w x 1 2 a k u Clear [K / L/ s / B] : [the Number buttons] : [ENTER] : [A] : [B] : [C] : [D] : 6 7 8 e f g h i j o p q r s t y z .</p></li><li><h6><a class="text-decoration-none text-link fw-bold" href=/manual/onkyo/dv-bd507/blu-ray-disc-player-instruction-manual/page-48.html>PAGE 48</a></h6><p>FUNCTION SETUP 5 Press [RETURN] to go back to the previous screen, or press [SETUP] to exit. Disable Deactivate all the network connection and settings. 1 2 3 Follow steps 1 to 4 in “Connection Test” on page 45. Use [K / L] to select “Disable”, then press [ENTER]. Press [RETURN] to go back to the previous screen, or press [SETUP] to exit. Note • The network connection can be reactivated by setting the network connection to “Enable(Easy)” or “Enable(Custom)”. 5 Disc tray will open automatically.</p></li><li><h6><a class="text-decoration-none text-link fw-bold" href=/manual/onkyo/dv-bd507/blu-ray-disc-player-instruction-manual/page-49.html>PAGE 49</a></h6><p>FUNCTION SETUP Initialize Initialize the setting or SD Memory Card. 1 2 3 In stop mode, press [SETUP]. Use [K / L] to select [ENTER]. , then press Use [K / L] to select a desired option, then press [ENTER]. “Setup”: Resets the setup menu to the default. The setting for “Parental”, “Network Connection”and “Media Select” will not be reset. “Format SD Card” (Available only when an SD Memory Card is inserted.): Initializes the SD Memory Card.</p></li><li><h6><a class="text-decoration-none text-link fw-bold" href=/manual/onkyo/dv-bd507/blu-ray-disc-player-instruction-manual/page-50.html>PAGE 50</a></h6><p>TROUBLESHOOTING If the unit does not perform properly when operated as instructed in this manual, check the unit, consulting the following checklist. Problem No power No sound or picture - Distorted picture - Solution Check if the AC cord is properly connected. Unplug the AC cord once, and wait for 5-10 seconds and then plug it in again. Check if the connected TV is turned on. Check if the connections are made securely and correctly. Check whether the connected TV or other device supports HDCP.</p></li><li><h6><a class="text-decoration-none text-link fw-bold" href=/manual/onkyo/dv-bd507/blu-ray-disc-player-instruction-manual/page-51.html>PAGE 51</a></h6><p>TROUBLESHOOTING Problem Solution The password for rating level has - Enter the default password “4737”, then your forgotten password will be cleared. been forgotten Cannot connect the network - Check if the LAN cable connection is properly made. Turn on the modem or broadband router. Check the network setting. Check if the broadband router and/or modem is correctly connected. Check the “BD-Live Setting”.</p></li><li><h6><a class="text-decoration-none text-link fw-bold" href=/manual/onkyo/dv-bd507/blu-ray-disc-player-instruction-manual/page-52.html>PAGE 52</a></h6><p>GLOSSARY Analog Audio Dolby Digital Plus An electrical signal that directly represents sound. Compare this to digital audio which can be an electrical signal, but is an indirect representation of sound. See also “Digital Audio”. Dolby Digital Plus is the next generation digital audio compression technology developed as an extension to Dolby Digital. Blu-ray Disc supports 7.1 multi-channel surround sound output. Aspect Ratio Dolby TrueHD The width of a TV screen relative to its height.</p></li><li><h6><a class="text-decoration-none text-link fw-bold" href=/manual/onkyo/dv-bd507/blu-ray-disc-player-instruction-manual/page-53.html>PAGE 53</a></h6><p>GLOSSARY Region Code Regions associate discs and players with particular areas of the world. This unit will only play back discs that have compatible region codes. You can find the region code of your unit by looking on the rear panel. Some discs are compatible with more than one region (or all regions). Router A networking device which distinguishes the IP address assigned to each device and routing and forwarding information in the computer network.</p></li><li><h6><a class="text-decoration-none text-link fw-bold" href=/manual/onkyo/dv-bd507/blu-ray-disc-player-instruction-manual/page-54.html>PAGE 54</a></h6><p>LANGUAGE CODE Language A-B Abkhazian Afar Afrikaans Albanian Amharic Arabic Armenian Assamese Aymara Azerbaijani Bashkir Basque Bengali;Bangla Bhutani Bihari Bislama Breton Bulgarian [BUL] Burmese Byelorussian C-E Cambodian Catalan Chinese [CHI] Corsican Croatian Czech [CZE] Danish [DAN] Dutch [DUT] English [ENG] Esperanto Estonian F-H Faroese Fiji Finnish [FIN] Code 4748 4747 4752 6563 4759 4764 5471 4765 4771 4772 4847 5167 4860 5072 4854 4855 4864 4853 5971 4851 5759 4947 7254 4961 5464 4965 5047 6058 5</p></li><li><h6><a class="text-decoration-none text-link fw-bold" href=/manual/onkyo/dv-bd507/blu-ray-disc-player-instruction-manual/page-55.html>PAGE 55</a></h6><p>SPECIFICATIONS General Signal system Power requirements Power consumption Dimensions (width x height x depth) Weight Operating temperature Operating humidity Rear Terminals Audio output (Analog) RCA jack x 2 Video output RCA jack x 1 Component video output RCA jack x 3 Audio output (Digital) RCA jack x 1 Optical jack x 1 HDMI output HDMI jack x 1 ETHERNET terminal NTSC color 120V AC, 60Hz 22W (standby: 0.7W) 17-1/8 x 2-3/4 x 12-3/16 inches (435 x 69.3 x 310mm) 6.6 lbs ( 3.</p></li><li><h6><a class="text-decoration-none text-link fw-bold" href=/manual/onkyo/dv-bd507/blu-ray-disc-player-instruction-manual/page-56.html>PAGE 56</a></h6><p>Sales & Product Planning Div. : 2-1, Nisshin-cho, Neyagawa-shi, OSAKA 572-8540, JAPAN Tel: 072-831-8023 Fax: 072-831-8163 ONKYO U.S.A. CORPORATION 18 Park Way, Upper Saddle River, N.J. 07458, U.S.A. Tel: 201-785-2600 Fax: 201-785-2650 http://www.us.onkyo.com/ ONKYO EUROPE ELECTRONICS GmbH Liegnitzerstrasse 6, 82194 Groebenzell, GERMANY Tel: +49-8142-4401-0 Fax: +49-8142-4401-555 http://www.eu.onkyo.</p></li></ul></nav></div></section></section></main><footer class=page-footer><div class="container flex-column py-3 py-sm-4"><div class="row mb-1 mb-sm-2 mb-md-5"><a href=/ class="brand offset-sm-0 col-sm-4 col-md-3 col-lg-2 offset-2 col-8 text-center text-md-start"><img class=logo-small src=/assets/img/brand-large.png alt=Manualshelf></a></div><div class=row><dl class="text-center text-sm-start col-sm-3"><dt class=fw-bold>Who We Are</dt><dd><a class=text-decoration-none href=/about>About Us</a></dd><dd><a class=text-decoration-none href=/company>Company</a></dd><dd><a class=text-decoration-none href=/careers>Careers</a></dd><dd><a class=text-decoration-none href=/terms>Terms & Privacy</a></dd></dl><dl class="text-center text-sm-start col-sm-3"><dt class=fw-bold>Resources</dt><dd><a class=text-decoration-none href=/brands>List of Manufacturers</a></dd><dd><a href=/ class=text-decoration-none>Support</a></dd><dd><a class=text-decoration-none href=/press>For the Press</a></dd><dd><a class=text-decoration-none href=/press#assets>Media assets</a></dd><dd><a class=text-decoration-none href=/faq>FAQ</a></dd></dl><dl class="text-center text-sm-start col-sm-3"><dt class=fw-bold>Get in touch</dt><dd><a class=text-decoration-none href=#>Blog</a></dd><dd><a class=text-decoration-none href=#>Email</a></dd><dd><a class=text-decoration-none href=/dmca>DMCA</a></dd></dl></div><div class=row><div class="text-center text-sm-start col-sm-4 pe-sm-0"><a href=https://www.facebook.com/pages/ManualShelf/1488826334681423 class="fs-5 text-center d-inline-block social rounded-2 align-middle text-decoration-none me-2"><i class="fab fa-facebook-f"></i></a><a href=https://www.twitter.com/ManualShelf class="fs-5 text-center d-inline-block social rounded-2 align-middle text-decoration-none me-2"><i class="fab fa-twitter"></i></a><a href=https://plus.google.com/+ManualShelf class="fs-5 text-center d-inline-block social rounded-2 align-middle text-decoration-none me-2"><i class="fab fa-google-plus-g"></i></a><a href=http://www.pinterest.com/ManualShelf class="fs-5 text-center d-inline-block social rounded-2 align-middle text-decoration-none"><i class="fab fa-pinterest-p"></i></a></div><div class="col col-sm-8 d-flex flex-column align-items-center flex-sm-row flex-wrap flex-sm-nowrap justify-content-center justify-content-sm-end"><div class="copy w-auto d-flex align-items-center justify-content-center justify-content-sm-end mt-2 mt-sm-0 me-2">ManualShelf © 2013-2025</div><select class="form-select form-select-sm w-auto mt-2 mt-sm-0"><option value=usa>USA</option></select><div></div></div><div id=pixel><script>
googletag.cmd.push(function() { googletag.display('pixel'); });
</script></div></footer><script src=/assets/js/jquery-3.3.1.min.js></script><script src=/assets/js/bootstrap.bundle.min.js></script><script src=/assets/js/jquery.autocomplete.min.js></script><script type=text/javascript>
$.extend({
redirectPost: function(location, args) {
var form = '';
$.each(args, function(key, value) {
form += '<input type="hidden" name="' + key + '" value="' + value + '">';
});
form = '<form id="s1" action="' + location + '" method="POST">' + form + '</form>';
$(document.body).append(form);
$("#s1").submit();
}
});
$(document).ready(function(){
$("#query").autocomplete({
minChars: 3,
groupBy: 'type',
paramName: 'q',
dataType: 'json',
serviceUrl: '/autocomplete',
noCache: true,
showNoSuggestionNotice: true,
noSuggestionNotice: 'Zarro results found',
onSelect: function (suggestion) {
$.redirectPost(suggestion.data.url, {highlight: encodeURIComponent(JSON.stringify(suggestion.data.hls))});
}
});
var toc = $('.toc-selector');
if (toc.length) {
var slideParams = { duration: 800, easing: 'linear' };
toc.click(function() {
$(this).toggleClass('open');
var section = $('.toc-content');
var isCollapsed = section.attr('data-collapsed') === 'true';
if (isCollapsed) {
section.slideDown(slideParams)
section.attr('data-collapsed', 'false')
} else {
section.slideUp(slideParams);
section.attr('data-collapsed', 'true')
}
});
}
});
var lastSmall = $(window).width() < 576;
$(window).resize(function() {
var newSmall = $(window).width() < 576;
if (lastSmall != newSmall) {
lastSmall = newSmall;
window.location.href = window.location.href;
}
});
</script></body></html>