
DV-CP706 DVD Changer Instruction Manual


54
Troubleshooting
—Continued
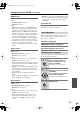
If you’re using an HDMI connection and there’s no picture or sound, you can check the status of the HDMI connection
by pressing and holding down the DV-CP706’s [DISPLAY] button for 10 seconds until a message ID appears on the
display. Look up the message ID in the following tables and check the HDMI connections and settings on both the
DV-CP706 and the connected component.
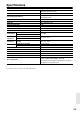
HDMI connection and HDMI-related settings status
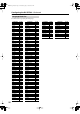
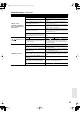
No picture from the HDMI connection
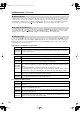
No sound from the HDMI connection
■
Abnormal Behavior
The DV-CP706 contains a microcomputer for signal processing and control functions. In very rare situations, severe
interference, noise from an external source, or static electricity may cause it to lockup. In the unlikely even that this
should happen, unplug the power cord from the wall outlet, wait at least five seconds, and then plug it back in again.
Alternatively, press and hold the Stop [ ] button until “RESET” appears on the display (about 10 seconds).
■
Restoring the Default Settings
To reset the DV-CP706 to its factory defaults, turn it on, and when “ONKYO DVD” has disappeared from the display,
while holding down the Stop [ ] button, press the [ON/STANDBY] button. “INITIALIZE” appears on the display.
When the reset is complete, “COMPLETE” is displayed, and the DV-CP706 enters Standby mode.
■
HDMI Status Mode
Displayed ID Message
MSG ID 001
MSG ID 005
MSG ID 015
Tu rn the DV-CP706 and the connected component off, then turn them on again. Make sure that the
connected component is working properly and that the DV-CP706’s HDMI settings are configured
suitably for that component.
Displayed ID Message
MSG ID 002 The HDMI Output Setting is set to Off. Change it to On (page 45).
MSG ID 003
MSG ID 004
The HDMI cable may not be connected properly. Check the connection. Also, make sure the HDMI
input on the TV or AV receiver is correctly configured to received HDMI.
MSG ID 005
MSG ID 006
MSG ID 007
Make sure the HDMI input on the TV or AV receiver is correctly configured to received HDMI.
The connected component may not support HDCP. Make sure the connected component supports
HDCP.
Tu rn the DV-CP706 and the connected component off, then turn them on again.
The DV-CP706 may be connected to the other component’s DVI jack. Some TVs may not properly
receive the video output by the DV-CP706. Also, with a DVI connection, there will be no sound.
MSG ID 008
The DV-CP706’s HD Resolution setting is set to 480i or 720p or 1080i or 1080p. If your TV doesn’t
support these resolutions, select another resolution (page 24).
MSG ID 009
The connected component may not be receiving the HDMI signal properly.
Tr y selecting another resolution on the DV-CP706 (page 24).
Displayed ID Message
MSG ID 010
The DV-CP706’s Digital/HDMI Audio Out setting is set to Off. Change the setting to All or PCM
(page 46).
MSG ID 011
MSG ID 014
The connected component may not support 96 kHz PCM. Set the DV-CP706’s Linear PCM Out
setting to Down Sample On (page 46).
MSG ID 012
MSG ID 013
The connected component may not support Dolby Digital. Set the DV-CP706’s Digital/HDMI Audio
Out setting to PCM (page 46).
MSG ID 016
MSG ID 017
The connected component may not support DTS.
The DV-CP706 cannot play the DTS format audio or soundtrack. On your DVD-Video disc’s audio
setup menu, select an audio format other than DTS.
DV-CP706_En.book Page 54 Wednesday, July 2, 2008 10:25 AM