Contents Before Using Your DVD Player DVD Player Getting Started DV-S535 Instruction Manual Basic Playback Advanced Playback Thank you for purchasing the ONKYO DVD Player. Please read this manual thoroughly before making connections and turning on the power. Following the instructions in this manual will enable you to obtain optimum performance and listening enjoyment from your new DVD Player. Please retain this manual for future reference.
WARNING: TO REDUCE THE RISK OF FIRE OR ELECTRIC SHOCK, DO NOT EXPOSE THIS APPLIANCE TO RAIN OR MOISTURE. WARNING AVIS RISK OF ELECTRIC SHOCK DO NOT OPEN RISQUE DE CHOC ELECTRIQUE NE PAS OUVRIR The lightning flash with arrowhead symbol, within an equilateral triangle, is intended to alert the user to the presence of uninsulated “dangerous voltage” within the product’s enclosure that may be of sufficient magnitude to constitute a risk of electric shock to persons.
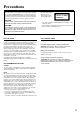
Precautions This unit contains a semiconductor laser system and is classified as a “CLASS 1 LASER PRODUCT.” So, to use this model properly, read this Instruction Manual carefully. In case of any trouble, please contact the store where you purchased the unit. To prevent being exposed to the laser beam, do not try to open the enclosure. The label on the right is applied on the rear panel except for USA and Canadian models.
Precautions 1. Regional Restriction Codes (Region Number) Regional restriction codes are built into DVD players and DVD videos for each sales region. If the regional code of the DVD Player does not match one of the regional codes on the DVD video, playback is not possible. The regional number can be found on the rear panel of the DVD Player. (e.g. 1 for Region 1) 2. About This Manual This manual explains the basic procedures for operating the DVD Player.
Table of Contents Important Safeguards/Precautions/Table of Contents ....................................... 2–5 Getting Started Features/Supplied Accessories ............................................................................. 6 Preparing the Remote Controller .......................................................................... 7 Connecting to a TV ...............................................................................................
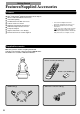
Getting Started Features/Supplied Accessories Features DTS*1/Dolby Digital*2/MPEG2/PCM Digital Audio Outputs Advanced 96-kHz/24-Bit D/A Converters Video CD Capability 27-MHz/10-bit Video D/A Conversion 3-Mode “Zoom-In” Function Audiophile-Grade Audio Performance RGB Video Output Scart Connector Composite Outputs High Resolution On-screen Display Full-Function Remote Control Supplied *1 “DTS” and “DTS Digital Surround” are trademarks of Digital Theater Systems, Inc.
Preparing the Remote Controller Inserting the Batteries 1 Open the battery compartment cover. Using the Remote Controller Point the remote controller toward the remote control sensor. STANDBY indicator (as remote control reception indicator) STANDBY/ON The STANDBY indicator lights up each time the DVD Player receives a signal from the remote controller. For the other functions of this indicator, see page 10. STANDBY Remote control sensor 2 Insert the two R6 (size AA) batteries.
Connecting to a TV Before connecting • Refer also to the instruction manual of the TV. • When you connect the DVD Player to the TV, be sure to turn off the power and unplug both units from the wall outlet before making any connections. • Connect the DVD Player to the TV directly. If you connect the DVD Player to a VCR, TV/VCR combination, or video selector, the playback picture may be distorted as DVD videos are copy protected.
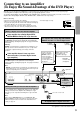
Connecting to an Amplifier (To Enjoy the Sound Advantage of the DVD Player) Although you can reproduce the DVD Player’s sound from the TV speakers with the connections on the opposite page, connecting with an amplifier and subwoofer provide you high quality dynamic sounds. To reproduce Dolby Digital surround, MPEG1 audio, MPEG2 audio*, and DTS surround sound, you need to connect to an amplifier with a Dolby Digital, MPEG1 audio, MPEG2 audio*, and DTS decoder respectively.
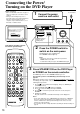
Connecting the Power/ Turning on the DVD Player Before connecting 1 • Make sure that all the connections on pages 8 and 9 are complete (the connection to a TV is required). • Turning on the DVD Player may cause a momentary power surge, which might interfere with other electrical equipment such as computers. To prevent the interference, use a wall outlet on a different circuit. To a wall outlet Connect the power cord to a wall outlet.
Notes on Discs This section shows you how to handle, clean, and store discs. Playable Discs Cleaning Discs This DVD Player can playback the following discs. Maximum playback time Approx. 4 hours (single sided disc) Approx. 8 hours (double sided disc) Approx. 80 minutes (single sided disc) Approx. 160 minutes (double sided disc) Contents Disc size Audio + Video (moving pictures) 12 cm VIDEO CDs Audio + Video (moving pictures) 12 cm Approx. 74 minutes 8 cm Approx.
Basic Playback Playing DVD Videos / VIDEO CDs / Audio CDs Before playing • DVD Videos, VIDEO CDs, and audio CDs can be played with the DVD Player (see “Playable Discs” on page 11). Do not play anything else. • When playing DVD videos or VIDEO CDs, turn on the TV and set the TV to the DVD Player’s input. • If the audio system is connected to the DVD Player, turn on the audio system and set it to the DVD Player’s input.
DVD DVD If the screen on the right appears – Screen Saver Tip to obtain a higher quality picture Occasionally, some picture noise not usually visible during a normal broadcast may appear on the TV screen while playing a DVD video because the high resolution pictures on these discs include a lot of information. While the amount of noise depends on the TV you use, you should generally adjust the TV to reduce sharpness when viewing DVD videos.
Playing DVD Videos / VIDEO CDs / Audio CDs To play in fast reverse or fast forward DVD VCD CD POWER DISPLAY DIMMER OPEN/ CLOSE Press d (Fast Reverse) or f (Fast Forward) during playback. DVD The playback speed becomes two times the normal speed.
DVD VCD Operating the menu appearing on the TV screen About disc menu DVD A DVD video may include more than one language and more than one sound system. In many instances, such DVD videos let you choose the language (e.g. disc menu language/audio language/subtitle language), sound system, and so on using the menu. Depending on the disc, the name of the disc menu varies and the disc menu may be included in the main menu.
Locating a Specific Title / Chapter / Track / Location The structure of the disc content VIDEO CD/Audio CD VIDEO CDs and Audio CDs are divided into tracks. DVD video Normally, DVD videos are divided into titles, and the titles are subdivided into chapters.
POWER DISPLAY DIMMER OPEN/ CLOSE SEARCH Number buttons 1 2 3 4 5 6 7 8 9 SEARCH +10 0 MENU TOP MENU TOP MENU MENU / / / ENTER / ENTER RETURN AUDIO STOP s SETUP SUBTITLE ANGLE SUBTITLE ON/OFF PLAY FR FF REPEAT A-B MEMORY CLEAR PAUSE/STEP DOWN UP SLOW RANDOM ZOOM CLEAR REMOTE CONTROLLER VCD 5 Locating a specific track directly Press s. PLAY The DVD Player starts playback from the selected chapter in the selected title.
Locating a Specific Title / Chapter / Track / Location POWER DISPLAY DIMMER OPEN/ CLOSE SEARCH Number buttons 1 2 3 4 5 6 7 8 9 SEARCH +10 0 MENU TOP MENU CURSOR OPEN/CLOSE STOP PLAY ENTER ENTER RETURN SETUP ACOUSTIC CONTROL STANDBY/ON MENU RETURN SETUP POWER ON DIMMER PAUSE AUDIO OFF SUBTITLE ANGLE SUBTITLE ON/OFF STANDBY STOP s q w PLAY FR FF REPEAT A-B MEMORY CLEAR PAUSE/STEP DOWN RANDOM REMOTE CONTROLLER DVD VCD DVD CD Locating a specific chapter or tra
Advanced Playback POWER DISPLAY DIMMER Playing Repeatedly OPEN/ CLOSE SEARCH 2 3 4 5 6 7 8 9 1 +10 0 MENU TOP MENU ENTER RETURN AUDIO STOP A-B REPEAT You can play a specific title, chapter, track, or segment repeatedly (Title repeat, chapter/track repeat, A-B repeat). DVD VCD Repeating a Title, Chapter, or Track You can play the same title, chapter, or track repeatedly (Title, chapter/track repeat). 1 Select the title, chapter, or track you want to repeat. (See pages 16 to 18.
POWER DISPLAY DIMMER Playing in a Favorite Order Title : 2 Chapter : 12 DISPLAY SEARCH 2 3 4 5 6 7 8 9 1 Number buttons +10 0 MENU Title : 2 Chapter : 25 OPEN/ CLOSE TOP MENU 2 Title : 1 Chapter : 1 ENTER RETURN SETUP RETURN AUDIO STOP 3 You can combine your favorite titles, chapters, or tracks and play them in any order. You can program up to 28 selections into the memory (Memory playback).
OPEN/ CLOSE POWER DISPLAY DIMMER Playing in Random Order SEARCH Number buttons 1 2 3 4 5 6 7 8 9 SEARCH +10 0 MENU TITLE Title : 1: 1 CHAPTER Chapter : 3: 3 TOP MENU ENTER Title : 2 Chapter : 2 Title : 3 Chapter : 1 s RETURN SETUP AUDIO SUBTITLE ON/OFF ANGLE SUBTITLE STOP PLAY FR FF REPEAT A-B MEMORY CLEAR PAUSE/STEP DOWN UP w You can play titles, chapters within a title, or tracks in random order (Random playback).
OPEN/ CLOSE POWER DISPLAY DIMMER Zooming a Picture SEARCH 2 3 4 5 6 7 8 9 1 +10 0 MENU / TOP MENU / / RETURN You can magnify areas within a picture. ENTER RETURN SETUP AUDIO SUBTITLE ON/OFF ANGLE SUBTITLE STOP PLAY FR FF REPEAT A-B MEMORY CLEAR PAUSE/STEP DOWN UP SLOW RANDOM ZOOM ZOOM CLEAR DVD Zooming a Picture and Shifting the Zoom Point You can zoom in on a picture. You can also shift the zoom point. ZOOM Press ZOOM during normal, slow, or still playback.
OPEN/ CLOSE POWER DISPLAY DIMMER Selecting the Camera Angle SEARCH 2 3 4 5 6 7 8 9 1 2 +10 0 MENU TOP MENU ENTER Angle : 1 Angle : 2 Angle : 3 1, 2 You can select a preferred camera angle to watch a scene.
Turning on/off Subtitles Selecting the Subtitle Language POWER DISPLAY DIMMER OPEN/ CLOSE SEARCH 2 3 4 5 6 7 8 9 1 / +10 0 MENU TOP MENU ENTER RETURN AUDIO STOP Good evening! Bon soir! ¡Buenas tardes! You can display subtitles on the TV screen and select a subtitle language from those included on the DVD video.
Selecting the Audio Language and Sound System as a set OPEN/ CLOSE POWER DISPLAY DIMMER SEARCH 2 3 4 5 6 7 8 9 1 +10 0 MENU TOP MENU MENU Good morning! Bon jour! / ¡Buenos días! / / AUDIO You can select a preferred audio language and sound system.
Using Information on the On-Screen Display and the DVD Player’s Display You can view information about a disc and its operational status on the TV screen and the DVD Player’s display. CURSOR OPEN/CLOSE STOP PLAY ENTER ACOUSTIC CONTROL STANDBY/ON MENU RETURN SETUP POWER ON DIMMER PAUSE OFF STANDBY Note Some DVD videos may not display the chapter number or elapsed time.
OPEN/ CLOSE POWER DISPLAY DIMMER DISPLAY SEARCH 2 3 4 5 6 7 8 9 1 +10 0 MENU TOP MENU Dimming the DVD Player’s Display ENTER RETURN Press DIMMER. To resume the original brightness, press the button again. DISPLAY AUDIO SETUP SUBTITLE ANGLE SUBTITLE ON/OFF STOP PLAY FR FF REPEAT A-B MEMORY CLEAR PAUSE/STEP DOWN UP SLOW RANDOM ZOOM Press DISPLAY during playback. Each time you press DISPLAY, the on-screen display on the TV screen changes as follows.
Function Setup POWER DISPLAY DIMMER Customizing the Function Settings SEARCH 2 3 4 5 6 7 8 9 1 +10 0 MENU 2-6 ENTER RETURN AUDIO 1, 7 Before operating SETUP can function even during normal playback. However, if an operation is inaccessible, a message will appear. In this case, try again after playback is stopped. VCD TOP MENU SETUP RETURN When you insert a DVD Video, VIDEO CD, or audio CD, the various functions of the DVD Player will be set (reset) according to the setting menu.
Reference Table of the Setting Menu Category Symbol Menu item Related to Details Page To select a preferred language for on-screen displays 30 On-Screen Language DVD Disc Menu Language DVD To select a preferred language for disc menus 30 Audio Language DVD To select a preferred language for the sound track 30 Subtitle Language DVD To select a preferred language for subtitles 30 TV Shape DVD To select a picture size according to the aspect ratio of your TV 31 Black Level DVD VCD To
Customizing the Function Settings Explanation of Each Item in the Language Category Note LANGUAGE On-Screen Language Disc Menu Language Audio Language Subtitle Language On-Screen Language To know the factory setting for each item, see the on-screen illustration on the left.
Explanation of Each Item in the Picture Category Note To know the factory setting for each item, see the on-screen illustration on the left. PICTURE TV Shape 4:3LB Black Level NRML Auto PAL/Auto * TV Shape • 4:3 Letterbox: DVD Select when a 4:3 TV is connected. Displays widescreen images with masking bars above and below the picture. • 4:3 Normal: Select when a 4:3 TV is connected. Displays pictures cropped to fill your TV screen. Either or both sides of the picture are cut off.
Customizing the Function Settings Explanation of Each Item in the Audio Category Note To know the factory setting for each item, see the on-screen illustration on the left. Audio Out Select DVD VCD CD • PCM: Select when you make the digital connection with the 2 channel digital stereo. The output sound format can be changed by changing the setting of “Audio Out Select” –– the sound signal conversion method.
Explanation of Each Item in the Display Category DISPLAY On-Screen Displays OSD Background Color Extended Subtitle Features Screen Saver Dynamic Range Control • Off: • On: DVD Note To know the factory setting for each item, see the above on-screen illustration. Full dynamic range is maintained. Dynamic range is reduced. On-Screen displays Notes • This function works only with playback of Dolby Digital recorded discs. • The level of Dynamic Range Reduction may differ depending on the DVD video.
Customizing the Function Settings Explanation of Each Item in the Operation Category Note OPERATION Pause/Still Parental Lock Title Stop PBC To know the factory setting for each item, see the on-screen illustration on the left. Auto Off Off On Pause/Still • Auto: • Frame: DVD After pressing ENTER in step 4 of “Setting Steps” on page 28, Select for normal use. The image can be paused without shaking.
To change your 4-digit security code After selecting “On” or “Off” and pressing ENTER in step 4 of “Setting Steps” on page 28: 1 Press STOP four times, then press ENTER. STOP STOP STOP STOP ENTER The 4-digit security code is cleared. 2 Press the number buttons to create a new 4-digit security code. 3 Press ENTER. Title Stop DVD • Off: The DVD Player continues playback after playback of a title is complete. • On: The DVD Player stops playback after playback of a title is complete.
Table of Languages Table of Languages and Their Abbreviations Abbreviation Language of the Language ––– CHI (ZH) DUT (NL) ENG (EN) FRE (FR) GER (DE) ITA (IT) JPN (JA) KOR (KO) MAY (MS) SPA (ES) AA AB AF AM AR AS AY AZ BA BE BG BH BI BN BO BR CA CO CS CY DA DZ EL 36 No alternate language Chinese Dutch English French German Italian Japanese Korean Malay Spanish Afar Abkhazian Afrikaans Amharic Arabic Assamese Aymara Azerbaijani Bashkir Belorussian Bulgarian Bihari Bislama Bengali,Bangla Tibetan Breton Cata
Others Troubleshooting Check the following guide for the possible cause of a problem before contacting service. Refer also to the respective instruction manuals of the connected components and TV. Symptoms Causes Remedies Pages The DVD Player doesn’t switch on. • The power cord is disconnected. • Check the connection of the power cord. 10 • The main power is set to OFF. • There is external noise in the computer circuits of the DVD Player. • Turn on the main power.
Specifications DVD Player Power supply USA and Canadian models: AC 120 V, 60 Hz Other models: AC 100–240 V, 50/60 Hz Power consumption USA and Canadian models: 21 W Other models: 19 W Weight 3.8 kg, 8.4 lbs. External dimensions 435 × 91 × 300 mm (W/H/D), 17 1/8" × 3 9/16" × 11 13/16" (W/H/D) Signal system USA and Canadian models: Standard NTSC Other models: PAL/3.
Index to Parts and Controls For operational instructions, see the page indicated in brackets [ ].
Index to Parts and Controls Front panel 1 2 3 4 CURSOR OPEN/CLOSE STOP PLAY ENTER ACOUSTIC CONTROL STANDBY/ON MENU RETURN SETUP POWER ON DIMMER PAUSE OFF STANDBY 5 7 8 9 0 A B C D E F G H I 1 Remote control sensor [7] A 2 Display [26, 27, 41] B 3 DVD/VIDEO CD/CD disc tray [12] C ACOUSTIC CONTROL button/indicator [14] 4 CURSOR ( / / / )/ ENTER [10, 15, 28] D OPEN/CLOSE button [12, 13] 5 STANDBY indicator [7, 10] E STOP button [13] 6 STANDBY/ON button [10] F PLAY button
Display 1 7 2 3 8 4 5 6 9 1 Operating status indicator 6 Angle icon indicator [23] 2 Title/track number indicator [26, 27] 7 Inserted disc indicator [12] 3 Chapter number indicator [26, 27] 8 Multifunctional indicator (e.g.
Index to Parts and Controls Remote controller E 1 POWER button [10] F 2 Number buttons [16] OPEN/ CLOSE POWER DISPLAY DIMMER 3 MENU button [15, 16, 25] G 1 4 / / / ENTER buttons [10, 15, 16, 28] SEARCH 2 H 1 2 3 4 5 6 +10 7 8 9 0 5 RETURN button [20, 22, 28] 6 AUDIO button [25] 7 ANGLE button [23] MENU I 3 4 7 8 9 0 RETURN SETUP AUDIO SUBTITLE ON/OFF ANGLE SUBTITLE PLAY FR FF A REPEAT A-B B C MEMORY CLEAR (PLAY) button [12] PAUSE/STEP DOWN UP SLOW (FR)/ (FF
Memo 43
Sales & Product Planning Div. : 2-1, Nisshin-cho, Neyagawa-shi, OSAKA 572-8540, JAPAN Tel: 072-831-8111 Fax: 072-833-5222 http://www.onkyo-intl.com ONKYO U.S.A. CORPORATION 18 Park Way, Upper Saddle River, N.J. 07458, U.S.A. Tel: 201-785-2600 Fax: 201-785-2650 http://www.onkyousa.com ONKYO EUROPE ELECTRONICS GmbH Liegnitzerstrasse 6, 82194 Groebenzell, GERMANY Tel: +49-8142-4401-0 Fax: +49-8142-4401-555 http://www.onkyo.