Contents Before Using Your DVD Player 2 Getting Started 6 DVD Player DV-SP300 Facilities and Connections 10 Basic Operation 17 Advanced Operation 20 Function Setup 30 Others 37 Instruction Manual Thank you for purchasing the Onkyo DVD Player. Please read this manual thoroughly before making connections and turning on the power. Following the instructions in this manual will enable you to obtain optimum performance and listening enjoyment from your new DVD Player.
WARNING: TO REDUCE THE RISK OF FIRE OR ELECTRIC SHOCK, DO NOT EXPOSE THIS APPLIANCE TO RAIN OR MOISTURE. CAUTION: TO REDUCE THE RISK OF ELECTRIC SHOCK, DO NOT REMOVE COVER (OR BACK). NO USER-SERVICEABLE PARTS INSIDE. REFER SERVICING TO QUALIFIED SERVICE PERSONNEL.
Precautions This unit contains a semiconductor laser system and is classified as a “CLASS 1 LASER PRODUCT”. So, to use this model properly, read this Instruction Manual carefully. In case of any trouble, please contact the store where you purchased the unit. To prevent being exposed to the laser beam, do not try to open the enclosure. The label below is applied on the rear panel except for USA and Canadian models. CAUTION: VISIBLE LASER RADIATION WHEN OPEN AND INTERLOCK FAILED OR DEFEATED.
Precautions 1. Regional Restriction Codes (Region Number) Regional restriction codes are built into DVD Players and DVD-Video media for each sales region. If the regional code of the DVD Player does not match one of the regional codes on the DVD-Video, playback is not possible. The regional number can be found on the rear panel of the DVD Player. (e.g. 1 for Region 1) 2. About This Manual This manual explains the basic procedures for operating the DVD Player.
Table of Contents Important Safeguards / Precautions / Table of Contents ............................ 2 - 5 Getting Started Notes on Discs .................................................................................................... 6 Playable Discs / The Structure of the Disc Content / About Video CDs / MP3 Compatibility Information / Handling Discs / Cleaning Discs / Storing Discs / Notes on Copyright Features/Supplied Accessories ...................................................................
Notes on Discs This section shows you how to handle, clean, and store discs. The Structure of the Disc Content Playable Discs This DVD Player can playback the following discs. Disc mark DVDVideo Video CD Contents Disc size Audio + Video (moving pictures) 12 cm Audio + Video (moving pictures) CD-RW* Audio Title 2 Chapter 1 Chapter 2 Chapter 3 8 cm 12 cm 8 cm Video CD/CD Video CD and CD are divided into tracks.
Handling Discs Notes on Copyright • Do not touch the playback side of the disc. Playback side • Do not attach paper or tape to discs. It is forbidden by law to copy, broadcast, show, broadcast on cable, play in public, and rent copyrighted material without permission. The video recorded on DVD-Video is copy protected, and any recordings made from these discs will be distorted. This product incorporates copyright protection technology that is protected by method claims of certain U.S.
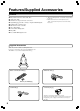
Features/Supplied Accessories Features ● ● ● ● ● ● ● ● ● ● Plays DVD-Video Discs, Video CDs, CDs 10-bit Video DAC Simultaneous output to all video connections Digital Outputs pass DTS®*1, Dolby®*2 Digital and PCM Signals Built-In Dolby® Digital decoder Full-function remote controller Direct Digital Path CD-R and CD-RW playable Plays MP3 Pass 96 kHz PCM digital stream *1 “DTS” and “DTS Digital Out” are trademarks of Digital Theater Systems, Inc. *2 Manufactured under license from Dolby Laboratories.
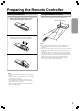
Preparing the Remote Controller Point the remote controller toward the remote control sensor. Remote control sensor 30˚ Ap p ro x. 16 30˚ t 1 Remove the battery compartment cover by pressing the tab and lifting up the cover. Using the Remote Controller fe e Inserting the Batteries 2 Insert the two batteries (size AAA/R3). Be sure to match the + and – ends of the batteries with the diagram inside the battery compartment. Notes 3 Replace the battery compartment cover.
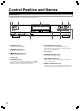
Control Position and Names Front Panel For operational instructions, see the page indicated in brackets [ ]. 1 2 3 4 7 1 POWER button [17] Turns on the main power supply. 2 STANDBY indicator [17] 5 8 6 9 0 6 PLAY/PAUSE £/8 button [18] Begins to play disc (close disc tray first if it is open.) Temporarily stops playback when a disc is playing. Press this button again for normal playback. Lights in the standby mode. 7 Disc tray [18] 3 STANDBY/ON button [17] Toggle for standby on and off.
Control Position and Names Rear Panel For operational instructions, see the page indicated in brackets [ ]. VIDEO OUTPUT COMPONENT DIGITAL OUTPUT OPTICAL ANALOG OUTPUT COAXIAL 1 2 3 PR DVD PLAYER MODEL NO. DV-SP300 L VIDEO PB R S VIDEO Y 4 5 6 1 DIGITAL OUTPUT OPTICAL jack [16] Use optical cable to connect your DVD Player to an AV component that features digital input capability. If the component has a Dolby Digital or DTS decoder, you can enjoy theater-quality multichannel sound.
Control Position and Names Display For operational instructions, see the page indicated in brackets [ ]. 12 DVD CD VCD MP3 3 4 5 6 7 PROGRESSIVE RESUME TITLE 8 RANDOM REPEAT 1ALL CHAPTER TRACK ~! 1 Inserted disc indicators 9 0 - = A-B INTRO HOUR MEM. MIN PBC SEC @ ■ Display Examples Indicate the type of current disc that is loaded. During DVD-Video playback: 2 Play/Pause indicators DVD Illuminate in play or pause mode.
Control Position and Names Remote Controller For operational instructions, see the page indicated in brackets [ ]. 1 @ 2 # 3 $ 4 % 5 ^ 6 7 & * ( ) 8 7 ON SCREEN button [20-24] Press this button while you’re playing a disc to see Banner Display on the screen. The Banner Display contains various playback features and gives you the information about the disc you’re playing. 8 MENU button [30] Displays the DVD Disc Menu on the TV screen in play mode and Setup Menu in stop mode.
Making Connections To accommodate a wide range of home entertainment systems, this player features numerous connection types for both audio and video. Please refer to the instructions on this and the following pages to determine the best possible type of connections for your system. Before Connecting • Refer to the instruction manuals supplied with any and all components that you plan to connect the DVD Player to.
Making Connections Optional Video Connections Visible improvements in DVD-Video quality can be achieved by making either S-video or component video connections to a TV or monitor compatible with these types of connections. Note When either an S-video or component video connection is made, it is not necessary to make composite video connections using the yellow cord of the audio-video cable.
Making Connections Optional Audio Connections This DVD Player provides numerous ways to take full advantage of the digital multi-channel sound recorded on DVD and some CD media. Be sure to set Digital Audio Out after connection using the setup menu explained in “Customizing the Settings” starting on page 30.
Turning on Connecting the POWER The DV-SP300 is shipped with the main power (POWER) switch in the on position ( ON). When the power cord is plugged in for the first time, the DV-SP300 will automatically enter the standby mode and the STANDBY indicator will light (same condition after step 2 below). POWER STANDBY/ON Notes • Make sure that all appropriate connections have been completed as described on pages 14 to 16.
DVD VCD CD Basic Playback Before playing • DVD-Video, Video CD, CD can be played with the DVD Player (see “Playable Discs” on page 6). Do not play anything else. • When playing DVD-Video or Video CD with video features, turn on the TV and set the TV to the DVD Player's input. • If an audio system is connected to the DVD Player, turn on the audio system and set it to the DVD Player’s input.
Basic Playback Various Playback ■ To remove the disc DVD VCD CD Press 0 to open the disc tray. Remove the disc after the disc tray opens completely. After removing the disc, be sure to press the button again to close the tray. ■ To play in fast reverse or fast forward DVD VCD CD OPEN/CLOSE 0 SLOW DIMMER STEP e/E During normal playback, press 1/¡. Each press of the same button changes the playback speed. DOWN 4/UP ¢ (During DVD playback) FR 1/FF ¡ F.SEARCH 1 (approx. x2) → F.SEARCH 2 (approx.
DVD VCD CD Using Banner Display DVD VCD CD Using the on-screen Banner Display The on-screen Banner Display contains many playback features. To see the Banner Display, press ON SCREEN on the remote conroller while a disc is playing. Use 2/3 to move through the different features in the Banner Display. Each feature is illustrated with an icon. 1 During playback, press ON SCREEN. The Banner Display appears on the screen.
Using Banner Display DVD DVD Selecting a Title VCD CD Selecting a Chapter or Track DVD-Video DVD-Video Title 1 Title 1 Title 2 Chapter 1 Some discs contain more than one title. For example, there might be four movies on one disc (each movie might be considered a title). 1 2 Title 2 Chapter 2 Chapter 1 Chapter 2 Chapter 3 Track 2 Track 3 Track 4 Track 5 Video CD/CD Track 1 Press ON SCREEN. Press 2/3 until the TITLE icon is highlighted. 3 Press ENTER.
Using Banner Display DVD DVD Selecting a Playback Audio Setting Good morning! Bon jour! Changing the Subtitle Language ¡Buenos días! Good evening! You can select the preferred audio language and sound system as a set from those included on the disc. This function lets you temporarily change the audio language which you selected as the automatic setting in the setting menu (see pages 30 and 31), and choose the sound system if the disc is recorded in more than one sound format.
Using Banner Display VCD DVD Changing the Camera Angle Angle : 1 Angle : 2 Angle : 3 If the scene was recorded from multiple angles, you can easily change the camera angle of the scene you are watching. 1 Press On SCREEN during playback. CD Using IntroScan Function Track : 1 Track : 2 Track : 3 IntroScan plays the first 10 seconds of each track on the Video CD or CD similar to the scan feature that's on many car radios. 1 When playing a Video CD, press ON SCREEN to display the Banner Display.
Using Banner Display DVD VCD CD To clear the bookmark Using a Bookmark The bookmark is cleared when a disc is removed from the player, when the power is turned off or when the player enters the standby mode. Notes The bookmark feature lets you mark a point on the disc that you can go to quickly. You can store up to 9 bookmarks. • If all 9 bookmarks are in use, you can still mark new scenes, but the previous bookmarks will be erased. • Depending on the disc, the bookmark function may not work.
DVD VCD CD Other Operations The following operations can be performed directly from the remote controller. • Progressive Scan Function • Random Play • Repeat Play • A-B Repeat Play • Memory Edit Play VCD CD Random Play The chapters or tracks of the disc are played in random order. Press RANDOM. The random playback starts. RANDOM Display REPEAT Lights RANDOM A-B ON SCREEN The Random Play display appears on the screen. 2/3/5/∞ ENTER P.
Other operations DVD VCD DVD CD Repeat Play VCD CD A-B Repeat Play A Desired disc or title can be played back repeatedly. There are four repeat options: • Disc Repeat the disc that is playing. • Title Repeat the title that is playing. • Chapter Repeat the chapter that is playing. • Track Repeat the track that is playing. B The A-B repeat function lets you mark a segment to repeat between the beginning “A” and the end “B” of the segment you want to replay.
Other operations DVD VCD To delete memory CD Memory Edit Play Title : 2 Chapter : 25 Title : 2 Chapter : 12 Title : 1 Chapter : 1 The DVD Player automatically plays titles, chapters, or tracks in the order you program. 1 Press MEMORY during stop mode. 1 Press MEMORY during stop mode. 2 Move the cursor with 3 to the “Playlist” and press 5/∞ to select the column to be deleted from the “Playlist”. (The color of the column where the cursor is located will change.
MP3 Function MP3 On-screen Display Playing Back MP3 The DVD Player can play back MP3 files recorded on CD-R or CD-RW. Folders within a root Playback information Playing file name Track Press £. Time elapsed When you insert MP3 media, playback will start automatically. MP3 On-screen display appears. Note Root icon Folder icon ALL CLEAR button • %/fi indicates the content continues above or below the display. To stop playback To display files within a folder Press 7.
MP3 Function 2 Press 5/∞ to select the file, then press ENTER. « MP3 Memory Play You can listen to the files in any desired order. 1 During stop mode, press MEMORY. 2 Press 5/∞ to select the file, then press ENTER. Playback will start from selected file. Files in the next folder will be played back when no files exist in the selected folder. « To select the folders to be played directly 1 During stop mode, press 5/∞ to select the folder, then press ENTER.
DVD VCD CD Customizing the Settings When you insert a DVD-Video, Video CD, or CD, the various functions of the DVD Player will be set (reset) according to the setting menu. You can customize this setting menu according to your preferences. DVD VCD CD Making Adjustments to Setting 1 Press MENU during stop mode. Current setup menu display appears. MENU 2 Press 5/∞ to select the item you want to change, then press ENTER.
Customizing the Settings Language-related settings Language Setting Audio Language DVD This sets the language to be used when playing a disc. If a disc does not contain the selected language, it is played in the priority language set for each disc. English: Spanish: French: German: Italian: Others: To display subtitles in English. To display subtitles in Spanish. To display subtitles in French. To display subtitles in German. To display subtitles in Italian. To make a further choice.
Customizing the Settings General utility settings Operation Setting Rating / Parental Lock DVD This can restrict playback of adult-oriented DVD discs that you do not want to be seen by children. To input password 1 Select “Set Password”. 2 Press the numeric buttons to enter password. 3 Select OK button and press ENTER. Confirm Password display appears below Enter Password display. 4 Press the numeric buttons to enter password. 5 Select OK button and press ENTER.
Customizing the Settings Operation Setting (continued) To change password 6 Press the numeric buttons to enter new password. 1 Press the numeric buttons to enter password. 7 Select OK button and press ENTER. 2 Select OK button and press ENTER. Password setup menu appears. To clear password 3 Select “Change Password”. Enter Password menu appears. 4 Press the numeric buttons to enter new password. 5 Select OK button and press ENTER. Confirm Password display appears below Enter Password display.
Customizing the Settings Audio output setting Picture-related setting Picture Setting TV Aspect Audio Setting DVD This sets the screen size (4:3 or 16:9 aspect ratio) according to the connected TV. 4 x 3 Letterbox: Choose this setting if you would prefer to see movies in their original aspect ratio. You will see the entire frame of the movie, but it will occupy a smaller portion of the screen. This setting may result in the movie appearing with black bars at the top and bottom of the screen.
Customizing the Settings Audio Setting (continued) Digital Audio Out DVD VCD CD DOLBY DIGITAL Surround DVD Video that have the This sets the type of audio output from the digital audio output jack. D I G I T A L mark are recorded using this system. DTS Surround DVD Video and CD that have the mark are recorded using this system.
Table of Languages Table of Languages and Their Code No. Code No.
Troubleshooting Check the following guide for the possible cause of a problem before contacting service. Refer also to the respective instruction manuals of the connected components and TV. Symptoms Causes Remedies Pages The DVD Player doesn’t switch on. • The power cord is disconnected. • The main power is set to OFF. • There is external noise in the computer circuits of the DVD Player. • Check the connection of the power cord. • Turn on the main power.
Specifications DVD Player Power supply AC 120 V, 60 Hz (North America models) AC 110-240 V, 50/60 Hz (Other models) Power consumption 16 W Weight 8.
Memo 39
Sales & Product Planning Div. : 2-1, Nisshin-cho, Neyagawa-shi, OSAKA 572-8540, JAPAN Tel: 072-831-8111 Fax: 072-833-5222 http://www.onkyo-intl.com ONKYO U.S.A. CORPORATION 18 Park Way, Upper Saddle River, N.J. 07458, U.S.A. Tel: 201-785-2600 Fax: 201-785-2650 http://www.onkyousa.com ONKYO EUROPE ELECTRONICS GmbH Liegnitzerstrasse 6, 82194 Groebenzell, GERMANY Tel: +49-8142-4401-0 Fax: +49-8142-4401-555 http://www.onkyo.