Contents Compact Disc Player Introduction .................................... 2 DX-7355 Instruction Manual Connections ................................. 13 Operation ...................................... 15 Thank you for purchasing an Onkyo Compact Disc Player. Please read this manual thoroughly before making connections and plugging in the unit. Following the instructions in this manual will enable you to obtain optimum performance and listening enjoyment from your new Compact Disc Player.
WARNING: TO REDUCE THE RISK OF FIRE OR ELECTRIC SHOCK, DO NOT EXPOSE THIS APPARATUS TO RAIN OR MOISTURE. CAUTION: TO REDUCE THE RISK OF ELECTRIC SHOCK, DO NOT REMOVE COVER (OR BACK). NO USER-SERVICEABLE PARTS INSIDE. REFER SERVICING TO QUALIFIED SERVICE PERSONNEL.
Precautions 1. Recording Copyright—Unless it’s for personal use only, recording copyrighted material is illegal without the permission of the copyright holder. 2. AC Fuse—The AC fuse inside the unit is not userserviceable. If you cannot turn on the unit, contact your Onkyo dealer. 3. Care—Occasionally you should dust the unit all over with a soft cloth. For stubborn stains, use a soft cloth dampened with a weak solution of mild detergent and water. Dry the unit immediately afterwards with a clean cloth.
Precautions—Continued This unit contains a semiconductor laser system and is classified as a “CLASS 1 LASER PRODUCT”. So, to use this model properly, read this Instruction Manual carefully. In case of any trouble, please contact the store where you purchased the unit. To prevent being exposed to the laser beam, do not try to open the enclosure. CAUTION: CLASS 1M VISIBLE AND INVISIBLE LASER RADIATION WHEN OPEN. DO NOT VIEW DIRECTLY WITH OPTICAL INSTRUMENTS. THIS PRODUCT UTILIZES A LASER.
Features ❑ ❑ ❑ ❑ ❑ ❑ ❑ ❑ ❑ ❑ ❑ ❑ ❑ ❑ VLSC* (Vector Linear Shaping Circuitry) Massive Power Transformer Wolfson 192 kHz/24-Bit D/A Converter Audiophile-Grade Capacitors 2 Digital Outputs (Optical/Coaxial) Plays Audio CD, MP3 CD, CD-R/RWs Headphone Jack with Volume Control Quick Navigation for MP3 CD Playback 3-Mode Dimmer 2 Repeat Modes (Track/Full) 25 Track Programming Hi-Rigidity, Anti-Resonant Chassis Aluminium Front Panel RI-Compatible Remote Control * VLSC and the VLSC logo are registered trademarks o
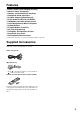
Table of Contents Introduction Important Safety Instructions.....................................................................................2 Precautions ..................................................................................................................3 Features .......................................................................................................................5 Supplied Accessories ......................................................................................
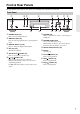
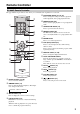
Front & Rear Panels The page numbers in parentheses show where you can find the main explanation for each item. Front Panel (1 (2 (3 (4 PHONES jack This is a standard stereo jack for connecting stereo headphones. POWER switch (15) Press to turn on/off the DX-7355. REPEAT button (24) Press to set the repeat playback or 1-repeat playback mode. DISPLAY button (17, 20) Press to change the displayed information. Disc tray (16) The CD is loaded here.
Front & Rear Panels—Continued Display (1 Play & Pause indicators Illuminate in play or pause mode. MP3 indicator Illuminates when MP3 CD is loaded. TITLE indicator Illuminates when the title (ID3 Tags) is displayed for MP3 track. TOTAL & REMAIN indicators Illuminate when the remaining time is shown. (Only when audio CD is loaded; not available when MP3 CD is loaded.) REMAIN: Displays the remaining playback time of the track.
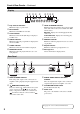
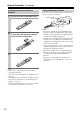
Remote Controller RC-686C Remote Controller The page numbers in parentheses show where you can find the main explanation for each item. REPEAT button (24) Press to set the repeat playback or 1-repeat playback mode. OPEN/CLOSE button (17) Press to open and close the disc tray. (1 PLAY MODE button (21, 22, 23) Press to change the settings for memory playback, random playback, and 1-group playback modes.
Remote Controller—Continued Installing the Remote Controller’s Batteries 1 To open the battery compartment, press the small hollow and slide open the cover. Using the Remote Controller To use the remote controller, point it at the DX-7355’s remote control sensor, as shown. DX-7355 Remote control sensor RC-686C 2 Insert the two supplied batteries (AA/R6) in accordance with the polarity diagram inside the battery compartment. 3 Slide the cover shut.
About CDs Supported Discs The DX-7355 supports the following discs. Disc Logo Format or file type PCM Audio CD Audio CD, MP3 CD-R MP3 Audio CD, MP3 CD-RW MP3 CD Extra Audio CD (Session 1), MP3 (Session 2) • Some audio CDs use copy protection that doesn’t conform to the official CD standard. Since these are nonstandard discs, they may not play properly in the DX-7355. • The DX-7355 supports CD-R and CD-RW discs.
About CDs—Continued • For ID3 version 2 tags, information contained in the beginning of the file are recognized. We recommend that you include only title, artist name, and album name information in ID3 tags. Compressed, encrypted, and unsynchronized ID3 tags cannot be displayed. • Some MP3 files may have ID3 tags whose information can be displayed no longer than 31 characters.
Connecting the DX-7355 Audio Connections • Before making any connections, read the manuals supplied with your other components. • Don’t connect the power cord until you’ve completed and double-checked all connections. • Push plugs in all the way to make good connections (loose connections can cause noise or malfunctions). • To prevent interference, keep audio cables away from power cords and speaker cables. Connection Color Coding RCA-type audio connections are usually color-coded: red and white.
Connecting the DX-7355—Continued Connections With (Remote Interactive) you can control the DX-7355 together with your other -compatible Onkyo AV components. With some Onkyo AV receivers you can use one remote controller to control all your Onkyo components and use the following special functions: Direct Change If your DX-7355 is connected to an -compatible Onkyo hi-fi amp or AV receiver, when you start playback on the DX-7355, the AV receiver will select the DX-7355 as the input source.
Before Using the DX-7355 • Turn off the power before changing the switch settings. • On changing the switch settings, DX-7355 is initialized to its factory defaults. Radio presets and other settings are deleted. Setting the Voltage Selector (Worldwide models only) Worldwide models are equipped with a voltage selector to conform with local power supplies. Be sure to set this switch to match the voltage of the power supply in your area before plugging in the unit.
Playing CDs Disc tray 1 Press the Open/Close [ ] button to open the disc tray. 2 Place the CD on the tray with the label-side facing up. Place 8 cm CDs in the center of the tray. 3 To start playback, press the Play [ ] button. The disc tray closes and playback starts. Lights up while the disc information is being displayed.
Playing CDs—Continued Using the Remote Controller Use the number buttons as shown in the examples below to select tracks. To select: Press to open and close the disc tray. Press: Track #8 Press to adjust the display brightness. Track #10 Track #34 Used to enter numbers over 10. Used to enter number 10 or 0. For MP3 CDs, you can select tracks in the current group with these buttons. By pressing this button, the brightness changes in order of “Normal”, “Dim”, and “Dimmer”.
Playing CDs—Continued Selecting Tracks in Navigation Mode Selecting Tracks (MP3 Files) For MP3 CDs, tracks (MP3 files) may be organized in a hierarchically, with groups (folders) containing tracks and subgroups, as shown below. • In this manual, MP3 files are referred to as tracks. • Likewise, folders (directories) are referred to as groups. In Navigation mode, you can select tracks by navigating through the group hierarchy. This mode can only be used while playback is stopped.
Playing CDs—Continued When Operating Directly on DX-7355 1. While playback is stopped, press the Stop [ ] button to display “ROOT” on the display. The DX-7355 enters Navigation mode. 2. Press the Play [ ] button to display the first group name in ROOT. 3. Press the Previous and Next [ ]/[ ] buttons to select a group. 4. Press the Play [ ] button. Repeat steps 3 and 4 to select the tracks and subgroups in that group. 5. Press the Previous and Next [ ]/[ ] buttons to select a track.
Playing CDs—Continued Selecting a Group during Playback (Search Mode) This section explains how to select MP3 groups by number. 1 2 During playback, press the [SEARCH] button. The display blinks. Use the number buttons to enter the group number. Enter the numbers in order from left-toright. For example, to enter group number 25, press [>10], [2], and [5]. The specified group name appears on the display.
Various Playback Modes These are the available playback modes: • 1-group playback (Only MP3 CDs) • Random playback • Memory playback By pressing the [PLAY MODE] button, the indicator changes in this order: GROUP o MEMORY o RANDOM o No play mode display o ··· 1-Group Playback (Only MP3 CDs) To Cancel 1-Group Playback • Press the Stop [ ] button to stop the playback. • 1-group playback is cancelled when the disc is ejected.
Various Playback Modes—Continued Memory Playback (For Audio CDs) To Remove Tracks from the Playlist Press the [CLR] button. Each press removes the last track from the playlist. Notes: • If the total playing time is more than 99 minutes and 59 seconds, “– –:– –” is displayed. • You can add up to 25 tracks to the playlist. If you try to add more, the message “MEM FULL” appears. In memory playback, you can create a playlist of up to 25 tracks.
Various Playback Modes—Continued Memory Playback (For MP3 CDs) Memory Playback in Navigation Mode Memory playback can be set only when the playback is stopped. 1 2 3 4 5 6 7 Press the [PLAY MODE] button repeatedly until the MEMORY indicator appears. Press the [ ] button. The DX-7355 enters Navigation mode and “ROOT” appears on the display. Memory Playback in All Group Mode To Change the Display 1 Press the [PLAY MODE] button repeatedly until the MEMORY indicator appears.
Various Playback Modes—Continued Repeat Playback In repeat playback, you can play an entire CD repeatedly, play one track repeatedly, or combine it with memory playback to play the playlist repeatedly, or random playback to play all of the tracks on the disc in random order repeatedly. For MP3 CDs, you can combine repeat playback with 1-group playback to play all of the tracks in a specified group repeatedly.
Setting for MP3—Continued Preferences Below, the name of each preference is followed by its options in parentheses, with the default option in bold. DISC NAME (DISPLAY/NOT) This preference determines whether or not the disc name is displayed when an MP3 disc is read. TRACK NAME (SCROLL/NOT) This preference determines whether or not the track name scrolls across the display when an MP3 track is selected. In Navigation mode (see page 18), the track name scrolls across the display regardless of this setting.
Troubleshooting If you have any trouble using the DX-7355, look for a solution in this section. If you can’t resolve the issue yourself, try resetting the DX-7355 before contacting your Onkyo dealer. To reset the DX-7355 to its factory defaults, turn it on and, while holding down the [ ] button, press the [REPEAT] button. “CLEAR” will appear on the display. Note that resetting the DX-7355 will delete your custom settings. Power Can’t turn on the DX-7355.
Troubleshooting—Continued does not work. • There’s no RCA/phono analog audio connection. To use you must make an analog audio connection (RCA/phono) between the DX-7355 and your Onkyo AV receiver, even if they are connected digitally. The DX-7355 contains a microcomputer for signal processing and control functions. In very rare situations, severe interference, noise from an external source, or static electricity may cause it to lockup.
Sales & Product Planning Div. : 2-1, Nisshin-cho, Neyagawa-shi, OSAKA 572-8540, JAPAN Tel: 072-831-8023 Fax: 072-831-8124 ONKYO U.S.A. CORPORATION 18 Park Way, Upper Saddle River, N.J. 07458, U.S.A. Tel: 201-785-2600 Fax: 201-785-2650 http://www.us.onkyo.com/ ONKYO EUROPE ELECTRONICS GmbH Liegnitzerstrasse 6, 82194 Groebenzell, GERMANY Tel: +49-8142-4401-0 Fax: +49-8142-4401-555 http://www.eu.onkyo.