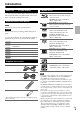
Contents BLU-RAY DISC PLAYER BD-SP308 Safety Information .........................2 Preparation ....................................5 Installation ...................................11 Instruction Manual Operation .....................................23 Maintenance.................................32 Troubleshooting ..........................33 Thank you for purchasing an Onkyo BLU-RAY DISC PLAYER. Please read this manual thoroughly before making connections and plugging in the unit.
Safety Information WARNING: TO REDUCE THE RISK OF FIRE OR ELECTRIC SHOCK, DO NOT EXPOSE THIS APPARATUS TO RAIN OR MOISTURE. CAUTION: TO REDUCE THE RISK OF ELECTRIC SHOCK, DO NOT REMOVE COVER (OR BACK). NO USER-SERVICEABLE PARTS INSIDE. REFER SERVICING TO QUALIFIED SERVICE PERSONNEL.
Precautions 1. Recording Copyright—Unless it’s for personal use only, recording copyrighted material is illegal without the permission of the copyright holder. 2. AC Fuse—The AC fuse inside the unit is not user-serviceable. If you cannot turn on the unit, contact your Onkyo dealer. 3. Care—Occasionally you should dust the unit all over with a soft cloth. For stubborn stains, use a soft cloth dampened with a weak solution of mild detergent and water. Dry the unit immediately afterwards with a clean cloth.
13. About this Manual—This manual explains how to use all of this unit’s functions. Although the BD/DVD standard offers many special features, not all discs use them all, so depending on the disc being played, this unit may not respond to certain functions. See the disc’s sleeve notes for supported features. This unit contains a semiconductor laser system and is classified as a “CLASS 1 LASER PRODUCT”. So, to use this model properly, read this Instruction Manual carefully.
Preparation Introduction About the “a” Symbol Display Playable Discs Blu-ray Disc • Discs such as movies that can be purchased or rented. • BD-R/RE discs that contain Movie, Music or Photo files. DVD-VIDEO (8 cm / 12 cm disc) • Discs such as movies that can be purchased or rented. DVD±R (8 cm / 12 cm disc) • Video mode and finalized only • Supports the dual layer disc also • Finalized AVCHD format • DVD±R discs that contain Movie, Music or Photo files.
• Hybrid discs have both BD-ROM and DVD (or CD) layers on one side. On such discs, BD-ROM layer will be only played back in this player. • Customers should note that permission is required in order to download MP3 / WMA files and music from the Internet. Our company has no right to grant such permission. Permission should always be sought from the copyright owner.
AVCHD (Advanced Video Codec High Definition) • This player can playback AVCHD format discs. These discs are normally recorded and used in camcorders. • The AVCHD format is a high definition digital video camera format. • The MPEG-4 AVC/H.264 format is capable of compressing images at higher efficiency than that of the conventional image compressing format. • Some AVCHD discs use the “x.v.Color” format. • This player can playback AVCHD discs using “x.v.Color” format.
Contents Safety Information Important Safety Instructions..........................................2 Precautions .......................................................................3 Preparation Introduction.......................................................................5 About the “a” Symbol Display........................................5 Symbols Used in this Manual..........................................5 Supplied Accesorries ......................................................
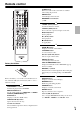
Remote control a CLEAR button Removes a mark on the search menu or a number when setting the password. ENTER button Acknowledges menu selection. RECEIVER control buttons (➔ 34) b 5/4 (SCAN) buttons Searches backward or forward. b 7/6 (SKIP) buttons Goes to the next or previous chapter / track / file. 3 (PAUSE) button Pauses playback. c 1 (PLAY) button Starts playback. 2 (STOP) button Stops playback. d c HOME (k) button Displays or exits the “Home Menu”. TOP MENU button Accesses menu on a disc.
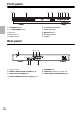
Front panel ab c d e f g h i a STANDBY indicator f 0 (OPEN/CLOSE) button b 9 ON/STANDBY button g 3 (PAUSE) button c Disc tray h 2 (STOP) button d Remote sensor i 1 (PLAY) button e Display window j USB port j Rear panel a b c e f d g a AC power cord e ETHERNET port b DIGITAL AUDIO OUTPUT (COAXIAL) jack f HDMI OUT jack (Type A, Version 1.
Installation Connecting to Your TV Make one of the following connections, depending on the capabilities of your existing equipment. • HDMI connection (➔ 11) • Component Video connection (➔ 12) • Video/Audio (Left/Right) Connection (➔ 13) HDMI-DVI Connection this unit Note • Depending on your TV and other equipment you wish to connect, there are various ways you could connect the player. Use only one of the connections described in this manual.
■ Additional Information for HDMI • When you connect a HDMI or DVI compatible device, make sure of the following: - Try switching off the HDMI/DVI device and this player. Next, switch on the HDMI/DVI device and leave it for around 30 seconds, then switch on this player. - The connected device’s video input is set correctly for this unit. - The connected device is compatible with 720x576p, 1280x720p, 1920x1080i or 1920x1080p video input.
Video/Audio (Left/Right) Connection Connect the VIDEO OUTPUT (VIDEO) jack on the player to the video in jack on the TV using a video cable. Connect the left and right ANALOG AUDIO OUTPUT jacks of the player to the audio left and right IN jacks on the TV using the audio cables. Video/Audio Connection Resolution Setting The player provides several output resolutions for HDMI OUT and VIDEO OUTPUT (COMPONENT) jacks. You can change the resolution using “Setup” menu.
Connecting to an AV receiver Make one of the following connections, depending on the capabilities of your existing equipment. • HDMI Audio connection (➔ 14) • Digital Audio connection (➔ 15) • 2CH Analog Audio connection (➔ 15) Since many factors affect the type of audio output, see “Audio Output Specifications” for details (➔ 39). Connect the player’s HDMI OUT jack to the corresponding in jack on your AV receiver using a HDMI cable. You will need to activate the player’s digital output.
Connecting to an AV receiver via Digital Audio Output Connect the player’s DIGITAL AUDIO OUTPUT jack to the corresponding in jack (COAXIAL) on your AV receiver. Use an optional digital audio cable. You will need to activate the player’s digital output. See “AUDIO Menu” (➔ 20–21). Connecting to an AV receiver via 2 Channel Audio Output Connect the Left and Right ANALOG AUDIO OUTPUT jacks on the player to the audio left and right in jacks on your AV receiver using audio cables.
Connecting to your Home Network This player can be connected to a local area network (LAN) via the ETHERNET port on the rear panel. By connecting the unit to a broadband home network, you have access to services such as BD-LIVE interactivity. Wired network connection Connect the player’s ETHERNET port to the corresponding port on your Modem or Router using a commercially available LAN or Ethernet cable (CAT5 or better with RJ45 connector).
5 If you select “Test” and press ENTER (j) at step 4 above, the network connection status is displayed on the screen. You can also test it on the “Connection Status” in the “Setup” menu. Notes on Network Connection: • Many network connection problems during set up can often be fixed by re-setting the router or modem. After connecting the player to the home network, quickly power off and/or disconnect the power cable of the home network router or cable modem.
USB device connection This unit can play movie, music and photo files contained in the USB device. Playback content in the USB device 1 2 3 4 5 6 En 18 Insert a USB device to the USB port until it fits into place. When you connect the USB device on the HOME menu, the player plays a music file contained in the USB storage device automatically. If the USB storage device contains various types of files, a menu for the file type selection will appear.
Settings Adjust the Setup Settings You can change the settings of the player in the “Setup” menu. 1 2 Press HOME (k). Use e/r to select the “Setup” and press ENTER (j). The “Setup” menu appears. DISPLAY Menu TV Aspect Ratio Select a TV aspect ratio option according to your TV type. `4:3 Letter Box: Select when a standard 4:3 TV is connected. Displays theatrical images with masking bars above and below the picture. `4:3 Pan Scan: Select when a standard 4:3 TV is connected.
1080p Display Mode When the resolution is set to 1080p, select “24 Hz” for smooth presentation of film material (1080p/24 Hz) with a HDMI-equipped display compatible with 1080p/24 Hz input. Note • When you select “24 Hz”, you may experience some picture disturbance when the video switches video and film material. In this case, select “50 Hz”.
DRC (Dynamic Range Control) BD Rating When a title encoded in Dolby Digital or Dolby Digital Plus is playing back, you may wish to compress the dynamic range of the audio output (the difference between the loudest sounds and the quietest ones). This allows you to listen to a movie at a lower volume without losing clarity of sound. Set “DRC” to “On” for this effect. Sets an age limit of BD-ROM playback. Use number buttons to input an age limit for BD-ROM viewing. `255: All BD-ROM can be played.
OTHERS Menu DivX VOD ABOUT DIVX VIDEO: DivX® is a digital video format created by DivX, Inc. This is an official DivX Certified device that plays DivX video. Visit www.divx.com for more information and software tools to convert your files into DivX video. ABOUT DIVX VIDEO-ON-DEMAND: This DivX Certified® device must be registered in order to play DivX Video-on-Demand (VOD) content. To generate the registration code, locate the DivX VOD section in the device setup menu. Go to vod.divx.
Operation General Playback Playing Discs 1 2 3 Press OPEN/CLOSE (0), and place a disc on the disc tray. Press OPEN/CLOSE (0) to close the disc tray. For the most Audio CD, BD-ROM and DVD-ROM discs, playback starts automatically. Press HOME (k). ■ To play frame-by-frame Press 3 (PAUSE) while movie playback. Press 3 (PAUSE) repeatedly to play Frame-by-Frame playback. ■ To scan forward or backward Press 5 or 4 to play fast forward or fast reverse during playback.
Advanced Playback Repeat Playback WERTU During playback, press REPEAT repeatedly to select a desired repeat mode. ■ BDs/DVDs `s A-: Selected portion will be repeated continuously. `s Chapter: The current chapter will be played back repeatedly. `s Title: The current title will be played back repeatedly. To return to normal playback, press REPEAT repeatedly to select “Off”. ■ Audio CDs/Music files `d Track: The current track or file will be played back repeatedly.
Using the search menu WERY Using search menu, you can easily to find the point where you want to start playback. ■ To search a point 1 2 During playback, press SEARCH to display the search menu. Press e/r to skip the playback 15 seconds forward or backward. You can select a point that you want to skip by pressing and holding e/r button. ■ To start playback from a marked scene 1 2 3 Press SEARCH and the search menu appears on the screen. Press w to highlight a marker number.
On-Screen display You can display and adjust various information and settings about the content. Playing from selected time WERY Displaying content information on-screen 2 WERY 1 1 During playback, press DISPLAY to show various playback information. a b c 3 Press DISPLAY during playback. The time search box shows the elapsed playing time. Select the “Time” option and then input the required start time in hours, minutes, and seconds from left to right.
Selecting a subtitle language WERY 1 2 3 4 During playback, press DISPLAY to display the On-Screen display. Use q/w to select the “Subtitle” option. Use e/r to select desired subtitle language. Press RETURN (l) to exit the On-Screen display. Note • Some discs allow you to change subtitle selections only via the disc menu. If this is the case, press POP UP MENU/MENU or TOP MENU button and choose the appropriate subtitle from the selections on the disc menu.
Enjoying BD-LIVE This unit allows you to enjoy functions such as picture-inpicture, secondary audio and Virtual packages, etc., with BD-Video supporting BONUSVIEW (BD-ROM version 2 Profile 1 version 1.1/ Final Standard Profile). Secondary video and audio can be played from a disc compatible with the picture-in-picture function. For the playback method, refer to the instructions in the disc.
Playing a movie file You can play movie files contained in a disc/USB device. 1 Press HOME (k). Selecting a subtitle file Y If a movie file name and the subtitle file name are the same, subtitle file is played automatically when playing the movie file. If the subtitle file name is different with the movie file name, you need to select the subtitle file on the [Movie] menu before playing the movie. 2 3 Select “Movie” using e/r, and press ENTER (j).
Viewing a photo You can view photo files using this player. 1 Press HOME (k). Options while viewing a photo You can use various options while viewing a photo in full screen. 1 2 2 3 While viewing a photo in full screen, press DISPLAY to display the option menu. Select an option using q/w. a Select “Photo” using e/r, and press ENTER (j). b c d e f g h Select the “Disc” or “USB” option using e/r, and press ENTER (j). a Current photo/Total number of photos Use e/r to view previous/next photo.
Listening to music during a slide show Listening to music You can display photo files while listening to music files. 1 2 3 4 5 6 7 8 The player can play Audio CDs and music files. Press HOME (k). Select “Photo” using e/r, and press ENTER (j). Select the “Disc” or “USB” option using e/r, and press ENTER (j). 1 2 3 Select a file using q/w/e/r, and press ENTER (j) to view the photo. Select “Music” using e/r, and press ENTER (j). Select the “Disc” or “USB” option using e/r, and press ENTER (j).
Maintenance Notes on Discs Handling the Unit Handling Discs When shipping the unit Do not touch the playback side of the disc. Hold the disc by the edges so that fingerprints do not get on the surface. Never stick paper or tape on the disc. Please save the original shipping carton and packing materials. If you need to ship the unit, for maximum protection, re-pack the unit as it was originally packed at the factory.
Troubleshooting Troubleshooting General ■ The Power does not turn on. Plug the power cord into the wall outlet securely. ■ The unit does not start playback. Insert a playable disc. (Check the disc type, color system, and regional code.) Place the disc with the playback side down. Place the disc on the disc tray correctly inside the guide. Clean the disc. Cancel the Rating function or change the rating level. ■ The angle cannot be changed.
Appendix Controlling an AV receiver with the Supplied Remote Control You can control your AV receiver using the buttons below. Button Operation ON/STANDBY 9 MUTE Turn the AV receiver on or off. VOL +/– INPUT +/– Mutes or unmutes the AV receiver. Adjust the volume of the AV receiver. Switch the AV receiver’s input source. Note • Be sure to set the “Remote ID” setting to “1” on the AV receiver.
Area Code List Choose an area code from this list.
Language Code List Use this list to input your desired language for the following initial settings: “Disc Audio”, “Disc Subtitle” and “Disc Menu”.
Subtitle Code List Code page Language 1250 1251 Romanian, Slovenian, Hungarian, Slovak, Polish, Albanian, Serbian (Latin), Croatian, Czech Mongolian (Cyrillic), FYRO Macedonian, Uzbek (Cyrillic), Ukrainian, Azeri (Cyrillic), Tatar, Kazakh, Belarusian, Kyrgyz (Cyrillic), Bulgarian, Serbian (Cyrillic), Russian English (Jamaica), French (Canada), French (France), French (Luxembourg), English (New Zealand), English (Ireland), Dutch (Netherlands), English (Caribbean), French (Switzerland), English (Canada), G
Trademarks and Licenses “Blu-ray Disc” is a trademark. “BD-LIVE” logo is a trademark of Blu-ray Disc Association. “BONUSVIEW” is trademark of Blu-ray Disc Association. Java and all Java-based trademarks and logos are trademarks or registered trademarks of Sun Microsystems, Inc. in the United States and other countries. Manufactured under license from Dolby Laboratories. Dolby and the double-D symbol are trademarks of Dolby Laboratories.
Audio Output Specifications Jack/Setting Analog 2CH Output Digital Output (DIGITAL AUDIO OUTPUT)*4 Source Dolby Digital Dolby Digital Plus Dolby TrueHD DTS DTS-HD Linear PCM 2ch Linear PCM 5.1ch Linear PCM 7.
Video Output Resolution ■ When the non-copy protected media is playing back Video Out Resolution 576i HDMI OUT 576p/480p* 576p/480p* 720p 1080i 1080p 24 Hz 1080p 50 Hz/60 Hz* 576p 720p 1080i 1080p 24 Hz 1080p 50 Hz COMPONENT VIDEO OUT HDMI connected HDMI disconnected 576i/480i* 576p/480p* 720p 1080i 576i/480i* 576i/480i* 576p/480p* 576p/480p* ■ When the copy protected media is playing back Video Out Resolution 576i 576p 720p 1080i 1080p 24 Hz 1080p 50 Hz HDMI OUT 576p/480p* 576p/480p* 720p 1080i 1
Specifications Signal System NTSC/PAL Composite Video Output / Impedance 1.0 V (p-p) / 75 Ω negative sync, RCA Component Video Output / Impedance Y: 1.0 V (p-p) / 75 Ω, PB/PR: 0.7 V (p-p) / 75 Ω, RCA Component Video Frequency Response 5 Hz ~ 13 MHz Component Video Resolution 480i/576i, 480p/576p HDMI Resolution 480i/576i, 480p/576p, 720p, 1080i, 1080p, 1080p 24Hz Audio Format LPCM, Dolby Digital, Dolby Digital Plus, Dolby True HD, DTS, DTS-HD Version 1.3a Support x.v.
Open source software notice The following GPL executables and LGPL libraries used in this product are subject to the GPL2.0/LGPL2.1 License Agreements: GPL EXECUTABLES: Linux kernel 2.6, bash, busybox, cramfs, dhcpcd, e2fsprogs, fdisk, mkdosfs, mtd-utils, nettools, procps, samba-3.0.25b, sysutils, tcpdump, tftpd, tinylogin, unzip, utelnetd LGPL LIBRARIES: uClibc, DirectFB, blowfish, cairo, ffmpeg, iconv, libusb, mpg123 gSOAP Public License 1.
Memo En 43
Sales & Product Planning Div. : 2-1, Nisshin-cho, Neyagawa-shi, OSAKA 572-8540, JAPAN Tel: 072-831-8023 Fax: 072-831-8163 ONKYO U.S.A. CORPORATION 18 Park Way, Upper Saddle River, N.J. 07458, U.S.A. Tel: 800-229-1687, 201-785-2600 Fax: 201-785-2650 http://www.us.onkyo.com/ ONKYO EUROPE ELECTRONICS GmbH Liegnitzerstrasse 6, 82194 Groebenzell, GERMANY Tel: +49-8142-4401-0 Fax: +49-8142-4401-555 http://www.eu.onkyo.