Contents Before using AV Receiver Important Safeguards ....................................... 2 Precautions ........................................................ 3 Features ............................................................. 4 Supplied accessories ......................................... 4 Before using this unit ....................................... 5 HT-R490 Facilities and connections Instruction Manual Front panel facilities .........................................
WARNING: TO REDUCE THE RISK OF FIRE OR ELECTRIC SHOCK, DO NOT EXPOSE THIS APPLIANCE TO RAIN OR MOISTURE. CAUTION: TO REDUCE THE RISK OF ELECTRIC SHOCK, DO NOT REMOVE COVER (OR BACK). NO USER-SERVICEABLE PARTS INSIDE. REFER SERVICING TO QUALIFIED SERVICE PERSONNEL.
21. Replacement Parts – When replacement parts are required, be sure the service technician has used replacement parts specified by the manufacturer or have the same characteristics as the original part. Unauthorized substitutions may result in fire, electric shock, or other hazards. 22. Safety Check – Upon completion of any service or repairs to the appliance, ask the service technician to perform safety checks to determine that the appliance is in proper operation condition. 23.
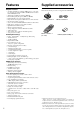
Features Supplied accessories Amplifier Features Check that the following accessories are supplied with the HT-R490. • 55 Watts minimum of continuous RMS power to each of the five channels into 8 Ω from 20 Hz to 20 kHz with no more than 0.
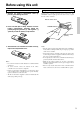
Before using this unit Installing batteries into the remote controller 1. Remove the battery compartment cover by pressing and sliding the cover. Using the remote controller Point the remote controller toward the remote control sensor. The STANDBY indicator lights up when the unit receives a signal from the remote controller. Remote control sensor HT-R490 2. Insert two AA (R6 or UM-3) batteries into the battery compartment.
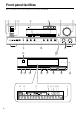
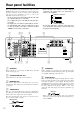
Front panel facilities Here is an explanation of the controls and displays on the front panel of the HT-R490.
Front panel facilities 1 POWER switch Turns on the main power supply for the HT-R490. The HT-R490 enters standby state and the STANDBY indicator lights up. Pressing the switch again to the off position (— OFF) shuts down the main power supply into the HT-R490. • Before turning on the power, make sure all cables are properly connected. • Turning on the HT-R490 may cause a momentary power surge that might interfere with other electrical equipment on the same circuit.
Front panel facilities 0 Input Selector Buttons (DVD, VIDEO 1, VIDEO 2, FM, AM, TAPE and CD) These buttons are used to select the input source. Pressing and holding the TAPE button for about 2 seconds allows the TAPE and MD sources to be switched. - Display A SPEAKERS A/B indicators Shows the current speaker system in use. B SLEEP indicator BASS and TREBLE control knobs Boosts or cuts the bass and treble response. BASS: Adjusts the bass response from the Front speakers.
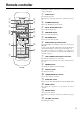
Remote controller For detailed descriptions on the buttons, see “Front panel facilities” on pages 6 through 8. 1 1 2 3 4 5 STANDBY/ ON SLEEP DIMMER DISPLAY INPUT SELECTOR CD TAPE DVD VIDEO 1 VIDEO 2 MODE CABLE SATELLITE STANDBY/ ON CH VCR For setting the sleep time. This button is provided only on the remote controller (refer to page 23). 2 STANDBY/ON button Turns on the HT-R490 or put it in standby.
Rear panel facilities Here is an explanation of the terminals found on the rear of the HT-R490 and how they are used. Before connecting your audio and video components, be sure to read this section carefully and then proceed to the explanations on how to connect each individual component (refer to page 12). • Be sure to always refer to the instructions that came with the component that you are connecting. • Do not plug in the power cord until all connections have been made.
Rear panel facilities 7 DIGITAL INPUT (OPTICAL/COAXIAL) There are 2 digital inputs, one with a coaxial jack and the other with an optical jack. The inputs accept digital audio signals from a compact disc, LD, DVD, or other digital source component. OPTICAL Optical fiber cable COAXIAL 9 z (REMOTE CONTROL) Connect the Onkyo components that have z connectors such as a CD player, and cassette tape deck using the z cables provided with them.
Example of how to connect your equipment Here is explanation of how to connect the main components to the HT-R490 in the standard manner. There are many ways that any one component can be connected, and it is up to you to decide which method best fits your situation. The directions given here are only one option and should only be thought of as such.
Example of how to connect your equipment Connecting your audio components Example of audio equipment connections Connecting a CD player Tape deck, MD recorder, DAT deck, CD recorder, (TAPE) Using an RCA-type audio connection cable, connect the output terminal on the CD player to the CD L/R jacks on the HT-R490. Make sure that you properly connect the left channel to the L jack and the right channel to the R jack.
Example of how to connect your equipment Connecting your video components Connecting a DVD player or LD player Connecting a satellite tuner or television Using an RCA-type video connection cable, connect the video output terminal (composite) on the device to the DVD IN VIDEO jack on the HT-R490. If there is an S video output terminal on the DVD player or LD player, connect it to the DVD IN S VIDEO jack using an S video cable.
Example of how to connect your equipment Example of video equipment connections TV monitor or Projector (MONITOR OUT) DVD player or LD player (DVD) AUDIO OUT R VIDEO DIGITAL S VIDEO OUT OUT OUT VIDEO S VIDEO IN IN COAXIAL L MONITOR OUT SUB WOOFER PRE OUT ANTENNA R DVD VIDEO 1 S VIDEO L IN OUT AM IN R DIGITAL INPUT TAPE IN MONITOR OUT OPTICAL IN COAXIAL L A FM 75 DVD FRONT VIDEO 1 R IN L SURR CD R OUT L L B VIDEO 2 IN R CENTER R L VIDEO SUB WOOFER R MULTI CHANNEL
Positioning speakers This unit has two sets of speaker system terminals (for SPEAKERS A and SPEAKERS B). Before connecting the speakers, place them correctly by consulting the instruction manuals that came with them. For surround playback, the configuration and placement of your speakers are very important. Speaker placement Ideal speaker placement varies depending on the size of your room and the wall coverings. Here, only typical example of speaker placement and recommendations are shown.
Connecting speakers • To prevent damage to circuitry, never short-circuit the positive (+) and negative (–) speaker wire. Connecting speakers After installing the speakers, connect them to the HT-R490. NO! CAUTION: SPEAKER IMPEDANCE 6 Ω min. per each speaker terminal. • Be sure to connect the positive and negative cables for the speakers properly. If they are mixed up, the left and right signals will be reversed and the audio will sound unnatural.
Connecting antennas To the use the tuner of HT-R490, it is necessary to prepare the supplied FM and AM antennas. • Adjustment and placement of the FM and AM antennas for better reception must be done while listening to a station broadcast. • If better reception cannot be obtained, then placement of an outside antenna is recommended. Connecting the AM loop antenna 1. Press down the lever. 2. Insert the end of the cable into the hole. Connecting the FM indoor antenna 1.
Connecting antennas If the reception condition cannot be improved by adjusting the provided antenna, install an outdoor antenna and connect it to this unit. Connecting an AM outdoor antenna An outdoor antenna will be more effective if it is stretched horizontally above a window or outside. Connecting an FM outdoor antenna Please make sure that you follow the considerations: • Keep the antenna away from noise sources (neon signs, busy roads, etc.). • It is dangerous to put the antenna close to power lines.
Connecting the power STANDBY indicator STANDBY/ON STANDBY/ON STANDBY/ ON SLEEP DIMMER DISPLAY INPUT SELECTOR CD TAPE DVD TUNER VIDEO 1 VIDEO 2 TUNER SUR MODE SW MODE AUDIO SEL PRESE T MODE TV DISPLAY STEREO / DTS SURROUND CABLE SATELLITE STANDBY/ ON DSP DVD CD VCR TAPE MASTER VOLUME LISTENING MODE STANDBY/ON CH STANDBY T V VOL CH DISC MUTING POWER ON TV/ VCR DIMMER OFF SP SEL SW MODE DIGITAL INPUT FM MODE MEMORY TUNING T V VOL PRESET A SPEAKERS B TOP MENU CLEAR
Speaker Setup STANDBY/ ON SLEEP SP SEL SW MODE DIMMER DISPLAY INPUT SELECTOR CD TAPE DVD TUNER VIDEO 1 VIDEO 2 TUNER SUR MODE SW MODE AUDIO SEL PRESE T SW MODE DISPLAY STEREO / DTS SURROUND MODE TV CABLE SATELLITE STANDBY/ ON DSP DVD CD VCR TAPE MASTER VOLUME LISTENING MODE STANDBY/ON CH STANDBY T V VOL CH DISC MUTING POWER ON TV/ VCR DIMMER OFF SP SEL SW MODE DIGITAL INPUT FM MODE MEMORY TUNING T V VOL VOLUME 5/∞ PRESET A SPEAKERS B TOP MENU CLEAR MENU ENTER
Selecting a sound source SLEEP SPEAKERS A MASTER VOLUME STANDBY/ ON SLEEP DIMMER DISPLAY INPUT SELECTOR CD TAPE DVD TUNER INPUT SELECTOR VIDEO 1 VIDEO 2 TUNER SUR MODE SW MODE AUDIO SEL PRESE T MODE TV DISPLAY STEREO / DTS SURROUND CABLE SATELLITE STANDBY/ ON DSP DVD CD VCR LISTENING MODE STANDBY/ON CH STANDBY TV VOL CH DISC MUTING POWER ON AUDIO SEL TAPE MASTER VOLUME TV/ VCR DIMMER OFF SP SEL SW MODE DIGITAL INPUT FM MODE MEMORY TUNING TV VOL MUTING PRESET A
Selecting a sound source Setting the input signal format If the input source is DVD, CD, VIDEO 1, VIDEO 2 or TAPE, you can specify the input signal format. With the initial setting, AUTO is assigned to the DVD and CD inputs, and ANALOG is assigned to the TAPE, VIDEO 1 and VIDEO 2 inputs. You can change this according to the signal format of the input source. Sleep function (Remote controller only) The sleep timer can turn off the power to the system after a specified time period.
Listening to Radio Broadcasts MEMORY STANDBY/ ON SLEEP PRESET a/s FM MODE DIMMER DISPLAY INPUT SELECTOR CD TAPE DVD TUNER VIDEO 1 VIDEO 2 TUNER SUR MODE SW MODE AUDIO SEL PRESE T MODE TV CABLE SATELLITE STANDBY/ ON DISPLAY STEREO / DTS SURROUND DSP CD VCR TAPE MASTER VOLUME LISTENING MODE STANDBY/ON DVD TUNER TUNER PRESET 5/∞ CH TV VOL CH DISC MUTING STANDBY POWER TV/ VCR ON TV VOL DIMMER OFF SP SEL SW MODE DIGITAL INPUT FM MODE MEMORY TUNING PRESET TOP MENU A SPE
Listening to Radio Broadcasts Presetting a radio station Selecting a preset radio station By storing (presetting) frequently received radio stations, they can be received automatically by pressing the PRESET ™/£ button on the front panel or TUNER PRESET 5/∞ buttons on the remote controller. Up to a total of 30 FM and AM stations can be preset. 1. Tune into the radio station you desire. 1. Press either the AM or FM input selector button. The display should show the currently selected frequency.
To enjoy Surround mode The HT-R490’s surround sound enables you to enjoy the presence of a movie theater or concert hall in your room. Before using a surround mode, make sure the speaker setup has been set (refer to page 21). The configuration of the speakers are very important for the surround sound. Refer to “Positioning speakers” on page 16 and “Connecting speakers” on page 17. Surround modes DOLBY DIGITAL Surround, DTS (Digital Theater System) Surround This 5.
To enjoy Surround mode Ÿ/DTS SURROUND STEREO DSP STANDBY/ ON SLEEP DIMMER DISPLAY INPUT SELECTOR CD INPUT SELECTOR TAPE DVD TUNER VIDEO 1 VIDEO 2 TUNER SUR MODE SW MODE AUDIO SEL PRESE T MODE TV DISPLAY STEREO / DTS SURROUND CABLE SATELLITE STANDBY/ ON DSP DVD CD VCR TAPE MASTER VOLUME LISTENING MODE STANDBY/ON CH STANDBY TV VOL CH DISC MUTING POWER ON TV/ VCR DIMMER OFF DIGITAL INPUT SP SEL SW MODE FM MODE MEMORY TUNING TV VOL PRESET A SPEAKERS B TOP MENU CLEAR
To enjoy Surround mode Selecting DOLBY DIGITAL/DTS surround Selecting Onkyo’s surround modes 1. Press an input selector button to select the desired sound source. 1. Press an input selector button to select the desired sound source. 2. Press the Ÿ/DTS SURROUND button. 2. Press the DSP button repeatedly until the desired surround mode name appears. 3. Play the selected sound source. The selected mode appears in the display.
Recording a source DISPLAY STEREO / DTS SURROUND DSP MASTER VOLUME LISTENING MODE STANDBY/ON STANDBY POWER ON DIMMER OFF SP SEL SW MODE DIGITAL INPUT FM MODE MEMORY TUNING PRESET A SPEAKERS B CLEAR AUDIO SELECTOR DVD VIDEO 1 VIDEO 2 FM AM CD TAPE VCR BASS TREBLE AV RECEIVER HT-R490 Input selector 2, 5 To record the input source signal you are currently watching or listening to FRONT VIDEO 1 SURR CD L Recording of video and/or audio signals can be performed on the comp
Using remote controller You can operate the z-connected Onkyo CD player, cassette tape deck or DVD player with the remote controller provided with the HT-R490. Controlling an Onkyo CD player The z connector of the Onkyo compact disc player must be connected to the HT-R490 (refer to page 11). 1. Press the CD MODE button. 2. Press the STANDBY/ON button to turn on the Onkyo compact disc player. STANDBY/ ON SLEEP 3. Press the desired operation button.
Using remote controller Controlling an Onkyo DVD player Make sure that you point the remote controller toward the remote control sensor of the DVD player. If it does not operate properly, change the code to 02 (refer to page 32). When the DVD player is connected with z connecter of the HT-R490, change the code to 01 and point the remote controller toward the HT-R490 (refer to page 32). STANDBY/ ON SLEEP 1. Press the DVD MODE button. DIMMER DISPLAY INPUT SELECTOR CD 2.
Pre-programming remote controller Learning a pre-programming code Controlling a DVD player You can make RC-446M remote controller to operate a product from other brand than Onkyo by storing the pre-programming code of the brand in the RC-446M. Buttons with programmed usage and operations are the same as the operational buttons on page 31. When entering the code of Onkyo DVD players 1. Find the 2-digit number for the brand name of the component that you want to operate in the table on page 33. 2.
Pre-programming remote controller CODE LIST Brand TV VCR CABLE DVD SAT ADMIRAL AIWA AOC AUDIO DYNAMIC BELL & HOWELL BROKSONIC CANON CITIZEN CRAIG CROSLEX CURTIS MATHIS DAEWOO DAYTRON DBX DENON DIMENSIA ECHOSTAR EMERSON FISHER FUNAI GE GENERAL INSTRUMENT GOLDSTAR HAMLIN HITACHI INSTANT REPLAY JC PENNEY JERROLD JVC KENWOOD KTV LXI MAGNAVOX MARANTZ MARTA MEMOREX MINOLTA MITSUBISHI MULTITECH NEC OAK OLYMPIC ONKYO PANASONIC PENTAX PHILCO PHILIPS PIONEER PORTLAND PRIMESTAR PROSCAN 01-03 — 04 — 01, 02 04 —
Troubleshooting guide If a problem occurs while you are using the remote controller, first try to operate the controls on the front panel of the HT-R490 to make sure that it is not due to a malfunction (or worn out batteries) in the remote controller. No sound or very low volume from subwoofer. • Subwoofer mode is set to “OFF”. ➞ Check the subwoofer mode setting (page 21). • Subwoofer mode setting is improper. ➞ Check the subwoofer mode setting (page 21). POWER Hum, low-frequency noise. No power.
Troubleshooting guide FM/AM TUNER AM stations cannot be received. • AM loop antenna is not attached. ➞ Connect the included AM loop antenna to the AM antenna terminals (page 18). Buzzing noise on AM (particularly conspicuous at night or with weak stations). • Noise from electrical apparatus such as fluorescent lamp. ➞ Move the AM loop antenna to different position (page 18). ➞ Set up an outdoor AM antenna (page 19). High-pitched noise or buzzing noise on AM. • Noise from TV set.
Specifications AMPLIFIER SECTION TUNER SECTION Continuous Average Power output (FTC) All channels: 55 watts per channel min. RMS at 8 ohms, 2 channels driven from 20 Hz to 20 kHz with no more than 0.08% total harmonic distortion. 70 watts min. RMS at 6 ohms, 2 channels driven from 1 kHz with no more than 0.1% total harmonic distortion. Continuous Power output (DIN) 75 watts × 5 at 6 ohms Maximum Power output (EIAJ) 100 watts × 5 at 6 ohms Total Harmonic Distortion: 0.